Table of Contents
- The Modern Minimalist Layout: Pea Gravel and Succulents with Cost Breakdown
- The Cozy Cottage Plan: Perennials and Repurposed Decor Shopping List
- The Vertical Oasis: Trellises and Container Gardening for Limited Space
- DIY Hardscaping: Installing Inexpensive Stepping Stone and Mulch Pathways
- Budget Border Ideas: Easy Garden Edging Using Brick or Treated Wood
- Elevating Your Entryway
- Design Dilemmas Solved
Your front yard serves as the first chapter of your home’s story, setting a welcoming tone before guests even reach the door. A compact entry does not need to feel cramped or neglected, as even the smallest footprint offers a canvas for sophisticated design.
Creating a charming outdoor vignette is entirely possible without extensive landscaping or heavy construction.
Many homeowners believe that high-end curb appeal requires a substantial financial investment, yet the most effective transformations often come from simple, strategic choices.
By focusing on smart layering, texture, and defining your hardscaping, you can elevate the space while sticking to a strict budget. The goal is to blend functionality with beauty to ensure every square inch works harder for your home.
We have curated a list of practical solutions that balance visual impact with easy maintenance. From utilizing vertical space to selecting the perfect multipurpose planters, these ideas prove that style is not limited by size or funds.
Get ready to discover how accessible materials and a bit of creativity can turn a modest front lawn into an inviting sanctuary.
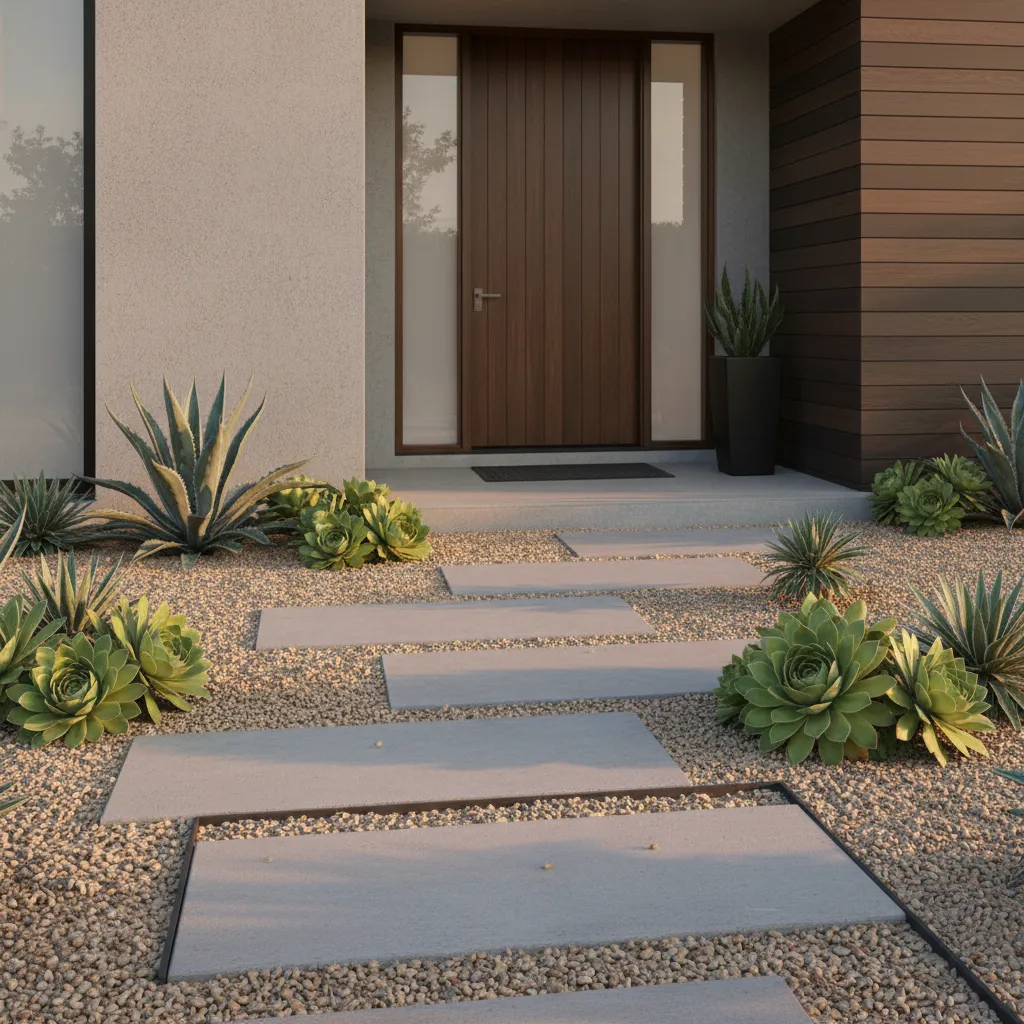
The Modern Minimalist Layout: Pea Gravel and Succulents with Cost Breakdown

Modern minimalism transforms small yards into serene retreats. This layout prioritizes texture over maintenance. It feels curated yet effortless.
The foundation of this look is pea gravel. This affordable material offers a satisfying crunch underfoot. It also provides excellent drainage.
A neutral stone palette creates a cohesive visual flow. It allows your home’s architecture to shine. This backdrop makes green plants pop.
Minimalism in landscaping isn’t about emptiness; it’s about making space for the elements that truly matter.
Succulents serve as the artistic focal point here. Their geometric shapes mimic sculpture. Varieties like Agave and Echeveria add organic drama.
Group these plants in odd numbers for a natural look. Use varying heights to guide the eye. This technique adds depth to flat spaces.
Functionality is key in this design. You save money on water and time on mowing. It is the ultimate low-maintenance solution for busy homeowners.
To prevent gravel migration, install proper edging. Metal or treated wood works best. This keeps the look crisp and prevents messy spillover.
Consider the color of your home when choosing stone. Darker gravel contrasts well with light siding. You might explore modern exterior colors to match.
Gravel is a great choice for a low-maintenance landscape… It’s porous, so it prevents runoff and allows water to soak into the ground.
The Spruce Team, The Spruce
Lighting plays a crucial role in the evening. Solar path lights cast a warm ambient glow. They highlight the texture of the stone and plants.
Cost Breakdown for a 100 Sq. Ft. Space

Understanding the budget helps you plan effectively. This layout is one of the most affordable options available to DIY enthusiasts currently.
| Item / Material | Estimated Cost | Function & Tips |
|---|---|---|
| Pea Gravel | $40 – $60 | Base layer; buy in bulk from local yards to save on delivery fees. |
| Weed Barrier Fabric | $20 – $35 | Essential for maintenance; prevents weeds from growing through stone. |
| Succulents (x5) | $50 – $75 | Focal points; start with smaller pots as they grow quickly. |
| Metal Edging | $30 – $50 | Structure; creates a clean separation between gravel and sidewalk. |
| Concrete Pavers | $40 – $80 | Walkway; creates spatial flow and protects shoes from dust. |
| Total Estimated | $180 – $300 | Prices vary by region and source (bulk vs. bagged). |
This budget assumes you do the labor yourself. Raking gravel is a workout but saves labor costs. It connects you physically to the transformation.
The aesthetic pairs well with sleek entryways. If you are upgrading your entrance, check out these front door ideas for inspiration.
Remember that “simple” does not mean boring. The interplay of light and shadow on the stones changes throughout the day. It creates a living vignette.
Minimalist Masterclass
- To prevent the ‘sinking’ feeling when walking, install a honeycomb stabilizer grid underneath the pea gravel; this keeps the stones locked in place and makes the surface firm enough for patio furniture.
- Always bury the bottom inch of your metal edging to anchor it against frost heave and prevent small stones from escaping underneath during heavy rains.
- When planting succulents in gravel, mix sand or perlite into the soil pocket directly around the roots to ensure sharp drainage and prevent root rot.
The Cozy Cottage Plan: Perennials and Repurposed Decor Shopping List

The cottage aesthetic creates a warm and inviting atmosphere. It embraces a slightly wild and organic look that feels lived-in rather than rigid.
This style is perfect for small yards because density is key. You want layers of textures, from soft mossy ground cover to rough stone pathways.
Achieving this look on a budget is surprisingly easy. It relies more on time and patience than expensive hardscaping or brand-new furniture.
True style is not about the size of the budget, but the story your garden tells through every bloom and weathered detail.
Budget-Friendly Perennial Picks

Perennials are the financial backbone of this plan. They are an investment that returns every spring, saving you money in the long run.
Choose hardy varieties like Coneflowers, Salvia, and Hostas. These plants fill gaps quickly and provide rich color without constant replanting.
If your ground space is limited, use vertical height. You can explore the best fall plant pot ideas to layer blooms on steps or porches.
Buy younger plants, known as plugs, to save cash. They may look small now, but they will grow to fill your space within a single season.
Vintage Finds and Repurposed Decor
Cottage charm thrives on items with history. Scour local thrift stores for galvanized buckets, old wooden crates, or rusted wire baskets.
These weathered textures add instant character to a green space. An old wooden ladder can easily become a vertical stand for small herb pots.
Defining the boundary is also crucial for this look. Consider checking these yard divider and fence ideas to frame your floral sanctuary.
The key to the cottage garden style is that it should look unplanned, even though it is carefully designed. Avoid planting in straight lines.
The Spruce Editors, The Spruce
The Cottage Curb Appeal Shopping List

Stay organized and on budget with this prioritized list. Focus on acquiring these items slowly to spread out the cost over the season.
| Essential Item | Thrift Strategy | Est. Budget |
|---|---|---|
| Perennial Plugs | Buy end-of-season or swap | $3 – $5 each |
| Galvanized Tubs | Flea markets or farm sales | $15 – $20 |
| Mulch / Gravel | Check for free community piles | $0 – $30 |
| Solar Path Lights | Discount retailers (multi-packs) | $15 per set |
| Vintage Chair | Roadside finds or garage sales | $5 – $10 |
Using mulch is vital for both aesthetics and function. It suppresses weeds and retains moisture, reducing the time you spend on maintenance.
Lighting adds the final magical touch. Simple solar stakes placed in planters create a soft ambient glow that welcomes guests in the evening.
Cottage Designer Secrets
- Multiply your plant stock for free by dividing mature perennials like Hostas and Daylilies every few years to fill empty garden gaps without spending a dime.
- Preserve the charm of vintage wooden crates or ladders by applying a clear matte sealant; this protects them from rot without losing that desirable weathered patina.
- When placing your new plugs, always plant in irregular drifts of odd numbers (groups of 3 or 5) rather than straight rows to mimic a natural, self-seeded wildflower look.
The Vertical Oasis: Trellises and Container Gardening for Limited Space

When square footage is tight, the only way to grow is up. Vertical gardening draws the eye upward and makes a compact yard feel surprisingly grand.
This approach maximizes greenery without sacrificing precious floor space. It transforms flat walls into lush, living tapestries of texture and color.
A small garden is not a limitation; it is an invitation to curate every leaf and vine with intention.
Elevation Inspiration
- Create an illusion of infinite depth by placing a weather-resistant mirror behind your trellis; it reflects light and makes a single green wall feel like a secret garden.
- Prevent top-heavy planters from tipping in the wind by placing heavy stones or bricks at the very bottom of the pot before adding soil.
- Combine form and function by training edible climbers, like scarlet runner beans or peas, up a decorative metal trellis for a display that is both stunning and harvest-ready.
Elevating Style with Trellises
Trellises are the backbone of a vertical garden. They add architectural interest while supporting climbing plants that soften hard exterior lines.

Choose materials that mimic your home’s exterior. Raw cedar offers a rustic organic feel, while matte black metal provides a modern, industrial edge.
Functionality is key here. A well-placed trellis acts as a semi-transparent wall. This works perfectly if you need creative yard dividers and fence ideas for privacy.
Vertical gardening is an excellent way to cover an unattractive wall or fence and add privacy to an outdoor space.
The Editors, Better Homes & Gardens
Garden Style Secret
- Coordinate materials by matching your trellis to existing architectural details, like window trim or fencing, for a seamless look.
- Create instant privacy by combining fast-growing annual vines with slower perennial climbers on your new structure.
- Use freestanding trellises anchored in deep planters to create flexible ‘walls’ that define outdoor rooms without permanent construction.
Curated Container Clusters
Potted plants allow you to rearrange your landscape anytime. Grouping containers creates a deliberate focal point rather than a cluttered look.

Use the “Thriller, Filler, Spiller” method. Place a tall plant in the center, surround it with bushy blooms, and let vines cascade over the rim.
Texture plays a huge role in small spaces. Mix glazed ceramic pots with rough concrete or woven baskets to add tactile depth to your porch vignette.
To keep your curb appeal high year-round, rotate your selection. You can find inspiration in seasonal plant pot ideas to match the changing weather.
Best Plants for Vertical Impact
Selecting the right flora is crucial for vertical success. Here are the top performers that thrive when trained upward or planted in pots.
- Star Jasmine: Produces fragrant white blooms and climbs aggressively on trellises.
- English Ivy: excellent for shaded corners, creating a classic and dense green wall.
- Bougainvillea: Offers vibrant, paper-like flowers that love full sun and heat.
- Trailing Rosemary: A functional herb that spills beautifully over container edges.
- Clematis: Known as the queen of climbers, offering stunning flowers in various shades.
Ensure your containers have proper drainage holes. This prevents root rot and ensures your vertical oasis remains healthy and vibrant for seasons to come.
Potting Pro-Tips
- Master the “Thriller, Filler, Spiller” formula: place a tall statement plant in the center, surround it with bushy fillers, and finish with vines cascading over the edge.
- Create visual depth by mixing container materials; try pairing glossy ceramic planters with rough concrete or woven baskets for a curated, designer look.
- Ensure your vertical oasis thrives by double-checking drainage; every pot needs holes to prevent root rot and keep climbers healthy.
DIY Hardscaping: Installing Inexpensive Stepping Stone and Mulch Pathways
Creating a designated walkway instantly elevates the visual value of your front yard. It guides guests to your entrance and adds a layer of sophisticated intention to the landscape.
Hardscaping often consumes the largest portion of a renovation budget. However, using a combination of loose organic material and stepping stones drastically reduces costs.
This approach avoids the expense of pouring concrete or hiring professional masons. It also introduces a lovely textural contrast between the rigid stone and the soft, organic mulch.
The path to your door is more than a walkway; it is the opening sentence of your home’s story.
Selecting Your Materials Palette

The secret to a high-end look is selecting materials that complement your home’s exterior palette. You want the path to feel like an extension of the architecture, not an afterthought.
For a modern aesthetic, consider square concrete pavers paired with black mulch or grey pea gravel. This creates clean lines that look stunning against 15 modern exterior colors that wow.
If your style leans towards rustic or cottage-core, irregular flagstones are the perfect choice. Their organic edges soften the transition between the hardscape and your lawn.
Common Material Pairings:
- The Modernist: 24-inch square grey pavers + Black Polished River Rocks.
- The Cottage: Irregular Slate Flagstone + Shredded Cedar Mulch.
- The Minimalist: Round Concrete Stepping Stones + White Pea Gravel.
- The Naturalist: Log “Cookies” (Wood Slices) + Pine Straw.
Installation Guide for Durability
Proper installation ensures your path does not sink into the mud after the first rainstorm. Functionality is just as important as the visual flow.
Begin by laying out your path with a garden hose to visualize curves. A curved path creates a sense of mystery and slows the journey, making the yard feel larger.
Once you are happy with the layout, you must prepare the ground. This prevents weeds and ensures a stable walking surface for years to come.
| Step | Action Required | Why It Matters |
|---|---|---|
| 1. Excavate | Remove 2-3 inches of sod/soil. | Keeps materials flush with the lawn. |
| 2. Barrier | Lay heavy-duty landscape fabric. | Prevents weeds and sinking stones. |
| 3. Position | Place stones at a comfortable stride. | Ensures natural walkability. |
| 4. Fill | Add mulch or gravel around stones. | Locks stones in place visually. |
When placing your stones, consider the destination. The path should lead naturally to your entryway, perhaps flanked by 25 front door ideas to instantly boost your home’s curb appeal.
You want to space stones so that you fall into a natural rhythm when walking. It usually ends up being about 24 inches from the center of one stone to the center of the next.
Roger Cook, This Old House Landscape Contractor
To finish the look, install flexible edging along the border of your path. This keeps the mulch contained and maintains a crisp, professional line between the path and the grass.
Pro Landscape Tip
- Test your stride before you dig: lay the stones out and walk the path naturally to ensure the spacing fits your gait, preventing an awkward ‘shuffle’ later.
- Set your stepping stones just slightly below the soil level (about half an inch) so your lawnmower can glide safely over them without chipping the stone.
- Add a thin layer of sand or stone dust underneath each paver to make leveling easier and prevent the stones from rocking or cracking over time.
Budget Border Ideas: Easy Garden Edging Using Brick or Treated Wood

Defining the perimeter of your lawn creates an instant sense of order in a small yard. It transforms a sprawling patch of grass into a curated feature.
A crisp edge guides the eye and establishes spatial flow. This visual separation makes even compact front yards feel larger and more intentional.
A garden without a clear border is like a beautiful painting without a frame.
The Timeless Warmth of Brick

Brick offers a classic, earthy texture that grounds your landscape design. The raw clay tones provide a warm contrast against vibrant greenery.
You can often find reclaimed bricks for free or cheap at local construction sites. This adds a charming, vintage character to your curb appeal.
Laying bricks diagonally creates a sawtooth effect that looks highly decorative. This technique adds dynamic energy to an otherwise flat lawn.
For those interested in maximizing their outdoor entry, you can coordinate this look with 25 Budget Friendly Front Porch Fall Decorating Ideas.
Modern Structure with Treated Wood

Treated lumber provides clean, straight lines that suit modern aesthetics. It creates a rigid boundary that keeps mulch from spilling onto the grass.
Using timber sleepers mimics the structural discipline found in Modern Villa Summer Architecture House Floor Plans Design Layout.
Pressure-treated wood resists rot and insect damage effectively. This ensures your budget landscaping investment lasts for many seasons.
In a small space, strong lines are essential. A crisp edge gives the eye a place to rest and makes the planting feel deliberate rather than chaotic.
Arne Maynard, House & Garden
Material Comparison: Brick vs. Wood
Choosing the right material depends on the specific mood you want to evoke. This comparison helps clarify which option fits your style and budget.
| Feature | Reclaimed Brick | Treated Lumber |
|---|---|---|
| Visual Vibe | Rustic, organic, and textured | Sleek, linear, and modern |
| Installation | Labor-intensive (digging trench) | Quick (secure with spikes) |
| Flexibility | Great for curved borders | Best for straight lines |
| Maintenance | Occasional resetting needed | Needs sealing every few years |
Both materials improve the functionality of your yard by reducing maintenance. They create a physical barrier that stops grass roots from invading beds.
Ultimately, the choice comes down to the architectural style of your home. Brick suits cottages, while wood complements contemporary designs.
Designer Edge Secrets
- Use a flexible garden hose to layout your border shape before digging; it allows you to tweak curves for brick layouts or visualize the perfect straight lines for timber.
- Create a functional ‘mowing strip’ by sinking your brick edging flush with the soil level, allowing your mower wheel to ride along the edge and eliminating the need to weed whack.
- Always apply a coat of wood preservative to the fresh cut ends of treated lumber; this simple step prevents moisture rot at the joints and extends the life of your border by years.
Elevating Your Entryway
Transforming a small front yard doesn’t require a fortune. With smart choices like pea gravel and strategic planting, you can build a stunning entrance.
Balancing budget and aesthetics is easier than it looks. Whether you choose minimalism or lush greenery, the key is intentional design.
Start small, plan your layout, and enjoy the process. Your front yard is the first chapter of your home’s story; make it a beautiful one.
Design Dilemmas Solved
A DIY budget typically ranges from $200 to $500 for simple layouts using gravel and minimal plants. Reusing materials can lower costs significantly.
Succulents, ornamental grasses, and lavender are excellent choices. They require little water, look structural, and thrive in various climates.
Use curved garden beds and distinct pathways. Vertical gardening or varying plant heights draws the eye upward, creating a sense of volume.
Pea gravel lasts longer than mulch, which needs annual refreshing. While gravel costs more upfront, it saves money and labor in the long run.
