Table of Contents
- The 12-Inch Deep Setup: A Blueprint for Narrow Counters
- Vertical Expansion: Utilizing Floating Shelves and Under-Cabinet Hooks
- Selecting Ultra-Compact Brewers with Footprints Under 6 Inches
- Tray Zoning: Corral Canisters to Define the Coffee Area
- Invisible Infrastructure: Renter-Friendly Cable Management Solutions
- Your Daily Ritual, Elevated
- Design Dilemmas Solved
There is an undeniable magic in the ritual of a morning brew, yet finding space for it in a compact kitchen can feel like a design puzzle.
Even when square footage is limited, you do not need to sacrifice the luxury of a dedicated coffee station. With a bit of creativity, a small sliver of counter space can transform into a sophisticated nook that rivals your favorite local café.
The secret lies in balancing vertical storage with curated aesthetics to maximize functionality. Instead of cluttering the surface, think upward with floating shelves or hooks that display your favorite mugs as art.
Incorporating textures like wood or brass adds warmth, while uniform jars keep ingredients accessible but visually tidy. This approach ensures your morning routine flows smoothly without overwhelming the room.
We have gathered practical DIY solutions that blend high-end design principles with budget-friendly ingenuity suitable for renters and homeowners alike.
From repurposed trays to clever organization hacks, these ideas prove that style is not defined by size. Prepare to reclaim your counter and brew your next cup in a space that feels uniquely yours.
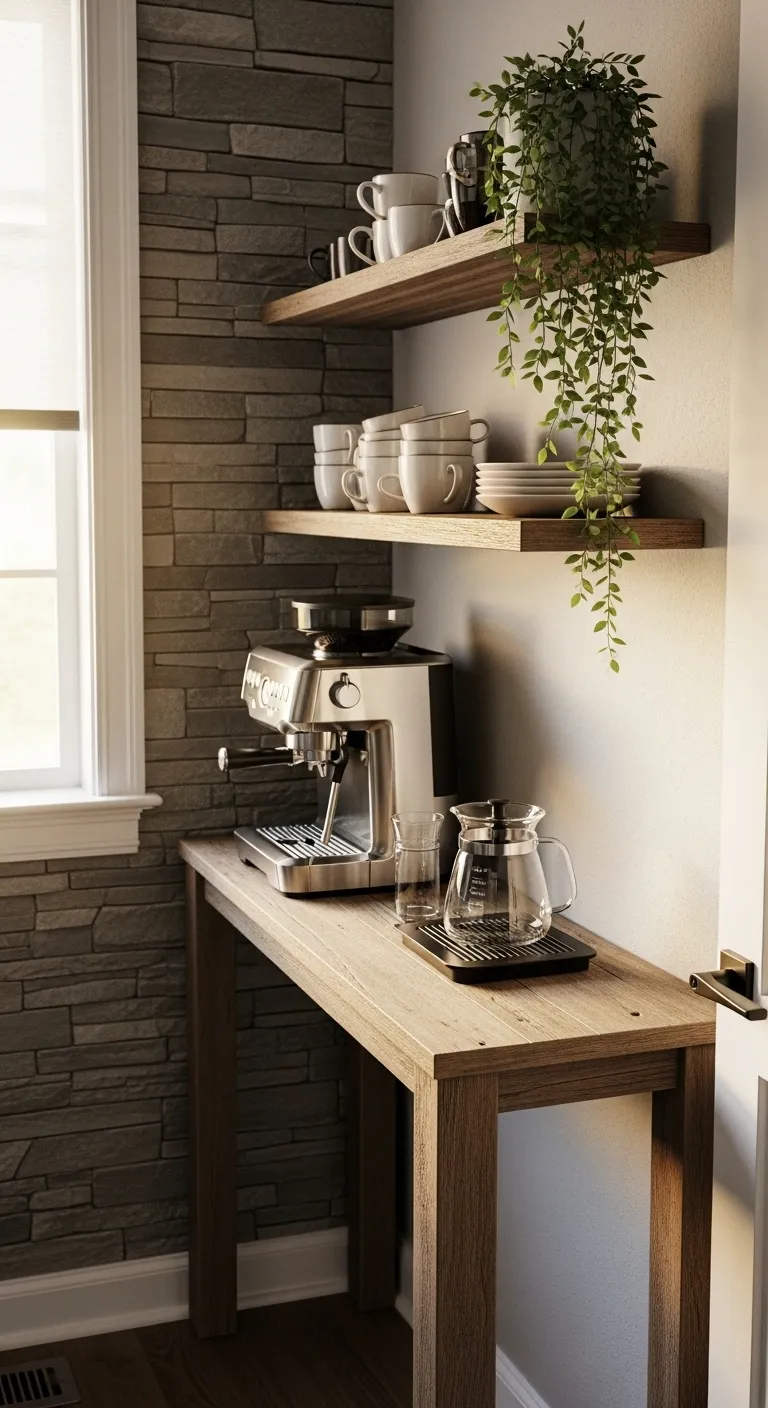
The 12-Inch Deep Setup: A Blueprint for Narrow Counters

Working with a narrow footprint requires a shift in perspective. A 12-inch depth is the standard for slim console tables and hallway shelving.
This depth is perfect for a single row of essentials. You must avoid layering items front-to-back. Instead, you arrange your station linearly.
Start by placing your machine on the far left or right. This anchors the vignette. Leave the center open for pouring and mixing your morning brew.
Small spaces aren’t a limitation; they are an invitation to curate only what you truly love.
Utilizing Vertical Real Estate

When you cannot build out, you must build up. Installing floating shelves above your narrow counter doubles your storage capacity instantly.
Use the wall for hanging storage. A simple brass rail with S-hooks keeps mugs accessible. This frees up the precious surface area below for prep work.
The backdrop creates the mood. If your narrow spot lacks character, look at 15 DIY Rustic Farmhouse Kitchen Backsplash Ideas for texture inspiration.
Imagine a raw wood shelf against a dark charcoal wall. The contrast creates depth. This visual trick makes a shallow nook feel like a deliberate feature.
In a small space, every piece of furniture has to earn its keep… Look for pieces with a small footprint but big impact.
Nathan Turner, House Beautiful
Choosing the Right Surface Material

The material of your narrow counter sets the tone. Since the surface area is small, you can splurge on higher-quality finishes without breaking the bank.
Reflective surfaces help expanding the space. A polished stone or glass top bounces light around. This prevents a cramped corner from feeling heavy.
For a cozy vibe, opt for warm timber. If you prefer a dramatic aesthetic, explore 21 Moody Kitchen Ideas That Are a Total Vibe to match your station.
Below is a comparison of popular materials for narrow coffee stations to help you decide which fits your lifestyle and budget.
| Material | Visual Weight | Durability | Best For |
|---|---|---|---|
| Tempered Glass | Light & Airy | Medium | Tiny modern apartments |
| Reclaimed Wood | Heavy & Warm | High | Farmhouse or rustic nooks |
| Polished Marble | Classic Luxe | High (if sealed) | Elegant bakery vibes |
| Matte Metal | Sleek Industrial | Very High | Minimalist, durable setups |
Always measure your machine before buying a table. Ensure the feet of the coffee maker fit entirely within the 12-inch depth for safety and stability.
Slim Space Saviors
- Opt for rectangular or square canisters instead of round jars; they sit flush against one another, utilizing every millimeter of your linear arrangement without wasted gaps.
- Since narrow tables often lack a back panel to hide clutter, use adhesive cable clips along the underside or back legs to keep power cords invisible.
- Fake extra depth by placing a mirror against the wall behind your station; the reflection tricks the eye into seeing double the surface area and bounces light.
Vertical Expansion: Utilizing Floating Shelves and Under-Cabinet Hooks

When counter real estate is at a premium, the most effective design strategy is to stop looking outward and start looking upward.
Vertical expansion transforms a cramped corner into a curated vignette. It allows you to store essentials without cluttering your prep surface.
By utilizing the walls, you create a sense of height. This visual trick makes compact kitchens feel airy and spacious rather than stuffed.
In small spaces, your walls are not just boundaries; they are canvases for functional art.
Elevated Thinking
- Mix function and form on open shelves by pairing stacks of daily dishes with trailing greenery or small framed art to soften the look.
- Install screw-in hooks underneath upper cabinets to hang mugs, measuring cups, or utensils, instantly reclaiming precious drawer and counter space.
- Group items by color on your vertical displays to reduce visual noise; a cohesive palette makes the space feel organized rather than chaotic.
The Magic of Floating Shelves

Floating shelves are the hero of small coffee bars. They provide storage that feels lighter than bulky cabinetry, preserving the room’s flow.
Choose materials that complement your existing palette. A dramatic moody kitchen aesthetic benefits from dark walnut or matte metal shelves.
For a softer look, unlacquered brass brackets with glass shelving add a touch of Parisian bistro charm. This reflects light and opens the space.
Functionally, place your daily essentials on the lowest shelf. Keep coffee grounds, sugar, and filters within easy arm’s reach for efficiency.
Open shelving is a great way to force yourself to be organized… stick to a palette of all white or glass so it doesn’t look cluttered.
Emily Henderson, Kitchen Styling 101
Shelf Styling Secrets
- Decant dry goods like coffee beans and sugar into matching clear canisters to eliminate visual clutter from busy branded packaging.
- Group items in odd numbers (clusters of three work best) and vary heights to keep the display looking curated rather than chaotic.
- Install hooks underneath the lowest shelf to hang mugs; this maximizes vertical space and keeps your favorite cups accessible.
Under-Cabinet Hooks and Rails

The space immediately beneath your upper cabinets is often wasted. reclaiming this “dead zone” is crucial for a functional small coffee station.
Install a sleek brass rail or individual screw-in hooks. This lifts your mug collection off the counter, freeing up space for your coffee machine.
This method creates a lovely visual layer against your wall. It works particularly well if you have a textured rustic farmhouse backsplash to frame the mugs.
Ensure the hooks are sturdy enough for heavy stoneware. Space them out generously to prevent chipping when you grab a cup in a morning rush.
Styling Checklist for Vertical Coffee Bars
To keep your vertical storage looking intentional rather than chaotic, follow this simple layering guide when arranging your shelves and hooks.
- Balance the Weight: Place visually heavy items, like a French press or canister, on the bottom shelf or the ends of a rail.
- Stick to a Palette: Limit displayed items to two or three colors (e.g., white ceramic, wood, and clear glass) to reduce visual noise.
- Add Organic Textures: Incorporate a small trailing plant or a wooden scoop to soften the hard lines of appliances and shelves.
- Group by Function: Keep stirrers, spoons, and sugars together in a small tray or jar to maintain a logical workflow.
- Leave Negative Space: Do not fill every inch. Leave gaps between objects to let the wall “breathe” and maintain a modern look.
Designer Hack
- Measure your screw length against the cabinet base thickness before drilling to ensure points don’t poke through into your interior storage.
- Opt for rails with movable S-hooks instead of fixed hardware; this allows you to slide mugs apart to accommodate wider shapes without reinstalling.
- Test the clearance before mounting by holding your tallest mug in place; ensure it hangs high enough to clear the coffee machine’s water tank lid below.
Selecting Ultra-Compact Brewers with Footprints Under 6 Inches

When working with limited square footage, every inch of surface area matters. A standard coffee maker can quickly dominate a small counter. We must prioritize slim profiles.
You should look for machines specifically designed with a width under six inches. These ultra-compact brewers preserve the spatial flow of your kitchen. They prevent a cramped look.
Choosing a narrow machine allows you to add other elements, like a canister or mug tree. It turns a single appliance into a curated vignette. This balance is key for small spaces.
In small spaces, appliances must double as decor. Choose a brewer that acts as a sculptural element, not just a utility.
The Appeal of Slim Single-Serve Brewers

Single-serve pod machines are often the champions of space-saving design. Their vertical orientation minimizes their footprint significantly. This leaves room for prep work.
Many modern models feature textured finishes like matte white or brushed slate. These materials absorb light rather than reflecting it. This creates a softer visual impact.
Consider matching your machine to your existing palette. If you are exploring beautiful kitchen color combinations, choose a brewer that complements your cabinetry.
Manual Brewing for Zero-Footprint Style
For the ultimate space-saver, consider manual brewing methods. A French press or pour-over carafe can be stored away easily. However, they are often beautiful enough to display.
Glass carafes with wood collars add an organic touch to the coffee station. The transparency of the glass keeps the area feeling open and airy. It avoids the heaviness of plastic.
If you have open shelving, these tools serve as functional art. You can use creative bookshelf ideas to display your chemex or press above the counter.
When you have a small space, you have to prioritize what you use every day. If you don’t use it daily, it shouldn’t be on the counter.
Maxwell Ryan, Apartment Therapy
Comparison of Compact Brewer Footprints
Understanding the actual dimensions of popular brewer types helps you plan your layout. Here is a breakdown of typical widths for common compact options.
| Brewer Type | Typical Width | Best Visual Feature |
|---|---|---|
| Slim Pod Machine | 4.5 – 5.5 inches | Streamlined, cable management |
| Compact Espresso | 5.8 – 6.0 inches | Chrome accents, professional look |
| Electric Kettle (Base) | 5.0 – 6.5 inches | Gooseneck spout elegance |
| French Press | 3.5 – 4.5 inches | Vertical glass transparency |
High-End Espresso in Tight Quarters

You do not need a massive machine to enjoy quality espresso. Manufacturers now make high-pressure pumps in bodies just six inches wide. This brings luxury to small apartments.
Look for stainless steel finishes to bounce light around a dark corner. The metallic glint adds a touch of industrial chic. Ideally, the water tank should be removable from the side.
Side access prevents you from moving the machine to refill it. This functional detail is crucial when your brewer is tucked under low cabinets. It keeps the daily workflow smooth.
Space-Savvy Secrets
- Prioritize machines with side or front-loading water tanks so you don’t have to slide the unit out from under cabinets for every refill.
- Measure your vertical clearance carefully; many slim brewers have top-loading mechanisms that require extra height to insert pods or grounds.
- Use a narrow tray to anchor your brewer and accessories, visually grouping them into a deliberate vignette rather than loose clutter.
Tray Zoning: Corral Canisters to Define the Coffee Area

Visual clutter is the enemy of small kitchen counters. When loose jars and spoons scatter, the space feels chaotic.
A tray creates an instant boundary. It defines the coffee zone without requiring vertical walls or dividers.
This technique turns a collection of items into a single visual unit. The eye reads the tray as one object, not five.
A tray turns everyday clutter into a curated collection.
Functionally, a tray makes cleaning the counter effortless. You lift one item to wipe underneath, rather than moving several jars.
Selecting the Right Material for Atmosphere

The material of your tray sets the mood. It introduces texture that contrasts against your countertop finish.
For a warm and inviting look, opt for natural wood or woven rattan. These materials soften sleek quartz or granite surfaces.
If you love the cozy aesthetic, this approach aligns perfectly with hygge principles of comfort and texture.
Marble or brass trays offer a sophisticated, modern touch. They reflect ambient lighting, adding a subtle glow to the corner.
| Tray Material | Visual Effect | Best For |
|---|---|---|
| Raw Wood | Adds organic warmth and texture | Farmhouse or Scandi styles |
| Polished Marble | Creates a sleek, luxury feel | Modern or Minimalist kitchens |
| Woven Rattan | Introduces softness and contrast | Boho or Coastal themes |
| Matte Metal | Provides industrial definition | Urban or Contemporary spaces |
Curating Your Coffee Essentials

Do not overcrowd the tray. The goal is a breathing room, not storage capacity. Keep only daily essentials here.
Stick to a cohesive palette. Matching canisters create a streamlined look that feels intentional and high-end.
Consider your overall kitchen color combinations when choosing jars. Neutral tones usually work best in small footprints.
Layering heights adds visual interest. Place a tall canister next to a shorter sugar bowl to guide the eye.
Trays are a great way to corral small items that would otherwise look cluttered on a countertop.
The Spruce, Kitchen Counter Decorating Ideas
Finish the look with a “softener.” A small succulent or a tiny vase breaks up the hard lines of ceramic jars.
This vignette approach ensures your coffee station is a focal point, not a dumping ground for kitchen miscellaneous.
Tray Styling Secrets
- Apply small felt or silicone pads to the bottom of your tray; this prevents scratches and makes sliding the entire station aside for deep cleaning effortless.
- Follow the ‘Rule of Three’ for visual balance: arrange a tall coffee canister, a medium sugar jar, and a low element like a small succulent or spoon rest.
- Decant mismatched store packaging into uniform glass or ceramic jars to instantly reduce visual noise and create a cohesive, high-end look.
Invisible Infrastructure: Renter-Friendly Cable Management Solutions

Nothing disrupts the visual flow of a curated coffee station like a nest of tangled cords. These distinct black lines create visual chaos against your backsplash.
Creating a serene atmosphere requires managing this “visual noise” effectively. You want the focus to remain on the rich aroma of espresso and your ceramics.
Achieving a seamless look does not require an electrician or drilling into walls. Simple, non-permanent solutions can make your technology disappear.
Visual silence is the ultimate luxury in a small space; let the texture of your coffee bar speak louder than the wires.
The Art of Camouflage

Sometimes the best way to manage cables is to hide them in plain sight. Strategic layering is a powerful tool for small counter spaces.
Lean a beautiful wooden cutting board or a small piece of art against the backsplash. This instantly conceals the outlet faceplate and the plug head.
Group your canisters or syrups on a decorative tray. This creates a dedicated zone and allows you to tuck excess slack wire underneath the tray base.
If you are also looking for ways to streamline your entertainment zones, similar principles apply when implementing media wall ideas for a clean look.
Adhesive Solutions for Renters

Gravity is often the enemy of tidy cables. Without support, cords droop and sprawl across your precious counter space.
Clear adhesive cord clips are essential infrastructure. Stick them to the back of your coffee machine to keep the power cord tight against the unit.
This technique prevents the cord from pooling on the counter. It makes wiping down surfaces significantly easier and keeps the area sanitary.
You can also run cords along the underside of upper cabinets if your machine is nearby. This keeps the wires completely suspended and out of view.
Clutter is nothing more than postponed decisions. In a small space, every object must earn its keep, and visual clutter is just as stressful as physical mess.
Barbara Hemphill, Productivity & Organization Expert
Color Matching and Wraps
If you cannot hide a cord completely, make it blend in. A black cord against a white backsplash creates a harsh, high-contrast line.
Consider using spiral cable wraps in a color that matches your tile or paint. White wraps against white tile can make a cord virtually vanish.
This attention to palette is crucial. Just as you might choose paint colors to pair with honey oak cabinets, match your cable gear to your walls.
The Invisible Toolkit
Equip your coffee station with these specific tools to tackle different types of wire mess. This ensures functionality without sacrificing style.
| Tool Type | Best Application | Renter Friendly? |
|---|---|---|
| Velcro Ties | Bundling excess cord length behind the machine to prevent tangling. | Yes (100%) |
| Cord Shortener | Winding up long cables inside a plastic shell to reduce counter sprawl. | Yes (Reusable) |
| Adhesive Raceway | Running a wire along the backsplash edge or under a cabinet. | Yes (Command Brand) |
| Appliance Wrapper | Sticking to the back of a mixer or grinder to wind the cord when not in use. | Yes (Peel & Stick) |
Strategic Appliance Placement

The simplest solution often requires zero equipment. Place your largest appliance directly in front of the outlet to physically block it from view.
This “body block” technique works best with espresso machines that have a wide footprint. It creates a solid visual anchor for the space.
Ensure you still have access to the plug if you need to disconnect it safely. A small gap of two inches is usually sufficient for ventilation and safety.
The Invisible Edit
- Create a hidden spool by attaching a removable adhesive hook upside down on the back of your coffee maker to loop excess cord length tightly against the unit.
- Lean a decorative cutting board or framed art print against the backsplash to physically screen outlet faceplates and bulky plugs from view.
- Match your cable management to your environment; use white spiral wraps against white tile to make necessary wires visually dissolve into the background.
Your Daily Ritual, Elevated
Designing a coffee bar in a tight corner proves that limitation often breeds creativity. You do not need a sprawling kitchen to enjoy a cafe-quality experience.
By maximizing vertical space and choosing narrow consoles, you turn dead zones into functional art. Remember to curate strictly and only display what you use daily.
Whether you choose polished marble or reclaimed wood, your station should reflect your taste. Go ahead and brew that perfect cup in a space that feels uniquely yours.
Design Dilemmas Solved
A depth of 12 inches is usually the minimum. Always measure the footprint of your specific coffee machine to ensure the feet sit fully on the surface for safety.
Look up! Install hooks under a floating shelf or use a wall-mounted brass rail. This keeps your favorite mugs accessible while freeing up valuable prep space below.
Visual clutter ruins the vibe. Use adhesive cord clips attached to the back of your furniture, or hide the outlet behind a framed print or a bushy potted plant.
Slim espresso machines or compact single-serve brewers are ideal. Look for models specifically marketed as “mini” or “compact” to ensure they fit narrow profiles.
