Table of Contents
- Open-Concept Kitchens: Managing Load-Bearing Walls and Cabinet Weight
- Spa-Style Bathrooms: Solutions for Non-Standard Plumbing and Tub Sizes
- Seamless Wall Designs: Removing Batten Strips and Texturing VOG Panels
- Lightweight Flooring Upgrades: Installing Vinyl Plank Over Particle Board
- Modern Farmhouse Finishes: Adapting Stock Doors and Trim to Mobile Home Frames
- Redefining Mobile Living: Style Meets Structure
- Mobile Home Remodeling: Questions Solved
Transforming a mobile home into a stylish sanctuary is about blending smart functionality with personal flair.
Whether you are working with a compact layout or an open floor plan, the key lies in selecting cohesive textures and colors that breathe life into every corner.
By focusing on light and proportion, you can create an atmosphere that feels expansive and inviting.
Practicality meets sophistication when you choose high-impact upgrades like modern cabinetry or statement lighting.
These changes do not require a massive budget; often, a fresh coat of paint or updated hardware can completely redefine a room.
It is about making intentional choices that balance your aesthetic goals with the realities of daily living.
Your home should be a reflection of your unique story and creative spirit.
From choosing the perfect rug placement to layering soft textiles, every detail contributes to a cohesive and cozy environment.
Embrace these design principles to turn your mobile home into a modern retreat that looks beautiful and feels truly comfortable.
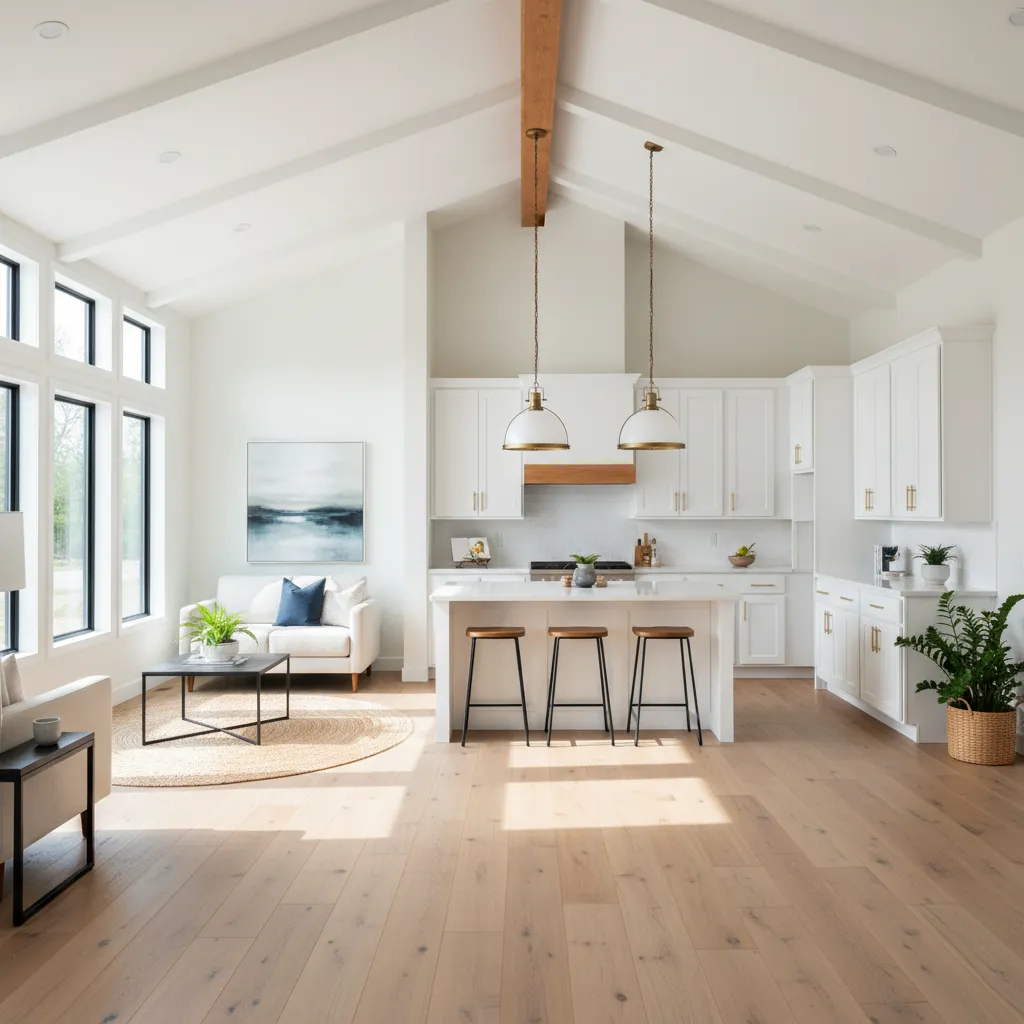
Open-Concept Kitchens: Managing Load-Bearing Walls and Cabinet Weight

Transforming a segmented mobile home layout into an airy, open-concept space is one of the most impactful upgrades you can make.
Removing barriers allows natural light to travel freely, creating a warm and inviting atmosphere that feels significantly larger than the actual square footage.
However, this renovation requires careful planning regarding the unique structural makeup of manufactured homes.
Unlike site-built houses, mobile homes rely heavily on specific interior walls and the outer shell to maintain structural integrity during settling.
An open kitchen is not just a layout change; it is an architectural invitation for connection and shared moments.
Identifying the Marriage Line and Load-Bearing Walls

In double-wide mobile homes, the “marriage line” where the two halves join is almost always a major load-bearing point.
You cannot simply remove walls along this center line without installing a heavy-duty header beam and support posts to carry the roof load.
If you prefer a completely flush ceiling, the beam must be recessed, which is a complex task in mobile home trusses.
A more accessible design choice is to embrace the beam, wrapping it in raw cedar or stained pine to add organic texture to the room.
Always consult a structural engineer before removing walls. What looks like a partition could be holding up your roof, especially in manufactured homes where truss systems vary significantly.
Bob Vila, How to Identify a Load-Bearing Wall
Single-wide homes typically have load-bearing walls on the exterior, but interior transverse walls often provide sheer strength to prevent the home from twisting.
Always check the blueprints or consult a pro before swinging a sledgehammer.
Reinforcing Walls for Cabinetry

Standard mobile home walls often use 2×3 studs rather than the residential standard 2×4, and they may be spaced irregularly.
This creates a challenge when installing heavy stock cabinets or trendy rustic farmhouse kitchen details like floating shelves.
To support the weight of modern cabinetry, you must add “blocking” inside the walls.
This involves opening the wall cavity and installing horizontal wood supports between studs. This provides a solid anchor point for heavy screws anywhere along the wall span.
| Installation Method | Weight Capacity | Best Use Case |
|---|---|---|
| Toggle Bolts | Medium (approx. 50 lbs) | Lightweight open shelving or decorative art; not for loaded cabinets. |
| Stud Mounting | High (100+ lbs) | Standard hanging method, but requires studs to align perfectly with cabinet placement. |
| Internal Blocking | Very High (Max support) | Heavy upper cabinets, pot racks, or areas where stud spacing is irregular. |
Creating Visual Continuity
Once structural changes are addressed, the goal is to create a seamless visual flow.
In an open concept, your kitchen flooring should extend into the living area without transition strips. This uninterrupted line tricks the eye into seeing one massive vignette rather than two small rooms.
Define the kitchen zone using lighting rather than walls. A trio of pendant lights with a warm brass finish over the island anchors the space.
For the adjacent area, consider living and dining room combo ideas that use rug placement to suggest boundaries without blocking sightlines.
Checklist for Wall Removal in Mobile Homes:
- Locate Utilities: Check for plumbing vents and electrical wiring running through the wall before demolition.
- Verify Roofing: Determine if your trusses are self-supporting or rely on the wall for stability.
- Permit Check: Ensure your renovation meets local HUD code requirements or local building standards.
- Floor Patching: Plan for the gap in the subfloor where the wall plate used to sit.
The Reno Reality Check
- Snap a photo of your new internal blocking with a tape measure visible before hanging drywall; this creates a permanent map so you never miss a solid anchor point for heavy cabinets later.
- Can’t recess the structural beam? Use a hollow faux-wood beam to wrap the support header; it adds rustic charm and provides a clever hiding spot for running new electrical wiring to your kitchen island lights.
- Expect a floor gap where the wall plate was removed; if you can’t weave in matching flooring, turn the ‘scar’ into a feature by installing a flat, contrasting threshold that defines the transition between zones.
Spa-Style Bathrooms: Solutions for Non-Standard Plumbing and Tub Sizes

Transforming a standard mobile home bath into a spa retreat requires vision. You must look past the beige vinyl walls and plastic fixtures. It begins with reimagining the spatial flow.
The goal is to create a sanctuary that feels organic and grounded. By layering textures like raw wood and linen, you mask the synthetic feel. This approach elevates the room instantly.
A small space does not mean you have to sacrifice luxury; it just means you must be more intentional with every inch.
The Sanctuary Shift
- Replace odd-sized 54-inch tubs with a custom tiled walk-in shower to bypass sourcing difficulties and visually expand the floor plan.
- Utilize PEX plumbing conversion kits to swap out plastic mobile home fittings for standard residential faucets and rainfall showerheads.
- Reinforce the subfloor with additional blocking before installing heavier elements like freestanding tubs or stone tile to ensure structural integrity.
Revamping the Garden Tub

The massive corner “garden tub” is a staple in many mobile homes. These fixtures often yellow over time or feel outdated. Removing them is difficult due to their odd dimensions.
Instead of demolition, consider an epoxy refinishing kit. A fresh coat of bright white enamel makes the tub look brand new. This saves your budget for high-end faucets.
If you choose to replace the tub, measure the door frames first. Standard residential tubs often do not fit through mobile home doors. You might need a specialized narrow model.
For those looking to maximize layout efficiency, check out these 15 Simple Small Bathroom Ideas on a Budget. They offer great layout inspiration.
The Tub Transformation
- Always use a high-quality respirator and run a ventilation fan when applying epoxy refinishing kits, as the fumes are exceptionally strong in small mobile home bathrooms.
- Apply peel-and-stick waterproof tiles to the tub surround for a custom masonry look that adds style without exceeding the weight limits of your subfloor.
- Before you begin any surface updates, double-check the caulking around the tub’s edge and replace old seals to prevent water from reaching the wooden framing.
Plumbing Hacks for Modern Fixtures
Mobile home plumbing often uses non-standard pipe sizes. This can make installing a modern rainfall showerhead tricky. You cannot simply screw on a standard fixture.
You will likely need PEX tubing and specialized adapters. These allow you to connect standard residential faucets to mobile home plumbing. This small upgrade significantly improves functionality.
Always check for polybutylene pipes before starting work. These gray pipes are prone to leaking and should be replaced. Upgrading to PEX ensures your remodel lasts for years.
In a small bathroom, you want to distract the eye from the size of the room. Wall-to-wall mirrors or a bold wallpaper on the ceiling can draw the eye up and out.
Hadley Keller, House Beautiful
The Retrofit Rundown
- Keep a stash of universal PEX adapters on hand to bridge the gap between non-standard mobile home lines and modern residential fixtures.
- Identify gray polybutylene pipes early; replacing them with flexible PEX saves you from future water damage and makes installs much simpler.
- Measure your supply lines twice before shopping; standard faucets often require a conversion kit for mobile home configurations.
Lighting and Storage Solutions

Harsh overhead lights destroy the spa atmosphere. Replace the standard plastic light bar with warm wall sconces. Soft lighting creates a relaxing vignette around the vanity.
Storage is often scarce in these compact rooms. Utilize vertical space by installing open shelving above the toilet. Rolled towels and glass jars add a decorative, functional touch.
For more creative ways to use vertical space, these 18 Genius Stacked Laundry Room Ideas can be adapted for bathroom storage.
Incorporating elements like a bamboo bath mat or a teak stool adds warmth. These natural materials contrast beautifully with white fixtures. They bring the “spa” feeling to life.
Material Swap Checklist
Upgrade the “plastic” feel of a mobile home bathroom by swapping out these key materials. This table guides you toward more organic, durable choices.
| Current Material | Spa-Style Upgrade | Visual Benefit |
|---|---|---|
| Plastic Tub Surround | Ceramic Subway Tile | Adds gloss and reflects light, expanding space visually. |
| Vinyl Wall Panels | Beadboard or Shiplap | Creates texture and adds a custom, architectural look. |
| Acrylic Faucets | Brushed Nickel / Brass | Provides a solid, weighted feel and modern finish. |
| Laminate Countertop | Butcher Block Wood | Introduces warmth and an organic element to the palette. |
Designer Hack
- Install a dimmer switch for your wall sconces to easily transition from a bright morning routine to a soft, relaxing evening soak.
- Use tiered wicker baskets on your open shelving to hide smaller toiletries while maintaining a natural, organic aesthetic.
- Attach a magnetic strip inside your vanity door to keep grooming tools like tweezers and bobby pins organized and off the counters.
Seamless Wall Designs: Removing Batten Strips and Texturing VOG Panels

The most transformative step in a mobile home remodel is addressing the walls. Standard VOG panels use vinyl strips to hide seams, creating a dated look.
Removing these strips eliminates the modular feel. It creates a clean canvas that mimics traditional drywall, making the interior feel significantly larger.
This process requires patience but offers the highest return on investment. The result is a sophisticated backdrop that allows your decor to truly shine.
The Strip Removal and Filling Process

Start by gently prying off the batten strips with a putty knife. You will reveal gaps between the panels, which are necessary for the home to flex.
Do not be alarmed by the width of these gaps. Fill them with a high-quality joint compound, using fiberglass mesh tape for added strength and flexibility.
Apply three coats of mud, feathering the edges out further each time. This technique blends the seam into the panel, making the wall appear perfectly flat.
Bedding the tape is the most important step in taping. If you don’t put enough mud under the tape, it will blister and peel.
The Family Handyman Editors, How to Tape Drywall
Priming and Choosing a Texture

Standard paint will not stick to the slick vinyl coating of VOG panels. You must use a bonding primer designed for difficult surfaces to ensure durability.
Once primed, adding texture helps hide any remaining imperfections in your mudding. A light texture adds depth and warmth to the otherwise flat panels.
After texturing, you can apply your final color. For inspiration, explore these 20 paint colors guaranteed to make your guests swoon.
Texture is the secret ingredient that turns a flat, manufactured box into a warm and inviting home.
Comparison of Wall Textures
Choosing the right finish depends on your skill level and the condition of your walls. Here is a breakdown of common options for mobile home interiors.
| Texture Style | Camouflage Ability | DIY Difficulty Level |
|---|---|---|
| Orange Peel | High | Beginner Friendly |
| Knockdown | Medium | Intermediate |
| Smooth Skim | Low | Expert / Hard |
| Sand Swirl | High | Intermediate |
An “Orange Peel” finish is often the best choice for DIYers. It is sprayed on and requires no trowel work, effectively hiding minor seam variations.
If you prefer architectural interest, consider adding structure. You might adapt some half wall makeover ideas to break up long hallways.
Seamless Pro Secrets
- Opt for a setting-type joint compound for the first coat to provide extra strength against the natural shifting and flexing of your mobile home.
- Lightly scuff-sand the vinyl panels with 120-grit sandpaper before priming to help the bonding primer grip the slick surface better.
- Warm up aerosol texture cans in a bowl of warm water for five minutes before spraying to achieve a consistent, professional-grade orange peel finish.
Lightweight Flooring Upgrades: Installing Vinyl Plank Over Particle Board

Replacing the flooring is arguably the single most transformative update you can make in a mobile home. It sets the tone for the entire interior.
Most mobile homes feature particle board subfloors. This material is notoriously sensitive to moisture and can swell if it gets wet.
Flooring is the silent foundation of design; it dictates how light travels and how a room breathes.
Luxury Vinyl Plank (LVP) is the premier choice for these remodels. It is lightweight, 100% waterproof, and exceptionally durable against foot traffic.
Unlike heavy ceramic tile, LVP does not add dangerous weight to the chassis. It also offers a floating installation method that is vital for stability.
Mobile homes shift slightly with temperature changes. A floating floor moves with the home, preventing the buckling that occurs with glued materials.
If you are aiming for farmhouse living room ideas, choose a matte finish. It hides dust and mimics raw timber.
Prepping the Particle Board Subfloor

You cannot simply lay planks over damaged particle board. You must ensure the surface is flat and dry to prevent future locking mechanism failures.
Sand down any raised seams where the particle board sheets meet. These high spots will eventually telegraph through your new vinyl planks.
Apply a high-quality primer to the particle board. This seals the porous wood and blocks odors that might have seeped into the old carpet pad.
Luxury vinyl flooring is a great choice for bathrooms and kitchens because it is waterproof and easy to clean… it can simulate the look of wood or stone.
The Spruce Editors, The Spruce
Always install a moisture barrier if your LVP does not have a pre-attached underlayment. This protects the subfloor from spills and dampens sound.
Selecting the Right Plank Style

The scale of the plank impacts the spatial flow. Wider planks generally make a narrow single-wide mobile home feel significantly larger and airier.
Consider the lighting in your space. Dark walnut floors add drama but can make low ceilings feel lower without adequate ambient lighting.
Blonde or whitewashed oak reflects light, enhancing the modern house floor plans typically desired in open-concept renovations.
To assist with your project planning, here is a checklist of essentials you will need before starting your lightweight flooring upgrade.
DIY Installation Essentials Checklist
- Utility Knife with Heavy-Duty Blades: You do not need a saw; simply score the plank and snap it for a clean cut.
- Tapping Block and Pull Bar: Essential for locking the joints tight without damaging the fragile edges of the vinyl.
- Rubber Mallet: Used with the tapping block to secure the planks. Never strike the plank directly with a hammer.
- Knee Pads: Mobile home hallways are long. Protect your joints during the hours you will spend on the floor.
- Quarter Round Molding: This covers the expansion gap you must leave around the perimeter of the room.
- Oscillating Multi-Tool: The cleanest way to undercut door jambs so the new flooring slides seamlessly underneath.
By choosing the right material and preparing your subfloor correctly, you create a durable foundation that elevates every other design choice in the room.
The Installer’s Edge
- Always leave a 1/4-inch expansion gap around the perimeter of the room to allow for the mobile home’s natural shifting and temperature-related expansion.
- Apply a high-quality floor primer to the particle board to seal in old odors and create a moisture-resistant barrier for the subfloor.
- Use a floor leveling compound on low spots and sand down high seams to ensure a perfectly flat surface, which prevents the LVP locking mechanisms from failing over time.
Modern Farmhouse Finishes: Adapting Stock Doors and Trim to Mobile Home Frames

Replacing the standard, hollow-core doors found in most manufactured homes is one of the most impactful upgrades you can make. These original doors often feel lightweight and lack texture.
To achieve a curated modern farmhouse aesthetic, focus on adding weight and architectural interest.
You want the space to feel solid and permanent, moving away from the “temporary” feel of vinyl finishes.
The goal is to introduce organic materials like raw pine or smooth-painted MDF. This shift in material instantly elevates the spatial flow of the hallway and bedrooms.
The smallest architectural details, like a solid door or chunky trim, ground a room and give it a soul.

The Barn Door Solution for Narrow Hallways
Mobile home hallways are notoriously narrow. Traditional swing doors often block traffic or hit opposing walls. Sliding barn doors are a practical functionality fix that oozes farmhouse charm.
Because mobile home wall studs are often smaller than standard 2x4s, you cannot simply screw a heavy track into the drywall. You must install a header board first.
Secure a 1×6 piece of lumber into the studs across the top of the door frame. This distributes the weight of the heavy wooden door, preventing sagging or wall damage.
Stain the wood in a warm walnut or paint it crisp white to match your palette. This creates a stunning focal point that draws the eye upward.
If you are looking for specific furniture to complement this rustic look, check out these 16 farmhouse living room ideas for a gray couch to tie the vignette together.
One of the easiest ways to upgrade a builder-grade space is to swap out the hardware. Matte black or antique brass levers instantly modernize dated doors.
Hadley Mendelsohn, House Beautiful
Craftsman Trim: The DIY Game Changer
The thin, rounded plastic trim in many mobile homes dates the interior. Replacing it with flat-stock lumber creates the clean, linear look essential to modern farmhouse design.
Use 1×4 pine boards for the headers and 1×3 boards for the legs of the door frame. This “Craftsman” style uses simple butt joints, meaning you do not need to cut complex angles.
This square-edge style is easier to install and looks significantly more high-end. Paint the trim a high-gloss white to contrast against matte walls.
For larger openings, such as between a dining area and a lounge, you can apply this same trim technique to create a framed entryway.
See these 20 double door design ideas for inspiration on framing wider spaces.

Checklist: Adapting Stock Doors to Mobile Frames
Standard residential doors sold at big-box stores are often slightly taller or wider than mobile home rough openings. Use this checklist to ensure a proper fit during your remodel.
- Measure the Rough Opening: Do not measure the existing door. Remove the trim and measure the actual stud-to-stud width and height.
- Check Wall Depth: Mobile home walls are often 3 inches thick, while stock door jambs are 4.5 inches. You may need to rip down the jambs with a table saw.
- Verify Structural Support: Ensure the hinge side stud is solid wood. Some older models use minimal framing that requires reinforcement before hanging a solid core door.
- Gap Management: Expect gaps. Purchase shims and expandable foam to fill spaces between the new frame and the old studs before installing your flat trim.
- Floor Clearance: Account for new flooring height. If you installed vinyl plank over existing linoleum, trim the bottom of the door slab to prevent dragging.
By addressing these structural nuances, you create a seamless finish. The result is a doorway that feels substantial, operates smoothly, and perfectly complements a cozy, modern aesthetic.
The Structural Stylist
- When adapting standard 4.5-inch door jambs to thinner mobile home walls, use a table saw to rip the jamb down to match the wall’s depth for a professional, flush finish before installing trim.
- Always install a 1×6 header board into the wall studs before mounting barn door hardware; this distributes the weight and prevents the track from pulling out of the typically smaller mobile home framing.
- Skip complex miter cuts by using the ‘butt joint’ method for Craftsman trim; simply place the top header board directly on top of the side casings for a clean, linear look that is easy to execute.
Redefining Mobile Living: Style Meets Structure
Transforming your mobile home into an open-concept haven creates a bright, spacious atmosphere. It turns a standard layout into a sophisticated retreat.
Remember that structural integrity comes first. Always identify load-bearing walls and the marriage line before you start removing any barriers.
Don’t overlook the details behind the drywall. Adding proper blocking ensures your modern cabinets and rustic shelves stay distinctively secure.
With careful planning and a touch of creativity, your remodeled space will offer the perfect blend of cozy comfort and practical luxury.
Mobile Home Remodeling: Questions Solved
No. Exterior walls and the ‘marriage line’ in double-wides are usually load-bearing. Always consult a structural engineer to ensure safety before demolition.
Standard studs are often too small. You must open the wall and install horizontal wood ‘blocking’ between studs to provide a secure anchor for heavy screws.
It is the center seam where two sections of a double-wide join. It supports significant weight and usually requires a heavy beam if you remove walls along it.
Yes, if properly anchored. Because mobile home walls are thinner, use toggle bolts for light items or install internal blocking for heavier rustic shelves.
