Table of Contents
- Essential Prep: Sealing Terracotta and Exact Paint Brand Recipes
- The Boho Arch: Using Paint Pens for Minimalist Abstract Lines
- Geometric Color Blocking: Tape Hacks for Crisp Modern Designs
- Whimsical Animal Faces: Traceable Templates for Cute Planters
- Eraser-Stamped Polka Dots: Foolproof Patterns for Beginners
- Cultivating Your Creative Garden
- Curated Answers for Your DIY Projects
Transforming your living space often begins with the smallest details. Hand-painted flower pots offer a sophisticated way to infuse personality into your home without a full renovation. These custom pieces bridge the gap between high-end boutique finds and budget-friendly creativity.
Achieving a professional finish requires a thoughtful balance of color and pattern. By selecting palettes that complement your existing furniture, you create a cohesive look that feels curated and intentional.
Whether you prefer minimalist geometric lines or organic botanical motifs, these designs serve as functional art for your windowsills and shelves.
Success lies in the preparation and the finishing touches. Using the right sealants ensures your artwork survives the elements while maintaining its vibrant charm. Embrace these practical techniques to elevate your greenery and showcase your unique design sensibility with confidence.
Essential Prep: Sealing Terracotta and Exact Paint Brand Recipes

Terracotta is naturally porous, which means it acts like a sponge for moisture. If you paint directly on raw clay, water from the soil will seep through.
This moisture causes paint to bubble and peel within weeks. To prevent this, you must create a waterproof barrier before applying any decorative color.
Proper preparation ensures your design stays crisp and your plants stay hydrated. It effectively turns the clay into a stable canvas for your art.
The Step-by-Step Sealing Process

Start by scrubbing your pots with warm water and a stiff brush. Allow them to dry in the sun for at least 24 hours to ensure no moisture remains trapped.
Once bone dry, apply a clear acrylic spray sealer to both the inside and outside. Two thin coats are better than one thick coat to avoid messy drips.
If you are looking for specific seasonal inspiration, check out these fall plant pot ideas to guide your color palette choices.
For terra-cotta pots, you want to seal the inside to keep moisture from seeping through to the outside, which can cause the paint to bubble.
Martha Stewart, MarthaStewart.com
Let the sealer cure completely before moving on to the primer. This creates a smooth surface that helps your brushes glide effortlessly over the clay.
Top Paint Brands and Formulas

For the base coat and detailed designs, heavy-body acrylics are the gold standard. They provide excellent coverage and resist fading in sunlight.
Brands like Liquitex Basics offer a thick consistency that covers imperfections well. For outdoor durability, FolkArt Outdoor Acrylics are a top choice.
If you enjoy other crafts like tote bag painting, you likely already have these versatile acrylics in your supply kit.
Choosing the right medium depends on the final look you want to achieve. Review the table below to decide which paint suits your specific project needs.
| Paint Type | Finish Texture | Durability | Best Application |
|---|---|---|---|
| Outdoor Acrylic | Satin / Gloss | High (UV Resistant) | Detailed brushwork |
| Spray Paint | Smooth / Matte | Medium | Quick solid base coats |
| Chalk Paint | Velvety / Matte | Low (Needs Wax) | Distressed vintage looks |
Always finish with a final UV-resistant clear coat. This protects your hard work from rain and sun, keeping those colors vibrant for seasons to come.
A masterpiece starts with a perfect canvas; seal your pots to ensure your art outlasts the seasons.
Clay Studio Secrets
- The ‘Cool’ Test: Not sure if your washed pot is truly bone dry? Touch the clay to your cheek. If it feels cool, it is still holding moisture. You can bake it in the oven at 200°F for 20 minutes to speed up the evaporation process.
- Protect the Drainage: Roll up a piece of painter’s tape or insert a small cork into the bottom drainage hole before spraying your sealer. This keeps the opening clear of sticky residue, ensuring your plants won’t drown later.
- Weatherproof Your Chalk Paint: While the text mentions wax for chalk paint, skip it for outdoor pots as the sun can melt the wax. Instead, seal that velvety vintage finish with a high-quality matte polyurethane spray.
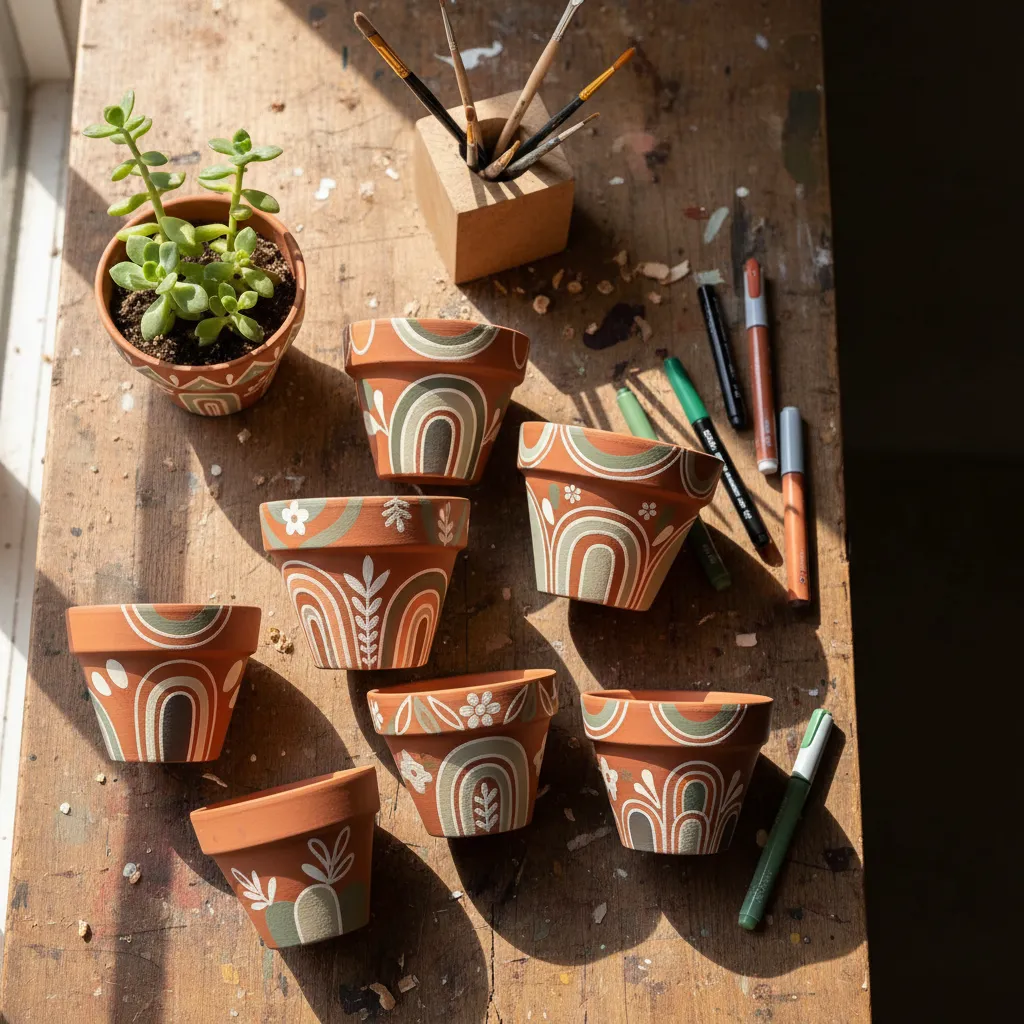
The Boho Arch: Using Paint Pens for Minimalist Abstract Lines

The boho aesthetic thrives on organic shapes and effortless flow. Painting minimalist arches on terracotta pots introduces a modern, high-contrast look that feels grounded and earthy.
This design choice relies on the raw texture of the clay. Leaving the background unpainted allows the natural warmth of the terracotta to serve as a neutral base for your art.
Using paint pens instead of brushes gives you superior control. You can achieve crisp, opaque lines without the dripping or uneven edges often caused by traditional bristles.
If you enjoy detailed hand-painting projects, you might also appreciate similar techniques used in easy wooden heart painting ideas for a cohesive home accent collection.
Mastering the Freehand Arch
Creating the perfect imperfect arch requires confidence rather than precision. The goal is a fluid motion that mimics the natural curve of a rainbow or a doorway.

Start from the bottom rim of the pot. Glide the pen upward, curve gently at the peak, and bring the line back down to the base. Vary the heights of your arches to create visual rhythm.
Once the outline is dry, you can choose to fill in the arch for a solid block of color or leave it as a delicate line drawing. Both styles offer a distinct spatial impact.
Imperfection is the truest form of beauty in a home; let your hand-painted lines waver slightly to show the human touch.
Paint Pen Nib Guide for texture
Selecting the right nib size changes the character of your design. Thicker lines feel bold and graphic, while fine lines look delicate and intricate.
| Nib Size | Visual Effect | Best Application |
|---|---|---|
| 0.7mm (Extra Fine) | Subtle, sketch-like quality | Adding tiny geometric details or dots inside the main arch. |
| 1.8mm – 2.5mm (Medium) | Clean, visible contour | The standard choice for drawing the primary arch outline. |
| 8mm (Broad Chisel) | Bold, blocky statement | Filling in large solid arches quickly with minimal strokes. |
Allow the ink to dry completely between layers. Paint pens dry faster than acrylics, making this an ideal project for a quick afternoon refresh of your patio or windowsill.
When working with porous materials like terracotta, minimal application is key. A paint marker allows the pigment to sit on top of the surface rather than soaking in, ensuring vibrant color payoff.
Martha Stewart, Martha Stewart Living
Styling Your Boho Pots
These pots look stunning when grouped together. The repetition of the arch motif creates a sense of unity, even if the pots vary in size or shape.
Place them near woven textures to enhance the vibe. A macrame hanger or a backdrop of decorative tapestries will complement the matte finish of the clay and paint.
Finally, consider the plant choice. Spiky succulents or trailing pothos vines contrast beautifully with the rounded, soft geometry of the painted arches.
Boho Studio Secret
- Prime your paint pen on a scrap piece of paper before applying it to the pot to prevent sudden ink blobs from soaking into the porous terracotta.
- For smoother curves, hold your pen hand steady and rotate the pot itself; or place it on a lazy Susan; instead of dragging your wrist across the surface.
- Nervous about freehanding? Lightly mark the peak height of each arch with a pencil first to ensure a balanced rhythm around the circumference.
Geometric Color Blocking: Tape Hacks for Crisp Modern Designs

Transforming ordinary terra cotta into modern decor pieces requires precision and a keen eye for balance. Geometric color blocking relies on the contrast between raw, organic clay textures and smooth, matte paint finishes.
This technique is perfect for adding a structured element to your shelves. The sharp lines of the painted design help ground the wild, organic shapes of your houseplants, creating a pleasing visual tension.
Geometry creates a visual dialogue between the organic chaos of nature and the structured calm of modern design.
If you enjoy Scandi-inspired patterns, this approach will fit seamlessly into your home. The key to this look is not artistic talent, but rather the strategic use of painter’s tape.
The Secret to Razor-Sharp Lines

Nothing ruins a modern geometric design faster than bleeding paint. To achieve professional results, you must prepare your surface properly. Dust and oils can prevent tape from adhering, leading to fuzzy edges.
Once your tape is applied, press the edges down firmly with a credit card. This burnishing step is crucial for sealing the barrier between the tape and the textured clay surface.
To ensure a clean line, remove the painter’s tape while the paint is still slightly wet. If it dries completely, it might peel the paint up with it.
Bob Vila Team, How to Use Painter’s Tape
For an extra layer of protection, paint a thin layer of clear sealant over the tape edge before applying your color. This blocks the pores of the terra cotta and ensures your colored line remains crisp.
Selecting a Palette and Pattern

When planning your design, think about the spatial flow of the room. Vertical stripes can make a squat pot look taller, while diagonal blocks add dynamic energy to a static corner.
Choose paint colors that complement your existing textiles. A monochrome palette of blacks and greys creates a minimalist vibe, while metallic gold accents add a touch of warmth and luxury.
Consider the “Rule of Thirds” when taping off sections. Avoid splitting the pot exactly in half, as this can look visually stagnant. Instead, tape off the bottom third or create an asymmetrical triangle near the rim.
Troubleshooting Common Paint Issues
Even with the best preparation, textured pots can be tricky. Use this checklist to ensure your geometric designs look high-end and intentional.
- Surface Prep: Wipe the pot with rubbing alcohol to remove invisible oils before taping.
- Tape Choice: Use high-adhesion tape for rough clay, or delicate surface tape for previously painted base coats.
- Brush Technique: Brush away from the tape edge, not towards it, to minimize paint forcing its way under the adhesive.
- Application: Apply multiple thin layers rather than one thick glob to prevent ridges when removing tape.
- Correction: If bleed-through happens, wait for it to dry and gently scrape the excess paint away with a craft knife.
Once your design is dry, place the pot in a spot with soft ambient lighting. The shadows cast by the plant foliage will play beautifully against the hard lines of your geometric art.
The Precision Playbook
- For a flawless seal, paint over the tape edge with a thin layer of clear matte medium or the pot’s base color first to lock in the line before applying your accent shade.
- Always pull your tape away from the painted area at a 45-degree angle while the paint is still slightly tacky to ensure the cleanest possible edge without peeling the finish.
- When working with terra cotta, wipe the surface with a lint-free cloth and rubbing alcohol before taping to remove fine dust that could compromise the tape’s adhesive seal.
Whimsical Animal Faces: Traceable Templates for Cute Planters

Adding a touch of personality to your indoor garden often requires nothing more than a bit of paint and some imagination. Animal-themed planters bring a playful energy to any vignette.
These whimsical designs work exceptionally well in spaces that need a softening effect, such as a modern home office or a nursery. The key is to keep the base matte for a tactile, organic feel.
Whimsy is not just for children; it is the sophisticated art of adding joy to the everyday corners of your home.
You do not need to be a professional illustrator to achieve this look. Utilizing carbon paper allows you to transfer printed templates directly onto the curved surface of the clay.
This simple transfer technique ensures your lines are crisp and symmetrical before you ever touch a paintbrush to the pot. It removes the anxiety of freehand sketching entirely.
Matching Shapes to Creatures

The silhouette of the vessel should dictate the animal you choose to create. This harmony between form and design creates a more professional and intentional finish.
Standard tapered pots are perfect for foxes, raccoons, or cats, where the ears can be painted near the rim. Rounder, bowl-style planters naturally lend themselves to bears, pigs, or frogs.
If you are looking for a weekend activity to share with family, this project rivals many 17 cute and easy fall craft ideas for preschoolers in terms of simplicity and fun.
To ensure your design creates the right visual impact, consider the following placement guide for facial features:
- The Eyes: Place these exactly halfway down the height of the pot to maintain a cute, youthful proportion known as “neoteny.”
- The Nose: Keep it small and centered; a heart shape often reads better than a realistic circle for whimsical designs.
- The Cheeks: Add soft pink circles using a dry brush technique to give the character a warm, blushing appearance.
- The Ears: If the animal has pointed ears, paint them extending slightly onto the inner rim of the pot for a 3D effect.
Once you have mastered these faces, you can group them with other seasonal items. They fit perfectly alongside 30 best fall plant pot ideas for seasonal home decor to create a layered porch display.
Most terra cotta pots are unglazed and porous… This means they can soak up paint. To prevent this, apply a primer or a base coat of white acrylic paint first.
The Spruce Team, How to Paint Terra Cotta Pots
Remember to seal your artwork with a clear, water-based polyurethane. This protects the design from moisture when you water your plants and keeps the colors vibrant for years.
Whimsy Workshop Secrets
- To help your paper template mold perfectly to the curved surface of the pot, cut small slits around the edges of the paper before taping it down.
- Always apply a white acrylic base coat or primer before painting your character; this stops the porous terra cotta from absorbing the paint and dulling your colors.
- Stick to the ‘neoteny’ rule for maximum cuteness: place the eyes exactly halfway down the pot’s height, rather than higher up near the rim.
Eraser-Stamped Polka Dots: Foolproof Patterns for Beginners

Polka dots inject a sense of playfulness into any room without feeling cluttered. This design is perfect for beginners because it requires zero drawing skills.
The secret tool for this project is likely already in your desk drawer. A fresh, unused pencil eraser creates a perfectly uniform circle every single time.
Dip the eraser into a small puddle of acrylic paint. Press it firmly onto the pot and lift straight up to avoid smudging the edges of the circle.
The most charming home details often come from the simplest tools found in your junk drawer.
For a sophisticated look, stick to a monochrome palette. White dots on raw terracotta create an organic, modern farmhouse aesthetic that feels curated.
If you prefer a bolder statement, paint the base black and use gold metallic paint for the dots. This adds a touch of glamour to your shelving units.
Designing Your Dot Layout

The arrangement of your dots changes the visual flow of the piece. You can create distinct vibes just by altering the spacing and alignment.
A structured grid pattern offers a clean and geometric appeal. This works exceptionally well in minimalist spaces where order is the priority.
For a more whimsical approach, try a random confetti style. Place dots sporadically around the pot, allowing them to overlap slightly for depth.
These pots are excellent for brightening up compact outdoor areas. They fit perfectly into top modern simple very small balcony apartment ideas to add color.
Common Pattern Variations:
- The Ombre Cascade: Cluster many dots near the top rim and gradually space them out as you move down the base.
- The Banded Look: Stamp dots only in specific horizontal rows, leaving negative space in between for a striped effect.
- The Inverted Dot: Paint the entire pot a bright color, then use a dipped eraser to remove wet paint, revealing the clay.
The texture of the paint plays a large role in the final finish. Matte acrylics absorb light for a soft look, while gloss finishes pop against sunlight.
To ensure your design lasts, wipe the pot down with a damp cloth to remove dust and let it dry completely before applying any paint.
Country Living Staff, 20 DIY Terracotta Pots
Allow the paint to cure fully before potting your plants. This prevents moisture from the soil from bubbling the paint from the inside out.
Grouping three pots of varying heights creates a lovely vignette. Use the same color palette but different dot patterns to maintain visual cohesion.
Master the Stamp
- Use a damp cotton swab to quickly wipe away any misplaced dots or smudges before the acrylic paint sets.
- Practice your stamping pressure on a piece of scrap paper first to ensure the eraser is evenly coated and produces a crisp circle.
- For perfectly spaced grids, use a piece of low-tack painter’s tape as a temporary guide to keep your rows straight and uniform.
Cultivating Your Creative Garden
Transforming simple terracotta into art is easier than you think. With the right preparation, your custom designs will last for seasons.
Remember to seal your pots first. This crucial step prevents bubbling paint and keeps your green friends happy and hydrated.
Whether you choose boho arches or bold florals, let your personal style shine. Grab a brush and start planting joy today.
Curated Answers for Your DIY Projects
Absolutely. Terracotta is porous. Without a sealer, moisture seeps through from the soil, causing your beautiful paint job to bubble and peel quickly.
Acrylic paint is the gold standard. Look for outdoor-rated formulas or heavy-body acrylics for the best coverage, durability, and pigment retention.
While outdoor acrylics are tough, freezing temperatures can crack the clay itself. It is best to bring your masterpieces indoors during harsh freezes.
Acrylics dry fast, but if you catch it wet, simply wipe it off. If dry, paint over the error with a white base coat and try again.
