Is the post-holiday quiet leaving your house a little too quiet? Are the kids starting to feel the winter blues, and you’re looking for a creative way to fill the long, chilly afternoons that doesn’t involve a screen? You’re in the right place to change that.
A DIY winter decoration shouldn’t just be a craft; it should be a magical afternoon, a backdrop for making memories, and a fun way to transform your home into a whimsical wonderland, made with the best little hands you know.
This is your creative playbook for transforming paper plates, cotton balls, and a bit of glue into a flurry of adorable characters and sparkling scenes that your kids will be proud to display.
We’ll explore super-simple project ideas, decode the secrets of a stress-free craft session, and walk through the practical steps to bring their frosty fantasies to life.
By the end, you’ll see a chilly winter day not as a challenge, but as a perfect canvas for your family’s creativity.
Before You Begin: Dreaming Up Your Frosty Fun
The most successful kids’ craft sessions start with a little bit of prep and a lot of flexibility. Before you break out the glitter, let’s lay the groundwork for a fun, creative experience where the process is just as important as the finished product.
The Secrets of a Magical Craft Day: Simple Rules for Happy Kids
Making adorable decorations with kids is all about embracing the fun and letting go of perfection. Here are a few simple secrets:
- Embrace the Glorious Mess: This is the golden rule. Put down a cheap plastic tablecloth or some old newspaper. Put the kids in clothes that can get messy. A stress-free craft time is one where you’re not worried about a little spilled paint or a glitter explosion.
- Shop Your Recycling Bin First: Some of the best craft supplies are already in your house. Toilet paper rolls, paper plates, old newspapers, and cardboard boxes are the unsung heroes of kid-friendly crafting. It’s cheap, eco-friendly, and teaches resourcefulness.
- It’s Their Masterpiece, Not Yours: It’s easy to want to “fix” a lopsided snowman or a penguin with three eyes. Resist the urge! The goal is for them to have fun and be proud of their own work. A quirky, kid-made decoration has far more charm and personality than a perfect replica.
- Think in Textures: Kids are sensory creatures. The best winter crafts involve fun textures. Think fluffy cotton balls for snow, scratchy salt for ice, gooey puffy paint for snowflakes, and smooth pebbles for snowmen.
What’s the Real Effort? A No-Fuss Project Breakdown
| The Approach | Estimated Time | What You’ll Need | The Little Extras (Don’t Skip These!) |
| The 15-Minute Marvel | Under 20 Minutes | • Paper, scissors, glue stick • Things from the recycling bin • Crayons or markers | • A pack of baby wipes for quick cleanup • A designated “drying spot” for wet projects • Lots of encouragement! |
| The Afternoon Art Studio | 30 – 60 Minutes | • Kid-safe paint & brushes • Cotton balls, pom-poms, googly eyes • A low-temp hot glue gun (for parent use) | • Fun background music • A snack and drink break • A smock or old t-shirt for the kids |
| The Big Winter Build | 1 Hour+ | • A large cardboard box • Multiple craft supplies • A collaborative family spirit | • A clear table or floor space to work • A simple plan or sketch to start • A “reveal” to the other parent when it’s done |
The Design Menu: Finding Your Frosty Fun
Here are 16 DIY winter wonderland decoration ideas perfect for little hands. Each one comes with a breakdown to help you get crafting.
Classic Winter Characters
1. The Paper Plate Penguin

- Best For: Preschoolers learning shapes and practicing their gluing skills.
- Key Consideration: This craft is all about simple, cut-out shapes.
- Pro-Tip: Fold a standard white paper plate in half to create the penguin’s body. Use black paper for the wings, and orange paper for the beak and feet.
- Styling Cue: Glue a small loop of ribbon to the back and hang your flock of penguins on door handles all around the house.
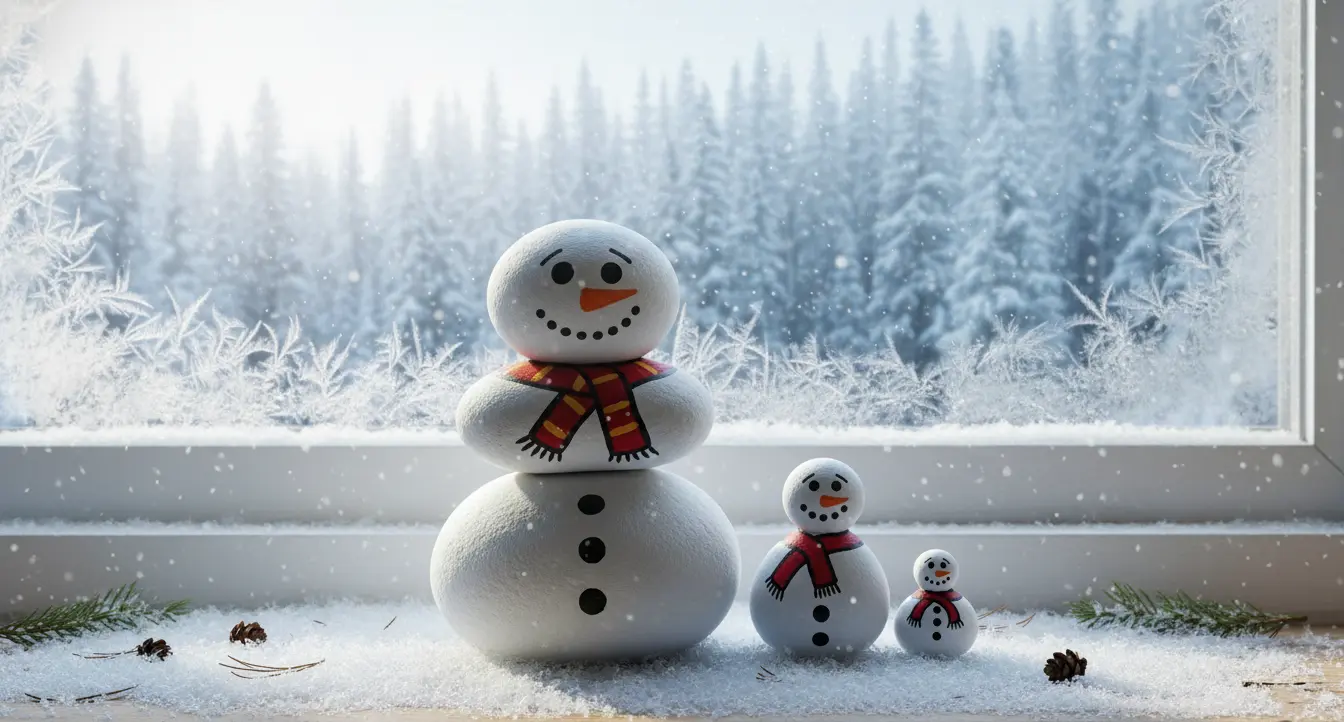
2. The Cotton Ball Snowman

- Best For: Toddlers and little ones who love sensory play.
- Key Consideration: The fun is in the texture of the cotton balls!
- Pro-Tip: Draw three circles on a piece of blue paper for the snowman’s body. Let your child cover the circles with glue and stick on cotton balls for a fluffy, 3D effect.
- Styling Cue: Use small buttons for the eyes and mouth and a couple of real twigs for the arms to add a fun, realistic touch.
3. The Toilet Paper Roll Polar Bear

- Best For: A super easy craft using a classic recycling bin staple.
- Key Consideration: This is a simple paint-and-decorate project.
- Pro-Tip: After painting the toilet paper roll white, pinch the top together and staple or glue it shut to create two little ears.
- Styling Cue: Draw a simple face with a black marker and wrap a small piece of scrap fabric or felt around the middle for a cozy little scarf.
4. The Pinecone Snowy Owl

- Best For: A charming craft that starts with a nature walk to find pinecones.
- Key Consideration: This involves small pieces, so it’s great for kids with a bit more dexterity.
- Pro-Tip: Use small tufts of cotton or felt scraps for the owl’s feathery details. Glue them into the crevices of the pinecone.
- Styling Cue: Add two large googly eyes and a small orange felt triangle for a beak to bring your wise winter owl to life.
Snowy & Frosty Fun
5. The Coffee Filter Snowflakes

- Best For: The ultimate classic. It’s mess-free, and every single snowflake is unique.
- Key Consideration: Show your child how to fold the round coffee filter in half, then in half again, and again, to create a triangle.
- Pro-Tip: Use safety scissors and let them snip small shapes along the folded edges. The magic is in the surprise when you unfold it!
- Styling Cue: Tape a whole flurry of these delicate snowflakes to your windows for a beautiful, frosty look that’s lovely from both inside and out.
6. The Puffy Paint Snow Scene

- Best For: A fantastic sensory experience that results in a cool, 3D art piece.
- Key Consideration: DIY puffy paint is a magical, two-ingredient recipe.
- Pro-Tip: Mix equal parts white school glue and shaving cream in a bowl. Voila! You have puffy paint. Let kids use brushes or their fingers to create snowy hills and snowmen on dark paper.
- Styling Cue: While the paint is still wet, sprinkle it with a little iridescent glitter to mimic the sparkle of real snow.
7. The Marshmallow Igloo
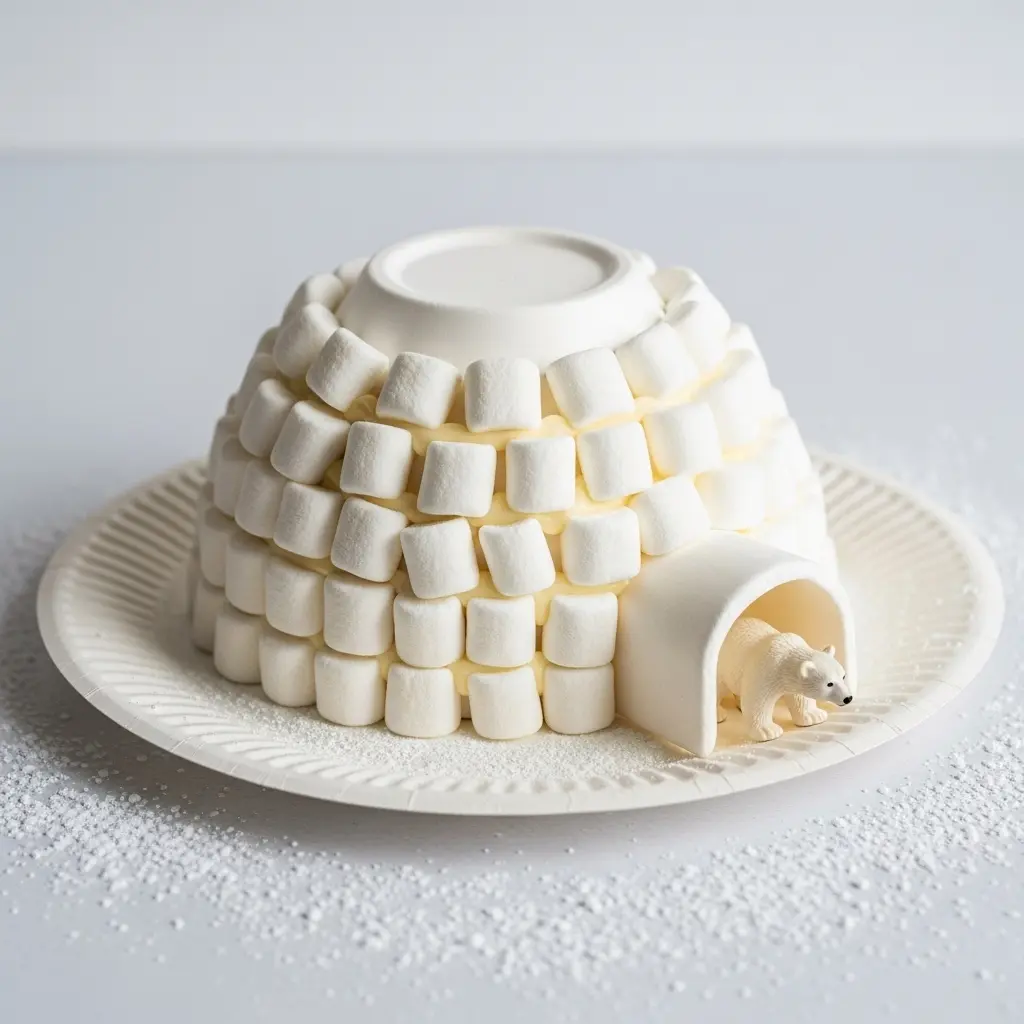
- Best For: A delicious building project that’s part craft, part snack.
- Key Consideration: Use a small paper bowl turned upside down as the base for your igloo.
- Pro-Tip: Use frosting or a thick powdered sugar “glue” to stick mini marshmallows onto the bowl in rows.
- Styling Cue: Place your finished igloo on a paper plate “snowfield” and put a small toy polar bear next to the entrance.
8. The Salt Painting Snowflakes

- Best For: A magical art project where science meets creativity.
- Key Consideration: You’ll need dark paper, school glue, table salt, and watercolor paints.
- Pro-Tip: First, draw snowflake shapes on the paper with glue. Then, generously sprinkle salt over the glue until it’s completely covered. Shake off the excess.
- Styling Cue: Touch a wet watercolor brush to the salt lines. Watch in amazement as the color magically travels and spreads along the snowflake’s arms!
Hanging Ornaments & Garlands
9. The Popsicle Stick Snowflakes

- Best For: A sturdy, classic ornament that kids can decorate in a million different ways.
- Key Consideration: A grown-up should pre-glue the popsicle sticks into a star or snowflake shape using a hot glue gun.
- Pro-Tip: Set up a “decorating station” with paint, glitter, small buttons, and pom-poms, and let the kids personalize their own snowflake.
- Styling Cue: Tie a loop of twine to one of the arms, and you have a beautiful, rustic ornament perfect for the Christmas tree or a doorknob.
10. The Pasta Snowflake Ornaments
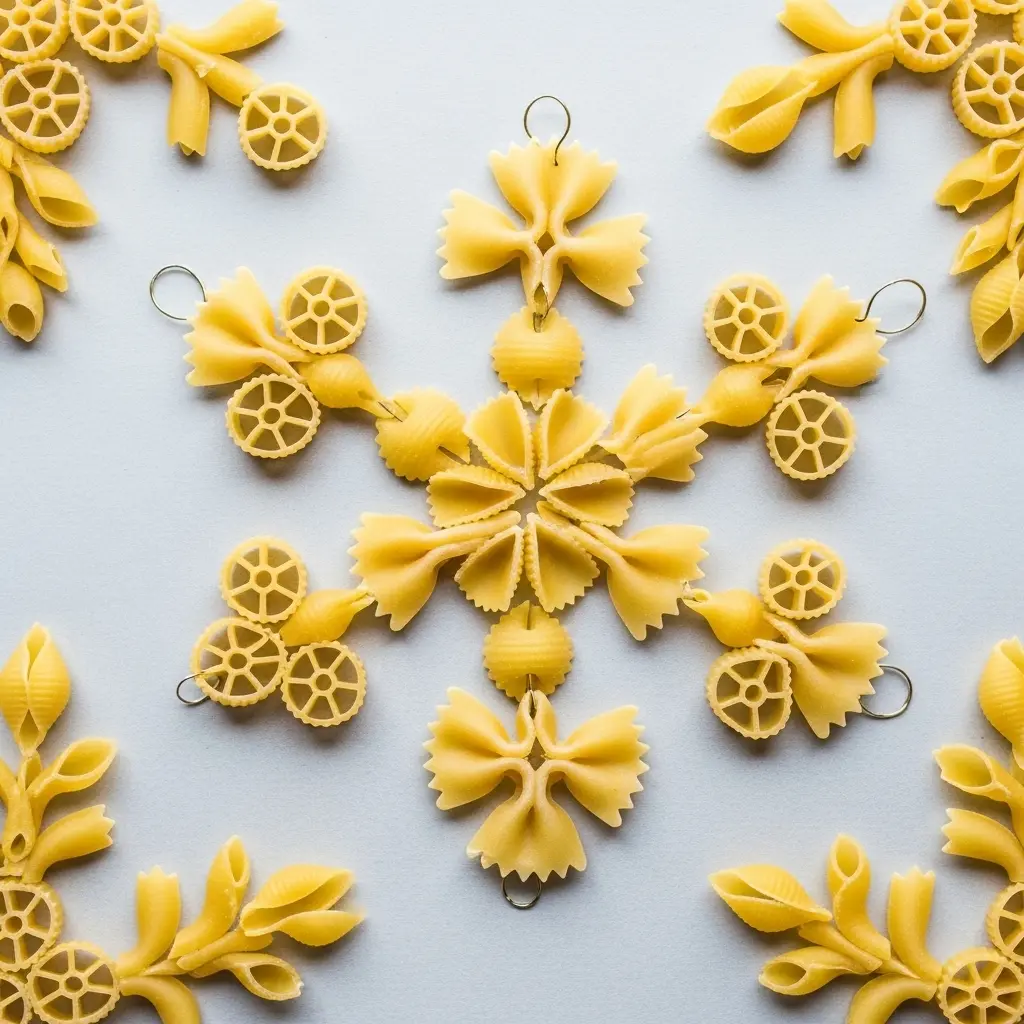
- Best For: A budget-friendly project using pantry staples to create intricate-looking designs.
- Key Consideration: Use a variety of pasta shapes wagon wheels, bow ties, small shells, and tubes.
- Pro-Tip: Arrange and glue the pasta shapes into a snowflake design on a piece of wax paper. Once the glue is completely dry, you can peel it off.
- Styling Cue: Spray paint the finished pasta snowflakes with white or metallic silver paint for a uniform, elegant look.
11. The Yarn-Wrapped Star

- Best For: A wonderful fine-motor-skill workout that results in a soft, cozy ornament.
- Key Consideration: Cut a star shape out of sturdy cardboard for the base.
- Pro-Tip: Cut small slits into the points and corners of the star. This gives the yarn a place to “catch” and makes it much easier for little hands to wrap without the yarn slipping off.
- Styling Cue: Use a chunky, variegated, or sparkly yarn for extra texture and visual interest.
12. The Paper Chain Snowman Garland

- Best For: A collaborative project that can decorate a whole doorway or wall.
- Key Consideration: This is just like a classic paper chain, but with a fun twist.
- Pro-Tip: Make your paper chains using only white paper. Once the chain is your desired length, use markers to draw a simple snowman face on each link.
- Styling Cue: Add a tiny orange paper triangle for a nose and a little scrap-fabric scarf on a few of the links for extra charm.
Whimsical Wonderland Crafts
13. The DIY Snow Globe
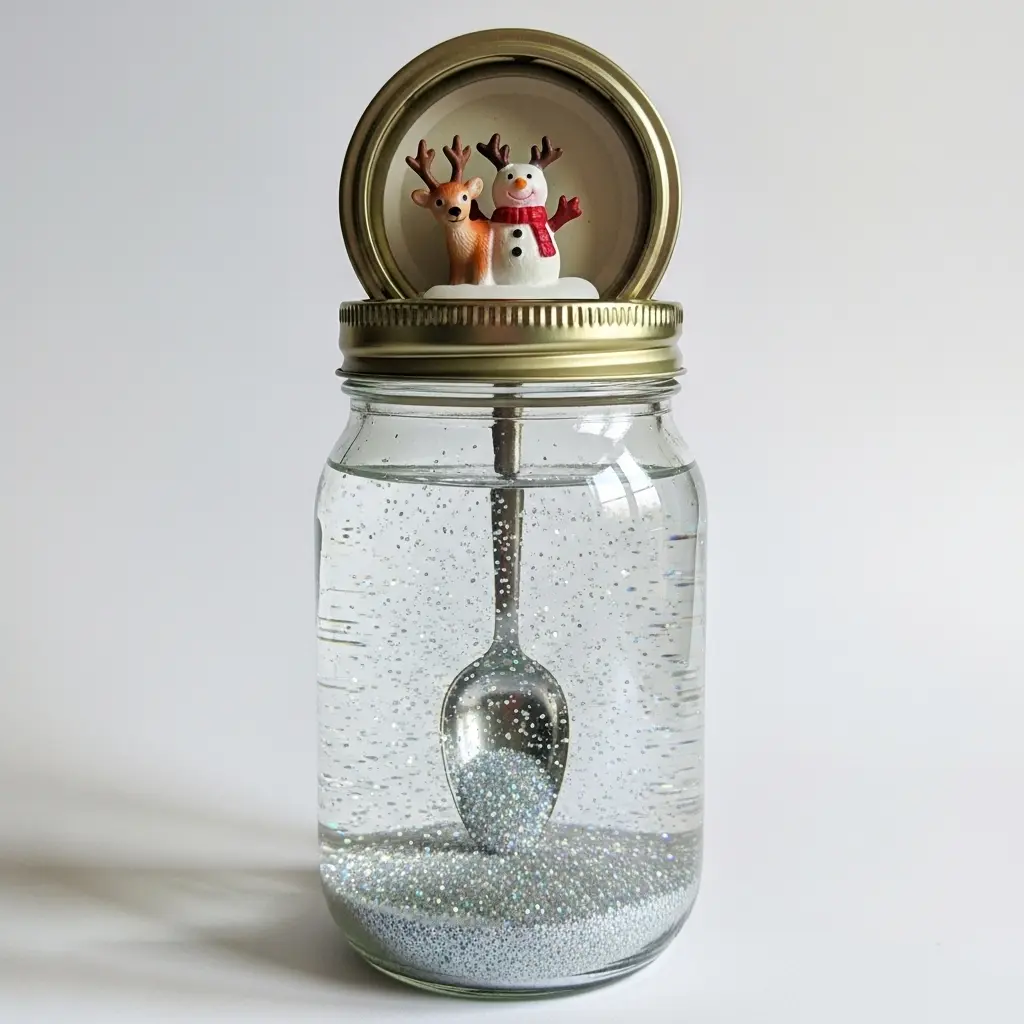
- Best For: A magical craft that captures a tiny winter world in a jar.
- Key Consideration: You’ll need a clean glass jar with a tight-fitting lid, glitter, and a small waterproof figurine.
- Pro-Tip: Use a strong, waterproof glue (like E6000 or hot glue) to attach a small plastic toy (like a reindeer or snowman) to the inside of the jar’s lid.
- Styling Cue: Fill the jar with water, a dash of glycerin (to help the glitter fall slowly), and a generous spoonful of iridescent or silver glitter. Screw the lid on tightly, and you’re done!
14. The Painted Rock Snowmen

- Best For: A simple, charming craft that can be used as paperweights or shelf decorations.
- Key Consideration: Start with a nature walk to find smooth, flat rocks that are perfect for painting.
- Pro-Tip: Paint the entire rock white first. Once it’s dry, it’s much easier for kids to use markers or other paint colors to add the face, buttons, and scarf.
- Styling Cue: Stack three painted rocks of decreasing size to create a fun, deconstructed snowman family on a windowsill.
15. The Paper Plate Snowy Owl

- Best For: A cute, wide-eyed creature that’s fun to create.
- Key Consideration: This craft uses simple folding to create the owl’s shape.
- Pro-Tip: Take a standard paper plate and fold the left and right sides in toward the center to create the wings. Fold the top down to create the head and “ear” tufts.
- Styling Cue: Use large yellow paper circles for the eyes and a black marker to draw feathery patterns on the wings and belly.
16. The Handprint Penguin

- Best For: A wonderful keepsake craft that captures how small their hands once were.
- Key Consideration: This can get messy, so have wipes ready!
- Pro-Tip: Paint the child’s palm and fingers black, but paint the center of their palm white. Have them press their hand down firmly on a piece of paper. The white palm is the penguin’s belly, the black fingers are the wings, and the black thumb is the head!
- Styling Cue: Once dry, add a googly eye and a small orange paper beak. Write their name and the year at the bottom.
Conclusion: The Warmest Winter Memories
And just like that, you’re no longer just looking at a pile of craft supplies; you’re looking at a day of laughter, creativity, and connection.
You have the ideas, the inspiration, and the kid-friendly tips to create a winter wonderland that is charming, personal, and made with love.
This isn’t just about keeping kids busy; it’s about making your home a gallery of their joy and creating the warmest memories during the coldest season.
It all starts with a single choice. Pick one project that made you smile, and lay down some newspaper.
You’ve got this. Happy crafting
