Table of Contents
- Curating the Kit: Bamboo Skewers, Floral Foam, and Korean Wrapping Paper
- Color Coordination: Matching Satin Ribbons to Die-Cast Paint Jobs
- Crafting the Blooms: How to Make Durable Satin Ribbon Roses
- The Collector-Safe Method: Mounting Blister Packs Without Glue Damage
- Professional Wrapping: Layering the Arrangement for a Gift-Ready Finish
- The Finish Line: Gifting in High Gear
- Pit Stop: Design Dilemmas Solved
Creating a thoughtful gift often requires a balance between playful nostalgia and refined craftsmanship. A Hot Wheels bouquet offers a unique way to celebrate a collector’s passion while maintaining a polished aesthetic.
By incorporating handmade ribbon flowers, you transform a simple toy into a curated centerpiece that feels both personal and high-end.
To achieve a professional look without a designer price tag, focus on color harmony and texture. Selecting cars that share a cohesive palette and pairing them with structured satin blooms ensures the arrangement looks intentional.
This project serves as a perfect example of how budget materials can be elevated through careful styling and attention to detail.
This guide provides clear instructions to help you build a sturdy and visually striking display. Whether you are decorating a shelf or surprising a loved one, the final result combines practicality with charm.
With a few simple tools and creative flair, you will master a decorative technique that adds character to any living space.
Curating the Kit: Bamboo Skewers, Floral Foam, and Korean Wrapping Paper

Creating a stunning bouquet requires more than just creativity. The structural integrity of your arrangement depends entirely on the quality of your base materials.
A professional finish begins with the right tools. We are curating a kit that blends industrial strength with delicate aesthetics for a balanced design.
The beauty of a handmade gift lies in the intentionality of the materials chosen.
Studio Secrets
- To prevent heavier items from sliding down bamboo skewers, apply a small dot of hot glue at the connection point before securing with tape.
- Cut your floral foam slightly larger than the container base to create a friction fit; this ensures the foundation won’t wobble as you add weight.
- When using Korean wrapping paper, layer sheets at slight angles to build volume and dimension without hiding the inner details of the bouquet.
The Structural Backbone: Skewers and Foam

Hot Wheels cars are significantly heavier than real flowers. You must use thick bamboo skewers, preferably 12 inches long, to support the die-cast metal weight.
Thin kitchen skewers will bend under the load. Opt for heavy-duty bamboo that offers a rigid spine, ensuring your arrangement remains upright and proud.
The anchor is equally critical. High-density floral foam provides the grip needed to keep the skewers stationary, maintaining the specific flower decoration ideas you envision.
Do not use soft wet foam meant for fresh hydrangeas. Dry foam blocks are superior here, as they resist crumbling when pierced by multiple heavy stems.
The mechanics of a floral arrangement are the most important part. If the mechanics are not sound, the arrangement will fall apart.
Preston Bailey, Preston Bailey Designs
Pit Crew Pro-Tips
- Secure the dry foam block to the bottom of your container with hot glue or floral tape; top-heavy die-cast cars can easily tip a loose block over.
- If a standard skewer flexes under the weight of a larger truck or van, tape two bamboo sticks together to create a reinforced ‘double-barrel’ stem.
- Apply hot glue along the length of the car’s undercarriage rather than a single spot to prevent the vehicle from spinning around on the skewer.
The Aesthetic Finish: Korean Wrapping Paper

The defining feature of a modern bouquet is the wrapping. Korean wrapping paper is the industry standard for creating that cloudy, voluminous aesthetic.
Unlike traditional tissue paper, this material is waterproof and holds its shape. It allows you to create deep, structural folds that do not collapse.
The matte finish diffuses light beautifully. It adds a soft, ambient glow to the bouquet, elevating it from a craft project to a sophisticated DIY gift idea.
Choose a neutral palette like cream, dusty pink, or slate grey. These tones provide a gallery-like backdrop that lets the colorful Hot Wheels cars pop.
| Material | Structure & Volume | Texture Finish | Durability |
|---|---|---|---|
| Korean Paper | High (Holds folds) | Matte / Waterproof | Excellent |
| Tissue Paper | Low (Collapses) | Sheer / Fragile | Poor |
| Cellophane | Medium (Rigid) | Glossy / Reflective | Good |
| Kraft Paper | High (Stiff) | Rough / Organic | Very Good |
Using the correct paper changes the tactile experience. The crisp sound of quality wrapping adds a sensory layer to the unveiling of the gift.
The Wrap Ritual
- Layering is key to the ‘cloud’ look; use at least 3-4 sheets of Korean paper, staggered at different heights, to create depth and volume.
- To avoid flat edges, pinch the paper at the base instead of folding it flat; this preserves the structural ‘puff’ that defines the Korean style.
- Take advantage of the matte texture by using a ring light or soft natural light when photographing; it absorbs glare and makes the colors of the contents pop.
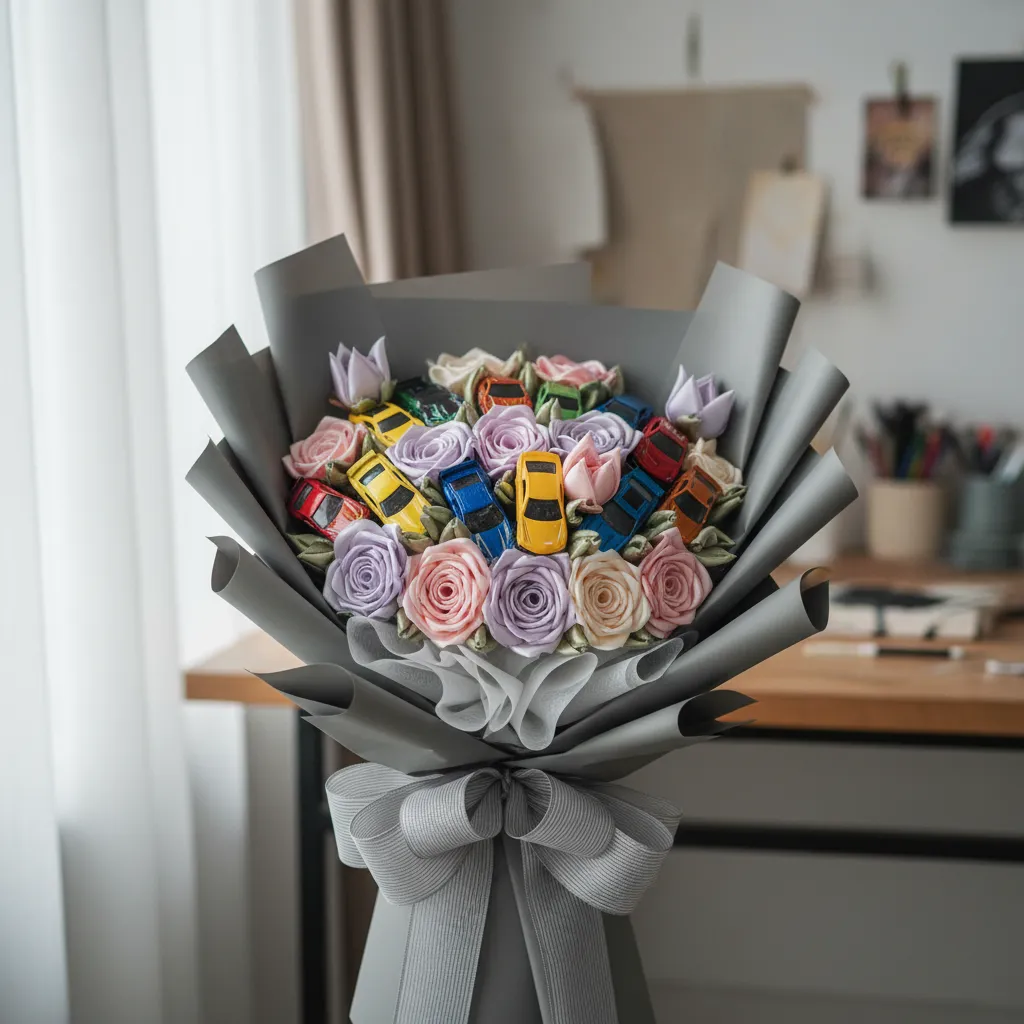
Color Coordination: Matching Satin Ribbons to Die-Cast Paint Jobs

The secret to a professional-looking bouquet lies in the palette. A cohesive color scheme elevates a simple craft into a curated design statement. The magic happens when the cold sheen of die-cast metal meets soft satin.
You must consider the visual weight of the car against the delicate nature of the ribbon. A bright orange track car might clash with pastel pinks, creating a disjointed look. instead, aim for harmony between the industrial and the organic.
If you are new to color theory, start with a monochromatic approach. Select a car in a specific hue, such as a metallic deep red. Pair this with ribbons in varying shades of burgundy, crimson, and blush to add depth.
True design personalization is found in the intentional matching of unexpected textures.
This technique creates a sophisticated gradient effect. It allows the car to act as the crown jewel without fighting for attention. The result is a seamless visual flow that feels intentional and high-end.
For those who prefer a bolder aesthetic, complementary colors are your best friend. Look for cars with paint jobs that sit opposite your ribbon choice on the color wheel. This creates a high-energy pop that is perfect for party decorations or celebratory gifts.
Texture and Finish Pairings

Beyond color, the finish of the car dictates the best fabric choice. Metallic or “spectraflame” paint jobs reflect light intensely. These pair beautifully with matte fabrics like grosgrain or cotton to prevent visual clutter.
Conversely, cars with a flat or matte finish require a bit of shine to lift the arrangement. High-gloss double-faced satin ribbons provide that necessary luster. This balance ensures the bouquet catches the ambient lighting effectively.
I prioritize the mood I want to create, then I choose the colors that will help me achieve that. Color is the most effective tool for setting the tone of a room.
Emily Henderson, Style by Emily Henderson
When selecting your materials, bring the die-cast car to the fabric store. Lighting in stores can be deceptive. Holding the metal directly against the spool ensures the undertones match perfectly before you start cutting.
Below is a quick reference guide for creating specific moods with your pairings. These combinations work well for centerpieces or unique party favors for guests.
| Car Finish & Color | Primary Ribbon | Accent Ribbon | Design Vibe |
|---|---|---|---|
| Metallic Blue | Navy Satin | Silver Organza | Modern Cool |
| Classic Red | Cream Grosgrain | Black Velvet | Vintage Racer |
| Neon/Lime Green | Electric Purple | Charcoal Grey | High Contrast |
| Matte Black | Gold Satin | White Lace | Luxe Industrial |
The Maker’s Edit
- Always test your pairings in natural daylight; store lighting can distort the undertones of metallic paint jobs and cause a mismatch once you get home.
- Scale your ribbon width to the car’s size; use delicate 1/8-inch ribbons for standard 1:64 die-casts to ensure the fabric doesn’t overwhelm the vehicle’s silhouette.
- To balance a high-gloss ‘Spectraflame’ finish, opt for a matte cotton or grosgrain ribbon to provide a textural contrast that makes the car’s shine pop without causing glare.
Crafting the Blooms: How to Make Durable Satin Ribbon Roses

Creating your own satin roses adds a layer of sophisticated charm to this project. Unlike fresh blooms, these flowers are permanent.
The texture of double-faced satin contrasts beautifully with the sleek metal of the toy cars. This mix creates a curated and tactile finish.
For a Hot Wheels Bouquet with Ribbon Flowers, durability is key. The flowers must be sturdy enough to support the weight of the cars.
The Artisan’s Touch
- Seal your ribbon edges with a quick pass of a lighter flame to prevent fraying and ensure a professional, long-lasting finish.
- Use a high-temperature glue gun for the tightest bond, ensuring your roses stay perfectly coiled even when supporting the weight of the metal cars.
- Apply a small drop of glue at every third fold of the ribbon to increase structural integrity and maintain a consistent bloom shape.
Essential Materials for Satin Roses

Gathering high-quality materials ensures your bouquet looks expensive rather than crafty. The sheen of the ribbon matters greatly here.
- Double-faced satin ribbon (1.5-inch width is ideal).
- Low-temperature hot glue gun and clear glue sticks.
- Sharp fabric scissors for crisp, clean cuts.
- Green floral tape and 18-gauge stem wire.
- A lighter or candle to seal ribbon edges.
Handmade decor brings a soul to a room that store-bought items simply cannot replicate.
Pro Maker Secrets
- Opt for high-density double-faced satin ribbon; its weight and luster on both sides create a much more realistic and luxurious petal fold.
- When sealing ribbon edges, use the blue part of the flame (the base) rather than the orange tip to prevent unsightly black soot marks.
- Invest in a non-stick silicone mat to protect your workspace from hot glue drips and to easily peel off excess adhesive for reuse.
Step-by-Step Folding Technique
Mastering the fold is easier than it looks. Start by cutting a 30-inch strip of ribbon. Briefly run the cut ends near a flame to seal them.
Fold the top corner down and roll it tightly to form the center bud. This core must be tight to hide the wire later. Secure it with a dot of glue.
Fold the ribbon backward at a 90-degree angle away from the center. Roll the bud over this fold. This creates the first geometric petal.
Continue this “fold, roll, and glue” motion. The ribbon should naturally angle downward, creating the blooming shape of a rose.
If you enjoy detailed crafts like this, you might also like exploring creative spring decorating ideas for more floral inspiration.
Sizing Your Roses for Visual Balance

Varying the size of your flowers creates a more organic and professional look. Uniformity can sometimes look too rigid in a bouquet.
Use this guide to determine how much ribbon allows for specific flower sizes. This helps in planning the spatial flow of your arrangement.
| Ribbon Length | Resulting Flower Size | Best Visual Application |
|---|---|---|
| 20 Inches | Small Bud (1 inch) | Fillers between cars |
| 30 Inches | Medium Rose (2 inches) | Standard bouquet bloom |
| 45 Inches | Statement Rose (3 inches) | Central focal point |
Once the rose is complete, glue the base firmly to a floral wire stem. Wrap the connection point with green floral tape for a seamless finish.
When creating faux florals, the imperfection of the petals is what creates realism. Do not pull every fold tight; allow some looseness to mimic nature’s organic flow.
Lia Griffith, Handcrafted Lifestyle Expert
These durable blooms can be placed in various vessels. Consider checking out easy hand painted flower pots for a custom base.
The final result is a lustrous, durable flower that catches the light. It provides a soft backdrop that makes the Hot Wheels colors pop.
Artisan Secrets
- Use a low-temp glue gun to prevent melting delicate satin ribbons while keeping your fingertips safe during the tight bud-rolling phase.
- To achieve maximum realism, slightly vary the tension of your 90-degree folds so no two petals look identical, mimicking nature’s organic growth.
- If the ribbon is too slippery to handle, a light spritz of hairspray can add just enough grip to keep your folds crisp without adding bulk.
The Collector-Safe Method: Mounting Blister Packs Without Glue Damage

Creating a bouquet that looks professional requires respecting the items you are displaying. A true collector values the card condition as much as the car.
Applying hot glue directly to the cardboard backing is a major mistake. The heat warps the paper and tears the graphics when removed, ruining the value.
The most thoughtful gift honors the hobbyist’s passion by preserving the integrity of their collection.
Preservation Pro Tips
- Slide your blister packs into clear plastic protector cases first and apply your adhesive to the case instead of the cardboard backing.
- Thread thin floral wire or clear fishing line through the existing peg hole to anchor the car to your display frame without using any glue at all.
- If you must use adhesive, opt for acid-free, low-tack mounting putty which can be gently rolled off the card without lifting the ink or tearing the paper fibers.
The Protective Case Strategy

The safest method involves an intermediate layer. Purchase clear plastic “clamshell” protectors or soft sleeves designed specifically for die-cast cars.
These cases provide a glossy, rigid surface. You can apply heavy-duty adhesives to this plastic shell without fear of damaging the vintage card underneath.
This technique mimics the care used in top valentines day crafts for adults where presentation is key. It keeps the gift pristine.
Attaching the Skewers
Once encased, flip the protected car over. Apply a generous line of hot glue down the center of the plastic backing. Press a wooden skewer into the glue.
Hold the skewer steady until the glue cools completely. The result is a sturdy “flower” stem that supports the weight of the die-cast metal vehicle.
When mounting collectibles, always use a reversible method. The goal is to display the item, not to alter its physical state permanently.
The Spruce Crafts Staff, The Spruce Crafts
The Collector’s Secret
- Wipe the back of the plastic protector with a small amount of rubbing alcohol before gluing to ensure a permanent, skip-free bond.
- For heavier 1:64 scale premium models, double up your skewers or use a thicker bamboo stake to prevent the stems from bending.
- If your protective case is slightly loose, use a tiny piece of acid-free museum putty inside to keep the car perfectly centered during display.
Alternative Mounting Options

If protective cases are not available, you can use the “tape sandwich” method. This is less secure but works for lighter mainline cars.
Apply a strip of blue painter’s tape to the back of the card. Glue the skewer to the tape, not the cardboard. The tape peels off cleanly later.
For extra stability, similar to the mechanics used in pipe cleaner flowers, wrap the skewer connection point with floral tape.
Adhesive Safety Levels
Understanding which adhesives pose risks to your collectibles is crucial for this project. This breakdown helps you choose the right materials.
| Mounting Material | Hold Strength | Risk to Cardboard | Best Application |
|---|---|---|---|
| Hot Glue (Direct) | High | Severe Damage | Never use directly |
| Protective Case | Very High | None (Zero Contact) | Heavy/Rare Cars |
| Painter’s Tape | Low/Medium | Low Risk | Lightweight Cars |
| Glue Dots | Medium | Medium Risk (Staining) | Temporary Decor |
Always test your mounting strength before assembling the final bouquet. A dropped car can crack the plastic blister, ruining the aesthetic.
Collector’s Pro Tips
- Always perform a ‘shake test’ with your tape sandwich before adding it to the bouquet to ensure the weight of the car doesn’t peel the tape.
- If using glue dots for temporary displays, place a small square of clear tape on the card first to prevent potential oil staining.
- For heavier premium cars, use two skewers taped in a ‘V’ shape to provide extra lateral stability and prevent the car from spinning.
Professional Wrapping: Layering the Arrangement for a Gift-Ready Finish

Transforming a collection of toy cars and ribbon blooms into a cohesive gift relies entirely on the presentation. The wrapping is not just a cover; it is the frame.
A professional wrap elevates the arrangement from a simple craft to a curated design object. It directs the eye to the focal point while hiding the mechanics of the stems.
You want to create a sense of anticipation. The tactile experience of crisp paper contrasting with soft ribbon adds to the overall impact of the gift.
The art of wrapping is about creating a boundary that enhances, rather than hides, the beauty within.
Selecting the right materials is crucial for structural integrity. The paper must be sturdy enough to support the weight of the die-cast cars but flexible enough to fold.
Consider the color palette carefully. Neutral wrapping allows the bright enamel of the Hot Wheels to pop, while monochromatic schemes feel modern and sleek.
Master the Layered Look
- Double-layer your wrapping paper or use high-gsm cardstock to provide structural support for the weight of the die-cast cars.
- Stagger the heights of your paper layers to create a pleated, tiered effect that adds professional depth to the arrangement.
- Use double-sided tape on the final seams to ensure a seamless, high-end finish without visible adhesive.
Selecting Textures for Depth and Contrast

The secret to a florist-quality finish lies in layering different opacities. This technique adds dimension and softens the transition between the handle and the blooms.
Using a mix of materials creates a sophisticated visual flow. It prevents the bouquet from looking flat or one-dimensional.
Here is a guide to pairing materials to enhance the “Hot Wheels” aesthetic without overwhelming the ribbon work.
| Material Type | Texture Profile | Visual Functionality |
|---|---|---|
| Matte Florist Paper | Smooth, opaque, rigid | Provides the main structural backdrop; contrasts with glossy cars. |
| Korean Mesh | Open weave, stiff | Adds airy volume; allows light to pass through to the lower stems. |
| Wax Tissue | Semi-translucent, soft | Buffers the flowers; creates a gentle “cloud” effect around the cars. |
| Cellophane | High gloss, clear | Protects the ribbon from dust; mimics the shine of the car paint. |
When working with these materials, avoid creating sharp creases directly over the flowers. Allow the paper to curve naturally around the arrangement.
This approach is similar to styling Creative Spring Decorating Ideas for the Home Diy Projects where layering textures creates a cozy, lived-in feel.
Packaging is the first thing the recipient sees, and it sets the stage for the gift. It should be as thoughtful as what is inside.
Martha Stewart, MarthaStewart.com
Pro Texture Play
- Start with your most opaque material as the structural base then layer semi-translucent wax tissue to bridge the gap between rigid paper and soft blooms.
- Pinch the paper at the base instead of folding it to maintain soft organic curves that echo the aerodynamic lines of the cars.
- Use a pop of Korean mesh near the focal point to add instant airy volume without hiding the intricate details of your ribbon work.
The Pleating Technique for Volume

To achieve that expansive, fan-like shape seen in professional boutiques, you must master the pleat. This prevents the paper from bunching awkwardly at the handle.
Proper pleating creates a cone shape that widens at the top. This spatial flow ensures the Hot Wheels are framed by negative space rather than suffocated by paper.
Follow these steps to secure the layers effectively:
- Create the Backboard: Place two sheets of matte paper slightly offset from each other behind the bouquet to establish height and width.
- The Side Hug: Take two smaller half-sheets. Pleat the bottom corner and place them on the left and right sides to cover the stems.
- Front Apron: Use a sheet of tissue or mesh cut lower than the back layers. Place this in front to cover the binding point without hiding the cars.
- Bind Tightly: Secure the paper layers at the handle with waterproof tape. Ensure it is tight enough to prevent slipping but loose enough to avoid crushing stems.
This method ensures the arrangement looks full and generous. It mimics the style often used in Cute Wedding Ideas for Guests Party Favors: Top Picks for a polished look.
Finally, tie the handle with a satin ribbon that complements the color of the cars. A long, trailing tail adds a touch of elegance and movement to the rigid structure.
The Volume Vault
- Use a handheld stapler at the base of each pleat before binding to keep the fan shape perfectly symmetrical and prevent layers from shifting.
- Gently run your fingernail or a bone folder along the edge of each fold to create sharp, professional lines that mimic boutique-quality gift wrap.
- Leave a small gap between the car packaging and the paper to create negative space, ensuring the volume frames the gift rather than hiding it.
The Finish Line: Gifting in High Gear
Crafting a Hot Wheels bouquet blends the nostalgia of die-cast cars with the elegance of floral design. It is a gift that truly stands out from the crowd.
Remember, the secret lies in the foundation. Strong bamboo skewers and dense floral foam ensure your arrangement stays upright and proud.
Finish with high-quality Korean wrapping paper for that professional, voluminous look. The matte texture elevates the entire presentation.
Now that you have the mechanics down, it is time to create. Build a memory that revs up their heart and lasts a lifetime.
Pit Stop: Design Dilemmas Solved
Avoid hot glue directly on the metal. Tape the skewers to the back of the card packaging or use a clear plastic blister casing to hold the car firmly.
Hot Wheels are heavy. Ensure your floral foam is anchored in a weighted base or vase to counterbalance the density of the die-cast metal.
We do not recommend it. Tissue paper collapses under weight and tears easily. Korean paper offers the structural stiffness needed for this design.
Styrofoam blocks are a viable alternative. Avoid wet floral foam, as it crumbles easily when pierced by thick, heavy-duty bamboo skewers.
