Table of Contents
- The Wire-Wrap Method: A Glue-Free Foundation for Hot Climates
- The Convertible Grapevine: Transitioning from Spring Tulips to Summer Sunflowers
- The Zip-Tie Farmhouse Loop: Sturdy Lemon and Lamb’s Ear Design
- The Weather-Sealed Finish: Protecting Faux Florals from UV Damage
- Lasting Beauty for Your Entryway
- Design & Crafting Inquiries
Creating a welcoming entrance is about more than just a clean mat; it is about setting a mood that begins at the threshold. A seasonal wreath offers the perfect opportunity to blend sophisticated design with approachable creativity.
By selecting the right textures and colors, you can transform a plain door into a curated focal point that reflects your personal style.
Choosing the right materials is essential for a wreath that looks high-end without the designer price tag. Focus on realistic faux florals and sturdy grapevine bases to ensure your creation lasts throughout the warmer months.
Balance and scale are the secrets to professional results; remember to step back and assess your work from a distance as you build each layer.
Whether you are a seasoned DIY enthusiast or a newcomer to home styling, this project is designed to be both rewarding and stress-free.
With a few budget-friendly supplies and a thoughtful approach, you can craft a stunning piece that elevates your curb appeal. Let us explore the simple steps to making a wreath that feels as beautiful as it looks.
The Wire-Wrap Method: A Glue-Free Foundation for Hot Climates

Summer heat can be disastrous for standard adhesive methods. Hot glue tends to soften and lose its grip when exposed to direct sunlight for hours.
The wire-wrap technique offers a durable alternative. This method ensures your arrangement remains secure regardless of rising temperatures.
It also allows for an organic flow. You can adjust the angle of your stems to create a natural and curated vignette that feels effortless.
True design resilience lies in the mechanics. A beautiful wreath must be as structural as it is stylish.
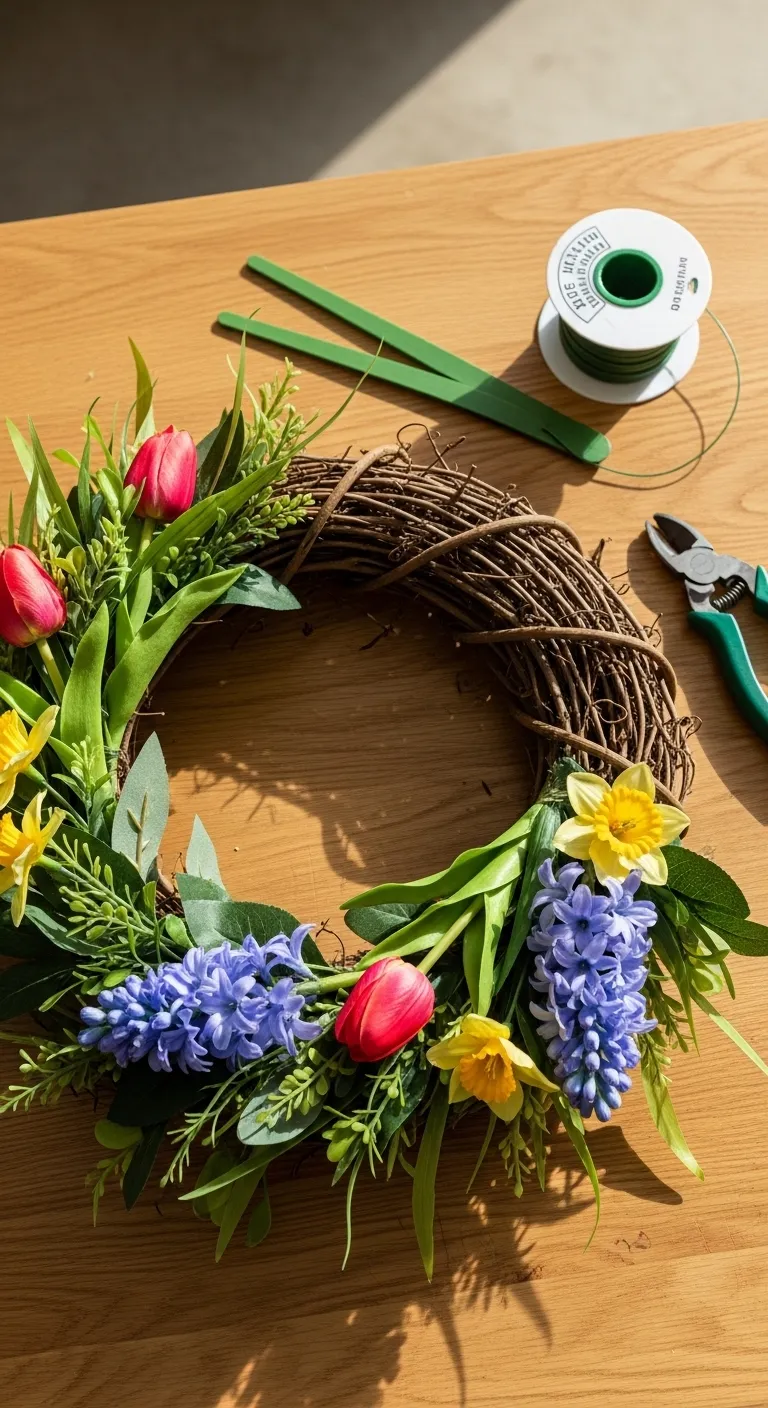
Gathering Your Structural Materials

Success begins with the right gauge of wire. A 22-gauge floral paddle wire provides the perfect balance of flexibility and strength.
You will also need heavy-duty wire cutters. Using standard scissors for this task will ruin the blades instantly, so invest in proper tools.
Select a grapevine form for the best grip. The twisted branches offer natural crevices that hold the wire securely in place without slipping.
Choosing durable mechanics is essential when considering front door ideas to instantly boost your home’s curb appeal this season.
The Wrapping Technique

Secure the end of your wire to the frame first. Twist it tightly around a thick branch of the grapevine to create a solid anchor point.
Layer your greenery bundles one by one. Place a bundle on the frame and wrap the wire around the stems three times, pulling very tight.
Do not cut the wire between bundles. Keep the spool continuous to create a single, unbreakable line of tension throughout the entire design.
Overlap the stems to hide the mechanics. The foliage of the new bundle should cover the wire wrapping of the previous one for a seamless finish.
When making a wreath, I prefer using floral wire over hot glue. It withstands the elements better and allows you to reuse the wreath form.
Stephanie Rose, Garden Therapy
Comparing Attachment Methods
Choosing the right attachment method changes the longevity of your decor. This comparison highlights why wire is superior for outdoor use.
| Feature | Wire-Wrap Method | Hot Glue Method |
|---|---|---|
| Heat Resistance | Extreme (Unaffected by sun) | Low (Melts above 90°F) |
| Adjustability | High (Untwist to move) | None (Permanent bond) |
| Sustainability | High (Base is reusable) | Low (Residue damages base) |
| Skill Level | Intermediate | Beginner |
This approach protects your investment. High-quality faux stems are expensive, and wiring them allows you to repurpose them in future seasons.
The texture remains visually light. Unlike glue clumps, wire disappears into the design, maintaining the airy aesthetic of creative spring decorating ideas.
The Structural Secret
- Maintain constant tension by keeping the wire spool in your dominant hand and pulling toward your body with every revolution; a loose wire is the most common cause of sagging stems over time.
- Leave a four-inch ‘tail’ of wire when creating your starting anchor. Once the wreath is finished, twist this tail together with your final wire end to create a double-secure, professional-grade knot.
- If working with particularly slick or heavy plastic stems, wrap the base of the stem in floral tape before wiring; the tacky texture provides extra ‘bite’ that prevents the stem from sliding out of the wrap.
The Convertible Grapevine: Transitioning from Spring Tulips to Summer Sunflowers

One of the smartest design hacks for seasonal decor is the convertible wreath. It saves storage space and reduces waste.
Instead of buying two separate wreaths, we utilize a sturdy grapevine base. This organic material offers a timeless, rustic texture.
The secret lies in the attachment method. We avoid permanent hot glue on the base itself to allow for seamless transitions.
Design is about versatility; a good base layer allows your home to evolve with the seasons effortlessly.
The Wire-Wrap Technique

To make your wreath convertible, you must use green floral wire or paddle wire. This ensures your focal point flowers are secure but removable.
Cut your stem lengths to about four inches. Nest the stem into the grapevine gaps, then wrap the wire tightly around a thick branch.
This method preserves the integrity of the wreath. You can incorporate creative spring decorating ideas without damaging the frame.
I love to use a grapevine wreath as a base because it is so easy to stick stems into and change them out for the seasons.
Liz Marie Galvan, Liz Marie Blog
Styling for Spring: The Tulip Vignette
For the initial spring setup, focus on a palette of soft pastels and fresh greens. Tulips or peonies work beautifully here.
Group your blooms in clusters of three for a balanced look. This creates a curated visual flow that feels natural rather than rigid.
Add a satin or velvet ribbon in a pale blue or blush pink. The soft fabric contrasts elegantly against the rough wood finish.
The Summer Switch: Sunflowers and Burlap

As the weather warms, simply untwist the wire to remove the delicate spring blooms. The transition takes less than ten minutes.
Insert large-scale sunflowers or hydrangeas for the summer iteration. These bold choices serve as a strong statement piece.
Swap the satin ribbon for burlap or raw linen. This adds an earthy element that helps boost your home’s curb appeal instantly.
Seasonal Swap Materials Checklist
Keep these items in a small designated kit to make the transition effortless between seasons.
- High-Quality Grapevine Base: Buy once, use forever. Look for tight weaves.
- Paddle Wire (22-Gauge): Strong enough to hold heavy summer blooms but flexible.
- Wire Cutters: Essential for trimming faux flower stems cleanly.
- Ribbon Variety: Keep one pastel spool for spring and one neutral jute for summer.
- Seasonal Foliage: Lamb’s ear works for spring; eucalyptus creates a dry summer look.
By using this method, you maintain a high-end aesthetic while staying budget-conscious. The grapevine base only gets better with age.
The Seasonal Swap Secret
- Layer a permanent base of neutral greenery, like eucalyptus or lamb’s ear, so you only have to swap out the focal flowers when the season changes.
- Use small, clear zip ties instead of wire for a faster, more secure hold that remains invisible among the grapevine branches.
- Save your retired seasonal stems in breathable fabric bags to prevent dust buildup and crushing while they wait for their next rotation.
The Zip-Tie Farmhouse Loop: Sturdy Lemon and Lamb’s Ear Design

For a look that perfectly bridges the gap between seasons, the farmhouse aesthetic is timeless. This specific design uses the contrast of bright citrus against soft textures.
The combination of zesty yellow lemons and the fuzzy, silver-green hue of lamb’s ear creates a sophisticated palette. It feels organic and incredibly welcoming.
This project prioritizes durability. Instead of relying solely on floral wire, we utilize zip ties to secure heavier elements. This ensures your farmhouse decor withstands summer storms.
Design is not just about how it looks, but how it holds up to real life. A sturdy wreath is a welcoming handshake that lasts all season.
Gathering Your Farmhouse Materials

The success of this wreath relies on the quality of your faux botanicals. Look for lemons with a waxy, realistic finish rather than shiny plastic options.
For the greenery, flocked lamb’s ear adds a tactile softness that mimics the real plant. The velvety texture softens the rough, woody look of the grapevine base.
- Grapevine Base: Choose an 18-inch frame for standard doors to maintain proper scale.
- Clear Zip Ties: Small, 4-inch cable ties are the secret weapon for invisible security.
- Faux Lemons: Select weighted foam fruit that won’t dent easily in outdoor weather.
- Wired Ribbon: A black and white buffalo check or neutral burlap adds a final rustic touch.
The Zip-Tie Technique for High Winds
Many DIY enthusiasts rely on hot glue, but high summer temperatures can cause glue to soften and fail. Zip ties provide a permanent mechanical bond.
Start by identifying the “heavy” side of your grapevine base. This is where you will anchor the focal point. Place your greenery stems first to create a bed.
Thread a zip tie through the thickest part of the grapevine and around the main stem of the lamb’s ear. Pull it tight until the greenery is immovable.
Once the greenery is lush, nestle the lemons into the leaves. Use a longer zip tie or floral wire wrapped around the fruit stem to anchor it deep into the vines.
When selecting a wreath, size matters. A good rule of thumb is to leave at least 6 inches of space on each side of the wreath for a balanced look.
Editorial Team, Better Homes & Gardens
Finishing the Look
Step back and assess the spatial flow. The lemons should look like they are naturally growing out of the greenery, not just sitting on top.
If your front door receives direct sunlight, this design is ideal. The fade-resistant properties of quality faux fruit outlast dried flowers.
Consider the color of your entry. This bright yellow arrangement pops beautifully against dark hues, much like trending modern exterior colors such as charcoal or navy.
Pro-Crafting Secrets
- Hide your hardware by rotating the zip-tie heads into the grapevine gaps and snipping the excess tails flush with wire cutters for a professional finish.
- For extra security in extreme winds, apply a small dab of weather-resistant adhesive to the stems before tightening your zip ties for a permanent bond.
- Apply a UV-resistant clear floral spray to your faux lemons and lamb’s ear to prevent sun-bleaching and keep colors vibrant all season long.
The Weather-Sealed Finish: Protecting Faux Florals from UV Damage

You have curated a stunning arrangement of silk peonies and faux eucalyptus. Now, you must ensure that vibrant palette withstands the harsh sun. Without protection, lush greens will turn blue-grey.
A weather-sealed finish preserves the visual flow of your entry for seasons to come. It acts as a shield against the elements, keeping the fabric crisp and the colors true to their original hue.
Preserving your decor is just as important as creating it; a sealed wreath is a lasting welcome.
Choosing the Right Matte Sealant

The finish of your spray is critical for maintaining an organic look. Avoid glossy lacquers, as they make faux florals look undeniably plastic and cheap under direct porch lighting.
Opt for a clear, matte UV-resistant acrylic coating. This maintains the dry, natural texture of linen or silk petals. It ensures your wreath complements modern exterior colors that wow rather than clashing with them.
The Application Process
Proper application prevents the colors from bleeding or the fabric from stiffening. Set up a workspace in a well-ventilated area, preferably outdoors on a drop cloth to catch overspray.
Hold the can 12 inches away from the wreath. Apply the sealant in short, sweeping bursts rather than a heavy stream. This technique mimics the delicate nature of chic easy backyard landscaping designs.
Let the first coat dry completely for 15 minutes. Apply two more light coats, rotating the wreath to reach the underside of the leaves. This ensures total coverage and maximum durability.
If you plan to hang your wreath outdoors, give it a coat of UV-resistant clear acrylic spray sealer. This will help prevent the colors from fading in the sun.
The Spruce, How to Protect Wreaths Outdoors
Seasonal Maintenance Routine
Even with a high-quality sealant, outdoor elements can accumulate on your decor. Follow this simple cleaning routine to keep your entry looking fresh and inviting.
- Weekly Dusting: Use a feather duster to gently remove surface pollen and street dust that settles on the petals.
- Monthly Spot Check: Inspect the wreath for any loose stems or fading areas that might need a touch-up of glue or spray.
- Storm Protection: Bring the wreath inside during severe heavy rain or high winds to prevent physical damage to the frame.
- Storage Prep: Before storing it away, wipe leaves with a microfiber cloth to ensure no moisture is trapped in the box.
By taking these extra steps, you extend the life of your creation significantly. A well-maintained wreath ensures your front door remains a focal point of warmth and style year-round.
Curator’s Longevity Secret
- Perform a spot test on a single petal or leaf before coating the entire arrangement to ensure the sealant doesn’t alter the fabric’s hue.
- Remember to treat the undersides of leaves and deep within clusters of petals, as sunlight reflects off porch surfaces and can cause uneven fading.
- For wreaths in high-exposure areas, reapply a single light coat of UV sealant every six months to maintain a robust barrier against color degradation.
Lasting Beauty for Your Entryway
Crafting a wire-wrapped wreath ensures your front door welcomes guests beautifully, even in the sweltering summer heat. No melting glue, just style.
By choosing a grapevine base and quality faux stems, you create a piece that looks organic and effortless. It is a timeless addition to your porch.
Enjoy the process of layering greenery to boost your curb appeal. Your handmade creation is ready to withstand the season with sophisticated charm.
Design & Crafting Inquiries
Store your wreath in a cool, dry place. Hang it on a hook or use a dedicated wreath storage bag to prevent the faux foliage from getting crushed.
Fresh flowers wilt quickly in heat. For a season-long display, stick to high-quality silk or dried florals. Use fresh blooms only for one-day events.
Paddle wire provides the best tension. In a pinch, heavy-duty zip ties work, provided you camouflage them well within the grapevine layers.
Dust accumulates over time. Use a hairdryer on the ‘cool’ setting to blow away debris, or gently wipe the leaves with a damp microfiber cloth.
