Table of Contents
- Upcycled & Eco-Chic Galentine’s Party Decor: A Budget-Friendly Guide
- Creative Heart Banners from Fabric Scraps and Old Magazines
- Charming Centerpieces from Repurposed Jars and Bottles
- DIY Table Accents: Coasters and Place Cards from Cardboard & Printables
- Glitter Accents & Color Pops with Saved Packaging Materials
- Crafting Memories, Not Just Decor
- Your Crafting Queries, Answered
Galentine’s Day is the perfect occasion to celebrate the incredible women in your life.
It is an opportunity to create a space that radiates warmth, friendship, and impeccable style.
This guide is dedicated to transforming your home into a chic sanctuary for your celebration, proving that heartfelt gatherings can also be beautifully designed.
Elevating your party decor does not require an extravagant budget or professional help.
Instead, we turn to the art of do-it-yourself crafts that infuse your space with a personal, sophisticated touch.
These projects are about making simple, impactful statements that feel both custom and curated without complicated steps.
Within these ideas, you will discover easy crafts that turn simple materials into stunning decorations.
We will guide you through each step, ensuring you can create a memorable and stylish atmosphere with complete confidence.
Get ready to craft a celebration that looks as wonderful as the friendships it honors.
Upcycled & Eco-Chic Galentine’s Party Decor: A Budget-Friendly Guide

Creating a beautiful party atmosphere doesn’t require a large budget. It requires a bit of creativity and a look at what you already own.
Upcycling everyday items infuses your decor with personality and charm. This eco-chic approach is both sustainable and uniquely stylish.
From Pantry to Party: Upcycled Glass Votives

Empty jam jars, pasta sauce containers, and wine bottles are blank canvases. A thin coat of chalk paint in soft pinks or whites creates a matte finish.
This texture instantly elevates the simple glass. For functionality, group them together to form charming DIY centerpieces for single stems or tea lights.
The warm, ambient glow from votives inside these painted jars will give your space an intimate and cozy feeling, perfect for heartfelt conversations.
No-Sew Fabric Scrap Garlands

Transform leftover fabric into a statement piece. Simply tear or cut strips of material and tie them onto a length of twine or ribbon.
The key is to vary the textures to create visual interest. This is a perfect way to add a soft, tactile element to your party’s spatial flow.
Drape your creation over a doorway, along a mantel, or as a backdrop for a photo booth. Consider these fabrics for a rich, curated look:
- Linen: For an organic, airy feel.
- Velvet: Adds a touch of luxe depth.
- Cotton Prints: Introduces a playful pattern.
Embracing imperfections in your handmade decor is what gives your space its unique soul and story.
Good design is sustainable design.
Ambra Medda, Vogue
Vintage Paper Heart Confetti & Decor

Old book pages, maps, or sheet music can find new life as romantic decor. The aged paper adds a soft, nostalgic quality no new material can replicate.
Use a heart-shaped punch or scissors to create delicate confetti for your table. You can also string them together for a lightweight, whimsical garland.
These personal touches help build an inviting atmosphere. You can find more inspiration in the details used for cozy farmhouse Valentine decor.
| Material | Aesthetic Feel | Ideal Use |
|---|---|---|
| Vintage Book Pages | Literary, Romantic | Table Scatter, Place Cards |
| Sheet Music | Melodic, Classic | Garlands, Votive Wraps |
| Kraft Paper | Rustic, Minimalist | Gift Tags, Banners |
Eco-Chic Hacks
- Transform empty glass jars (from jam, pasta sauce) into charming votives or small vases by applying a thin coat of chalk paint for a matte, elevated look.
- Create no-sew garlands by simply tearing or cutting fabric scraps into strips and tying them onto twine, varying textures for visual interest.
- Repurpose old book pages, maps, or sheet music by using a heart-shaped punch to make unique confetti or string them together for a whimsical garland.
Creative Heart Banners from Fabric Scraps and Old Magazines

Transform leftover materials into a statement piece. A handmade heart banner adds texture, color, and a deeply personal touch to your celebration space.
This craft is not only budget-friendly but also sustainable. It breathes new life into items you already own, creating decor with a unique story and charm.
Textured Fabric Heart Banners

Rummage through your sewing kit for fabric remnants. Cottons, velvets, and linens create a wonderfully tactile and cozy atmosphere when strung together.
Mixing patterns and solids adds visual depth. Consider a palette of soft pinks, deep reds, and creamy whites for a classic, romantic feel.
This type of decor improves more than just aesthetics. The soft fabric helps absorb sound, making conversations feel more intimate and cozy in the room.
- Create a Template: Cut a simple heart shape out of cardboard to your desired size. This ensures all your fabric hearts are uniform.
- Trace and Cut: Use the template to trace hearts onto your fabric scraps. Cut out two identical shapes for each heart you plan to make.
- Sew and Stuff: Place two heart shapes together, right sides facing out. Hand-sew around the edges, leaving a small opening for stuffing.
- Add Filling: Gently push cotton batting or more tiny fabric scraps inside to give the heart a plush, three-dimensional form before sewing it closed.
- String Together: Use a needle to thread a piece of jute twine or satin ribbon through the top of each heart, spacing them evenly.
Graphic Magazine Page Banners

Old magazines offer a limitless supply of colors, patterns, and text. Create a modern, graphic banner that acts as a unique focal point for your party.
Look for pages with interesting typography or solid blocks of color. This method allows you to curate a specific color palette that matches your party’s theme.
These banners add a sleek, contemporary touch. Their glossy finish can catch the light, adding a subtle shimmer and energy to your decor, much like art in vintage living room decor ideas.
There’s an inherent soulfulness in objects that have had a life before. When you bring them into your home, you are bringing that story and that history with you.
Robin Standefer, Architectural Digest
For this version, you simply cut single heart shapes from the pages. Use a hole punch at the top of each heart to easily thread them onto your string.
Handmade decor doesn’t just fill a space; it fills it with your story.
Creative Craft Hacks
- Infuse Scent & Texture: For a multi-sensory experience, add a few drops of essential oil to your fabric heart stuffing. Mix various fabric textures like velvet, lace, and cotton for an even richer, more inviting feel.
- Curate Your Palette: Don’t just cut randomly! Look for magazine pages with specific color schemes, interesting typography, or subtle imagery that complements your event’s theme for a truly cohesive banner.
- Beyond the Banner: Once the celebration is over, repurpose individual fabric hearts as sachets or decorative bowl fillers. Magazine hearts can become unique gift tags or scrapbooking elements, extending their charm.
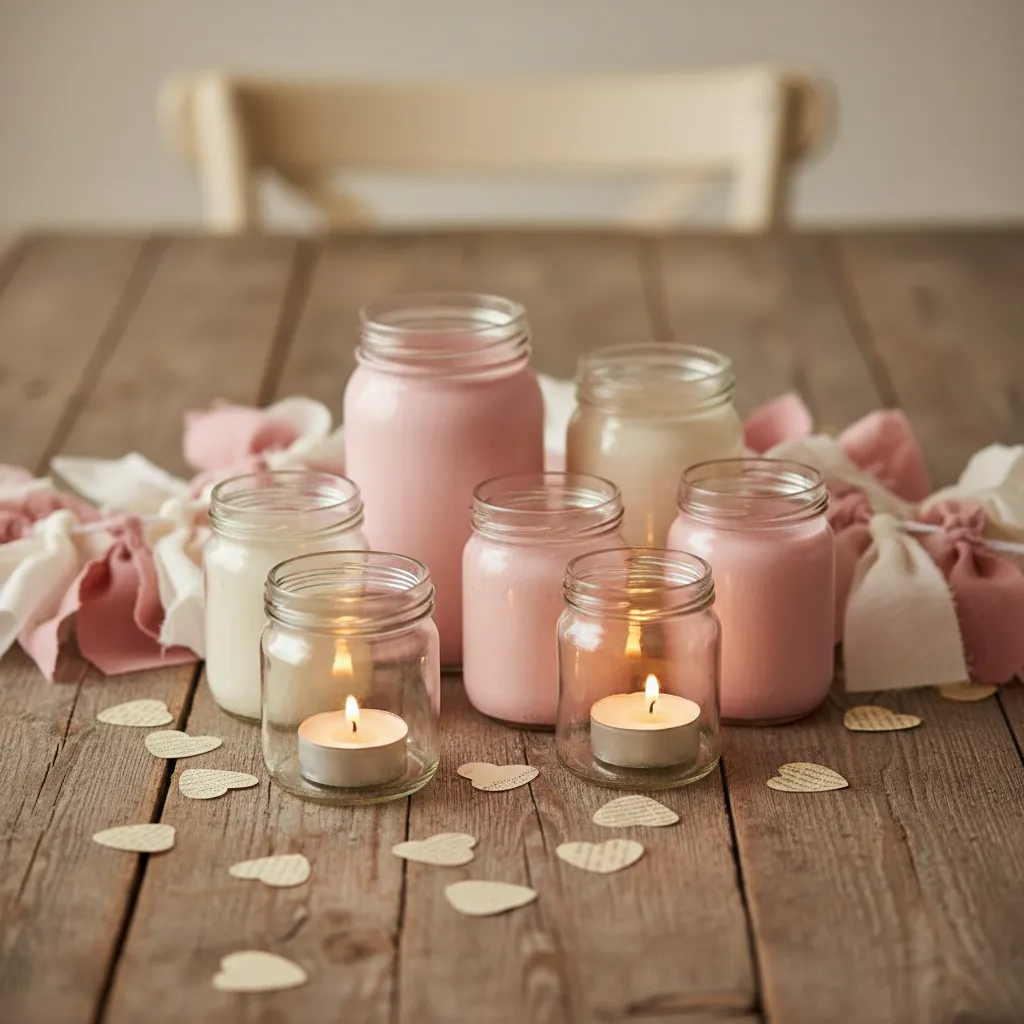
Charming Centerpieces from Repurposed Jars and Bottles

Transform everyday glass jars and bottles into a stunning focal point for your Galentine’s table. This craft is budget-friendly and adds a personal, curated touch to your decor.
By grouping vessels of varying heights and shapes, you create a dynamic and visually interesting arrangement. The smooth glass provides a perfect canvas for your creative vision.
From Pantry to Palette: Painting Techniques

The simplest way to elevate a glass jar is with paint. The finish you choose will define the atmosphere, from rustic to glam. A few thin coats are better than one thick one.
For a soft, velvety texture, chalk paint is an excellent choice. It adheres well to glass and gives a matte, farmhouse-inspired finish perfect for a cozy vibe.
If you desire a sleek, modern look, opt for a metallic spray paint in gold, rose gold, or copper. This finish catches the light beautifully, adding a touch of sophistication.
Adding Texture and Embellishments

Beyond paint, texture adds warmth and depth to your centerpieces. These tactile details make the arrangement feel more thoughtful and complete. It’s a key step for many
DIY centerpieces
.
Giving a simple object a new purpose is the heart of creative and sustainable design.
Consider these simple additions for a high-impact look:
- Jute Twine: Wrap twine around the middle or neck for a rustic, organic feel.
- Lace Ribbon: A delicate band of lace adds a vintage, romantic touch.
- Glitter: Apply glue and sprinkle fine glitter on the bottom third for a glamorous ombré effect.
- Washi Tape: Create patterns with colorful washi tape for a fun, playful design.
Creating an Ambient Glow with Light

Your repurposed jars aren’t just for flowers. They can become beautiful lanterns that cast a warm, inviting glow, enhancing the cozy atmosphere of your gathering.
Simply place a small tea light inside shorter jars or fill taller bottles with delicate, battery-operated fairy lights. The light will reflect off the glass, creating a soft, ambient sparkle.
I also love to use vintage and second-hand items… they add so much soul and character to a space and are a more sustainable choice too!
Niki Brantmark, The Nordique
This technique is especially effective as evening falls. The gentle flicker provides just enough light for intimate conversation and makes the entire tablescape feel magical.
Crafting Wisdom
- Group jars and bottles of varying heights and shapes to create a dynamic and visually interesting centerpiece arrangement.
- When painting, apply several thin coats instead of one thick layer to achieve a smoother, more professional-looking finish on your glass vessels.
- Transform your jars into enchanting lanterns by placing small tea lights inside or filling taller bottles with delicate battery-operated fairy lights for an ambient glow.
DIY Table Accents: Coasters and Place Cards from Cardboard & Printables

Personal touches transform a simple gathering into a memorable event. DIY table accents make each guest feel truly seen and celebrated, setting a curated tone for the entire party.
Using inexpensive materials like cardboard and digital printables, you can create a cohesive and high-end look. This approach adds a layer of texture and intention to your tablescape.
Crafting Your Custom Coasters

Protect your surfaces with style. Upcycled cardboard from shipping boxes provides a sturdy and sustainable base for chic, personalized coasters that match your party’s palette.
The key is a clean cut and a beautiful top layer. This simple craft is not only functional but also serves as a small piece of decor at each place setting.
Here’s what you’ll need:
- Sturdy cardboard (shipping boxes are perfect)
- Decorative paper or high-quality printables
- A craft knife or sharp scissors
- A pencil and a round object for tracing (like a glass)
- Mod Podge or a similar clear sealant
- A small foam brush
Trace and cut your circles or squares from the cardboard. Glue your decorative paper on top, smoothing out any bubbles. Finish with a thin coat of sealant to make them water-resistant.
Designing Elegant Place Cards

A simple place card guides guests to their seats and adds a touch of formal elegance. It shows thoughtful planning and makes everyone feel included in the celebration’s design.
Use cardstock that complements your color scheme. You can find beautiful, free printable templates online or design your own with fun fonts and minimalist heart icons.
The more personalized you can make it, the more your guests will appreciate it. Think about the details, the lighting, and the sounds. You want to make them feel special from the minute they arrive.
Mindy Weiss, Brides
For a cohesive aesthetic, coordinate the design of your place cards with other paper elements. This creates a professional and curated feel, similar to high-end event styling.
This attention to detail can echo the charm found in cozy farmhouse Valentine decor, where personal touches create an inviting atmosphere.
The best decor is born from creativity, not cost. Simple materials can create the most heartfelt and beautiful spaces.
Tabletop Transformation Tips
- Repurpose sturdy shipping box cardboard for durable coaster bases, ensuring clean, precise cuts for a professional finish.
- Always seal your DIY coasters with a clear sealant like Mod Podge to make them water-resistant and extend their life.
- Design your place cards to visually coordinate with your coasters and overall table theme (e.g., matching fonts or color schemes) for a cohesive and high-end look.
Glitter Accents & Color Pops with Saved Packaging Materials

Transform everyday trash into treasured decor. Upcycling saved packaging is a budget-friendly way to create custom pieces with a personal touch.
This approach not only saves money but also adds a unique, handcrafted feel to your celebration. It’s about seeing the potential in simple objects.
Transforming Jars into Sparkling Centerpieces

Empty glass jars from pasta sauce or jam can become dazzling focal points. A coat of glitter catches the light beautifully, creating a warm, ambient glow.
These repurposed vessels are perfect for holding flowers, candles, or even cutlery. Their sparkle adds a layer of festive texture to your tablescape.
Upcycling is about seeing the potential in an object that is beyond its original purpose.
Max McMurdo, House Beautiful UK
To create your own, you only need a few simple supplies. Gather your materials before you begin for a smooth and enjoyable crafting session.
- Clean, empty glass jars or bottles
- Craft glue or decoupage medium
- A foam brush for application
- Your choice of fine or chunky glitter
- Sealant spray (optional, to prevent shedding)
Simply apply a thin, even coat of glue to the jar’s exterior. Roll it in glitter until fully coated, then let it dry completely before using.
Creating a Geometric Color Pop Garland

Small cardboard boxes, like those from tea or cosmetics, are ideal for a modern garland. Cut them into geometric shapes like triangles, circles, or hearts.
Paint the shapes using a curated color palette. Think dusty rose, deep magenta, and a pop of metallic gold for a sophisticated and cohesive look.
A curated color palette is the secret to making simple, handmade decorations feel intentional and chic.
Once dry, punch a small hole in each shape and thread them onto twine or ribbon. This simple craft creates a high-impact statement piece.
Functionally, a garland improves spatial flow. Use it to frame a doorway, decorate a mantel, or create a festive backdrop for a photo booth area. Choosing the right
paint colors
will set the perfect mood.
Pro Decor Hacks
- Prevent glitter shedding by applying a clear sealant spray after your jars are fully dry. For extra sparkle, apply a base coat of fine glitter before adding chunkier flakes.
- Always ensure your upcycled materials (jars, boxes) are thoroughly clean and bone-dry before applying any glue or paint for optimal adhesion and a flawless finish.
- For smooth, vibrant color on cardboard shapes, use multiple thin coats of acrylic or spray paint rather than one thick layer. Let each coat dry fully before the next.
Crafting Memories, Not Just Decor
Your Galentine’s celebration is about connection. These DIY ideas help you create a setting that’s as unique and wonderful as your friendships.
By upcycling simple items, you infuse your space with personal charm and sustainable style. It proves that thoughtful design isn’t about expense.
Embrace the handmade process. The true beauty of your decor lies in the love and creativity you poured into it, making the day unforgettable.
Your Crafting Queries, Answered
Look to your closet! Old t-shirts, scarves, or even thrifted linens work wonderfully. Varying the textures is key to a beautiful result.
For a clean finish, make sure the jars are completely clean and dry before painting. Tying twine or a silk ribbon around the rim adds a chic touch.
Absolutely. Colorful scrapbook paper, old wrapping paper, or even magazine pages can create a more modern and vibrant aesthetic.
Use small, removable adhesive hooks or decorative washi tape. They provide enough hold for lightweight garlands and are easy to remove post-party.
