Is your porch looking a little too plain as the autumn leaves begin to fall? Are you looking to add a touch of spooky charm to your home without the high price of store-bought decorations? You’re in the right place to change that.
A DIY sign shouldn’t just be a piece of wood with words; it should be the opening line to your home’s seasonal story, a fun welcome for guests and trick-or-treaters, and a creative project that captures the spirit of the season.
This is your creative playbook for transforming simple materials into signage that’s not only impressive and atmospheric but feels deeply, personally you.
We’ll explore charming designs, decode the secrets of a professional finish, and walk through the practical steps to bring your vision to life.
By the end, you’ll see a plain piece of cardboard not as recycling, but as a spooky welcome waiting to happen.
Before You Begin: The Sign-Maker’s Mindset
The most impressive signs start with a clear purpose, not just a splash of paint. Before you begin, let’s lay the groundwork for a design that is clever, cohesive, and easy to create. The goal is to set a mood, not just fill a space.
The Secrets of Style: Simple Rules for a Stunning Sign
“DIY sign” doesn’t have to mean “messy and amateur.” These simple secrets are what elevate a simple craft into a professional-looking piece of decor.
- Legibility is Everything: A sign’s number one job is to be read. Choose clear, bold fonts and high-contrast color combinations (like white on black, or black on orange). A spooky, dripping font is fun, but if no one can read it from the sidewalk, it loses its impact.
- Weatherproofing is Non-Negotiable: For any sign that will live outdoors, this is a crucial step. A few coats of a matte or satin clear spray sealant will protect your hard work from rain and morning dew, ensuring it lasts the whole season.
- The Power of Aging: Want to make a brand-new piece of wood look like it’s been hanging on a haunted barn for a century? Lightly sand the painted surface, especially the edges, and then wipe on a thin layer of dark brown craft paint or wood stain, immediately wiping most of it off with a rag.
- Lighting is Your Secret Weapon: A simple, well-placed spotlight can make even the most basic sign look dramatic and eerie at night. An uplight from below casts spooky shadows, while a light from above creates a classic, welcoming glow.
What’s the Real Cost? A No-Fuss Budget Breakdown
| The Approach | Estimated Cost | What Your Money Buys | The Little Extras (Don’t Skip These!) |
| The Cardboard Creator | $0 – $15 | • Using recycled cardboard boxes • Sticks and twine from the yard • Craft paint you already own | • A good box cutter or craft knife • A black permanent marker • A hot glue gun |
| The Craft Store Artist | $20 – $50 | • Pre-cut wood sign blanks • A set of acrylic craft paints • Letter stencils for perfect text | • Sandpaper (medium & fine grit) • A can of clear spray sealant • Jute rope or rustic wire for hanging |
| The Woodworking Pro | $50 – $100+ | • Large planks of new or reclaimed wood • A vinyl cutting machine (like a Cricut) for stencils • High-quality exterior paint | • A power sander • Wood stain & conditioner • Sturdy hooks & chains for hanging |
The Design Menu: Finding Your Signature Spooky Style
Here are the ingredients for your perfect DIY Halloween sign. Each one comes with a breakdown to help you choose with confidence.
Welcoming & Whimsical
1. “Welcome, Foolish Mortals”
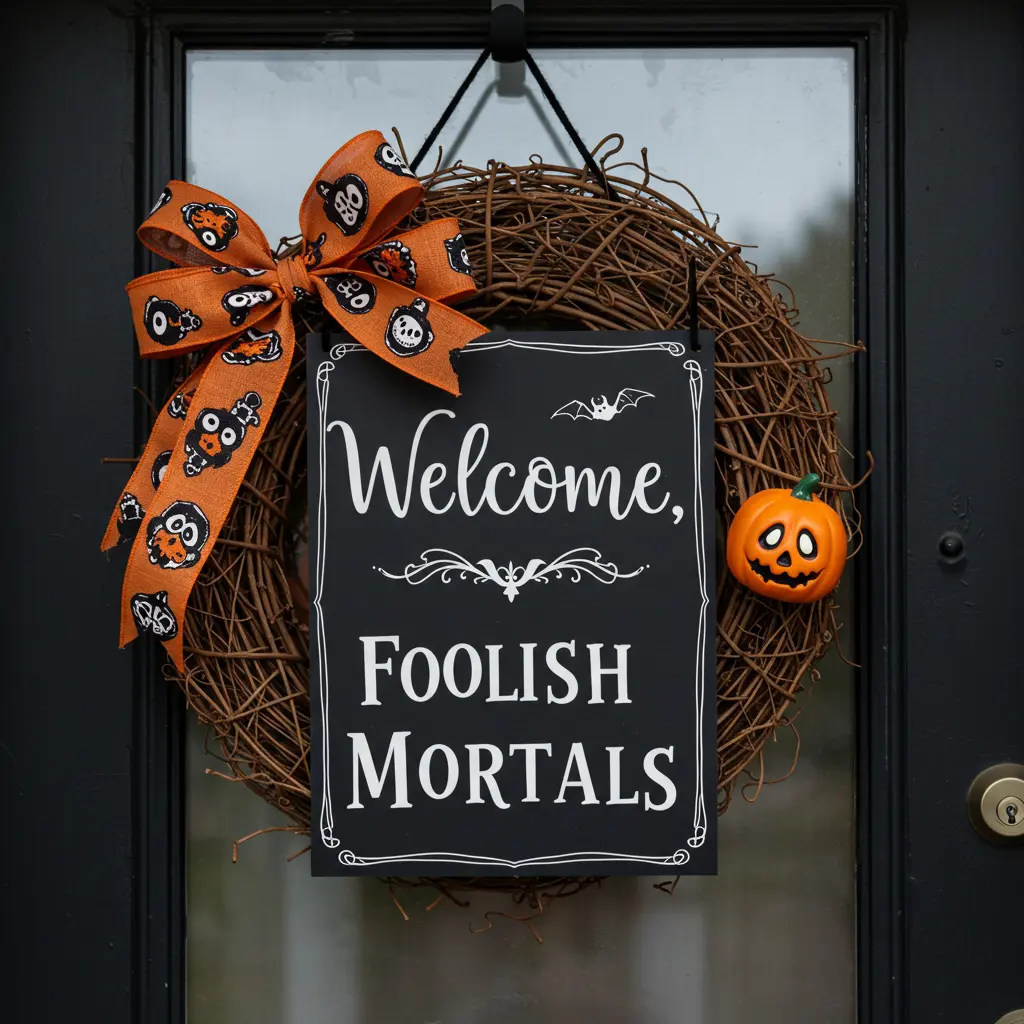
- Best For: A classic, playful greeting for your front door or entryway.
- Pro-Tip: Use a mix of a spooky, elegant cursive font for “Welcome” and a creepy, blocky font for “Foolish Mortals” to create visual contrast.
- Styling Cue: Hang this on your front door in place of a traditional wreath.
2. “Pumpkin Patch This Way”
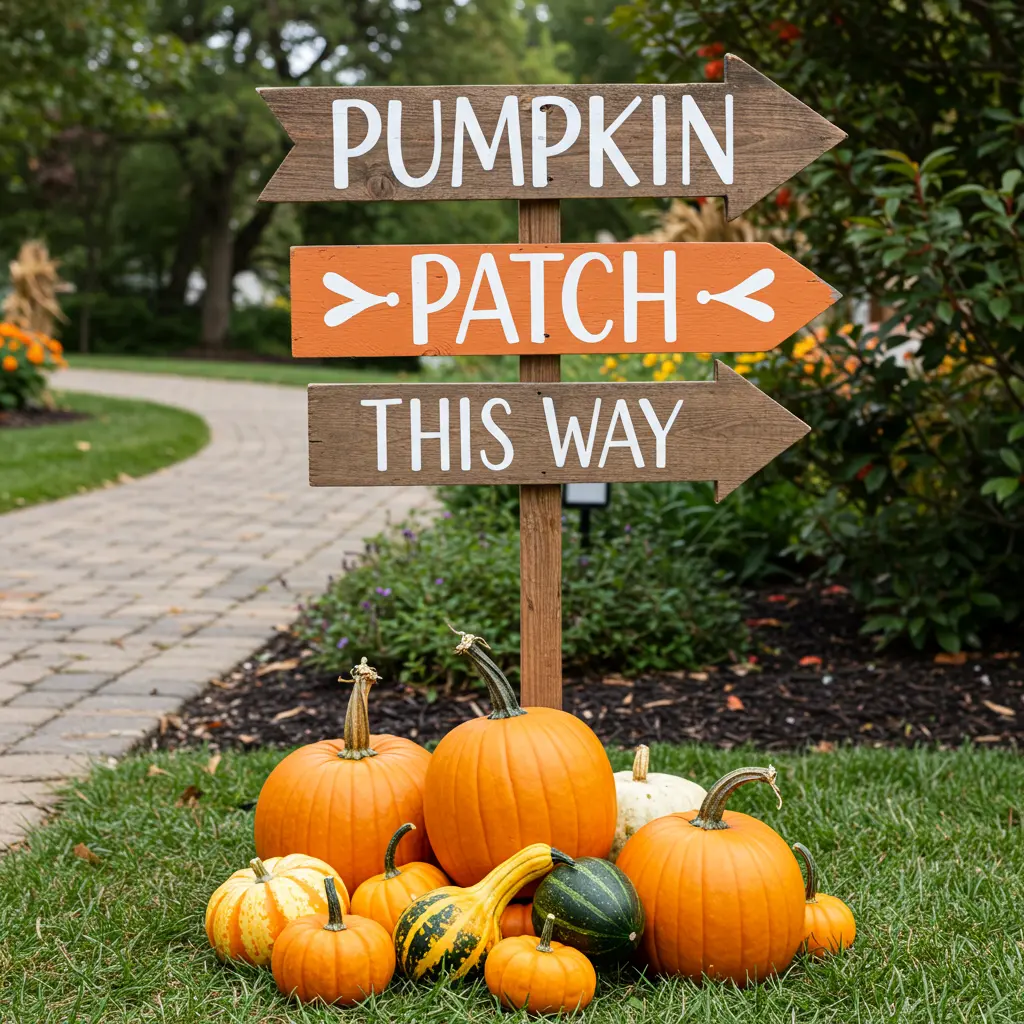
- Best For: A charming yard sign to guide guests along a walkway.
- Pro-Tip: Paint this on a piece of wood shaped like an arrow. A slightly distressed, weathered finish gives it an authentic “farm stand” feel.
- Styling Cue: Stake this sign in your yard at the beginning of your walkway and surround the base with a collection of real pumpkins and gourds.
3. “Happy Fall, Y’all”
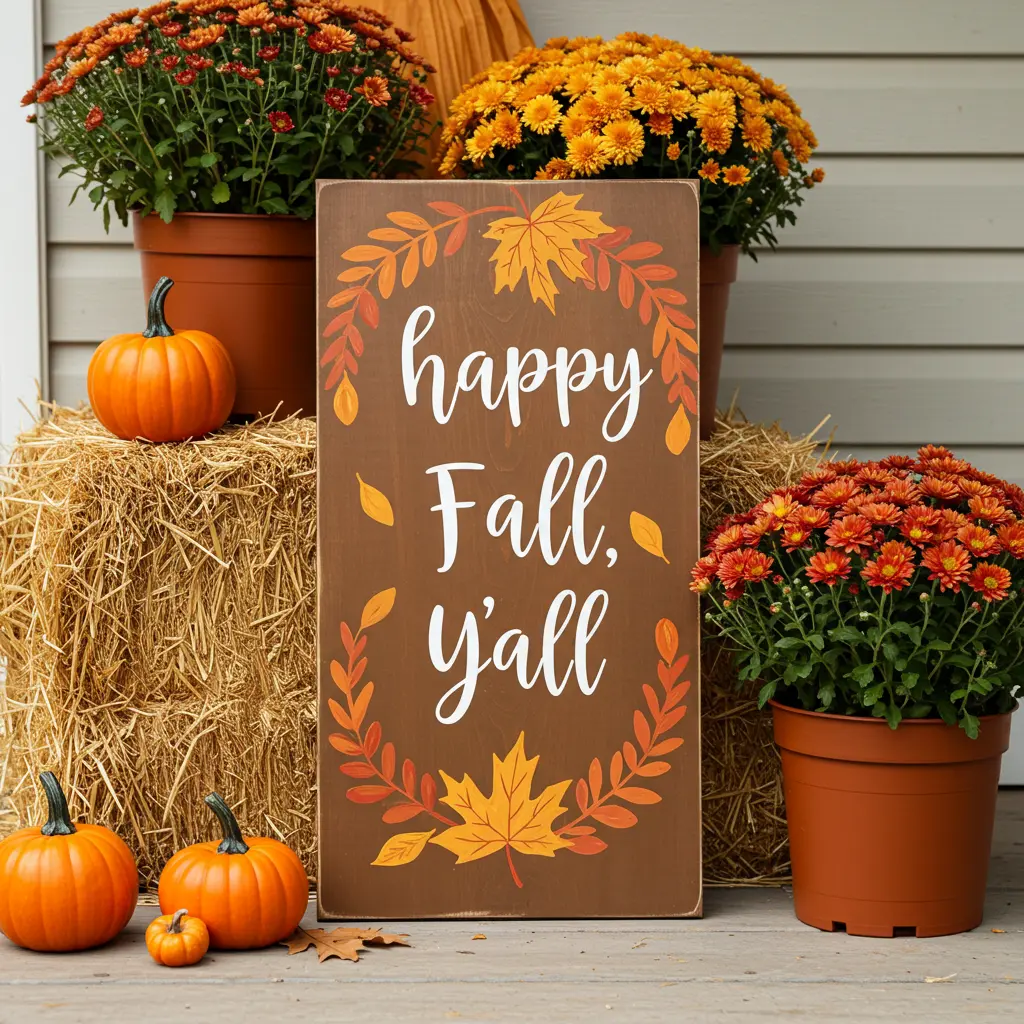
- Best For: A friendly, non-spooky sign that celebrates the whole autumn season.
- Pro-Tip: Paint a simple wreath of autumn leaves around the text to frame it.
- Styling Cue: This sign looks wonderful leaned against a hay bale on the porch, surrounded by pots of mums.
4. “Trick or Treat” Porch Leaner
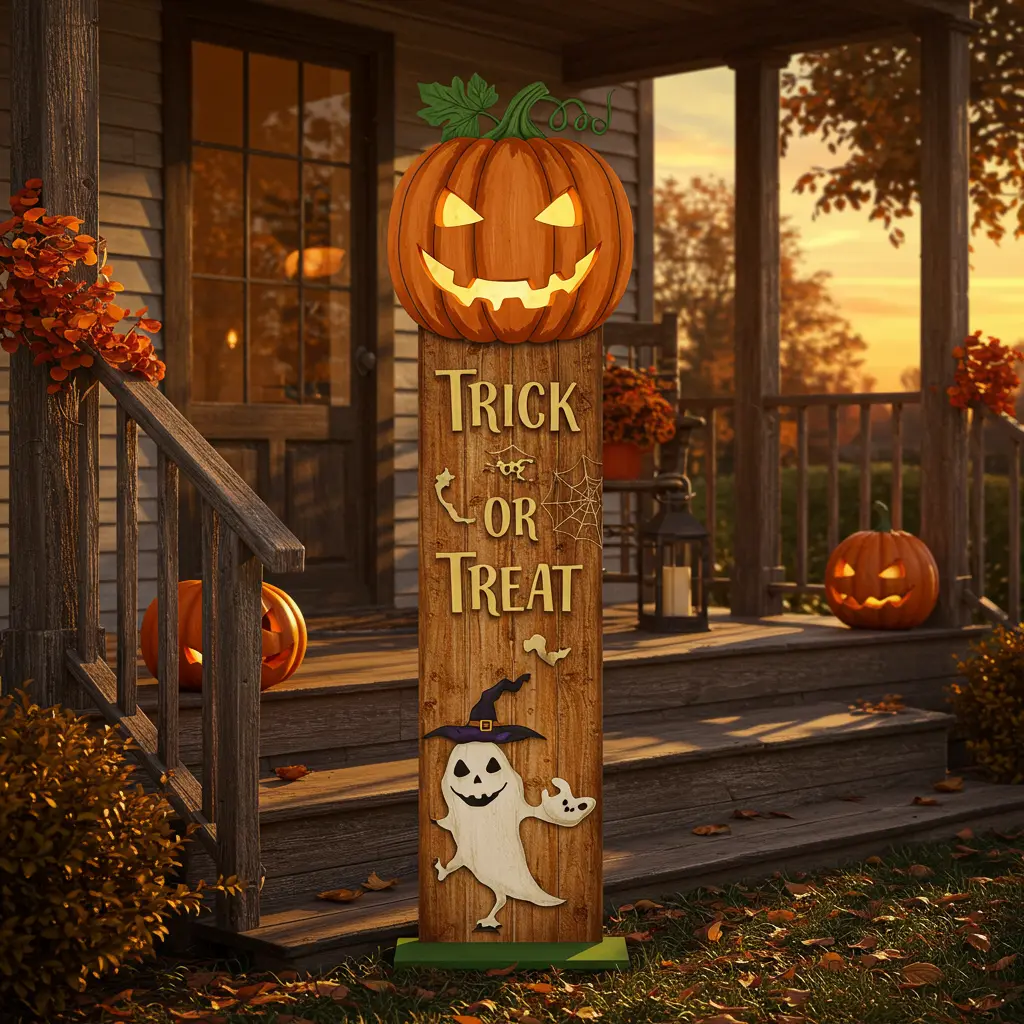
- Best For: A tall, high-impact sign that makes a big statement next to your front door.
- Pro-Tip: Use a long, vertical board (like a 1×8). Paint each word in a different fun font and color, alternating between orange, black, and white.
- Styling Cue: Add a big burlap or plaid bow to the top for a final festive touch.
5. “Come in for a Bite”
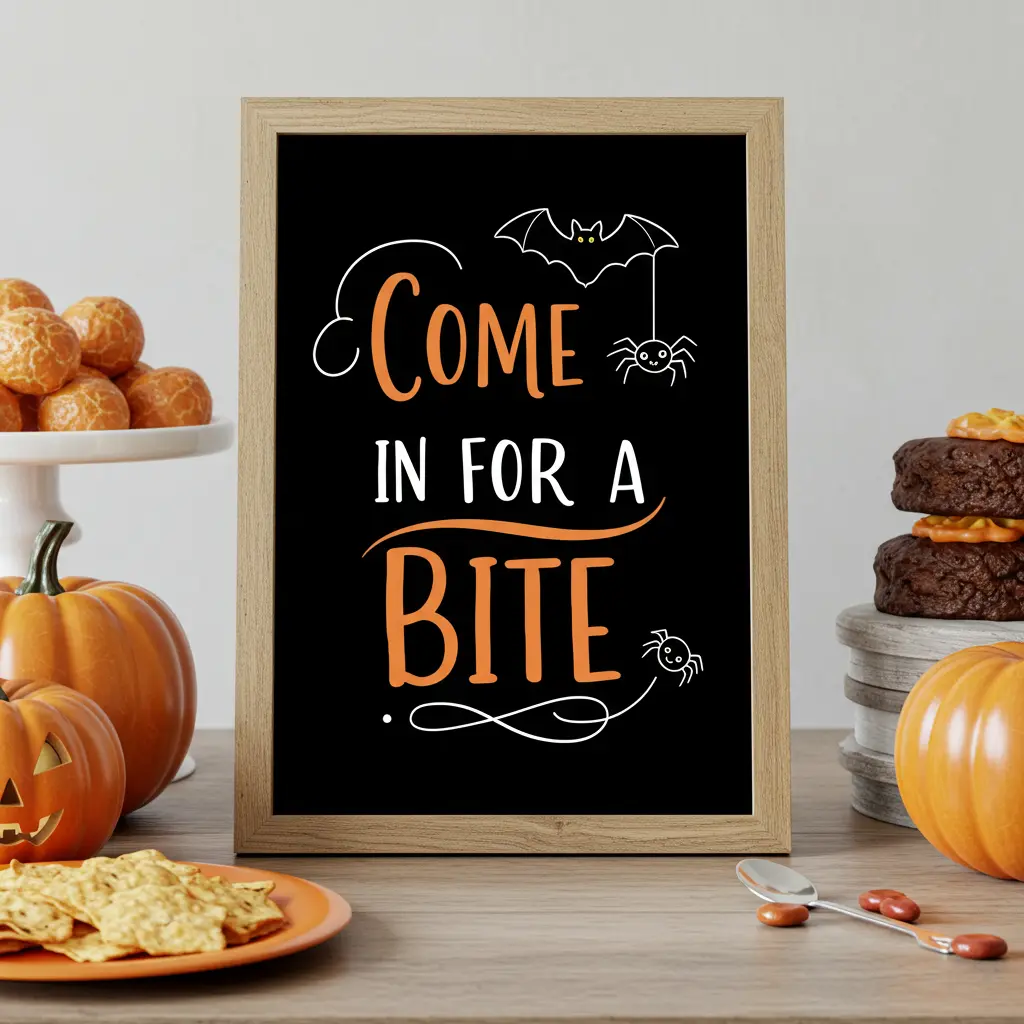
- Best For: A fun, food-themed sign for a party table or kitchen.
- Pro-Tip: Add a playful, cartoonish drawing of a friendly bat or a spider next to the text.
- Styling Cue: Place this sign on your snack table next to the party food.
6. “Candy & Potions”
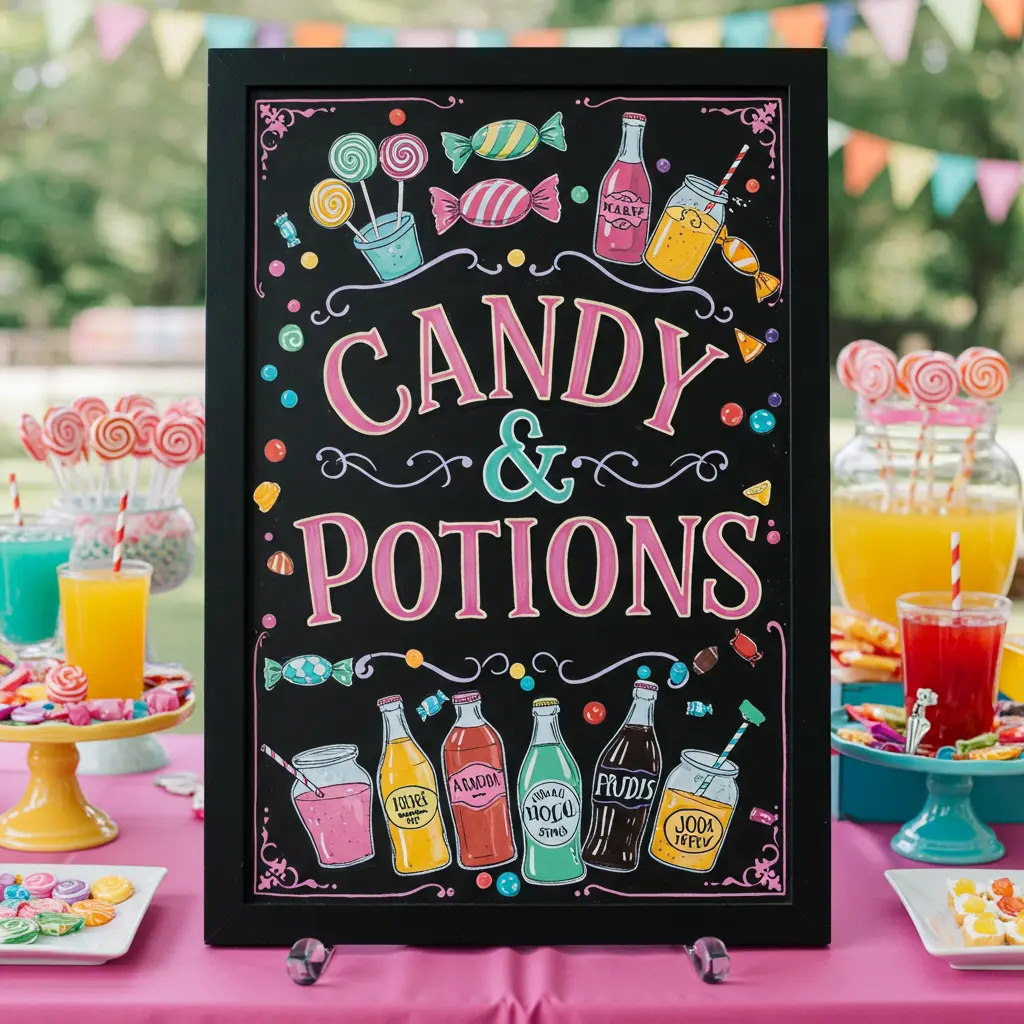
- Best For: A creative sign for a drink station, focusing on fun “potions” like juice and soda.
- Pro-Tip: Use elegant, apothecary-style lettering. You can find and print these fonts for free online to use as a template.
- Styling Cue: Set this sign up behind a collection of glass beverage dispensers filled with colorful drinks.
7. “The Pumpkin Spice Cafe”
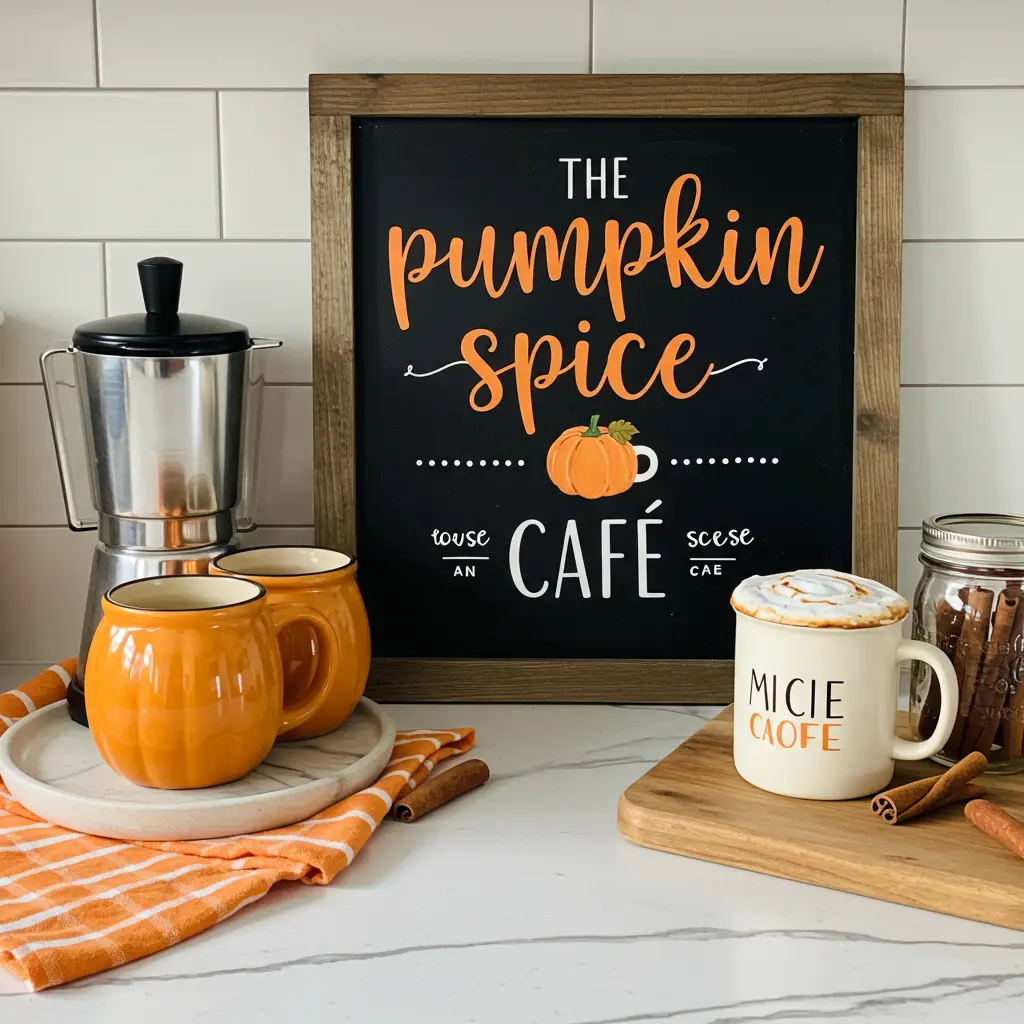
- Best For: A cute, trendy sign for a coffee bar or kitchen counter.
- Pro-Tip: Paint this on a small chalkboard for an authentic cafe menu feel.
- Styling Cue: Style it next to your coffee maker with a few mugs and a jar of cinnamon sticks.
Spooky & Eerie
8. “Enter If You Dare”
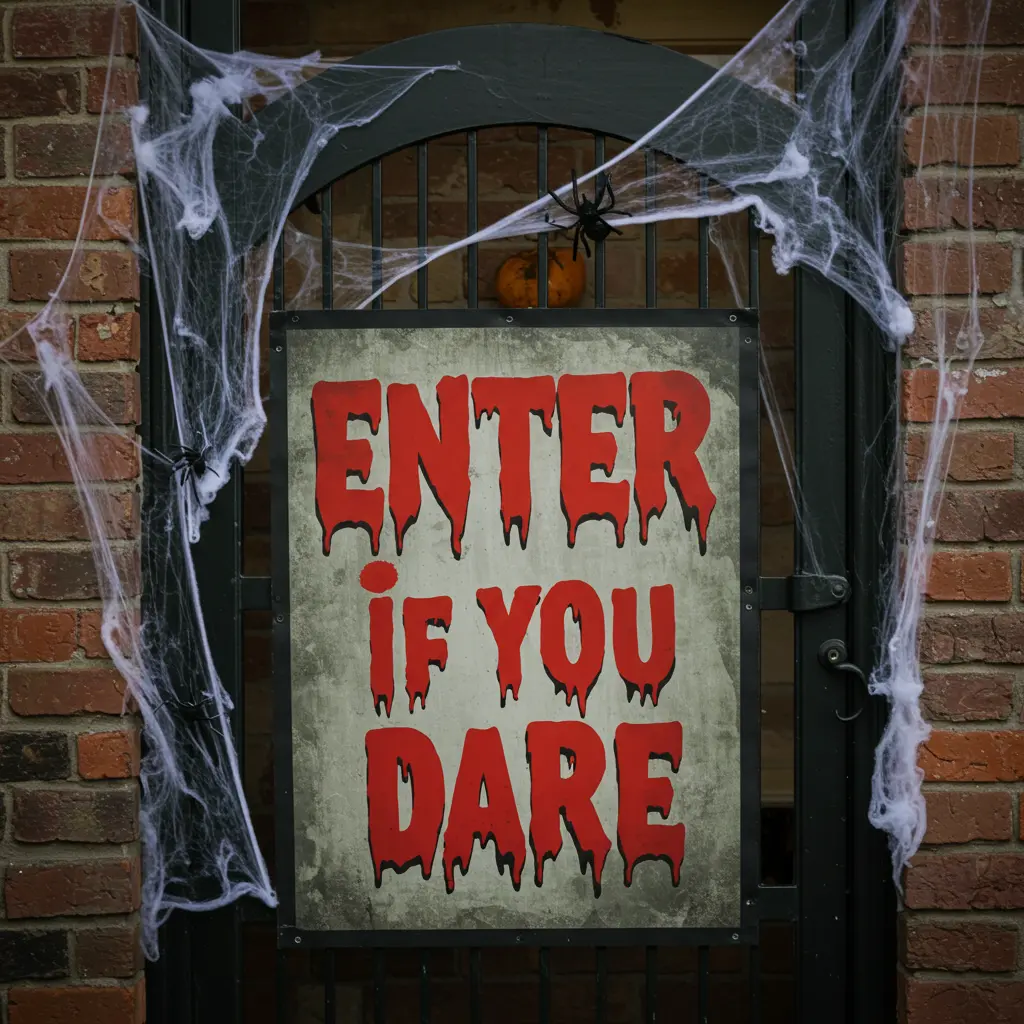
- Best For: A classic, creepy warning for a front gate or porch.
- Pro-Tip: Use a dripping font for the word “Dare.” You can easily create this effect by letting red or black paint drip down from the bottom of the letters.
- Styling Cue: Drape fake, stretchy spiderwebs over the corners of the sign to make it look old and abandoned.
9. “Beware of Spiders”
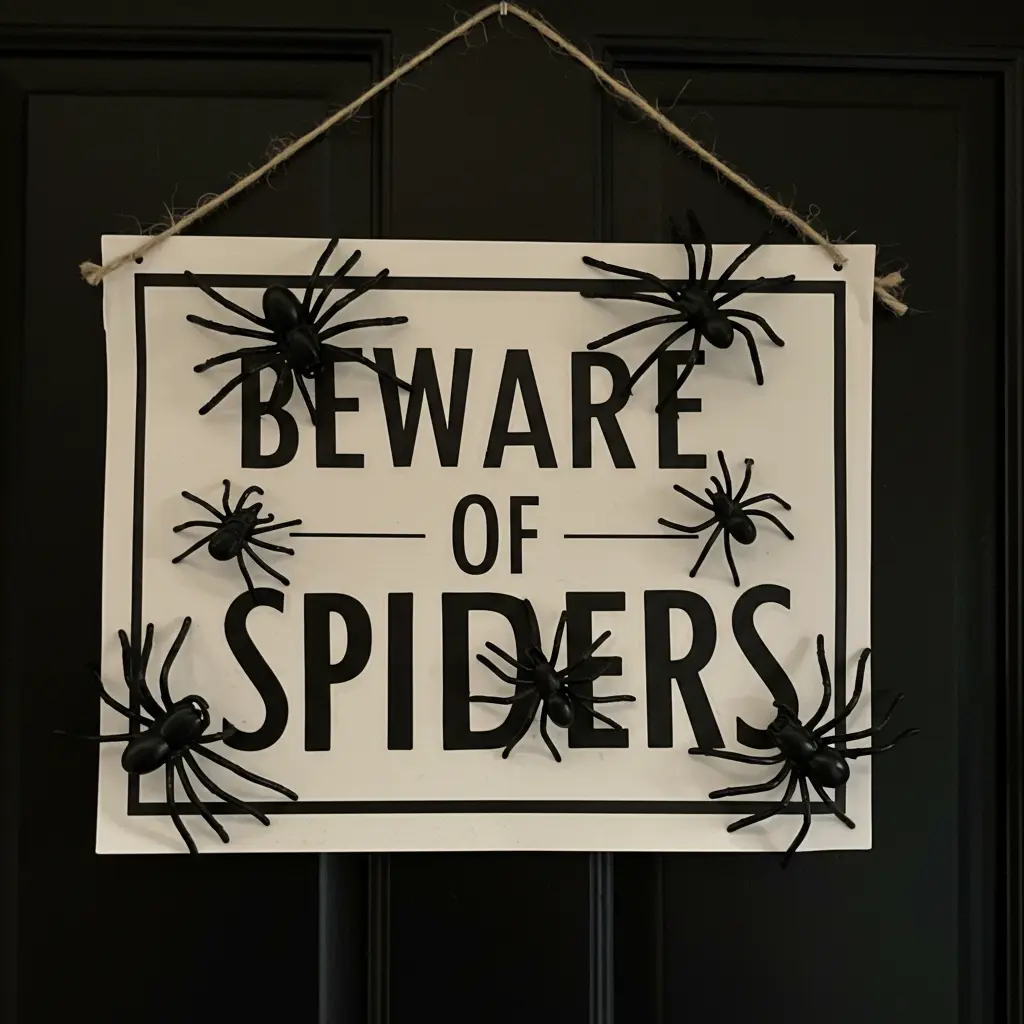
- Best For: A simple but highly effective creepy sign.
- Pro-Tip: Hot glue a few large, realistic plastic spiders directly onto the sign, as if they are crawling over the letters.
- Styling Cue: Hang this sign directly above a doorway, so guests have to walk under it.
10. The Spooky Silhouette Sign
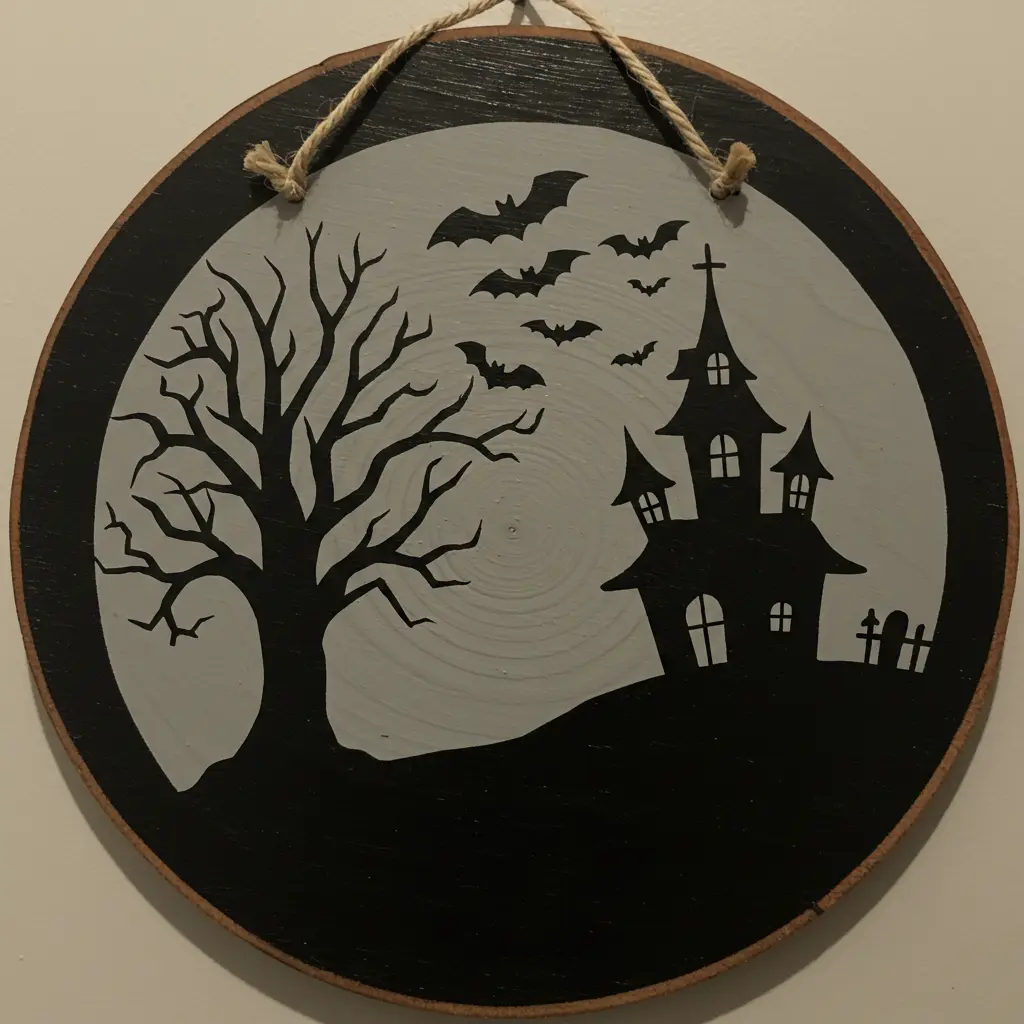
- Best For: Creating a chilling atmosphere without any words.
- Pro-Tip: Paint a round wood blank black. Then, use a stencil or freehand a spooky silhouette in a dark gray or off-white think a crooked tree, a swarm of bats, or a creepy house on a hill.
- Styling Cue: Place a single colored spotlight (like green or purple) on the sign at night to make it glow.
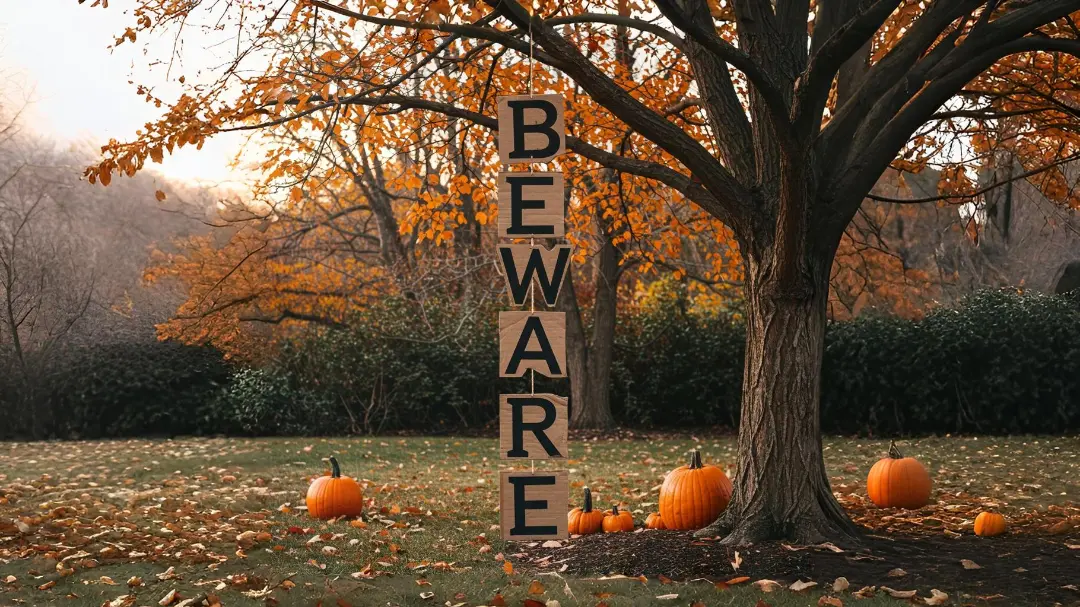
11. The Dangling “BEWARE” Sign
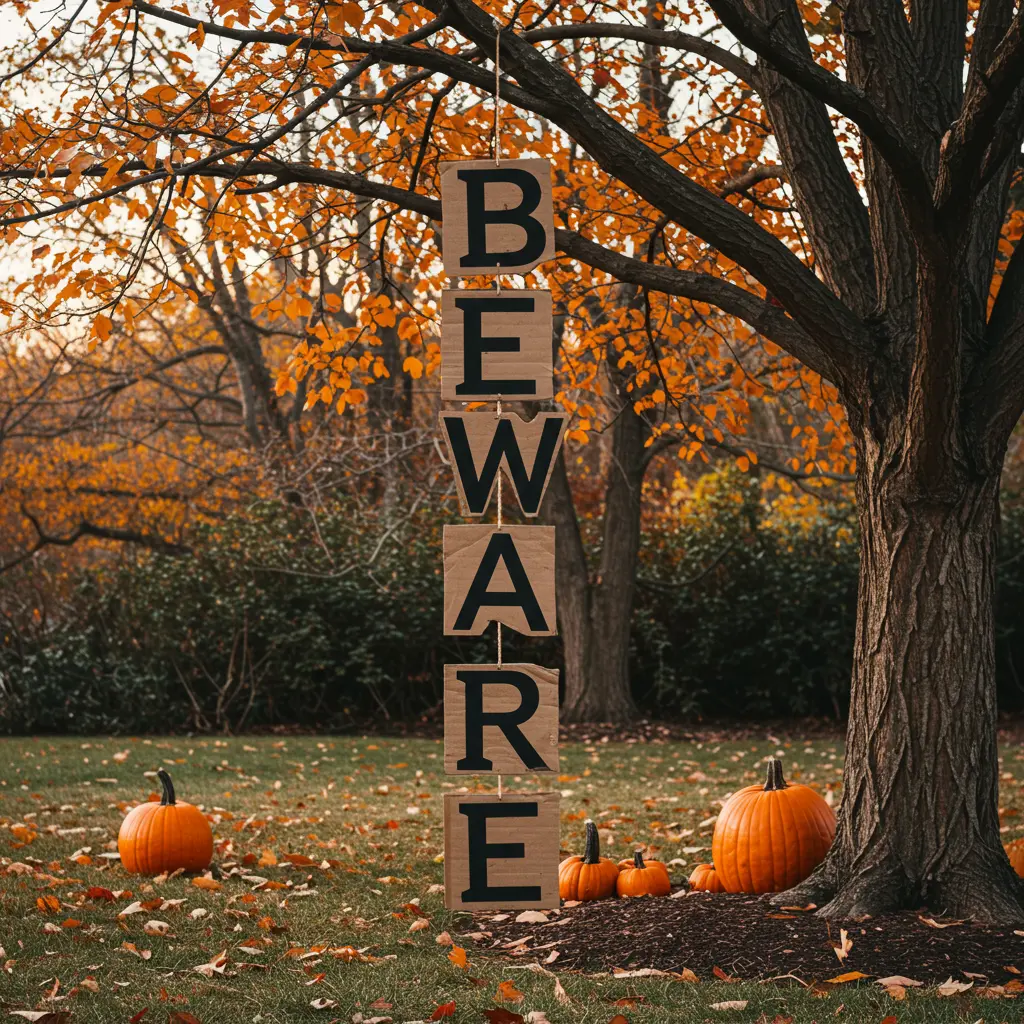
- Best For: An entryway or a low-hanging tree branch.
- Pro-Tip: Cut individual letters from cardboard or thin wood. Paint them black and distress the edges. String them together on a piece of rustic twine so they hang vertically.
- Styling Cue: The slightly uneven, dangling letters will move in the breeze, creating a subtle and unsettling motion.
12. “Something Wicked This Way Comes”
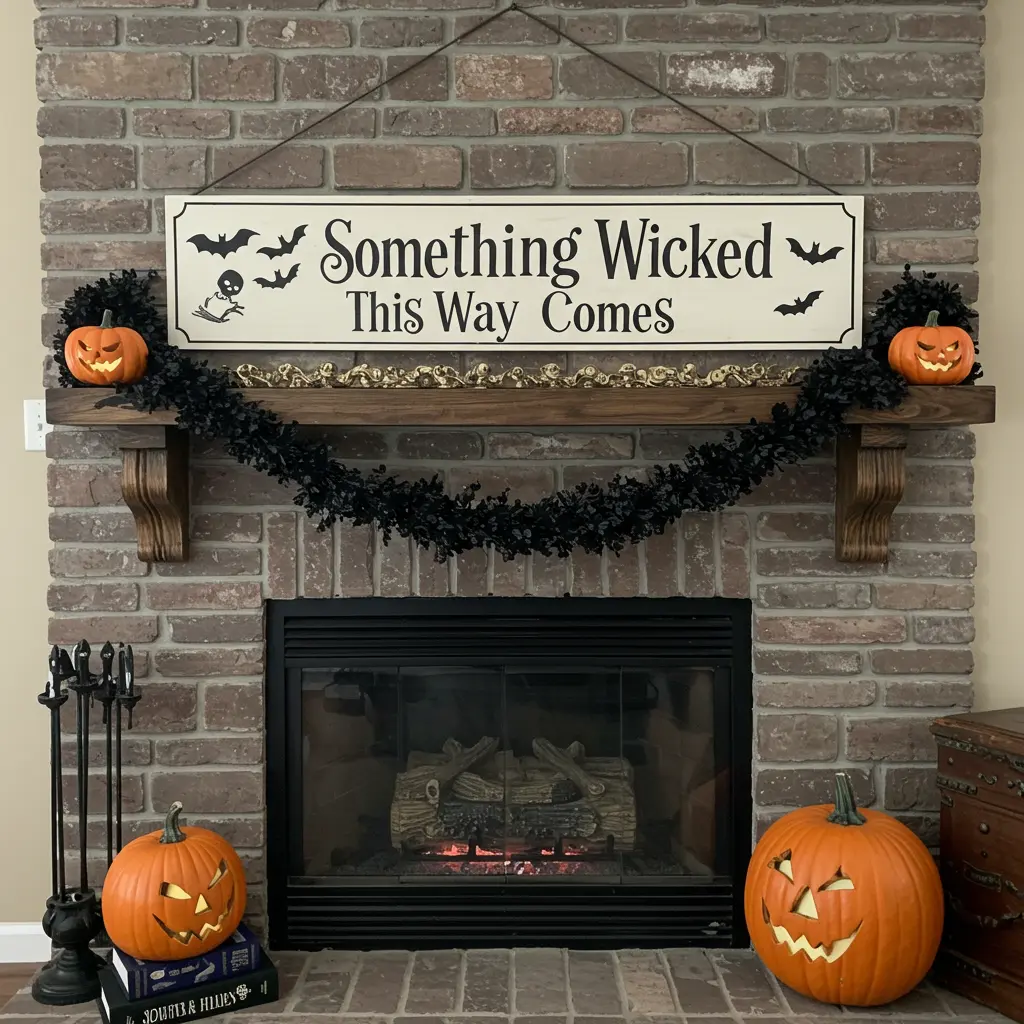
- Best For: A literary and sophisticated spooky quote.
- Pro-Tip: Use a classic, elegant serif font. The power of this sign is in the famous words, so the design can be very simple.
- Styling Cue: A long, horizontal sign made from a dark-stained board looks incredible hung above a fireplace mantel.
13. Directional Arrow Post
- Best For: A fun, multi-sign display for the yard.
- Pro-Tip: Create a central post and attach multiple arrow-shaped signs pointing in different directions. Use spooky but fun locations like “Creepy Hollow,” “Spider’s Den,” or “The Black Cat’s Alley.”
- Styling Cue: Let the signs be crooked and uneven to give the post a more chaotic and eerie feel.
Rustic & Natural
14. The Reclaimed Wood Sign

- Best For: An authentic, rustic look using weathered materials.
- Pro-Tip: Use old pallet wood or fence pickets. The natural aged gray color of the wood is the perfect backdrop. Simply dry-brush white or black paint on for the letters so the wood texture still shows through.
- Styling Cue: Perfect for a simple “BOO” or “EEK!” sign.
15. The Wood Slice Sign
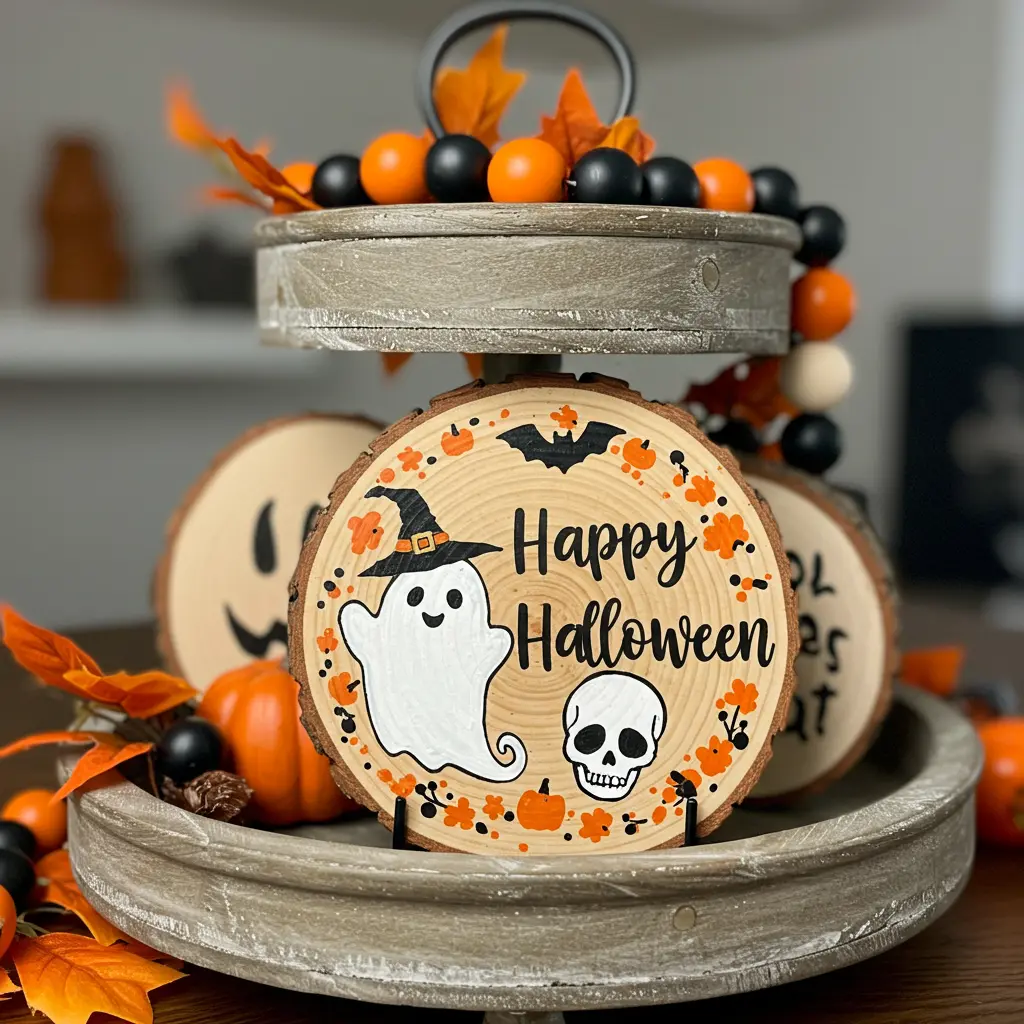
- Best For: A small, charming sign for a tiered tray or indoor shelf.
- Pro-Tip: You can buy pre-cut wood slices at any craft store. Use a wood-burning tool or a permanent marker for the lettering.
- Styling Cue: A simple drawing of a pumpkin or a spiderweb on a wood slice is a beautiful, natural accent.
16. The Burlap Banner
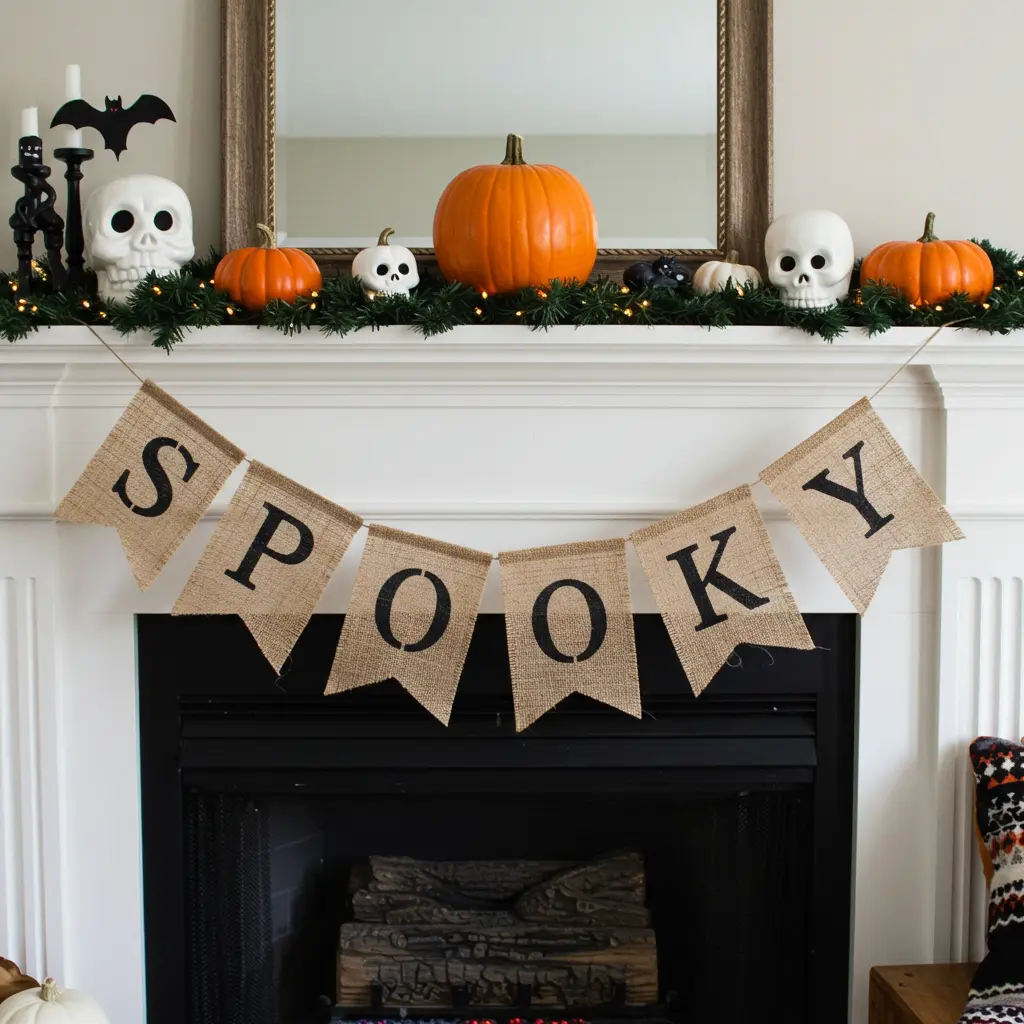
- Best For: A soft, textural sign for a mantel or doorway.
- Pro-Tip: Cut burlap into banner-shaped flags. Use black paint and a stencil to add one letter to each flag to spell out a word like “SPOOKY.”
- Styling Cue: String the flags onto a piece of jute twine and hang it across your fireplace.
17. The Pumpkin Address Sign
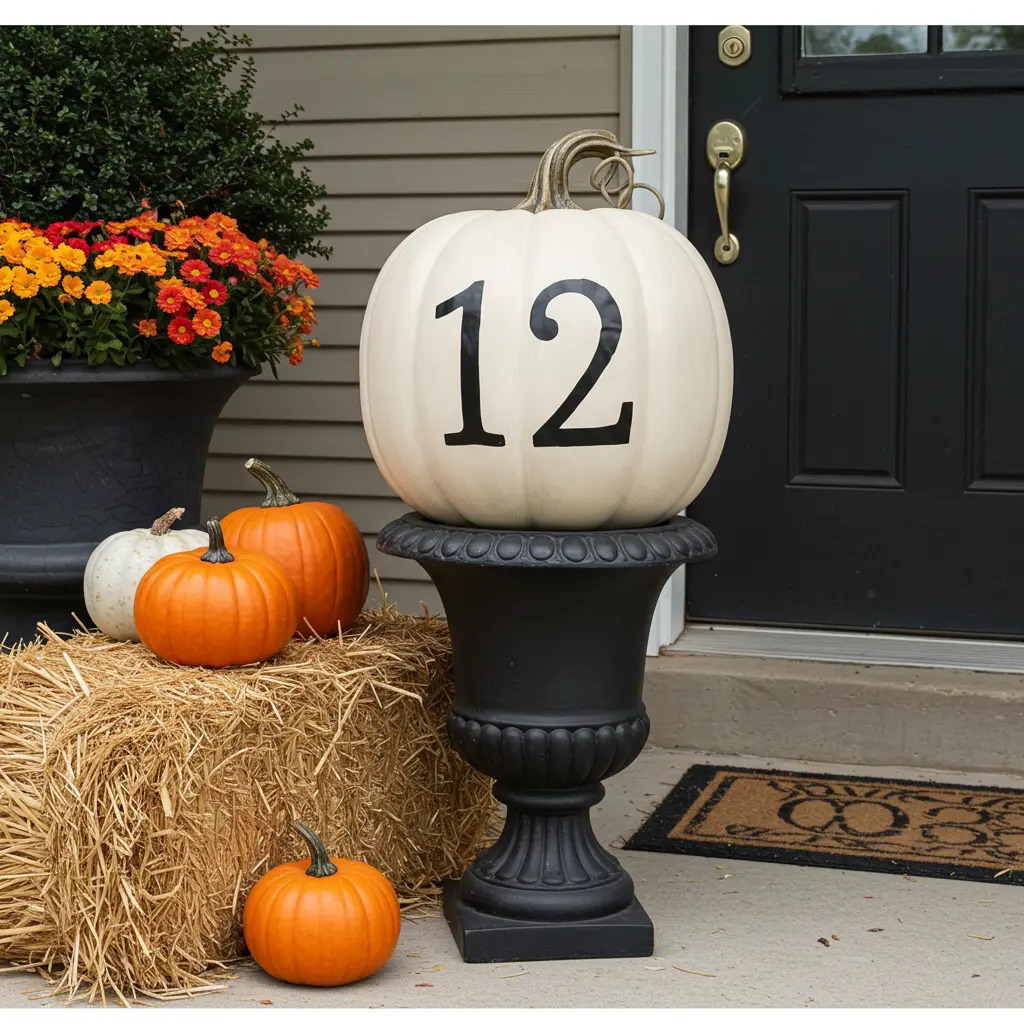
- Best For: A functional and festive way to display your house numbers.
- Pro-Tip: Use a large faux craft pumpkin (real ones will rot). Paint it a solid color (white or black looks very chic) and then stencil your house numbers onto it in a contrasting color.
- Styling Cue: Place it in a large urn or on a hay bale next to your front door.
Modern & Graphic
18. The Black & White Striped Sign
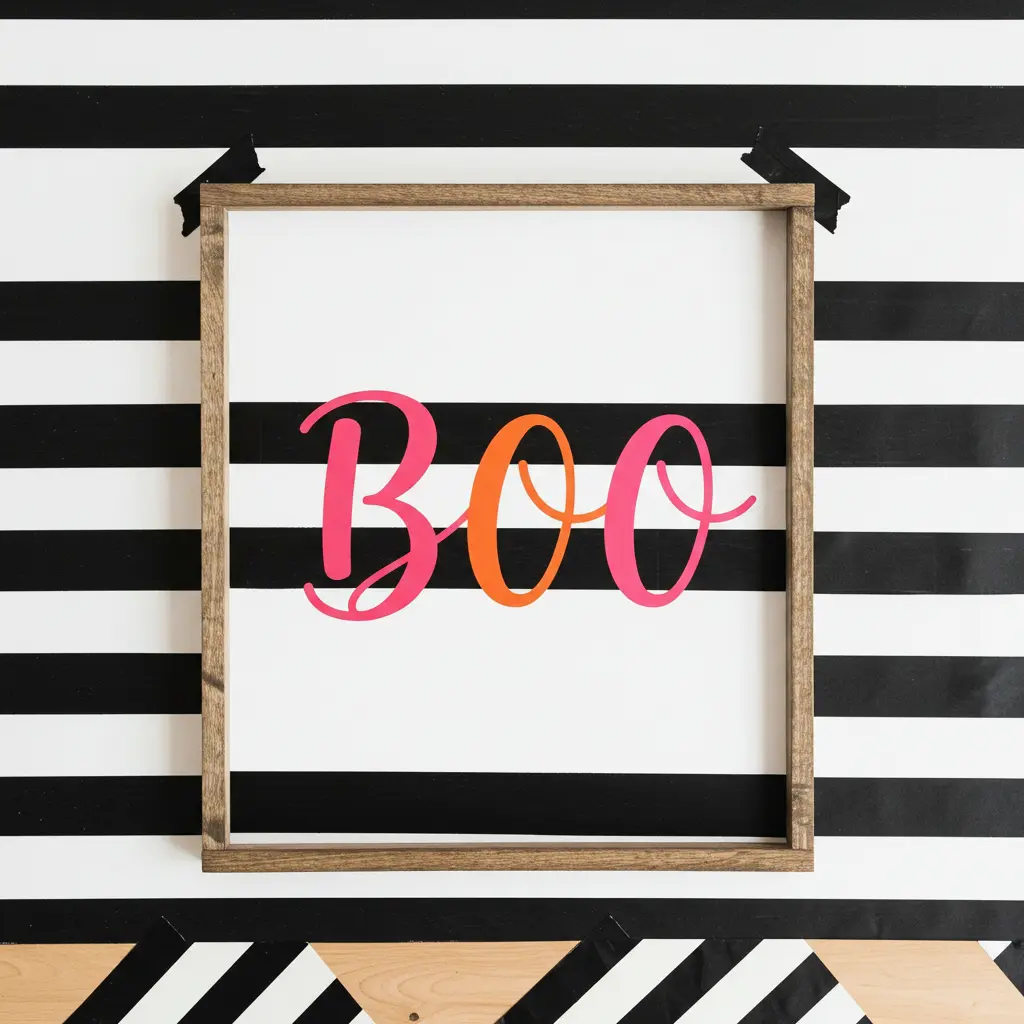
- Best For: A modern, high-contrast look.
- Pro-Tip: Use painter’s tape to create crisp, clean vertical or horizontal stripes as the background for your sign.
- Styling Cue: A single word like “BOO” in a bright orange or hot pink script font looks incredible against a black and white striped background.
19. The Minimalist Word Sign
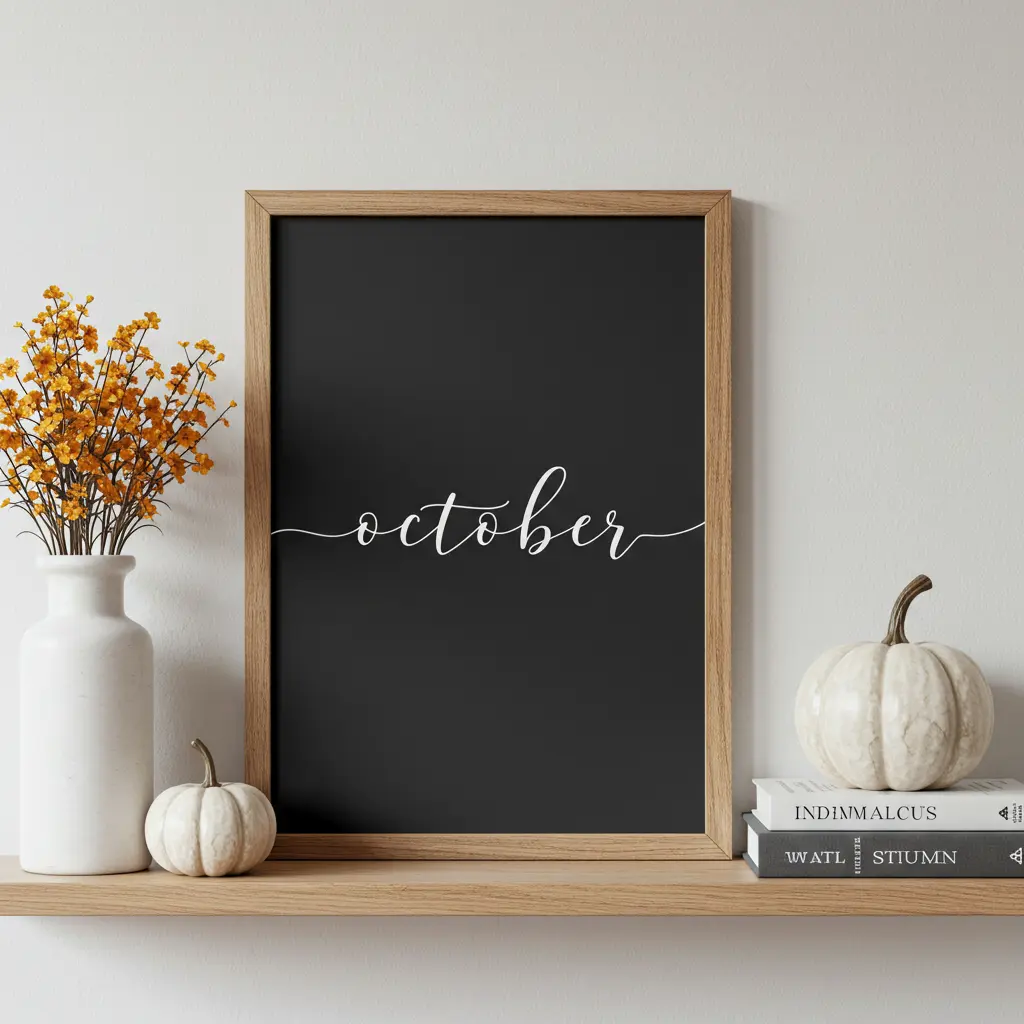
- Best For: An understated, chic, and modern vibe.
- Pro-Tip: Paint a wooden board a solid matte black. Use a simple, thin, all-caps sans-serif font to write a single word like “OCTOBER” or “AUTUMN” in white.
- Styling Cue: This sign looks beautiful leaned on a shelf, surrounded by simple, neutral-colored decor.
20. The Geometric Pumpkin Sign
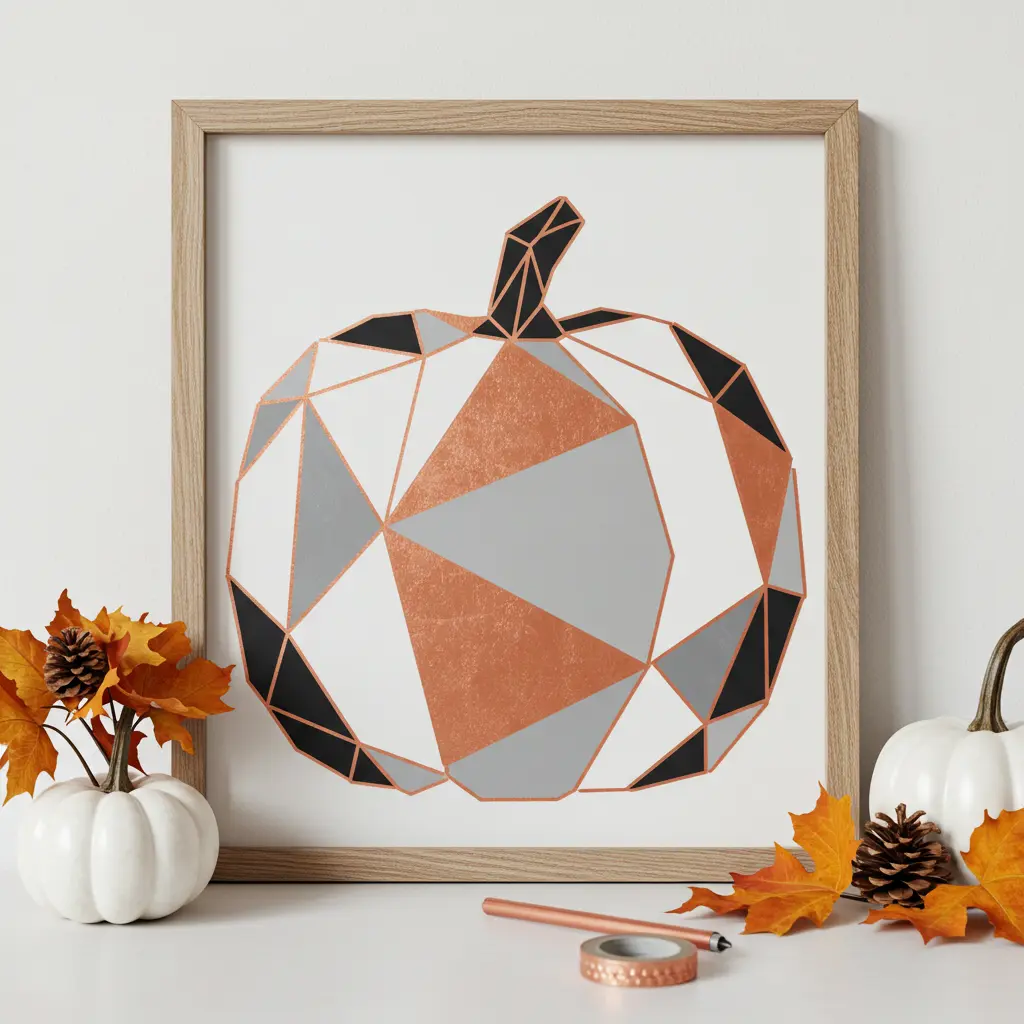
- Best For: A contemporary, artistic take on a classic fall symbol.
- Pro-Tip: Use painter’s tape to create a geometric, color-blocked pumpkin shape made of triangles and polygons.
- Styling Cue: Use a non-traditional fall color palette, like black, white, gray, and a pop of copper.
21. The Lightbox Sign

- Best For: A fun, changeable sign that can be updated with new spooky phrases all season long.
- Pro-Tip: You can buy inexpensive lightboxes at most craft or department stores.
- Styling Cue: Use it to display your favorite spooky movie quotes.
Creative & Clever
22. The “Out of Candy” Sign
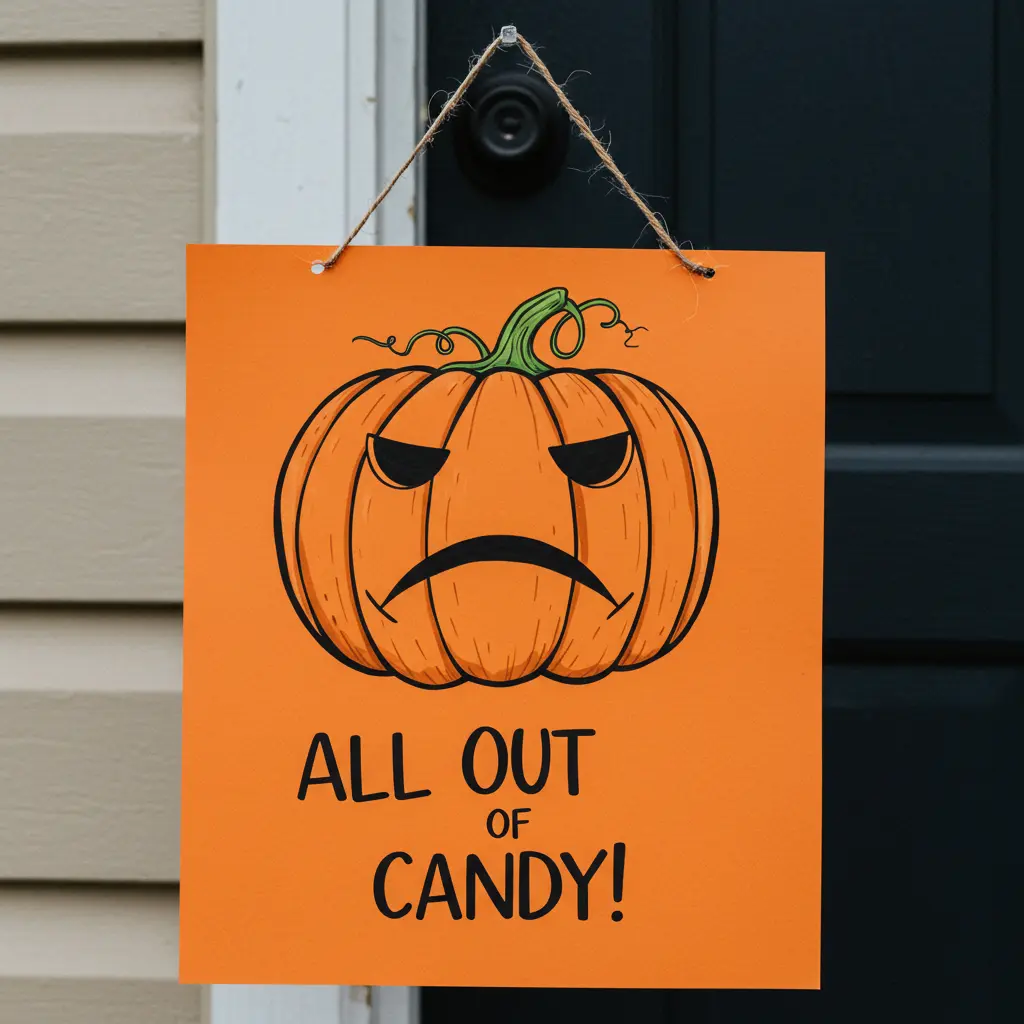
- Best For: A practical and funny sign for the end of a long trick-or-treating night.
- Pro-Tip: Make this sign ahead of time so you can put it out quickly once your candy bowl is empty.
- Styling Cue: A drawing of a sad-faced pumpkin with the words “All Gone!” is a cute and clear message.
23. The Chalkboard Countdown
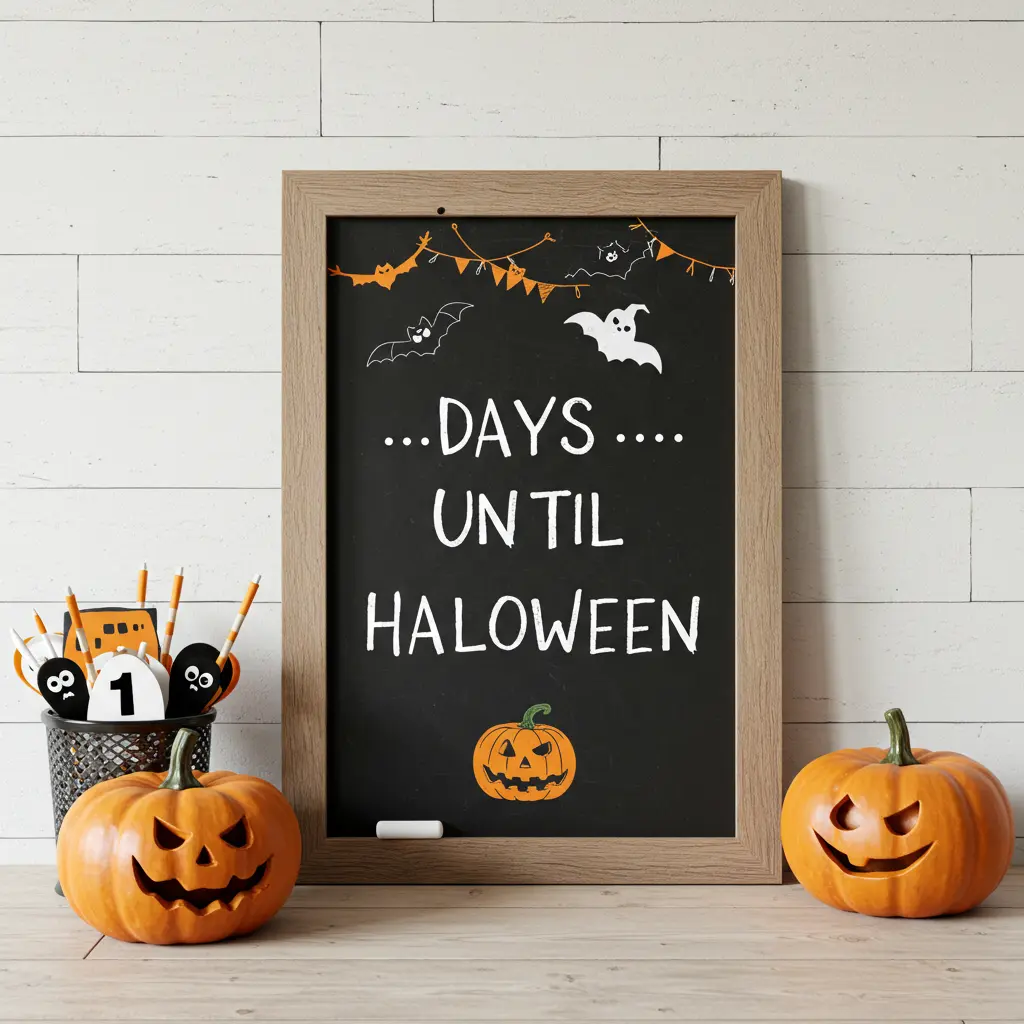
- Best For: An interactive sign that builds excitement for the big day.
- Pro-Tip: Use a chalkboard-painted board or a framed chalkboard. Write “___ Days Until Halloween” and update the number each day.
- Styling Cue: Place it in a high-traffic area like the kitchen or entryway where the whole family can see it.
24. The Dangling Spider Sign
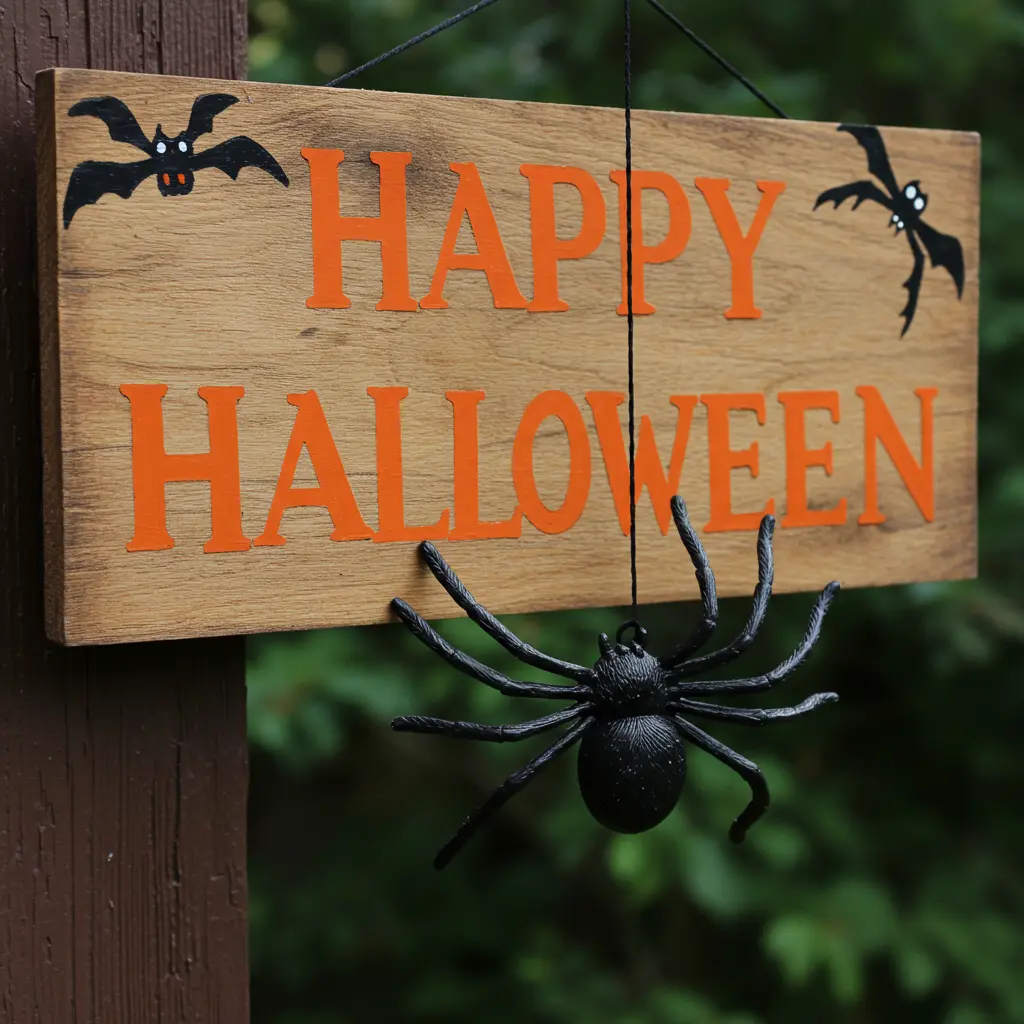
- Best For: A 3D, interactive sign.
- Pro-Tip: Paint “Happy Halloween” on a board. Drill a small hole at the top and hang a large plastic spider from it with a piece of black string or fishing line so it dangles in front of the words.
- Styling Cue: The spider will gently spin and move in the breeze, drawing attention to your sign.
25. The Layered Frame Sign
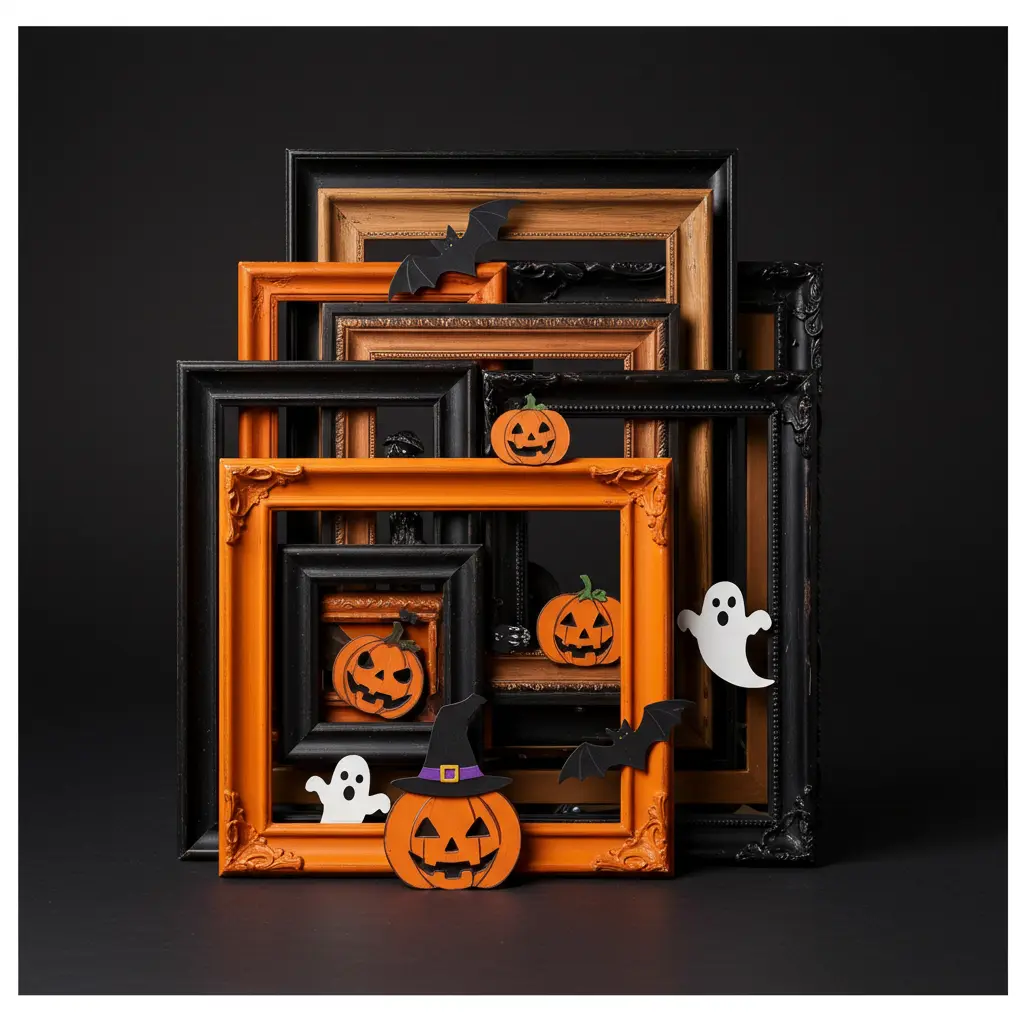
- Best For: A dimensional, high-end look using cheap thrift-store frames.
- Pro-Tip: Remove the glass and backing from a large, ornate frame. In the center, hang a smaller, simpler framed sign with your message.
- Styling Cue: Spray paint both frames the same color (matte black is perfect) to make it look like one cohesive, intricate piece.
Conclusion: Your Spookiest Welcome Yet
And just like that, you’re no longer just looking at a plain piece of wood you’re looking at a world of spooky, creative possibilities. You have the ideas, the inspiration, and the know-how to create DIY signs that are impressive, personal, and shockingly affordable. This isn’t just about decorating; it’s about having fun, embracing creativity, and setting the perfect mood for the season.
It all starts with a single choice. Pick an idea that made you smile, grab your paintbrush, and take the first spooky step.
You’ve got this.
