Have you ever walked into your new dorm room and felt the silence of the bare, white walls? They can feel cold and anonymous, like a hotel room you’re just passing through. I believe your walls shouldn’t be a blank space; they should be the canvas where the story of you begins to unfold. They are waiting to become a reflection of your past, a holder of your present, and an inspiration for your future.
A dorm wall is more than just a partition. It’s a backdrop for late-night talks, a witness to ambitious dreams, and the first thing you see when you wake up to a new day of possibility. It’s a space waiting to be gathered, to be curated with love and intention.
Think of this as your personal scrapbook of ideas. We’ll wander through gentle designs, listen to the whispers of style, and walk through the mindful steps to bring a little piece of your heart to life on your side of the room.
By the end, I hope you’ll see your walls not as a problem, but as a beautiful, empty canvas, just waiting for you to tell their story.
Before You Begin: Listening to Your Walls
The most soulful rooms begin not with a plan, but with a feeling. They ask us to slow down, to listen, and to dream. Before we gather a single Command strip, let’s sit with our small space and lay the groundwork for a design that will feel like coming home for the whole school year.
The Whispers of Style: Gentle Notes for a Harmonious Look
Design theory sounds so formal, doesn’t it? I like to think of it as the quiet wisdom a room shares with us about what makes it feel balanced and at peace. Here are a few of those gentle secrets for your walls:
- A Sense of Scale: Think of your wall decor as a loving family of items. A tiny framed photo on a vast, empty wall can feel lost. The key is choosing pieces that feel proportional and graceful in their space, like a large tapestry for a big wall or a tight cluster of small frames for a cozy nook.
- Creating a Gentle Balance: A blank wall is a quiet but strong presence. We can create a sense of harmony against it in two ways:
- Symmetrical Balance: Picture a large art print resting perfectly over your bed, flanked by two identical wall sconces or smaller frames. This creates a feeling of serenity, calm, and classic beauty.
- Asymmetrical Balance: Now, imagine that large print hung off-center, its presence answered by a floating shelf with a trailing plant and a few stacked books on the other side. This feels more like a gentle dance, full of life, warmth, and creative ease.
- The 60-30-10 Color Harmony: This is a simple recipe for a color palette that sings together beautifully, even in a dorm.
- 60% is your main room color (likely your bedding, the biggest splash of color).
- 30% is your secondary color, a lovely harmony (perhaps the dominant color in your wall tapestry or gallery wall).
- 10% is your accent, a little twinkle of light (the metallic finish on your frames, a vibrant neon sign, or a single colorful photo).
- Let the Story Shine: Your feature wall is becoming the heart of your corner. Try to let it have its moment. Piling a tall bookcase right in front of your beautiful new gallery wall can feel like two people talking at once. Let your beautiful new wall be the one to tell this particular story of personality and inspiration.
What Will It Ask of You? A Gentle Look at Your Budget
Let’s talk softly about the resources we might gather for this journey. Every path has its own needs, from a thrifty weekend project to a dream wall brought to life with a few smart splurges.
| The Approach | Estimated Cost | What Your Resources Gather | The Little Treasures (Don’t Forget These!) |
| The Weekend Makeover | $25 – $75 | • A poster set or postcards• Washi tape for a custom mural• Twine & clothespins for a photo garland | • Command strips & hooks• A good pair of scissors• Painter’s tape for straight lines |
| The Polished Upgrade | $80 – $200 | • A quality wall tapestry or flag• A set of matching frames for a gallery wall• A wire grid or pegboard organizer | • A small level to hang things straight• A set of beautiful fairy lights• Removable wall decals |
| The Custom Dream | $250 – $500+ | • High-quality peel-and-stick wallpaper• A custom neon sign• A set of floating shelves & decor | • A large, full-length leaning mirror• A collection of wall-mounted planters• High-quality, damage-free picture hangers |
The Design Menu: Finding Your Signature Style
Here are the ingredients you can choose from to create your perfect dorm wall. Each one holds a different feeling. Listen to your heart and see which one speaks to you.
The Foundation: Wall Treatments & Textures
1. The Immersive Wall Tapestry
Best For: Creating an instant mood and covering a large, uninspiring wall (hello, cinder block!). It adds softness, color, and personality in one easy step.
Pro-Tip: To avoid a saggy look, use several Command strips along the top edge for a crisp, taut line. It instantly makes it look more intentional.
2. The Peel-and-Stick Wallpaper Accent
Best For: Renters who want a splash of sophisticated pattern or glamour without damaging the walls. It creates a beautiful, custom backdrop.
Styling Cue: You don’t need to cover the whole room. A single accent wall behind your bed or desk creates a stunning focal point and a “zone” for your personal space.
3. The Faux Ivy or Floral Wall
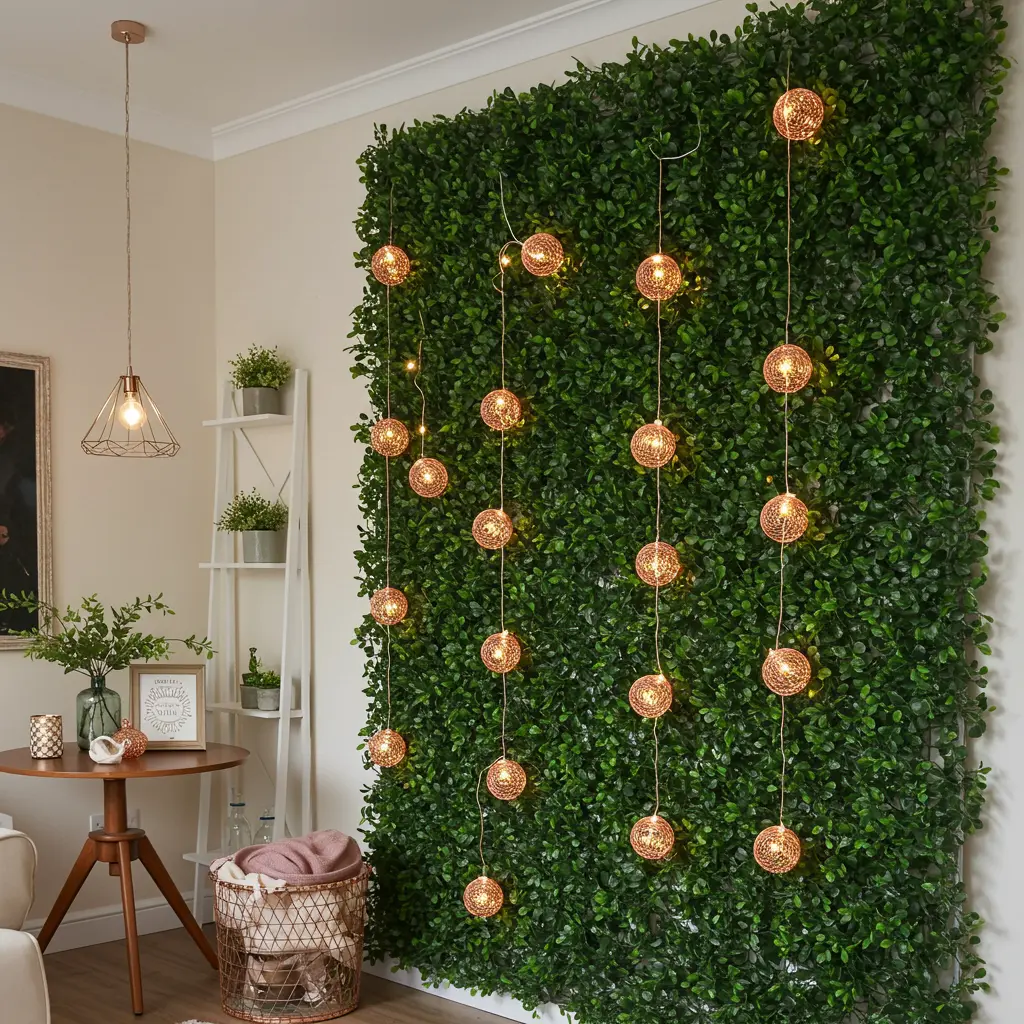
Best For: Bringing a lush, fairytale feeling indoors without the responsibility of watering plants.
Pro-Tip: Weave a set of delicate copper-wire fairy lights through the ivy strands. The combination is pure magic in the evenings.
4. The Washi Tape Mural
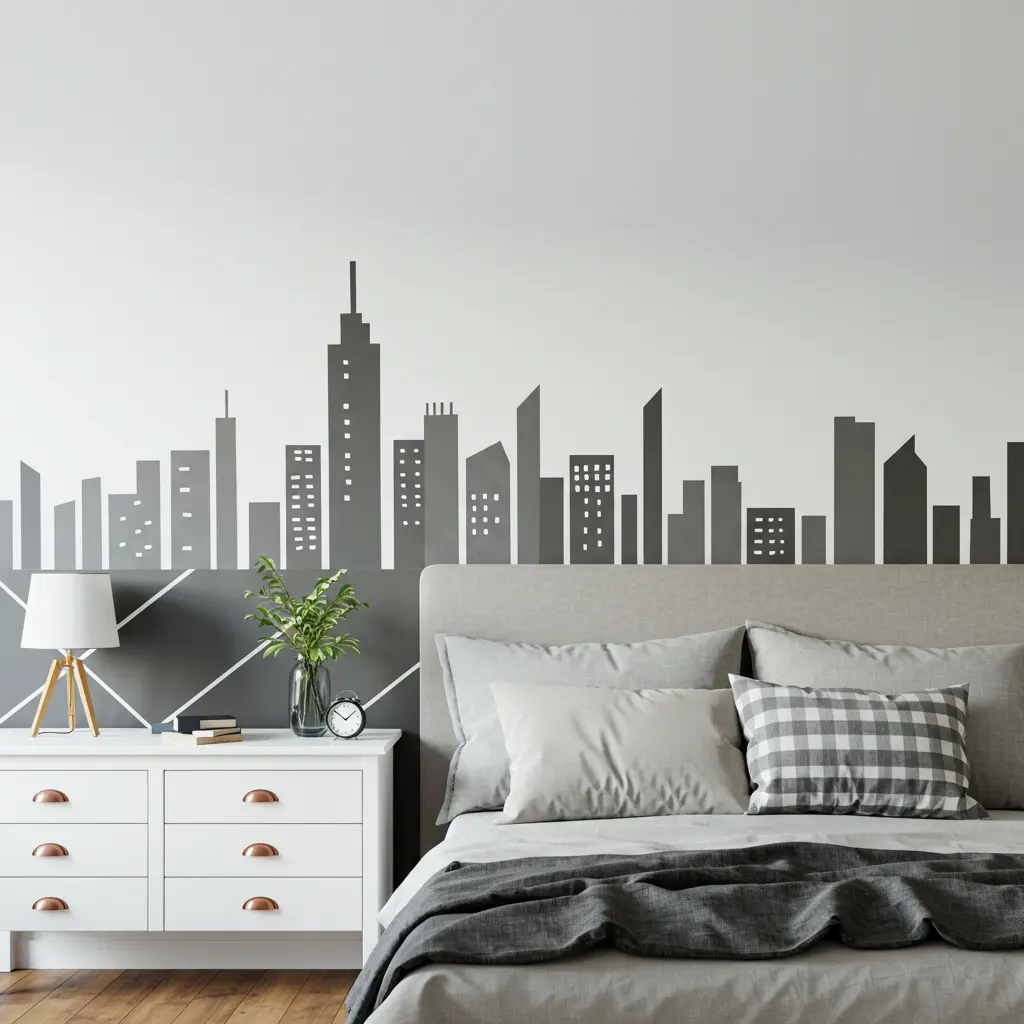
Best For: The creative minimalist on a tight budget. You can create geometric patterns, faux headboards, or simple cityscapes directly on your wall.
Key Consideration: It’s infinitely changeable and completely damage-free, perfect for indulging your creative whims throughout the year.
5. The Architectural Painted Arch
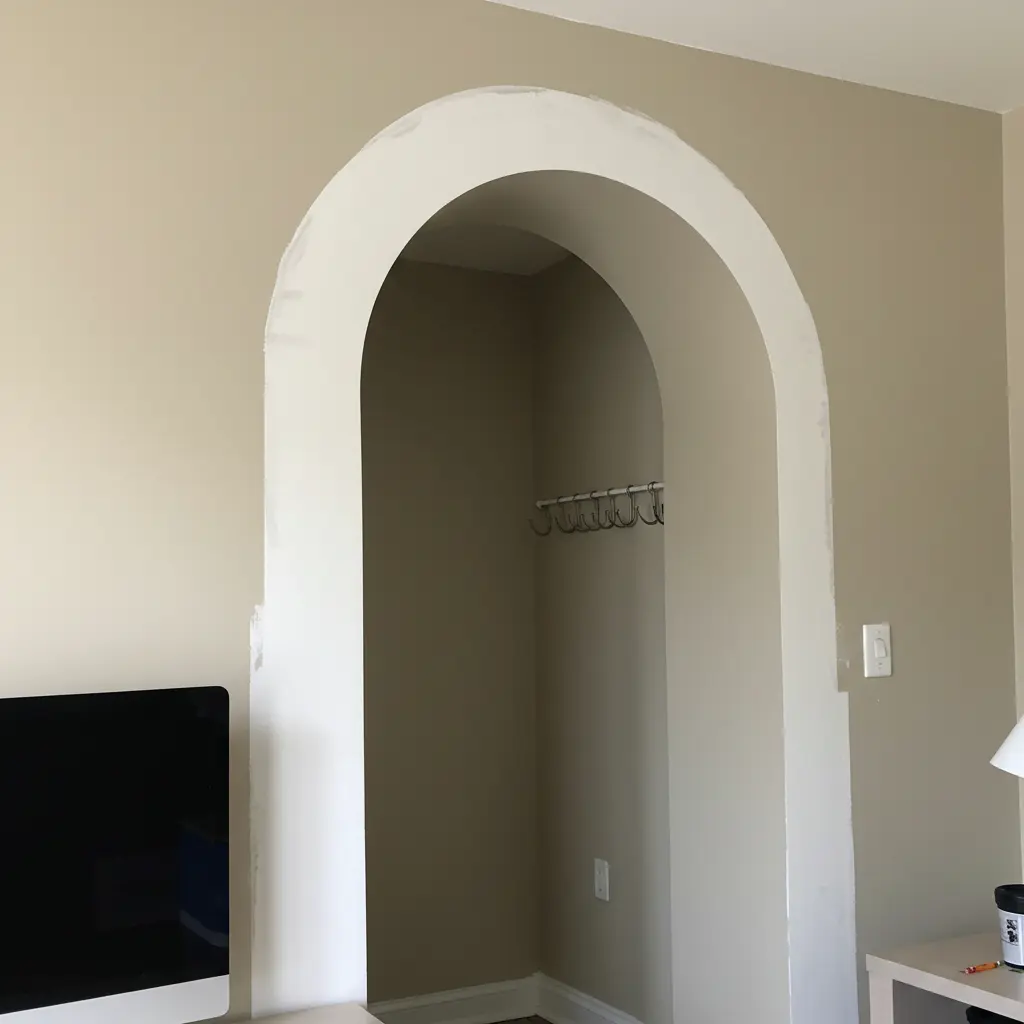
Best For: Creating a high-impact, designer look with just a can of (dorm-approved) paint. It beautifully frames your bed or desk space.
Pro-Tip: Use a pencil tied to a string and pinned to the wall to draw a perfect arch before you start painting with a steady hand.
The Gallery: How to Gather Your Art
6. The Classic Grid Gallery Wall
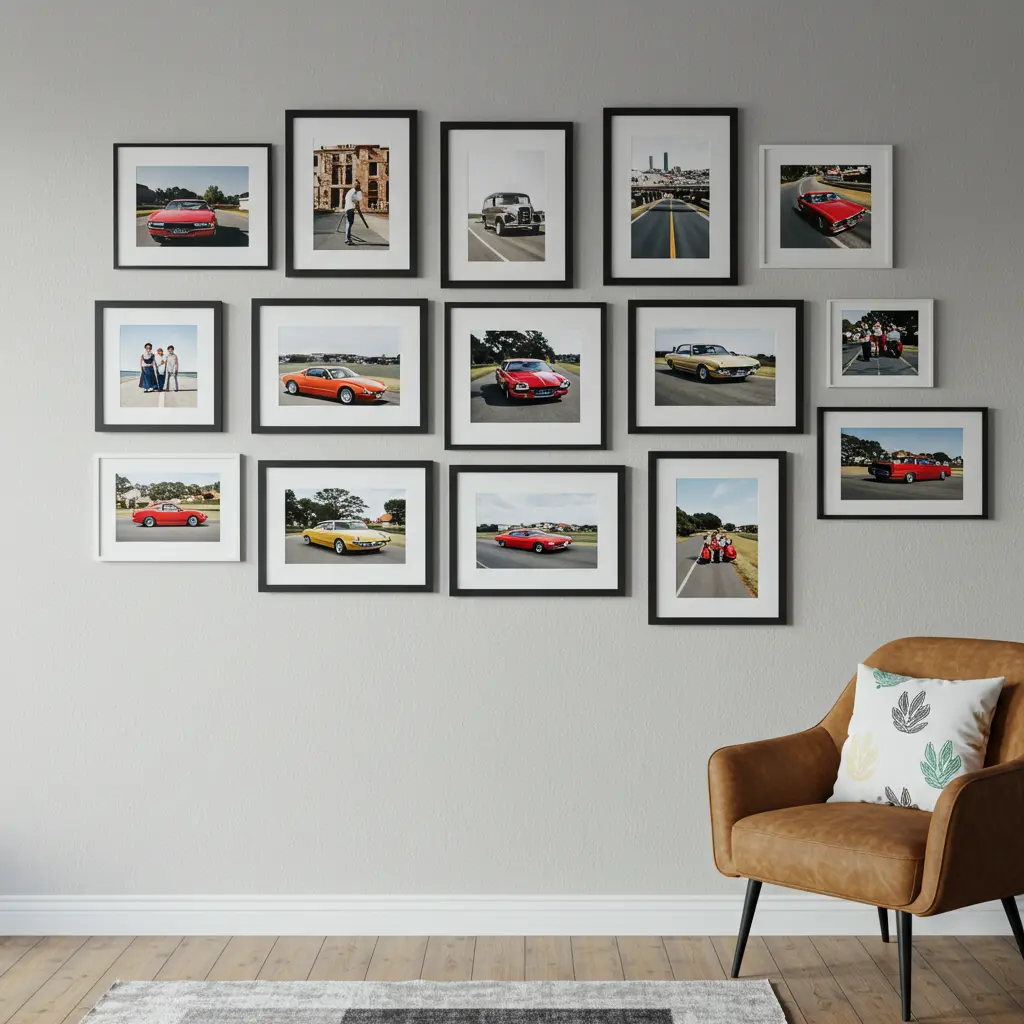
Best For: Anyone who loves a polished, put-together look. It’s the quickest way to make a collection of photos feel intentional and chic.
Pro-Tip: Use identical frames and space them evenly. To make it foolproof, lay your design on the floor first, then use small pieces of painter’s tape on the wall to mark where each frame will go.
7. The Modern Wire Grid Panel
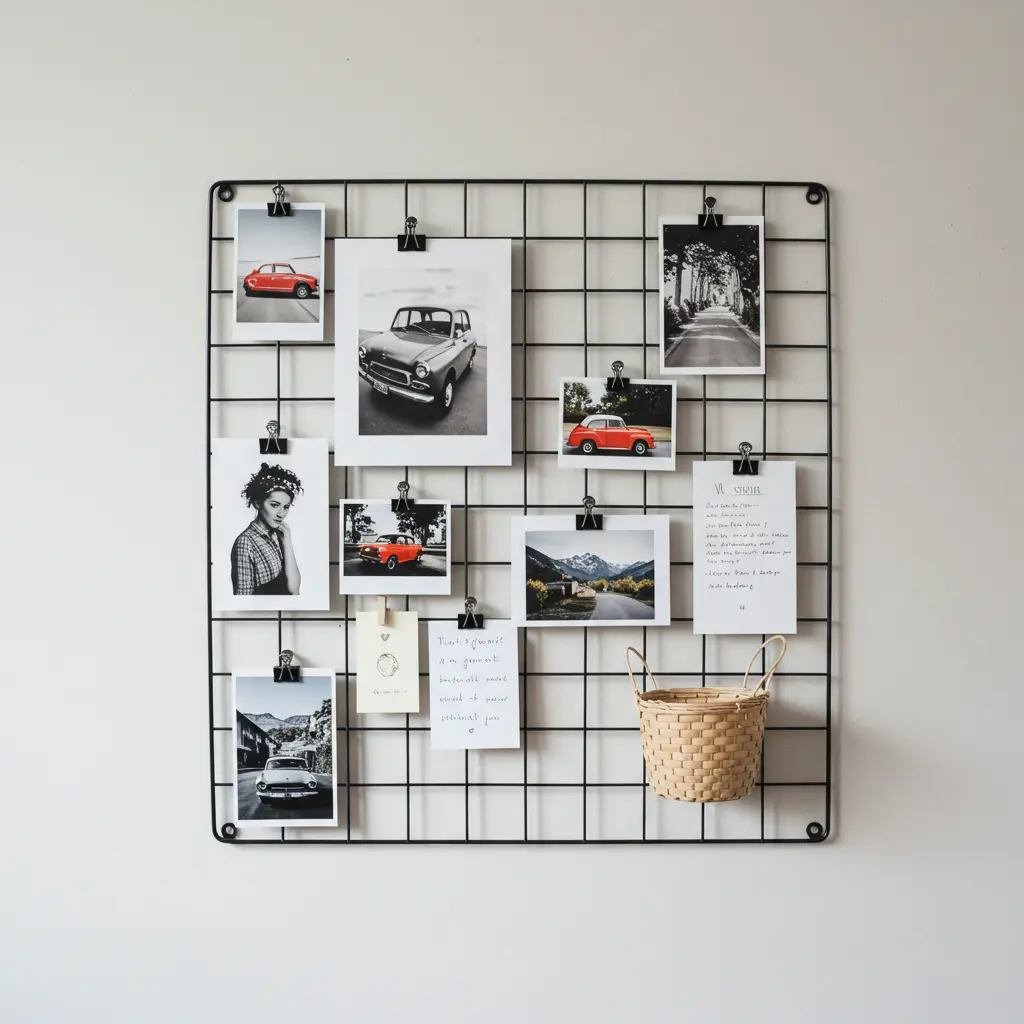
Best For: Minimalists and lovers of a light, airy, industrial look. It’s perfect for clipping photos, notes, and small hanging baskets.
Styling Cue: Use small, black binder clips to hang photos and prints. It’s a cohesive and inexpensive way to create a beautiful, personal gallery.
8. The Heartfelt Photo Garland
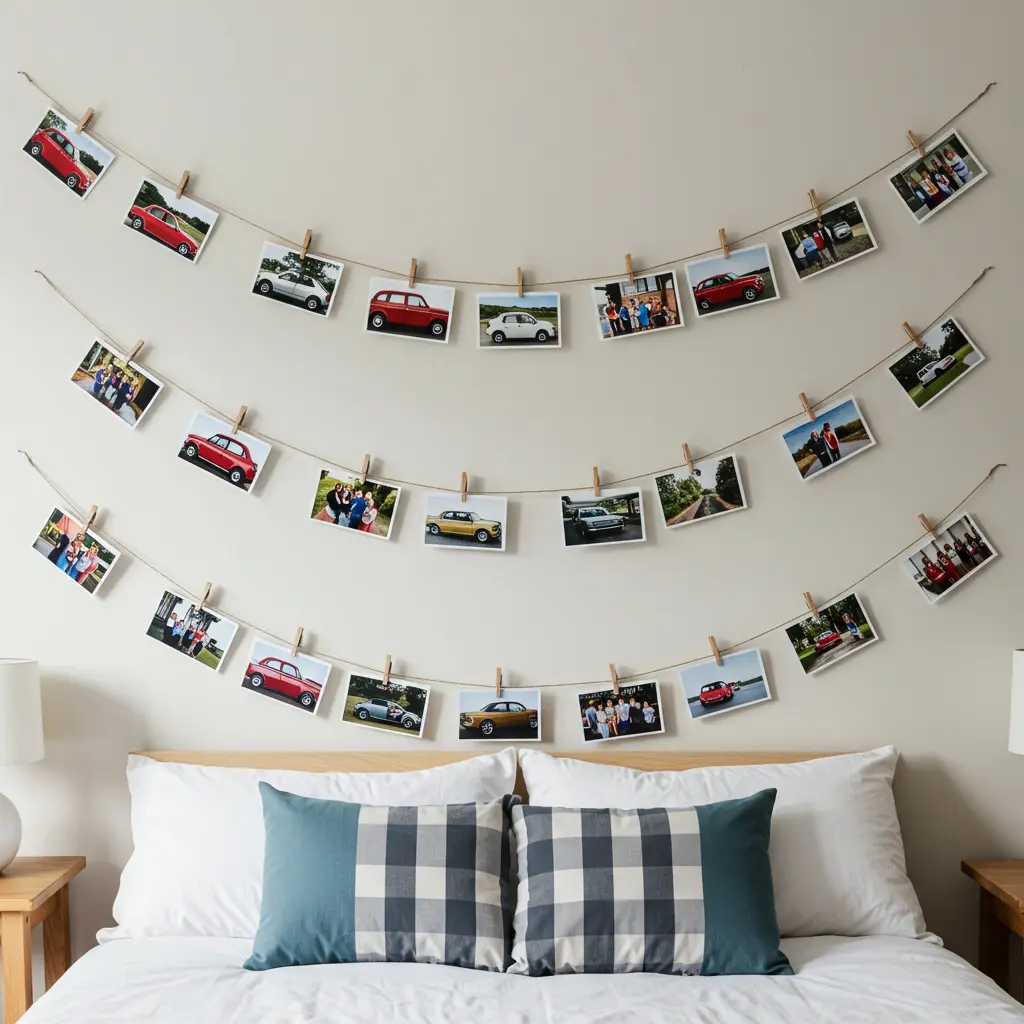
Best For: A sweet, personal, and easy-to-change display of memories. It adds a touch of casual, homespun warmth.
Key Consideration: Instead of one long string, hang several shorter strings of different lengths vertically to create a “photo curtain” effect behind your bed.
9. The Asymmetrical Art Ledge
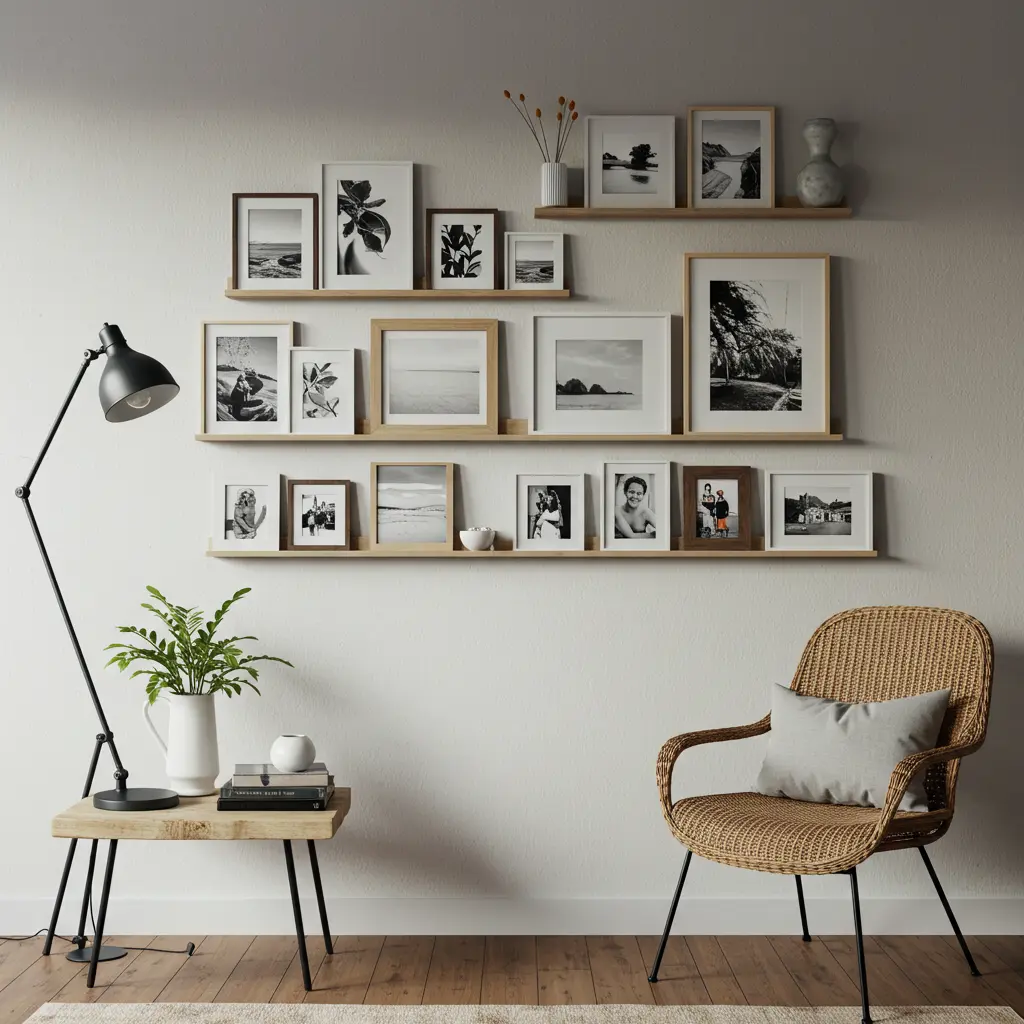
Best For: Displaying art, photos, and small treasures without putting a lot of holes in the wall. It creates a gathered-over-time, effortless look.
Pro-Tip: Use narrow picture ledges. They are perfect for layering frames of different sizes, and you can easily swap them out as your mood changes.
10. The Vinyl Record Showcase
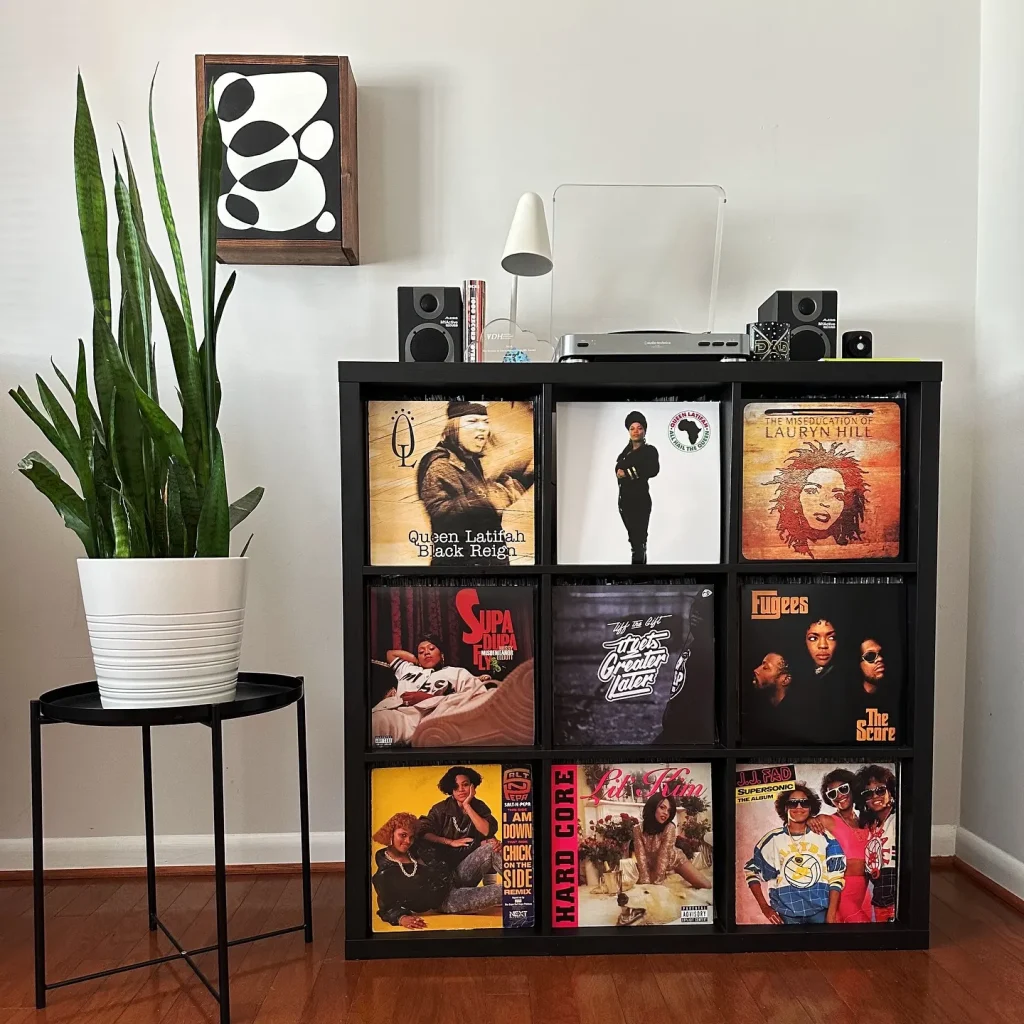
Best For: Music lovers who want to display their favorite album art as the masterpiece it is.
Styling Cue: Use small, clear acrylic shelves designed specifically for records. They make the albums appear to be floating on the wall.
The Wow Factor: Features That Elevate
11. The Whimsical Fairy Light Curtain
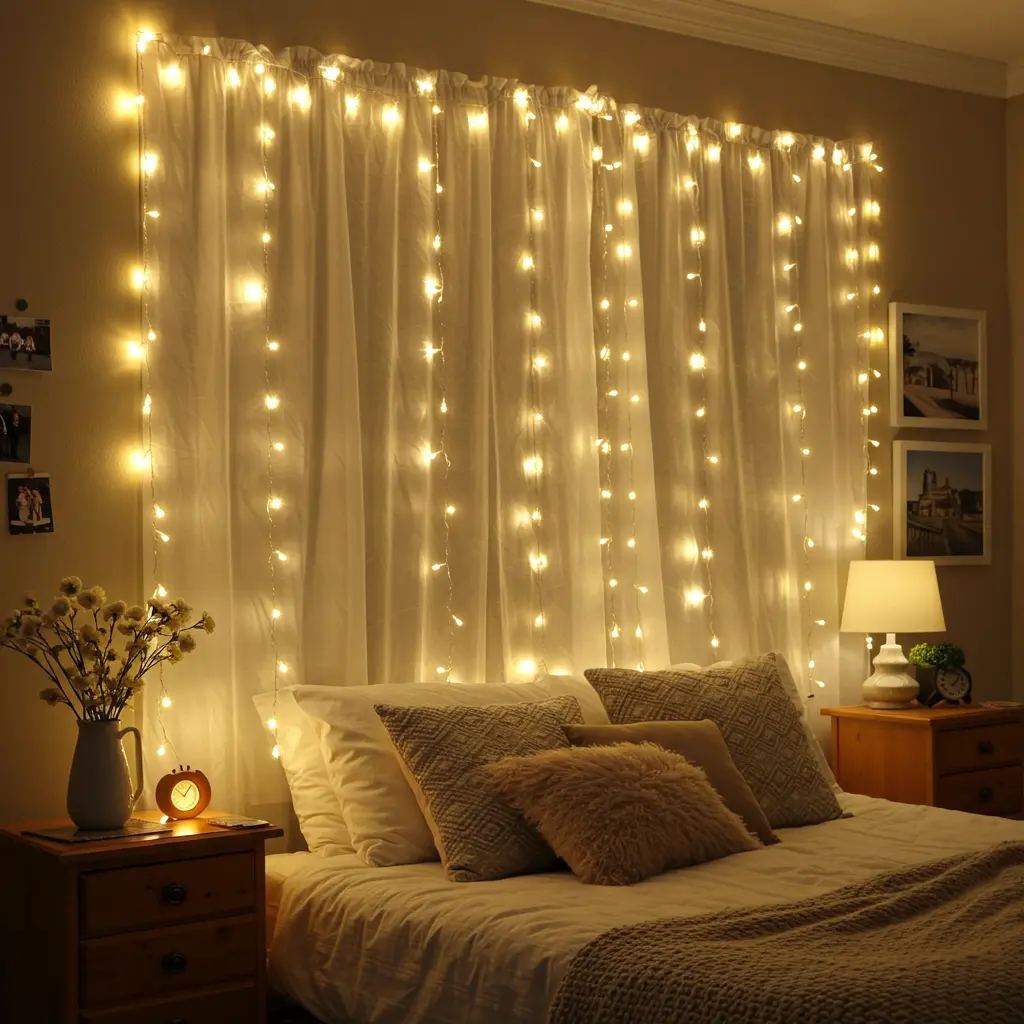
Best For: Adding an instant warm, magical, and cozy glow. It’s the signature of a comfy dorm room sanctuary.
Pro-Tip: For the ultimate dreamy effect, hang a set of curtain lights behind a sheer white or colored fabric panel. It diffuses the light beautifully.
12. The Personal Neon Sign
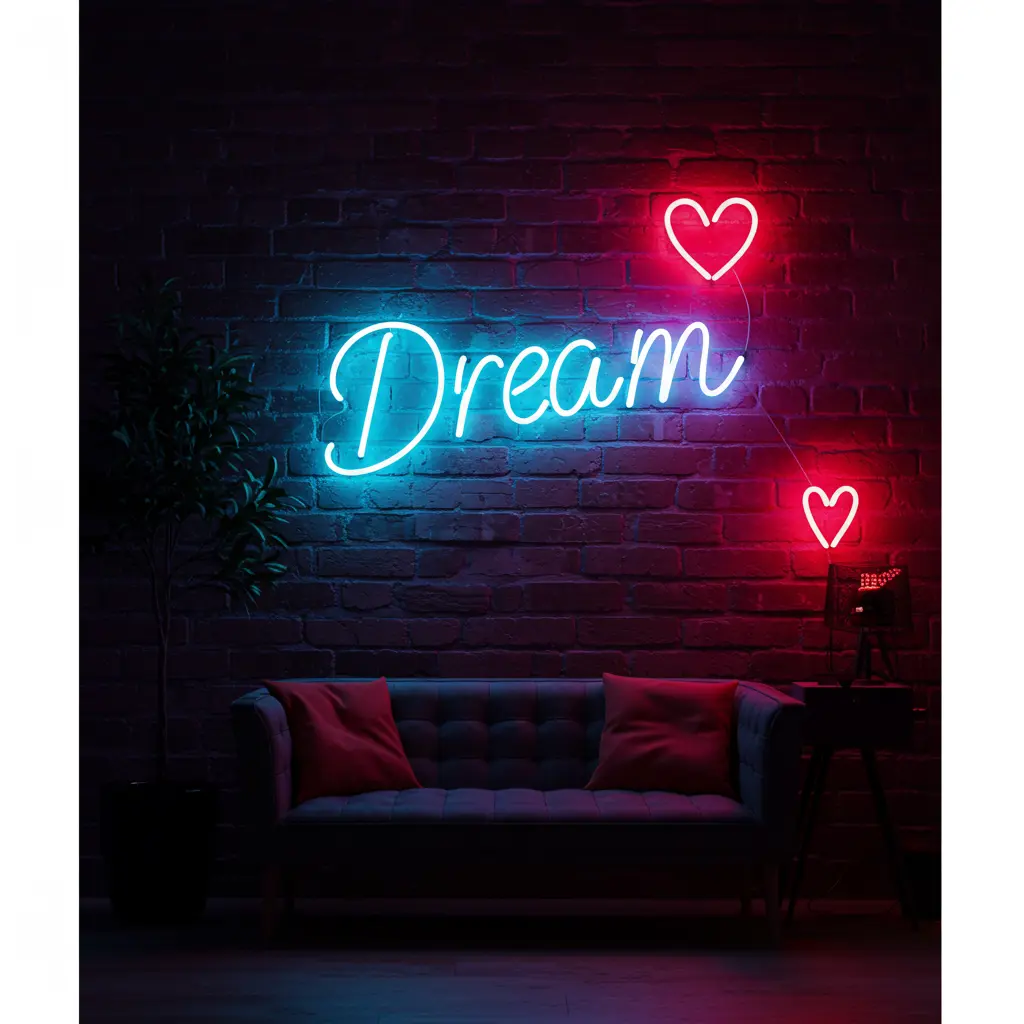
Best For: Creating the ultimate “wow” moment and infusing your space with personality and a vibrant glow.
Styling Cue: Choose a word or symbol that is meaningful to you, like “Dream,” “Focus,” or a simple heart. Let it be your mantra.
13. The Statement Leaning Mirror
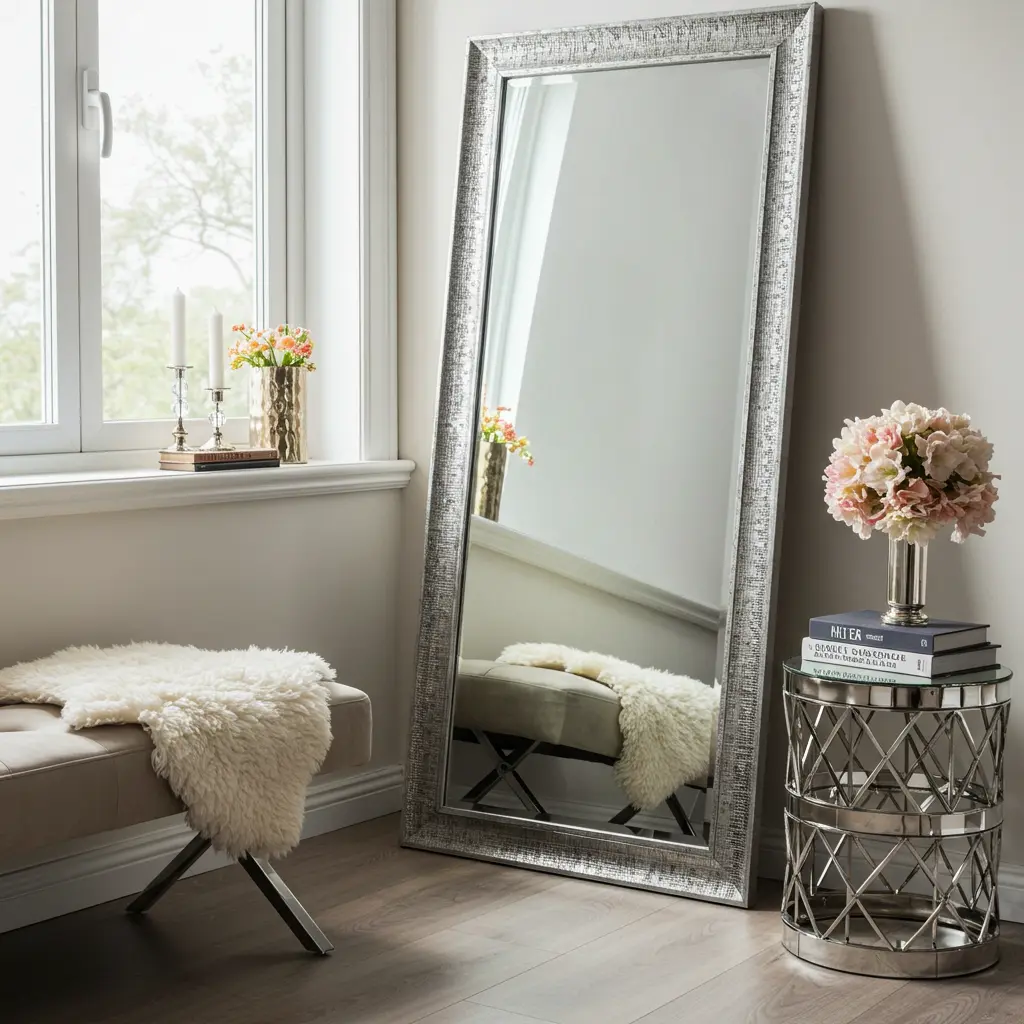
Best For: Making a small room feel instantly larger, brighter, and more glamorous.
Key Consideration: A full-length mirror leaned against the wall requires zero installation. Place it opposite a window to double your natural light.
14. The Organic Fabric Canopy
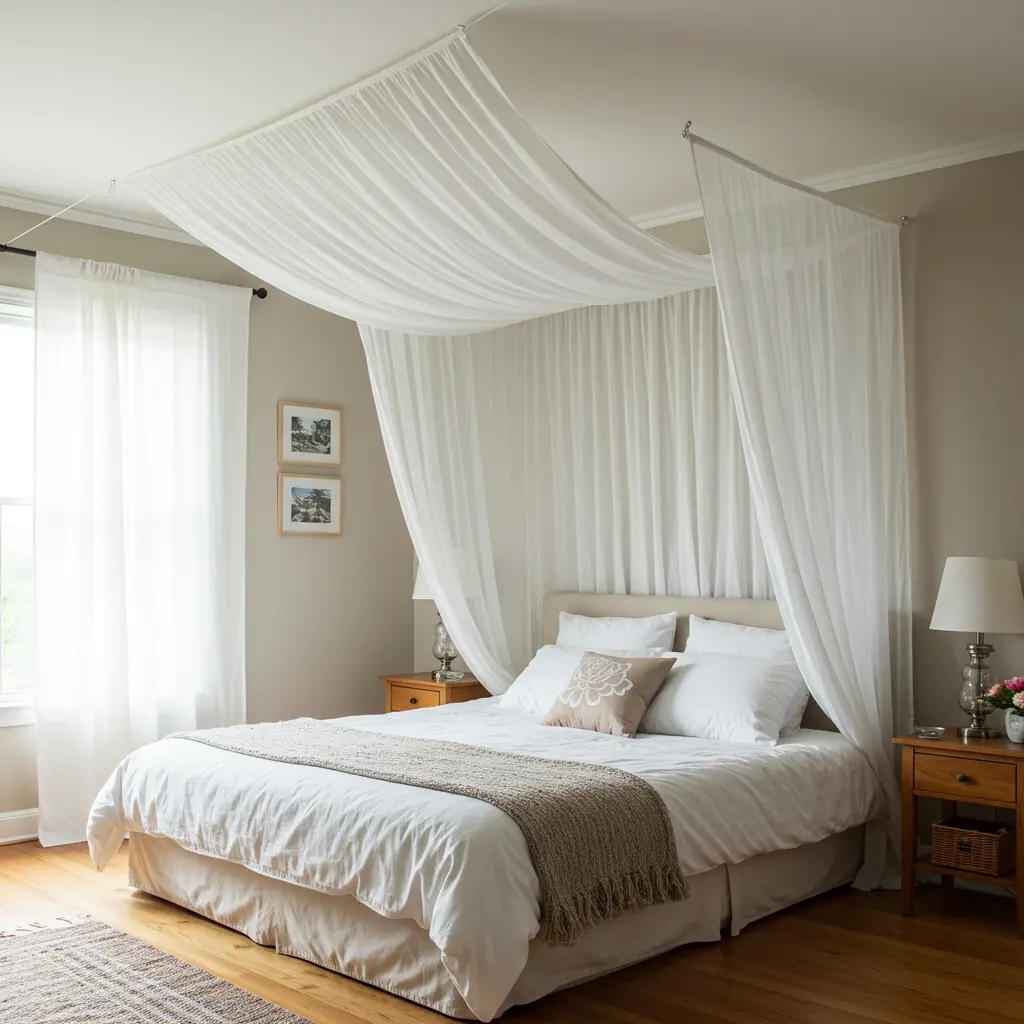
Best For: Creating a soft, dreamy, and cozy haven, especially over a bed.
Pro-Tip: Use lightweight, sheer fabric like chiffon or tulle. Secure it to the ceiling above the head of your bed with several sturdy, damage-free ceiling hooks, letting it drape down beautifully.
15. The Delicate 3D Wall Decals
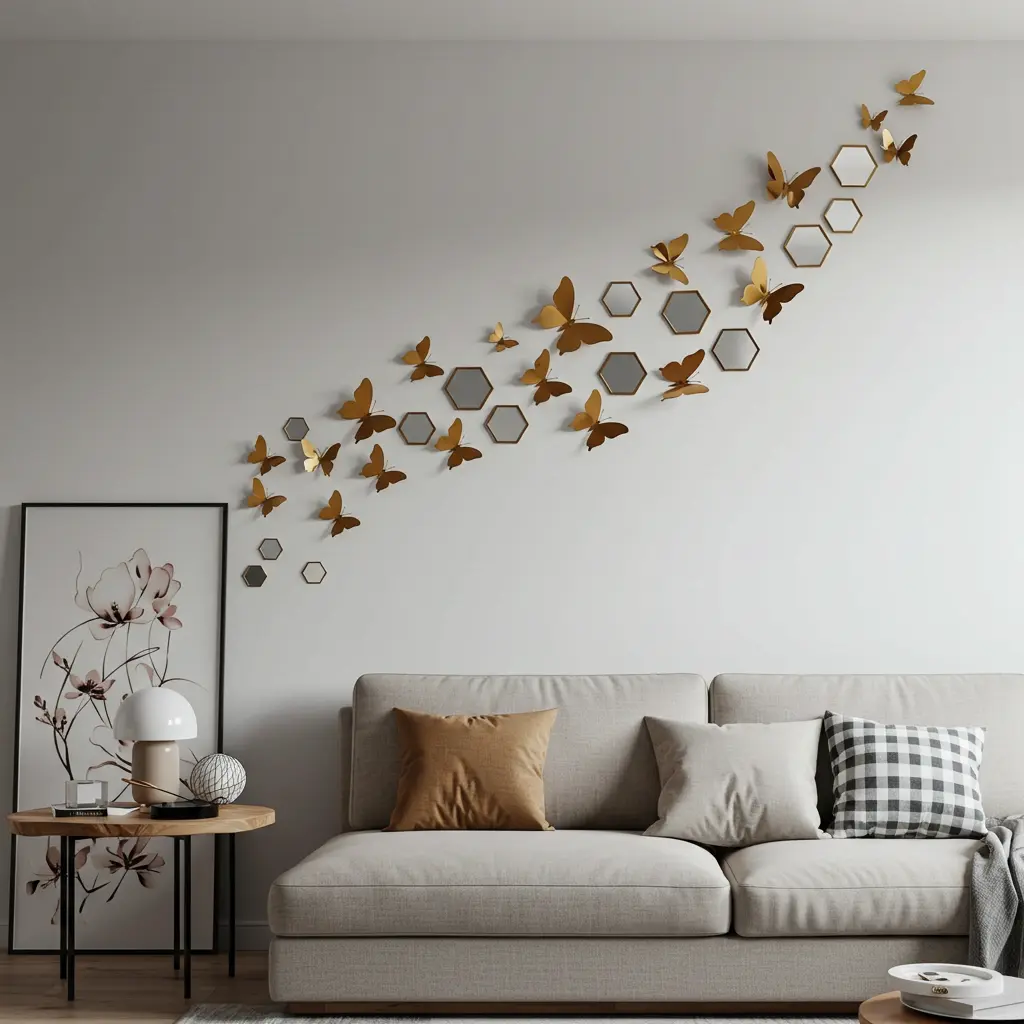
Best For: Adding a touch of playful dimension that makes your walls come alive.
Styling Cue: Create a “swoosh” of metallic butterflies or mirrored hexagons that flows from one corner of the wall, making the design feel dynamic.
The Natural Touch: Greenery & Organics
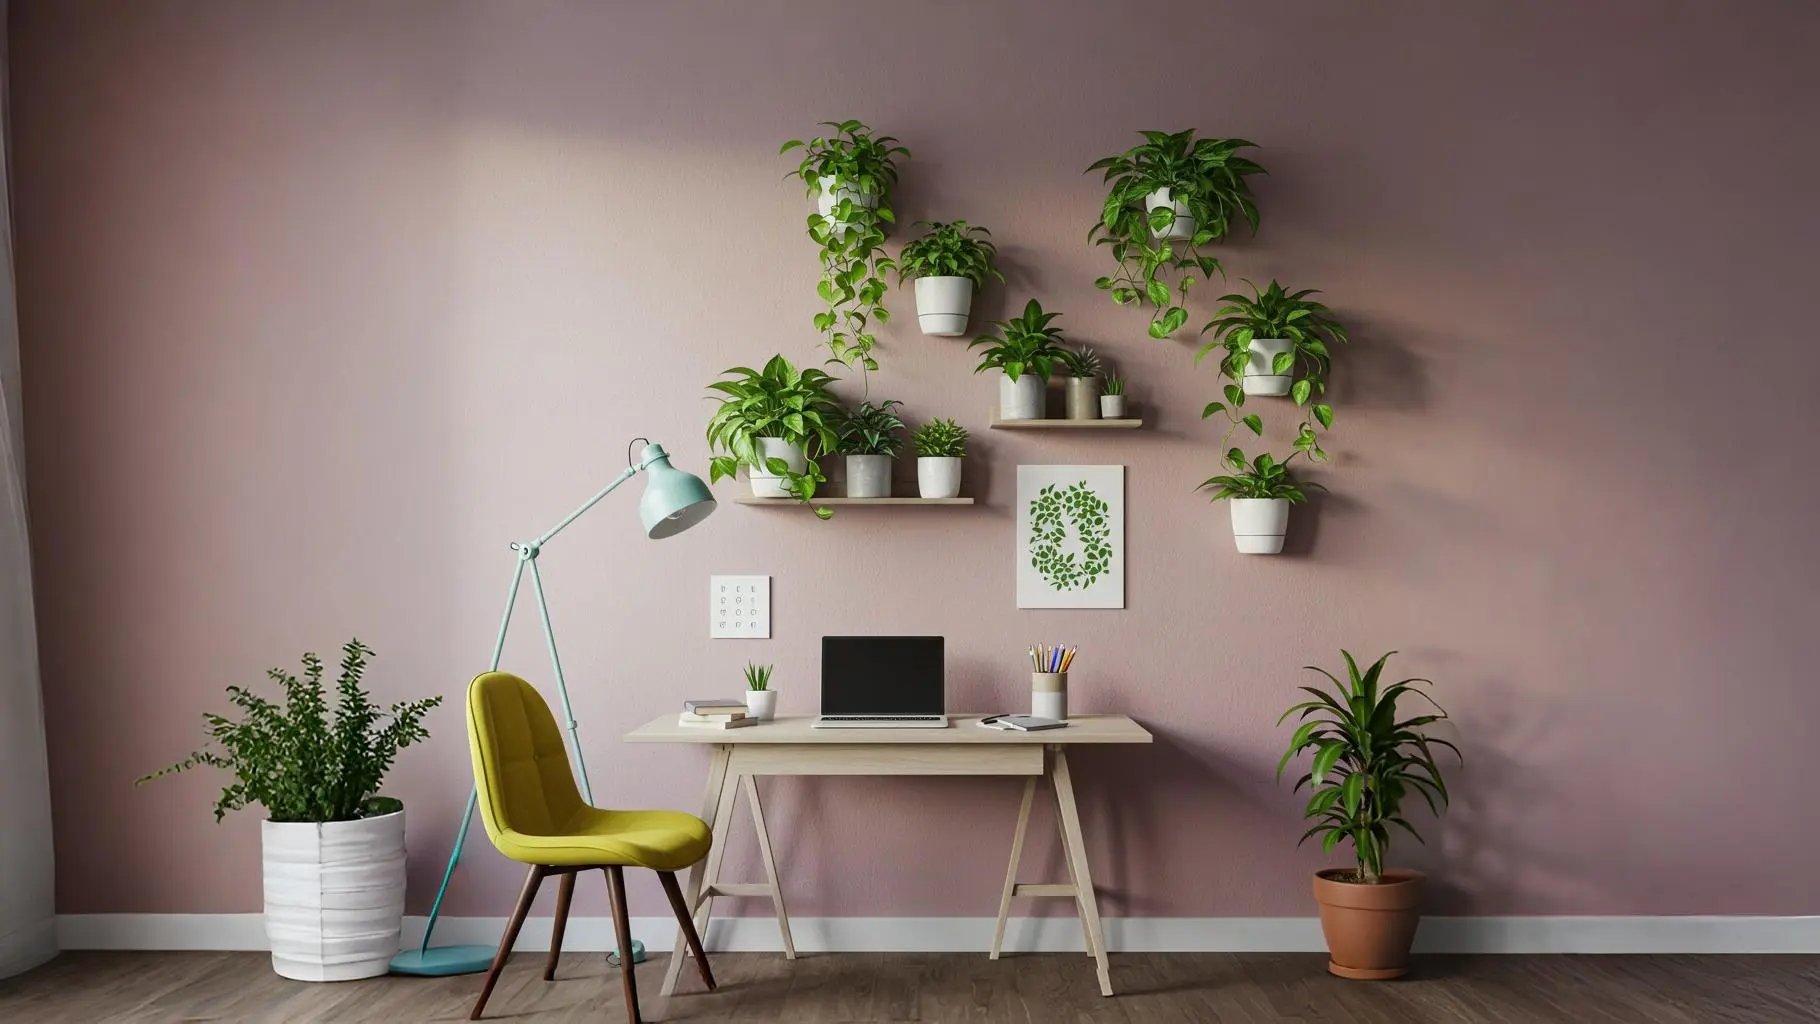
16. The Living Green Wall
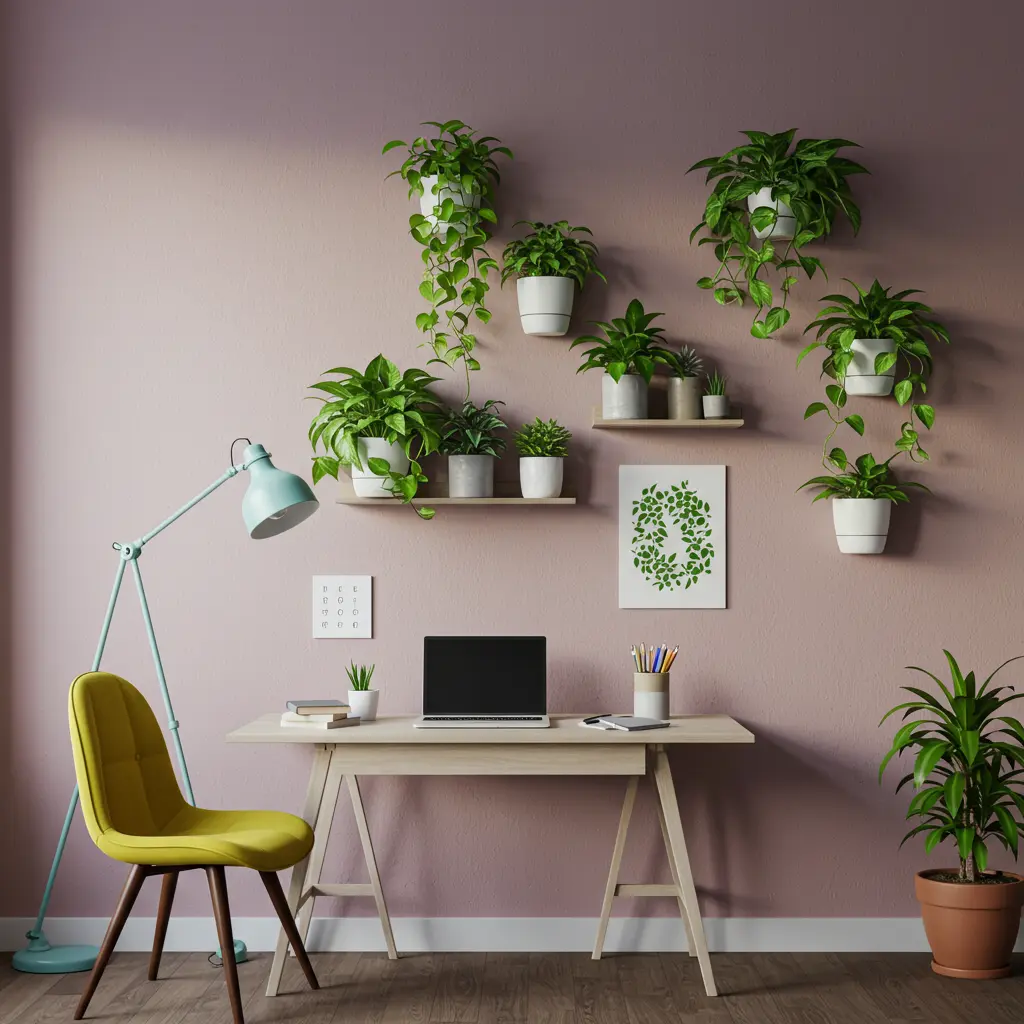
Best For: Bringing life, fresh air, and a sense of calm to your study space.
Pro-Tip: Use lightweight wall-mounted planters or a series of small floating shelves to hold easy-care plants like Pothos or Snake Plants, which thrive in lower light.
17. The Delicate Macrame Hanging
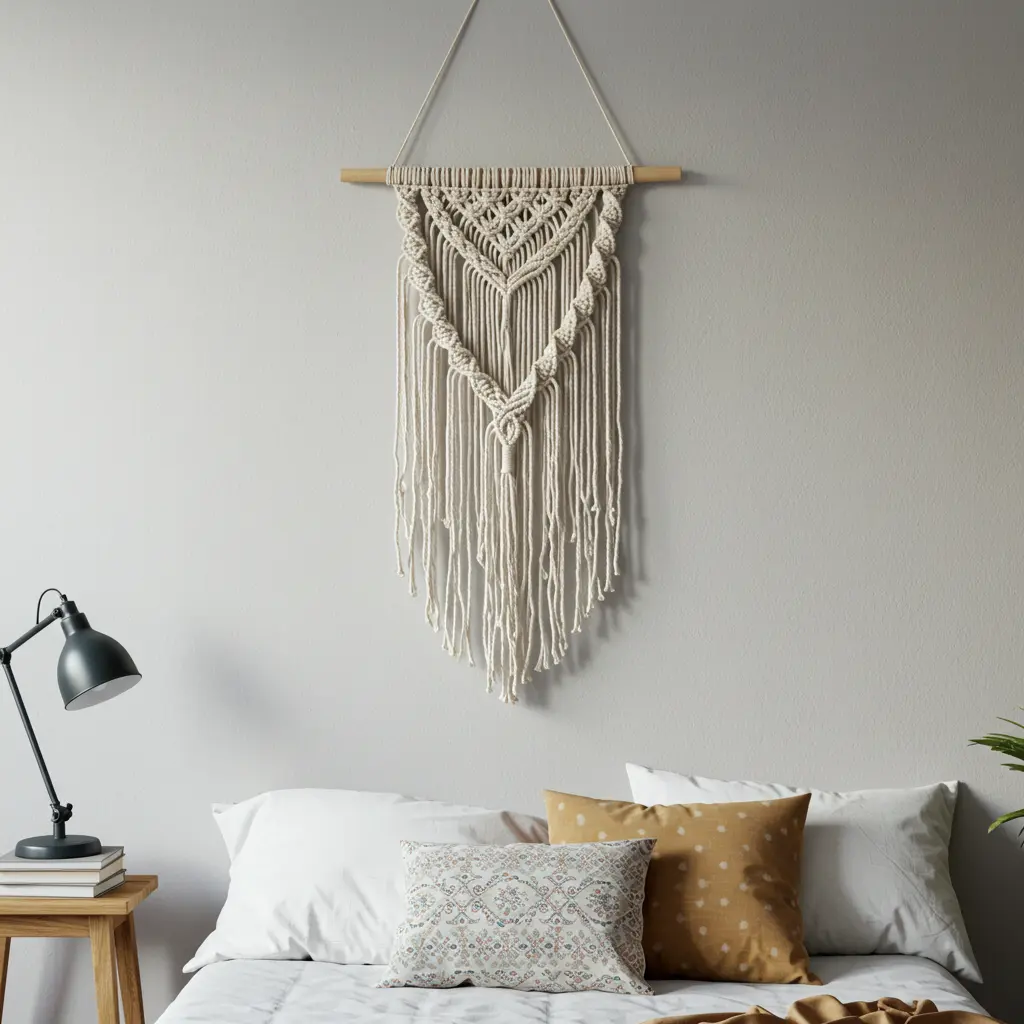
Best For: Adding soft, bohemian texture and a touch of handcrafted warmth.
Key Consideration: A single, beautifully made macrame piece can serve as the primary artwork over a bed or desk, adding texture without overwhelming the space.
18. The Pressed Flower Frames
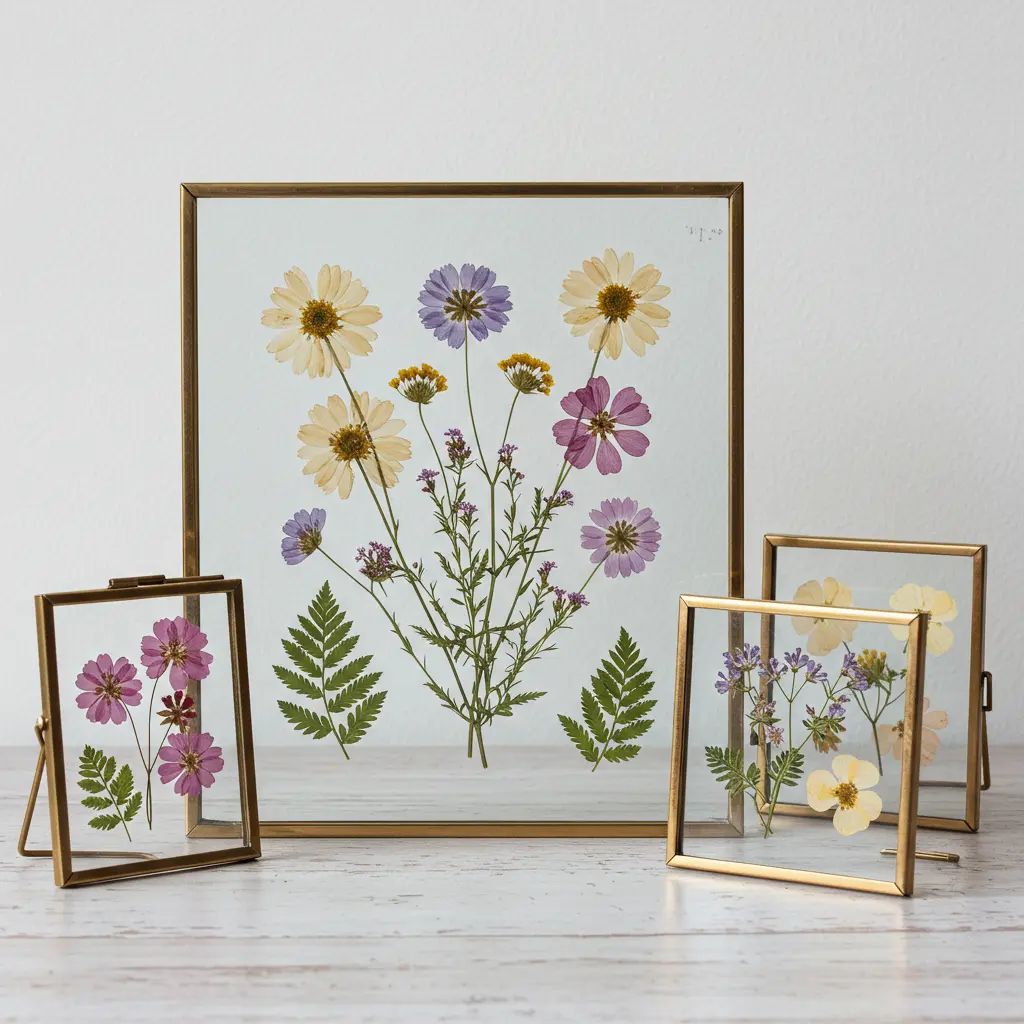
Best For: A delicate, vintage, and romantic touch of nature.
Styling Cue: Use floating glass frames to showcase the intricate beauty of the flowers. Group several small frames together for a botanical gallery.
19. The Natural Garland Swag
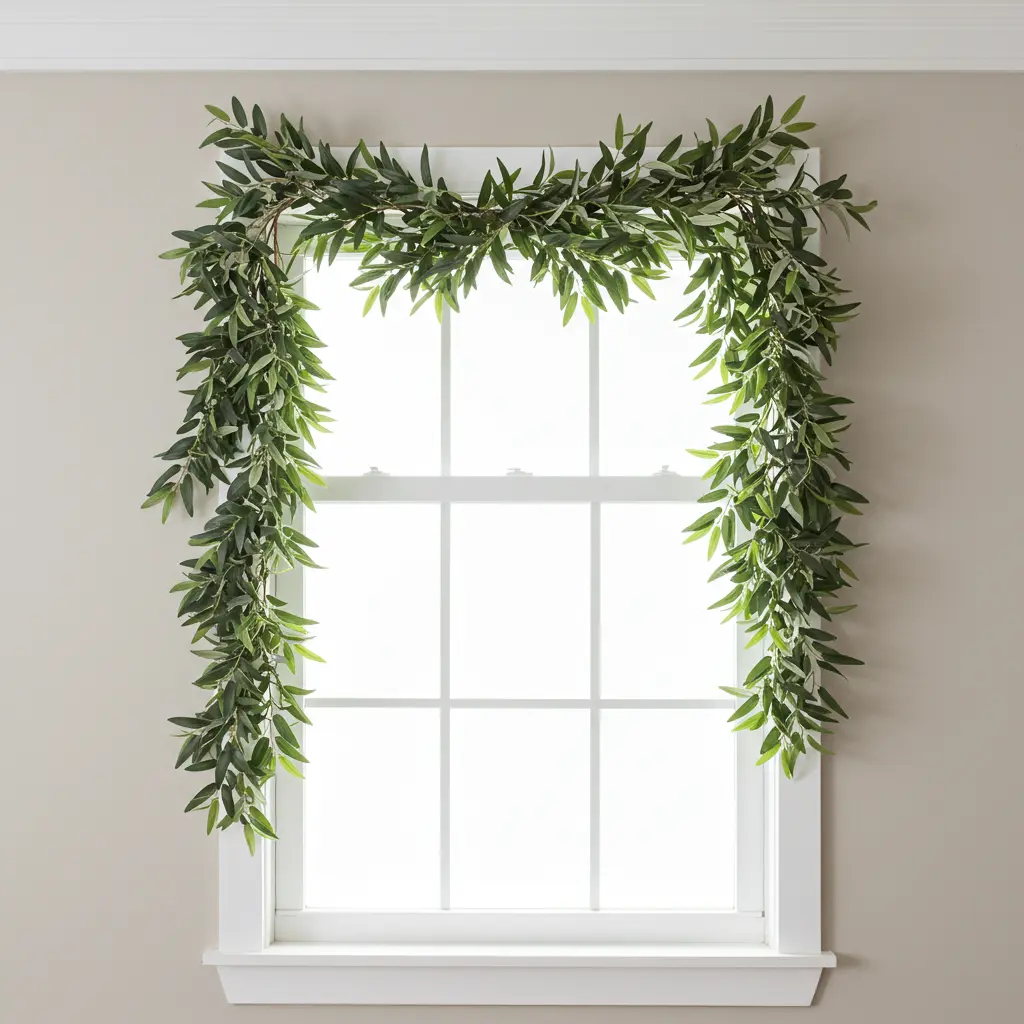
Best For: A simple, elegant touch of nature that can be draped over a window, a mirror, or a headboard.
Styling Cue: A faux eucalyptus or olive branch garland has a sophisticated, year-round appeal and requires no care.
20. The Hanging Scarf or Textile
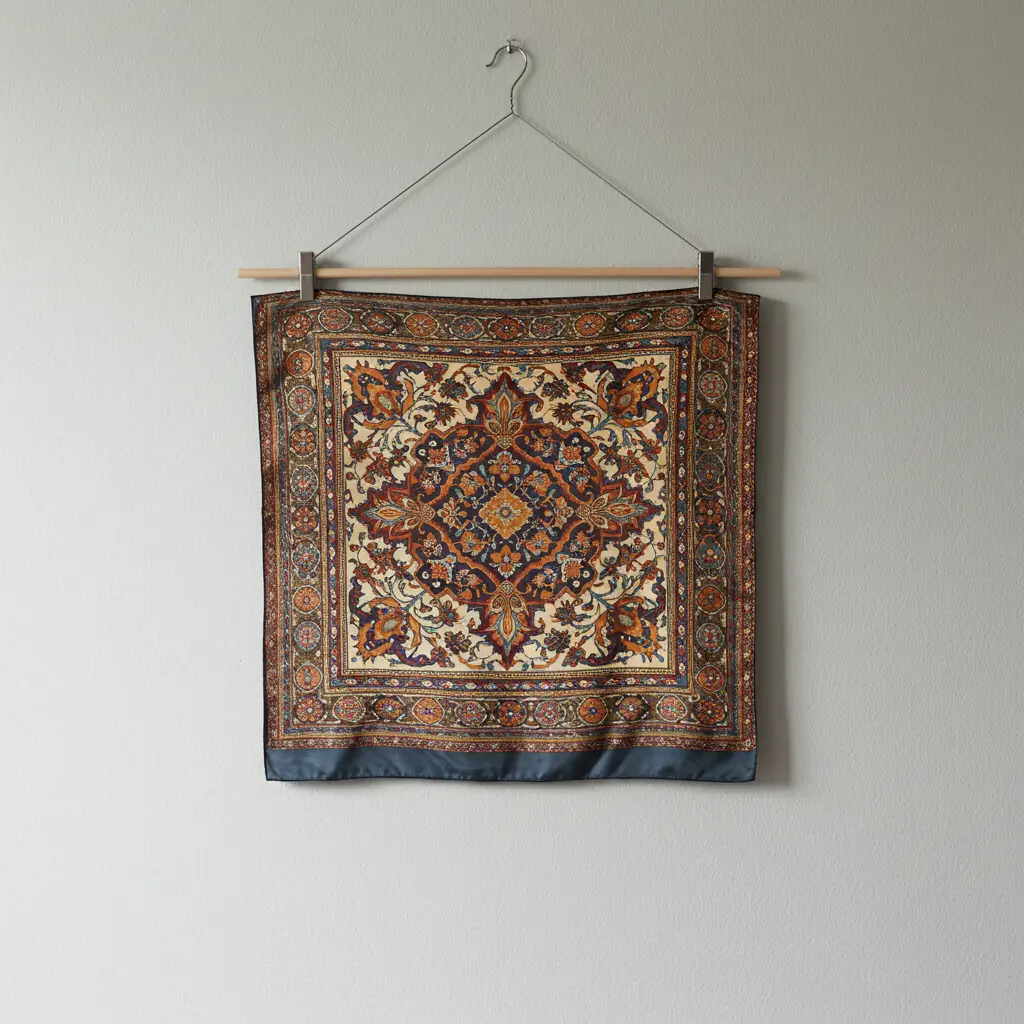
Best For: Displaying a beautiful silk scarf, a small vintage rug, or a sentimental piece of fabric as unique, textured art.
Pro-Tip: Use a simple wooden dowel or a decorative pants hanger to hang the textile for a clean, museum-like presentation.
The Smart Stuff: Function & Style
21. The Versatile Pegboard Organizer
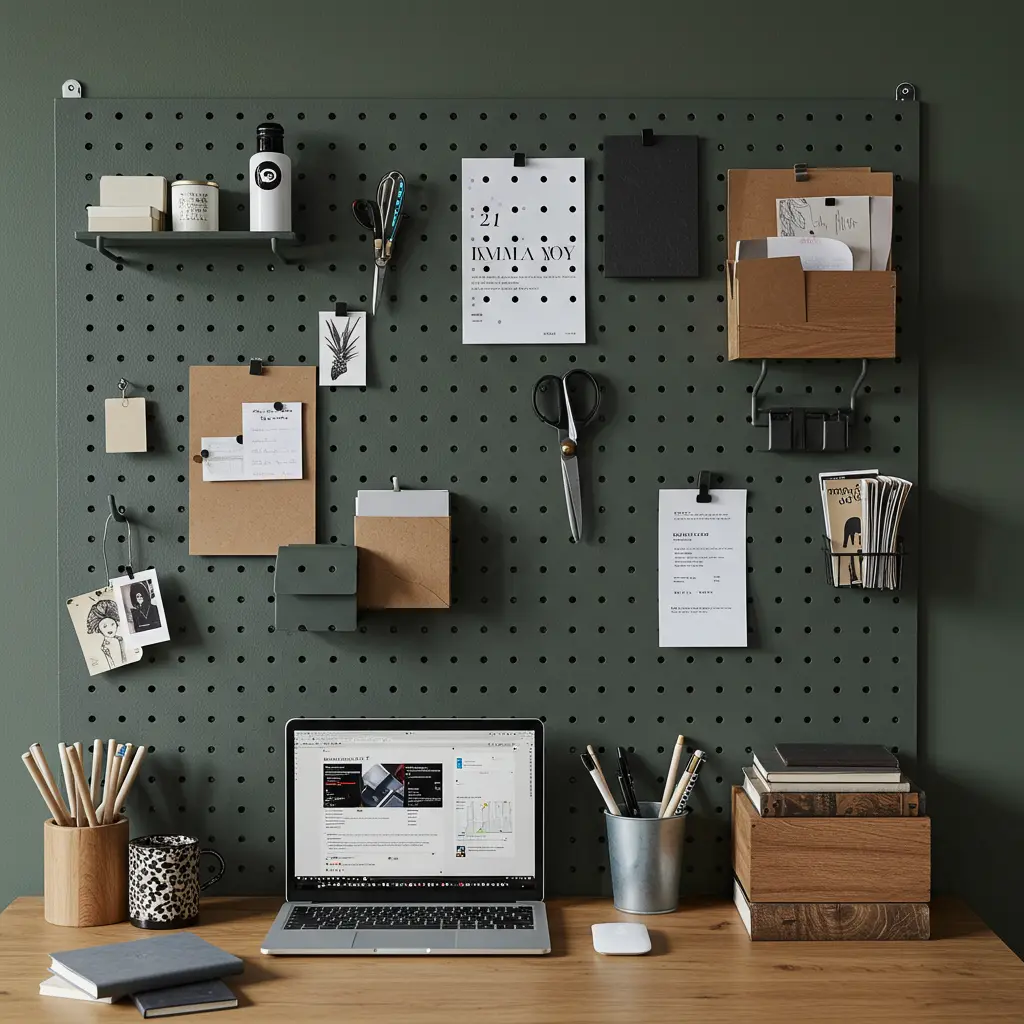
Best For: Creatives and anyone who loves to reconfigure their space. It adds a layer of utilitarian texture and gets everything up off your desk.
Styling Cue: Spray paint the pegboard a soft, moody color like charcoal or olive green to make it feel less like a garage and more like a designer feature.
22. The Warm Cork Board Wall
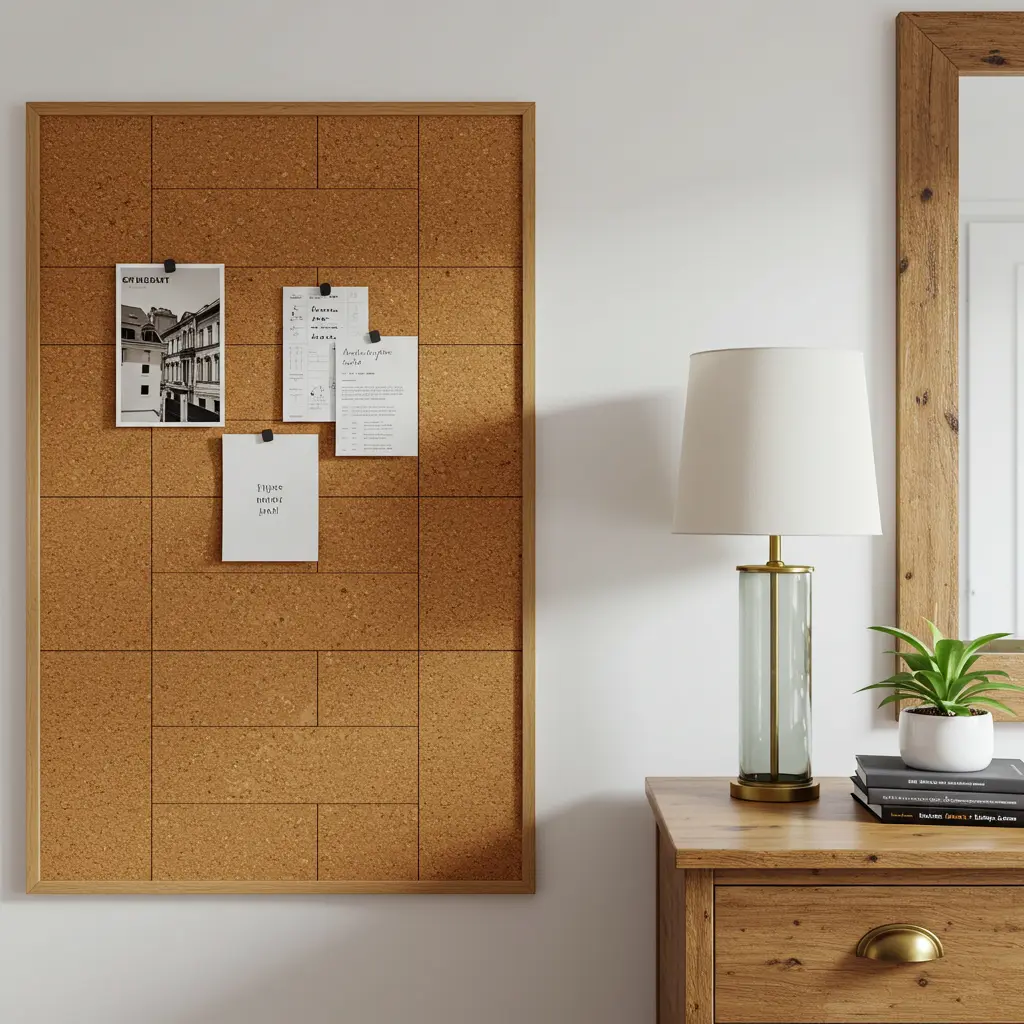
Best For: Adding natural texture and creating a classic, functional mood board for schedules, tickets, and inspirations.
Key Consideration: Look for cork tiles instead of a framed board. You can arrange them in a custom pattern and cover a larger area for a more integrated look.
23. The Floating Bookshelves
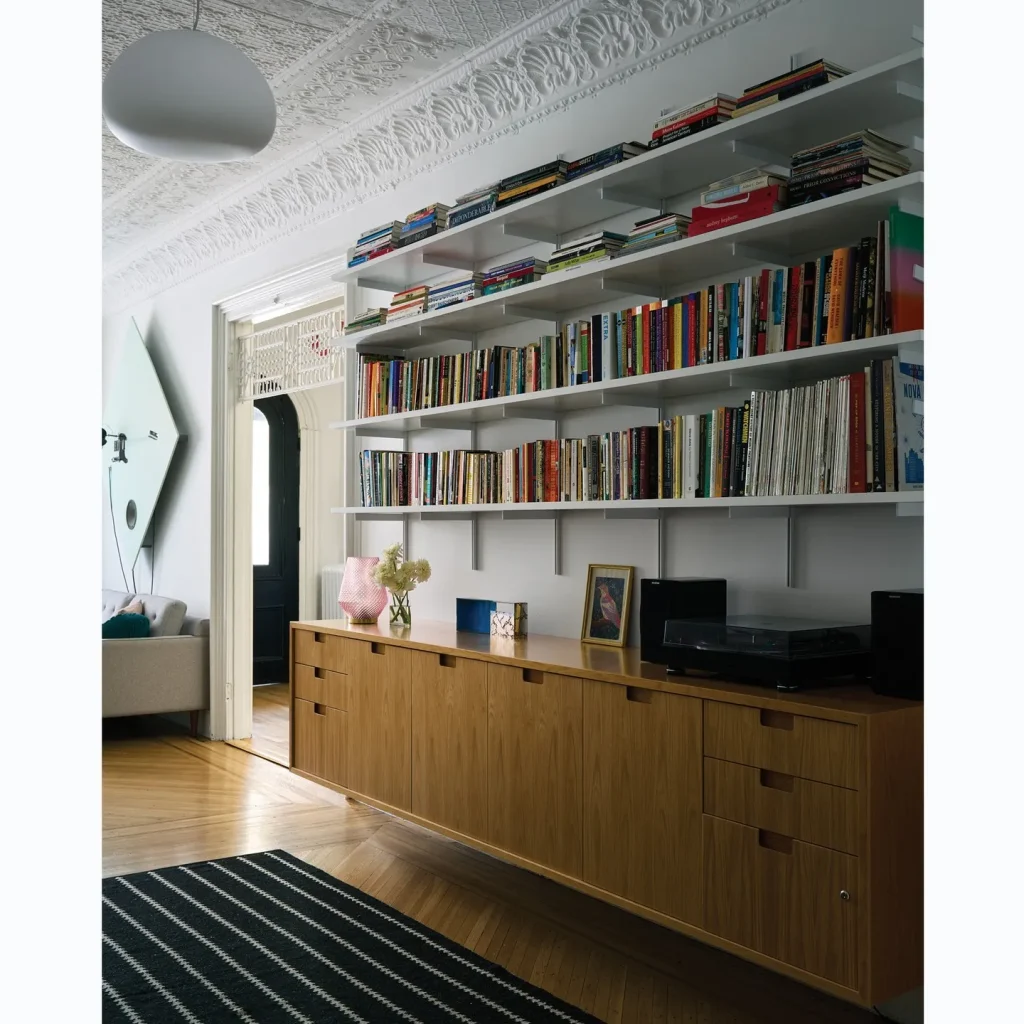
Best For: Book lovers who want to turn their collection into a gravity-defying art installation.
Pro-Tip: Arrange books by color for a rainbow effect, or turn them spine-in for a neutral, textured look.
24. The Peel-and-Stick Whiteboard
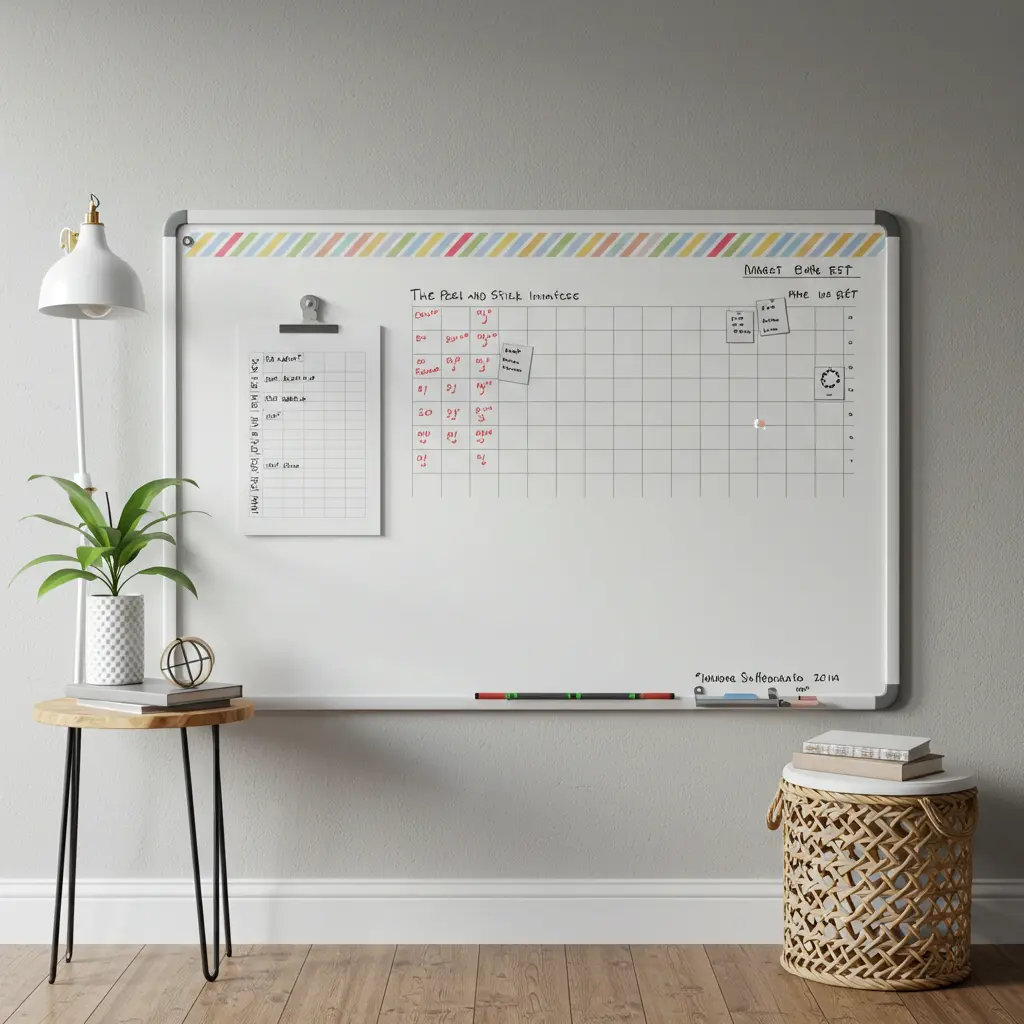
Best For: The super-organizer, the list-maker, and the doodler. It’s a functional space for reminders and creativity.
Styling Cue: Frame the peel-and-stick panel with colorful washi tape to give it a finished, custom look.
25. The Stylish Hat Wall
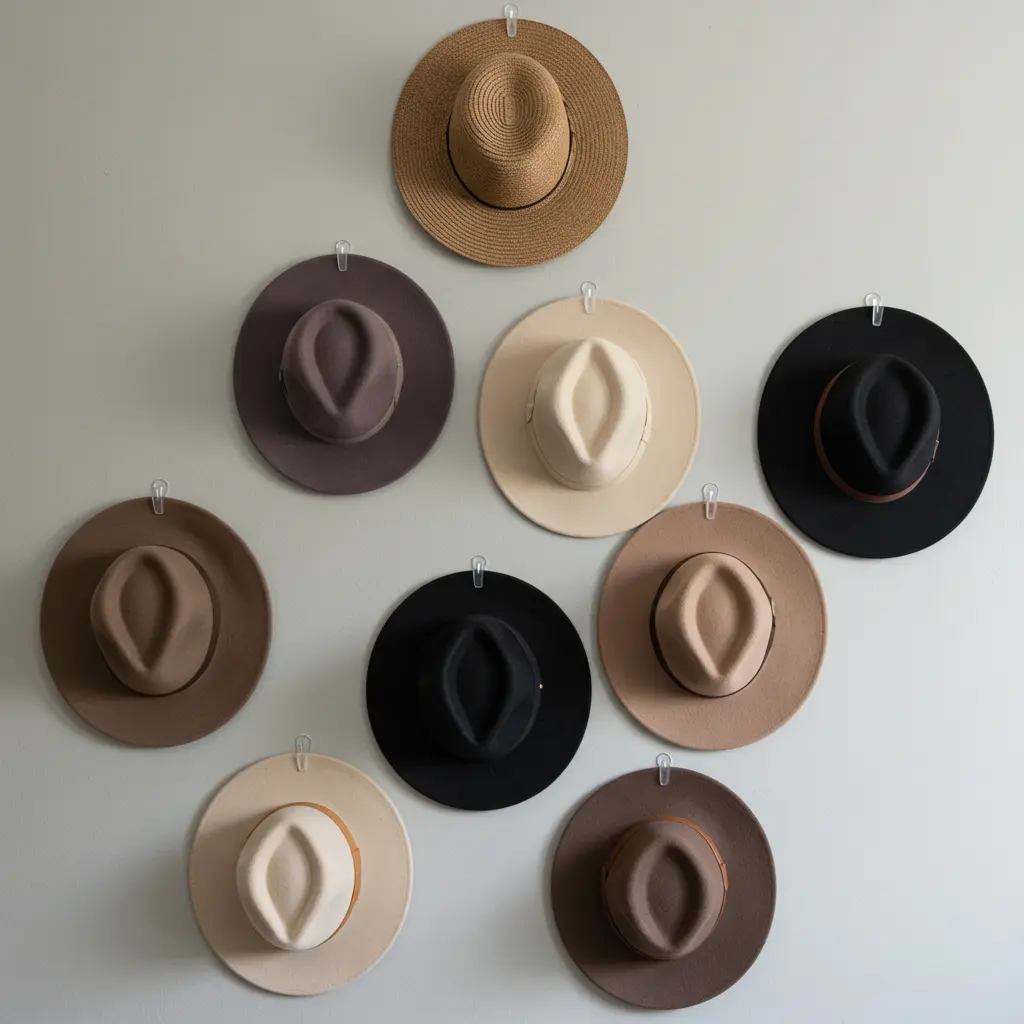
Best For: Anyone with a collection of beautiful hats. It turns your accessories into a piece of changing, functional art.
Pro-Tip: Use simple, clear Command hooks to create an artful, staggered arrangement that makes it easy to grab a hat on your way out.
Bringing Your Vision to Life
With a dream in your heart and a story in your head, it’s time for the gentle act of making it real.
Design Recipes for Tricky Spaces
- For the Ugly Cinder Block Wall: Your best friend is texture. A large, soft Tapestry (#1) or a wall of Faux Ivy (#3) will completely transform the cold, hard surface into something warm and inviting.
- For the Room with Low Ceilings: To create an illusion of height, think vertically. A Painted Arch (#5) behind your bed, a gallery wall with a strong vertical line, or Washi Tape stripes will draw the eye upward.
- For the Shared Wall with a Roommate: Create a beautiful boundary. A Peel-and-Stick Wallpaper panel (#2) on your half of the wall clearly and stylishly defines your personal zone without a single argument.
The Practical Stuff: Hanging & Safety
- A Solid Foundation: Before hanging anything, wipe the wall with a little rubbing alcohol. It removes any dust or oils and helps adhesive strips stick much better.
- Respect the Weight Limits: Command strips are heroes, but they have their limits. Use the right size for the right job, especially for heavier items like mirrors or framed art.
- Mind the Lights: When using fairy lights or neon signs, make sure cords are not frayed and are kept away from flammable materials like sheer fabrics. Use hooks to guide cords neatly along a wall or corner.
No Demo Required: A Renter’s Guide to a Beautiful Wall
- Lean Into It: A tall, leaning mirror or a large framed canvas placed on the floor against a wall gives the feeling of intentional decor without a single hole.
- The Power of Paint (Removable): Use spray paint to customize cheap plastic frames or organizers to create a high-end, cohesive look that you can take with you.
- Peel-and-Stick Wonders: High-quality, removable wallpaper, contact paper, or decals are your best friends for personalizing walls and even furniture.
- Command Your Gallery: You can create a full, stunning gallery wall around your desk or bed using only damage-free Command Strips and hooks.
Solving a Few “What Ifs…”
- My only wall has a window in the middle?
Embrace asymmetry. Create two smaller, balanced galleries on either side of the window. Or, make the window the centerpiece by draping a beautiful garland (#19) over the top. - My room has awkward pipes or a circuit breaker on the wall?
Work with it, don’t fight it. Hang a beautiful, lightweight textile (#20) or a tapestry (#1) over the feature to conceal it, ensuring you still have access if needed. - My bed has to go in a corner?
Make the corner feel intentional. Use a Peel-and-Stick Accent (#2) that covers both walls in the corner to create a unified, cozy nook, or string Fairy Lights (#11) to make it glow.
Designing for Tomorrow
- Think About Your Next Chapter: Invest in classic, versatile pieces (a good set of matching frames, a beautiful macrame hanging) that will transition from a dorm to your first “real” apartment.
- Make Access Easy: At the end of the year, you have to pack it all up. Choose solutions that are easy to disassemble and transport.
- Choose Timeless Materials: Simple wood tones, classic black or white metal, and natural fibers have a wonderful staying power that will feel stylish for years to come.
Conclusion: Your Wall’s Next Chapter
And just like that, you’re no longer just looking at a blank wall; you’re looking at a world of possibilities. You have the ideas, the inspiration, and the gentle know-how to create a personal space that is beautiful, functional, and a true reflection of you. This isn’t just about a better-looking room; it’s about creating a sanctuary that feels even more like home.
It all starts with a single choice. Pick a style that made your heart skip a beat, and take the first small, joyful step. You’ve got this.
May your home tell your story.
