Your outdoor space deserves as much love as your interior! Is your patio just a sad, empty slab of concrete, a place you walk through instead of relax in? Why spend a fortune on boring, generic patio furniture when you can create your own custom oasis?
This is your creative playbook for transforming your backyard into a cozy, “vibey” paradise. These 20 stylish and functional DIY patio furniture ideas are the ultimate glow-up for your outdoor space.
We’ll explore stunning designs, decode the secrets to a professional, long-lasting finish, and walk through the practical steps to bring your vision to life.
By the end, you’ll see a stack of old pallets not as trash, but as a “resort-worthy sectional” just waiting to happen. Don’t miss out, your dream outdoor retreat is just a project away!
Before You Begin: The Outdoor Oasis Mindset
The most incredible patios start with crafting an experience, not just building furniture. Before you cut a single board, let’s lay the groundwork for a design that is comfortable, functional, and “shockingly impressive”. The goal is to create a personal resort, not just a place to sit.
The Secrets of Style: Simple Rules for a Stunning Look
“DIY” doesn’t have to mean “amateur-hour.” These simple secrets are what elevate a weekend project into a high-end, designer-looking outdoor living space.
Weatherproofing is Everything: This is the #1 non-negotiable rule. Your hard work deserves to last. Use exterior-grade paint, stains with UV protection, and a quality waterproof sealant. For cushions, invest in outdoor, moisture-wicking fabrics like Sunbrella. This is the secret to furniture that “survives the seasons”.
Comfort is King: Uncomfortable furniture never gets used. Thick, high-density foam cushions are worth the investment. Pay attention to the height and depth of your seating. Your goal is furniture you want to “sink into for hours”, not perch on for five minutes.
Scale is Your Secret Weapon: A massive sectional on a tiny balcony will feel cramped, while a tiny bistro set in a huge yard will look lost. Measure your space and plan your furniture to fit. Creating “defined zones” for dining and lounging with rugs and furniture placement is a total pro move.
Lighting Creates the Vibe: This is the final layer of magic that transforms a patio into an oasis. A simple string of solar-powered Edison bulbs, a few modern solar lanterns, or some LED strip lighting under a bench can make your DIY space look “absolutely breathtaking” after sunset.
What’s the Real Cost? A No-Fuss Budget Breakdown
| The Approach | Estimated Cost | What Your Money Buys | The Little Extras (Don’t Skip These!) |
| The Scrappy Upcycler | $20 – $75 | • Sandpaper, screws, and exterior paint • Finding free pallets, tires, and crates | • A good pry bar for pallets • A heavy-duty staple gun • A sewing machine for custom cushion covers |
| The Hardware Store Pro | $100 – $300 | • New lumber (2x4s, cedar planks) • A bag of concrete mix • Pre-made outdoor cushions | • A power sander • A circular saw or miter saw • A Kreg Jig for strong, hidden joints |
| The Master Craftsman | $300+ | • Large reclaimed wood beams • A metal fire pit insert • A full pergola kit or hardware | • A router for finished edges • A table saw for precise cuts • High-end exterior stain and sealant |
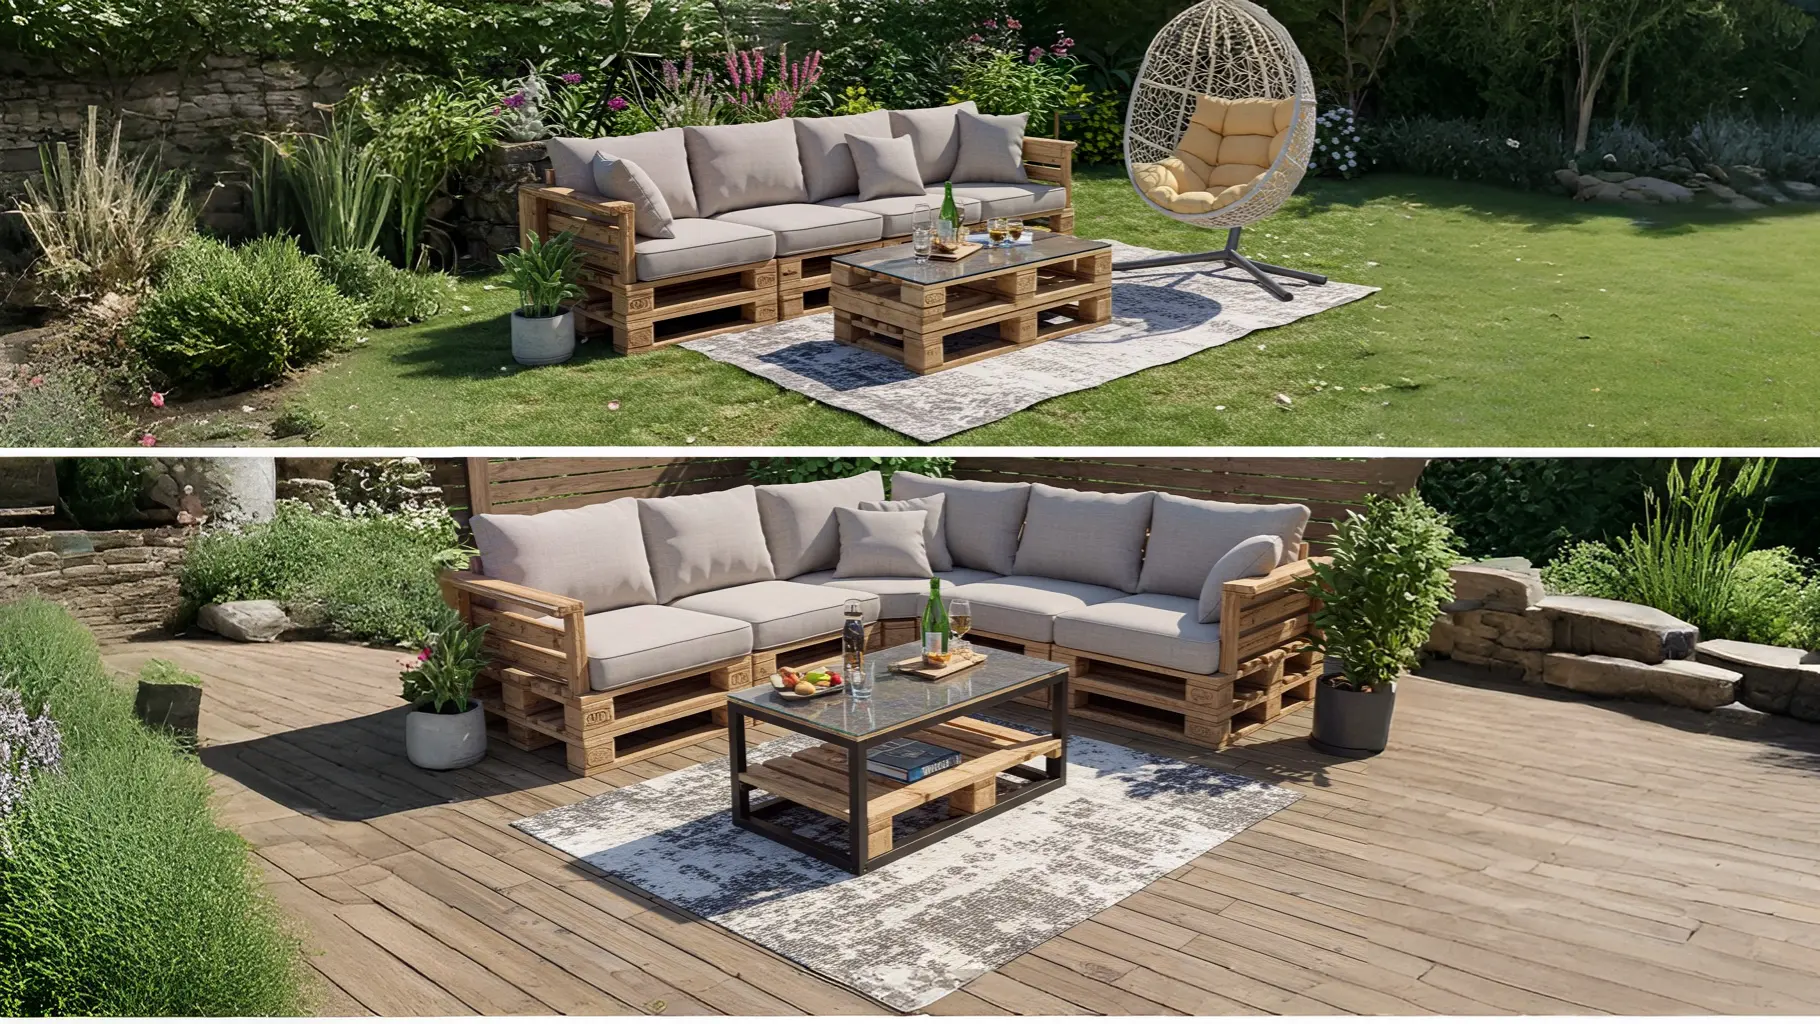
1. The Pallet Lounge Set
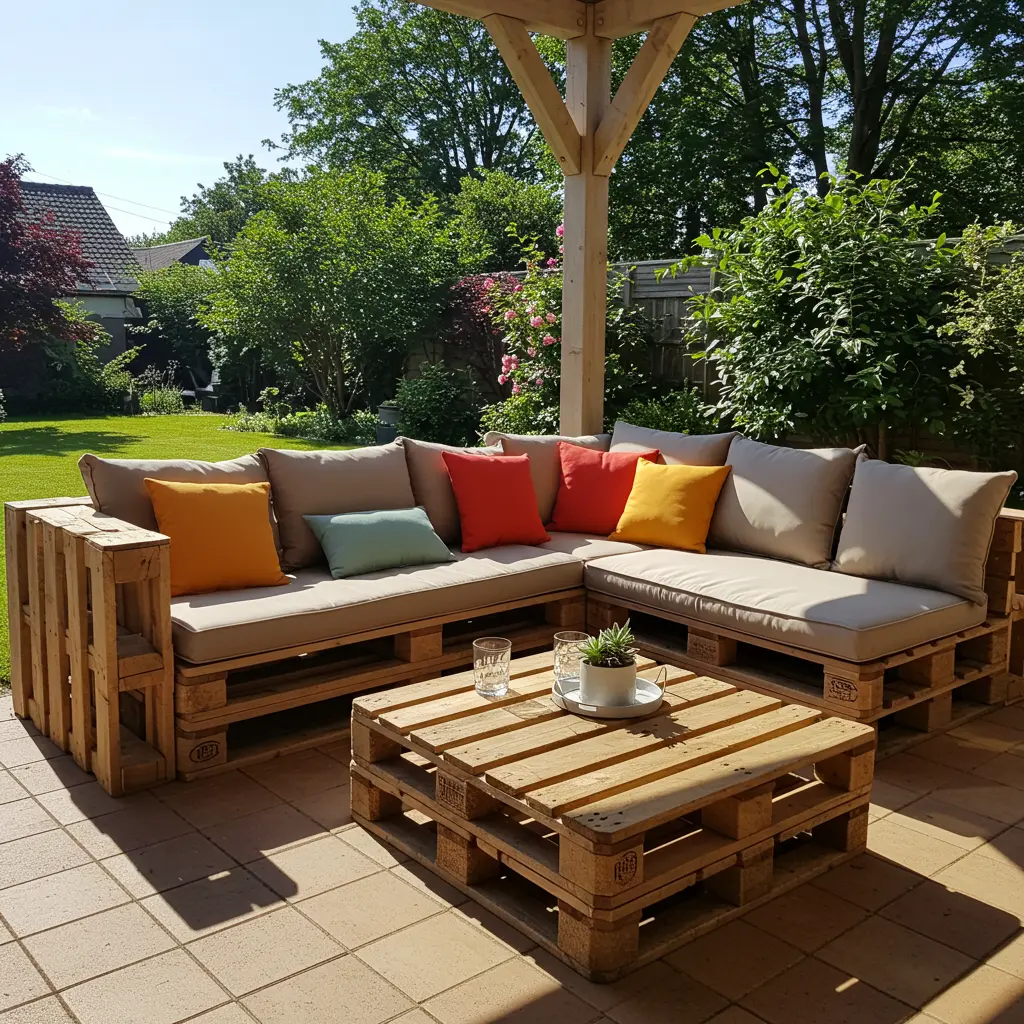
Best For: A rustic, modern, and incredibly budget-friendly way to get a huge amount of seating.
Pro-Tip: Source heat-treated (HT) pallets, not chemically treated (MB). Sand every surface “three times more than you think you need to” to avoid splinters, then seal with a quality exterior varnish.
Styling Cue: Use thick, 6-inch cushions in a bright, solid color. Define the space by placing the set on a large outdoor rug.
2. The Cinder Block Bench
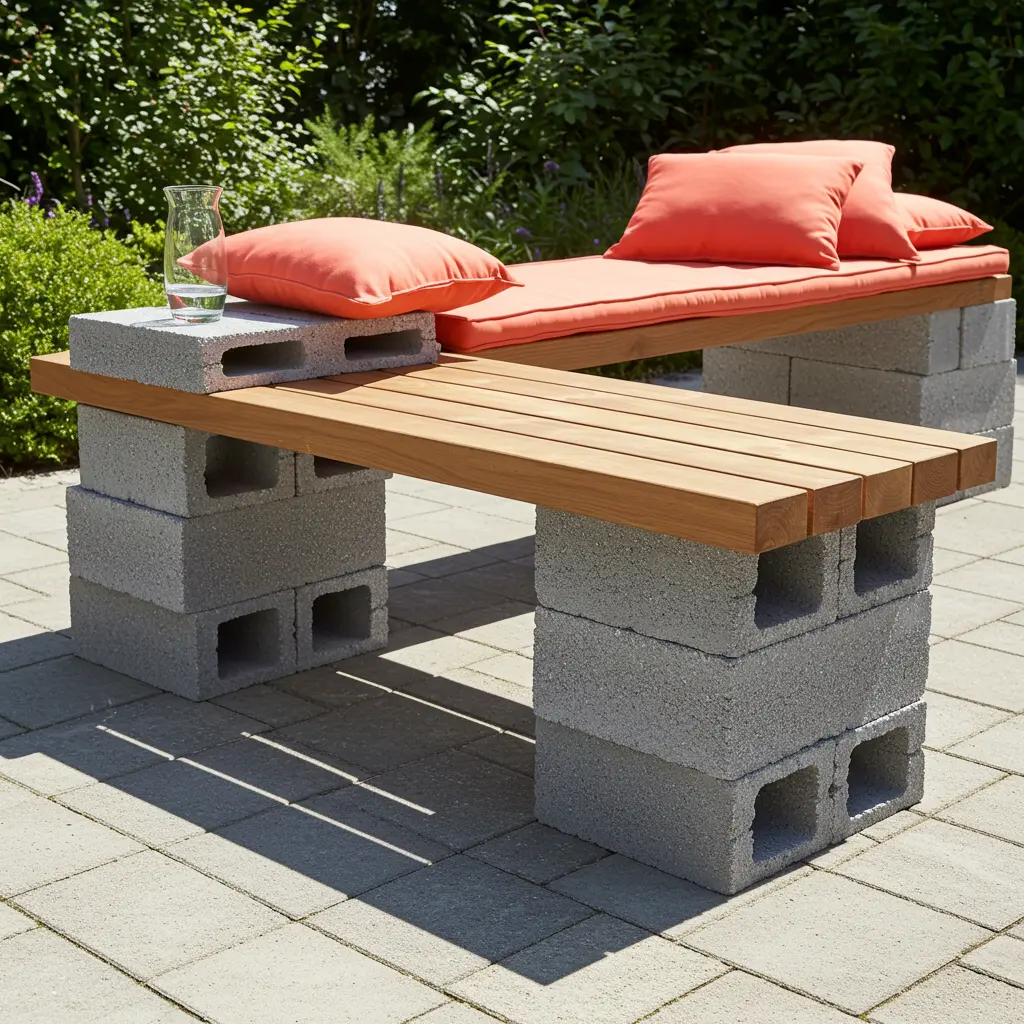
Best For: An industrial-chic, super-sturdy bench you can literally build in “under an hour”.
Pro-Tip: Use construction adhesive to secure the blocks together for extra stability, especially if you have kids. Sand and seal the 4×4 wood beams before sliding them through the holes.
Styling Cue: Pair it with black metal planters filled with spiky succulents for a cohesive, modern-industrial look.
3. The Reclaimed Wood Dining Table
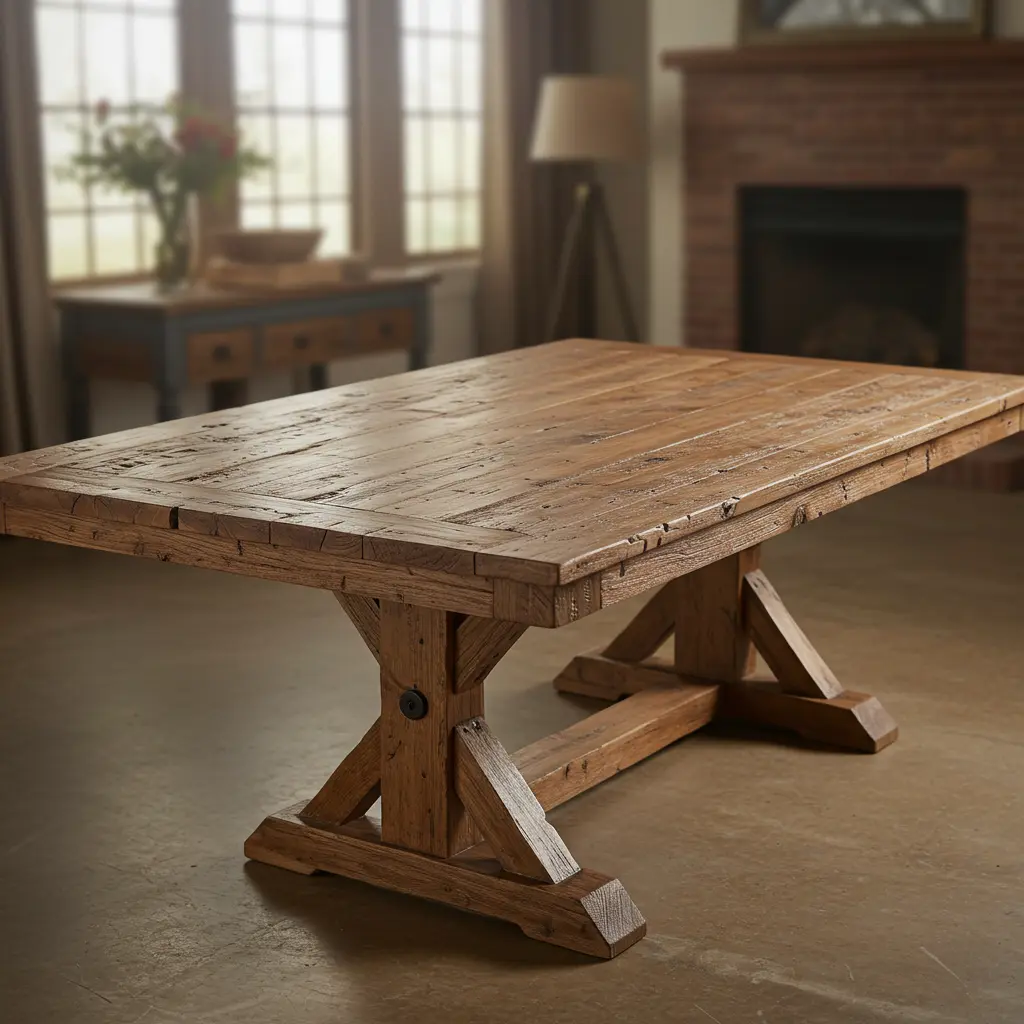
Best For: A statement-making, rustic centerpiece for memorable outdoor family dinners.
Pro-Tip: The beauty is in the imperfections of the reclaimed wood, but you need a flat top. Use a planer or a belt sander to level the surface, then fill any large gaps with a clear epoxy.
Styling Cue: Pair the rustic table with modern metal or molded plastic chairs for a “stunning high-contrast” look.
4. The Hanging Daybed Swing

Best For: Creating the ultimate dreamy escape for napping, reading, and relaxing.
Pro-Tip: Safety is paramount. Securely anchor the four corners to a sturdy overhead structure like a pergola beam or a thick tree branch. Use heavy-duty rope and hardware rated for well over your expected weight.
Styling Cue: Pile it high with oversized, comfortable pillows and a soft, chunky-knit throw blanket. “It’s a vibe”.
5. The Tire Ottomans
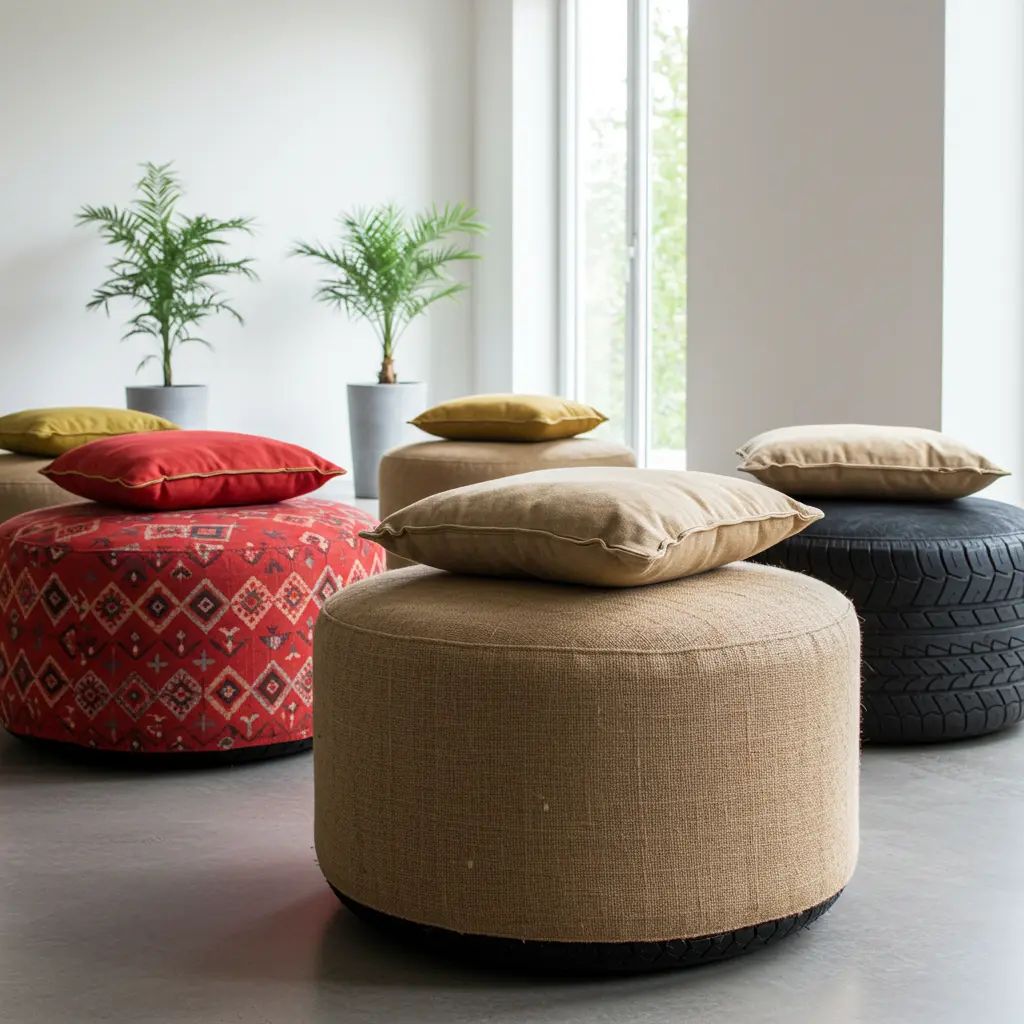
Best For: An eco-friendly, surprisingly chic, and durable extra seating or footrest option.
Pro-Tip: Clean the tires thoroughly with a degreaser first. When wrapping with rope, use a hot glue gun and start from the center of the top, spiraling outwards for the cleanest look.
Styling Cue: Make a pair and tuck them under a console table or place them in front of chairs. They add “incredible texture” to a space.
6. The Classic Adirondack Chairs
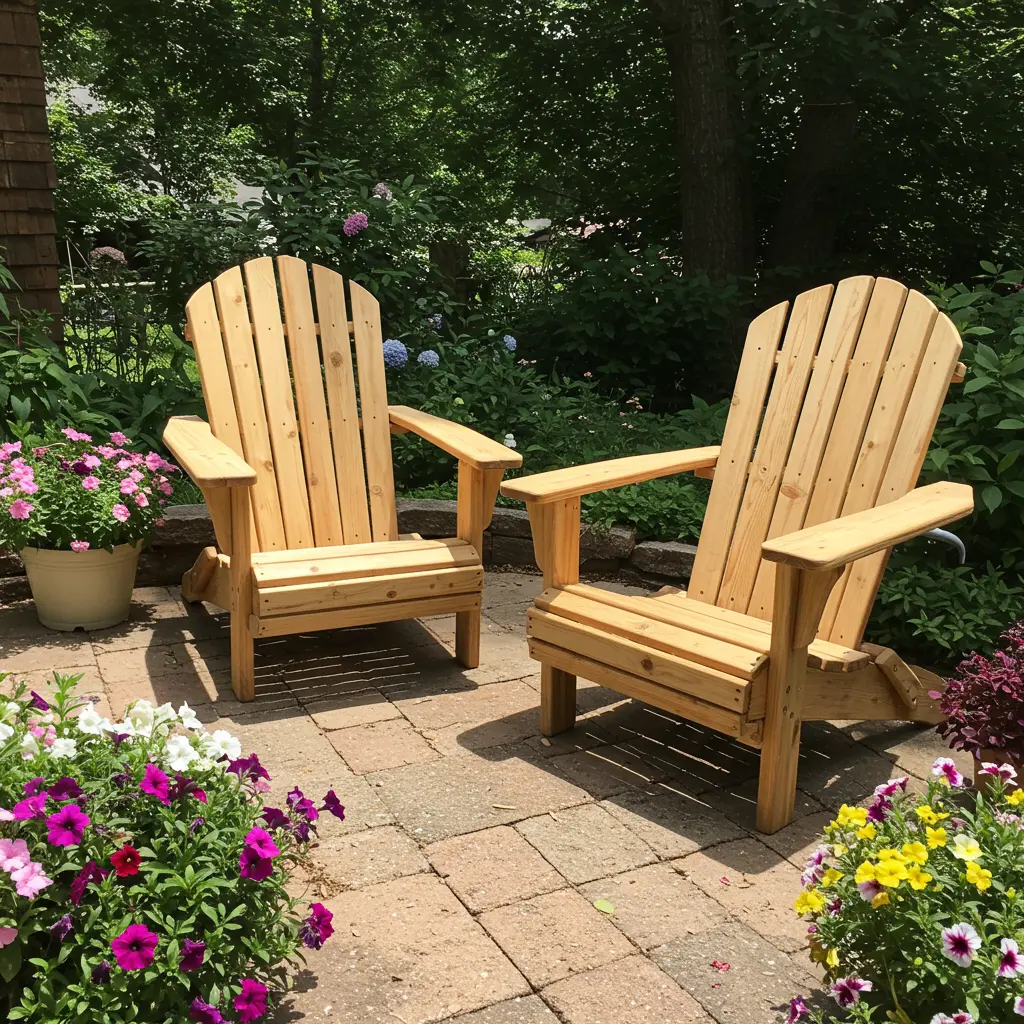
Best For: Timeless, comfortable seating that screams “classic summer relaxation”.
Pro-Tip: This is a woodworking project. Find a good set of plans online and take your time with the cuts. The wide armrests are perfect for holding a drink, so make sure they are sanded “impossibly smooth”.
Styling Cue: Paint them in a bold, unexpected color like navy blue, sunny yellow, or coral for a modern twist on a classic.
7. The Outdoor Bar Cart
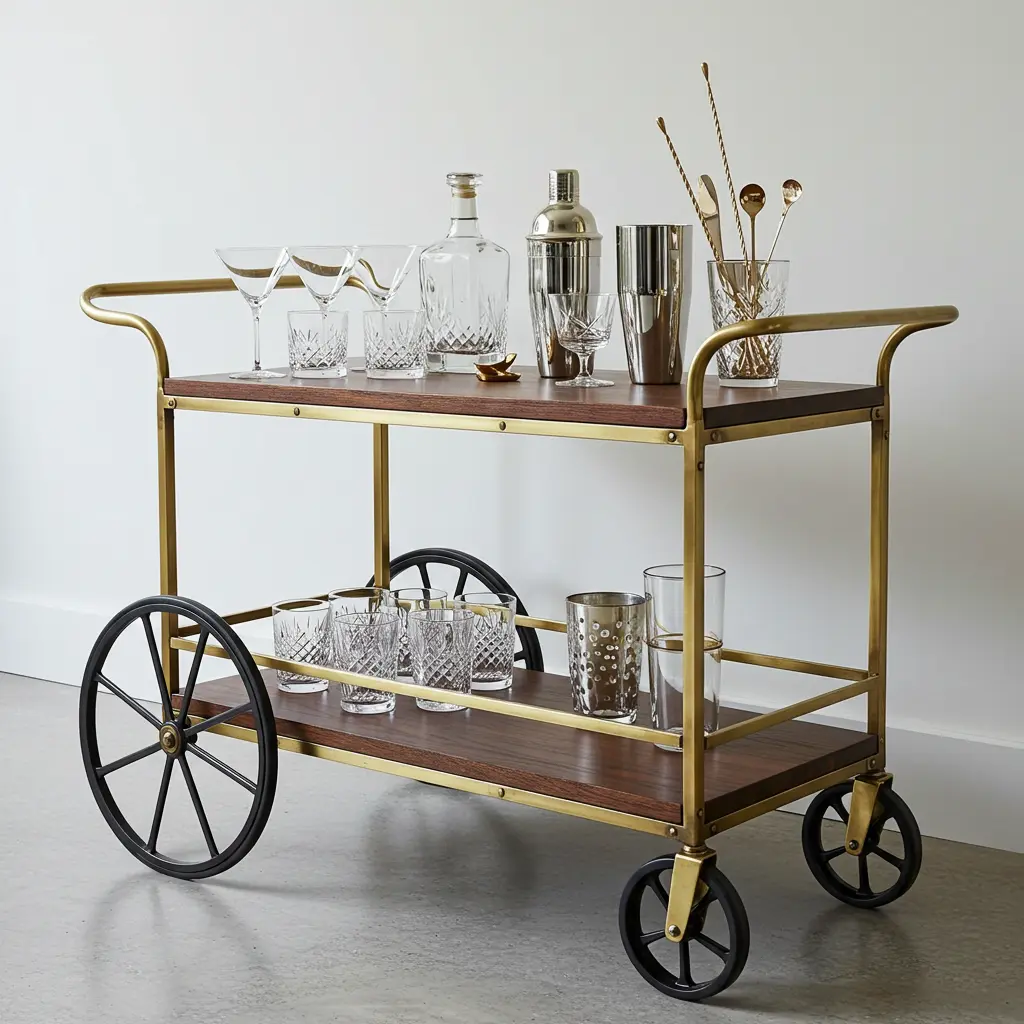
Best For: Stylish and mobile entertaining, keeping drinks and snacks close at hand.
Pro-Tip: Build a simple two-tiered cart from cedar or redwood. Add large, sturdy wheels that can easily roll over patio pavers or a deck. A handle made from industrial pipe adds a “cool, rustic touch”.
Styling Cue: Style it with a metal ice bucket, some colorful glasses, and a small potted herb plant like mint for mojitos.
8. The Concrete Side Table
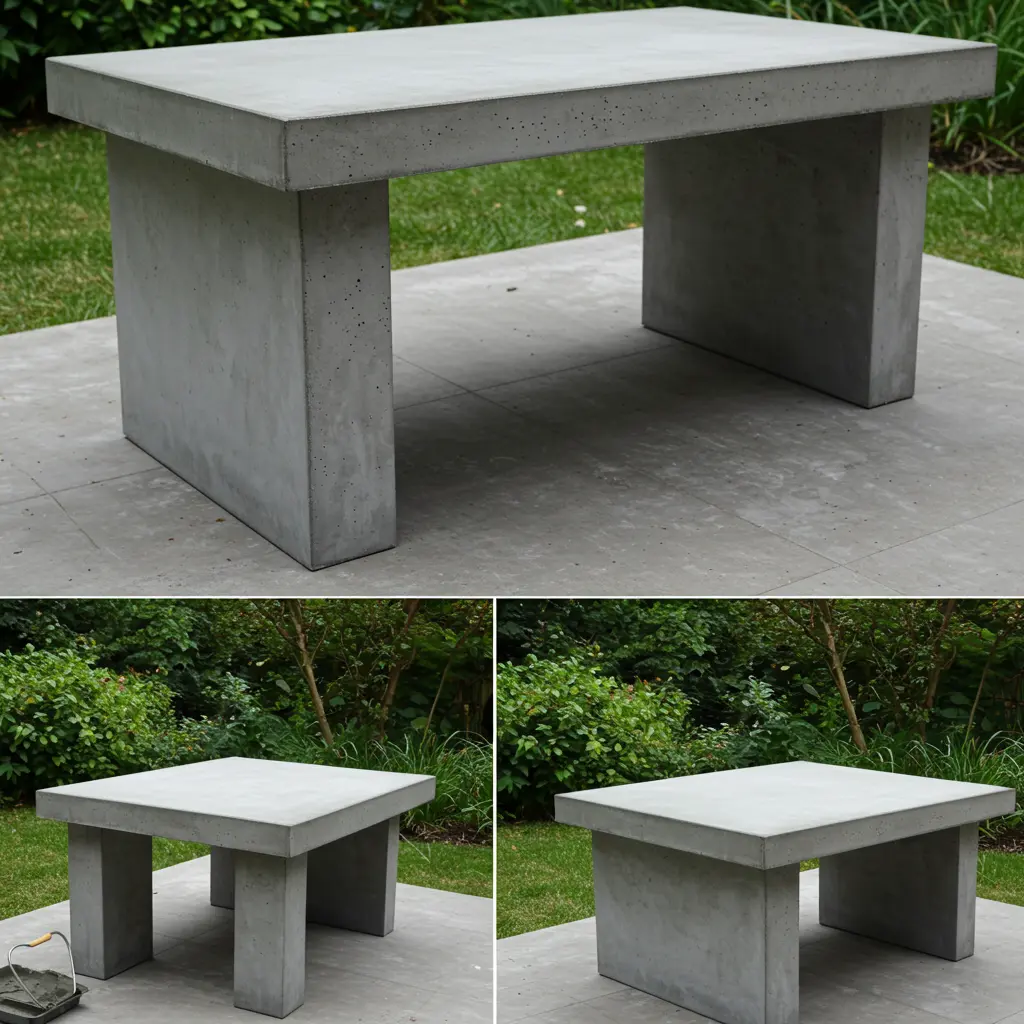
Best For: A sleek, modern, and incredibly durable table that can withstand any weather.
Pro-Tip: Use a plastic bucket or a large planter as a mold for a simple round table. Coat the inside of the mold with cooking spray for an easy release once the concrete has cured.
Styling Cue: Make a “trio of tables” at slightly different heights to function as a coffee table or scattered side tables.
9. The Repurposed Crate Coffee Table
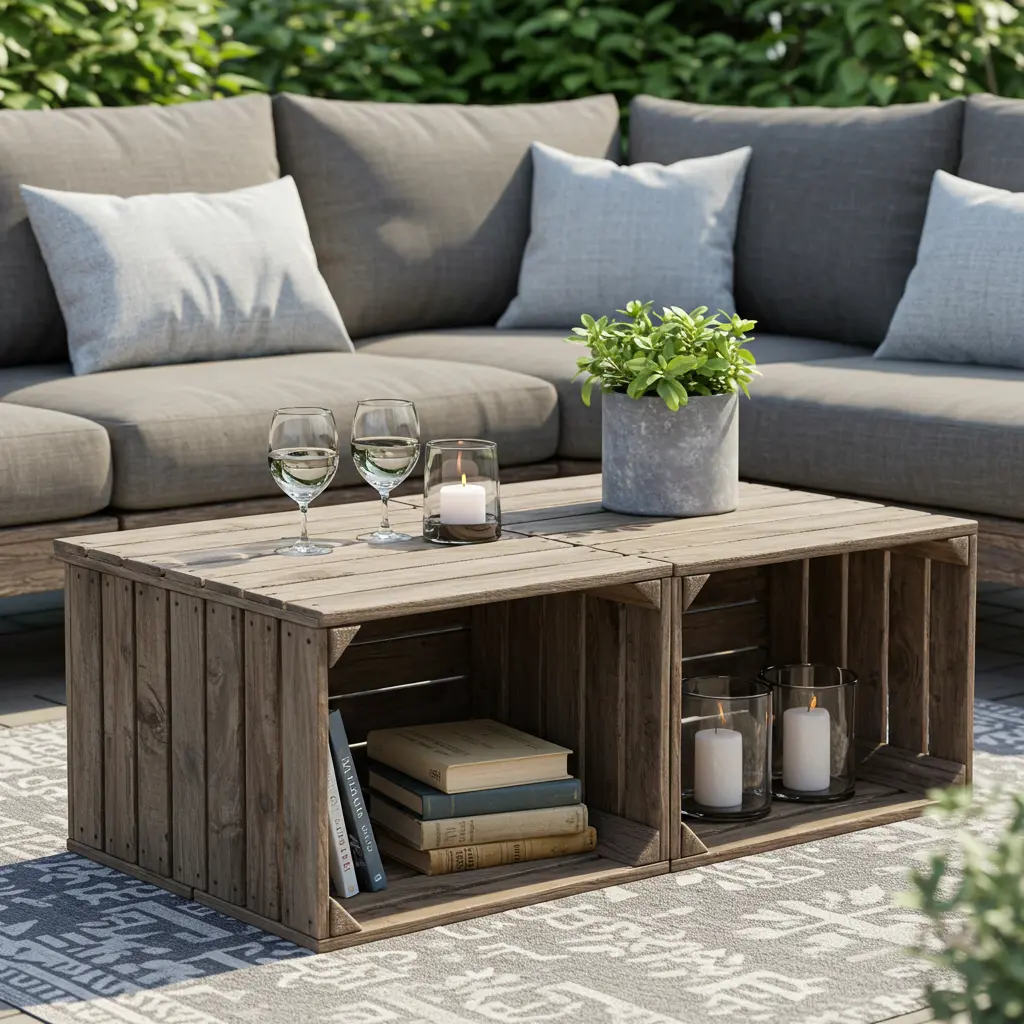
Best For: A functional, farmhouse-style coffee table with tons of built-in storage.
Pro-Tip: Use four wooden crates. Stand them on their sides with the openings facing out and screw them together to form a square. The central hole is perfect for a planter, and the cubbies are great for storage.
Styling Cue: Add locking caster wheels to the bottom so you can easily move it around the patio.
10. The Macramé Hammock Chair
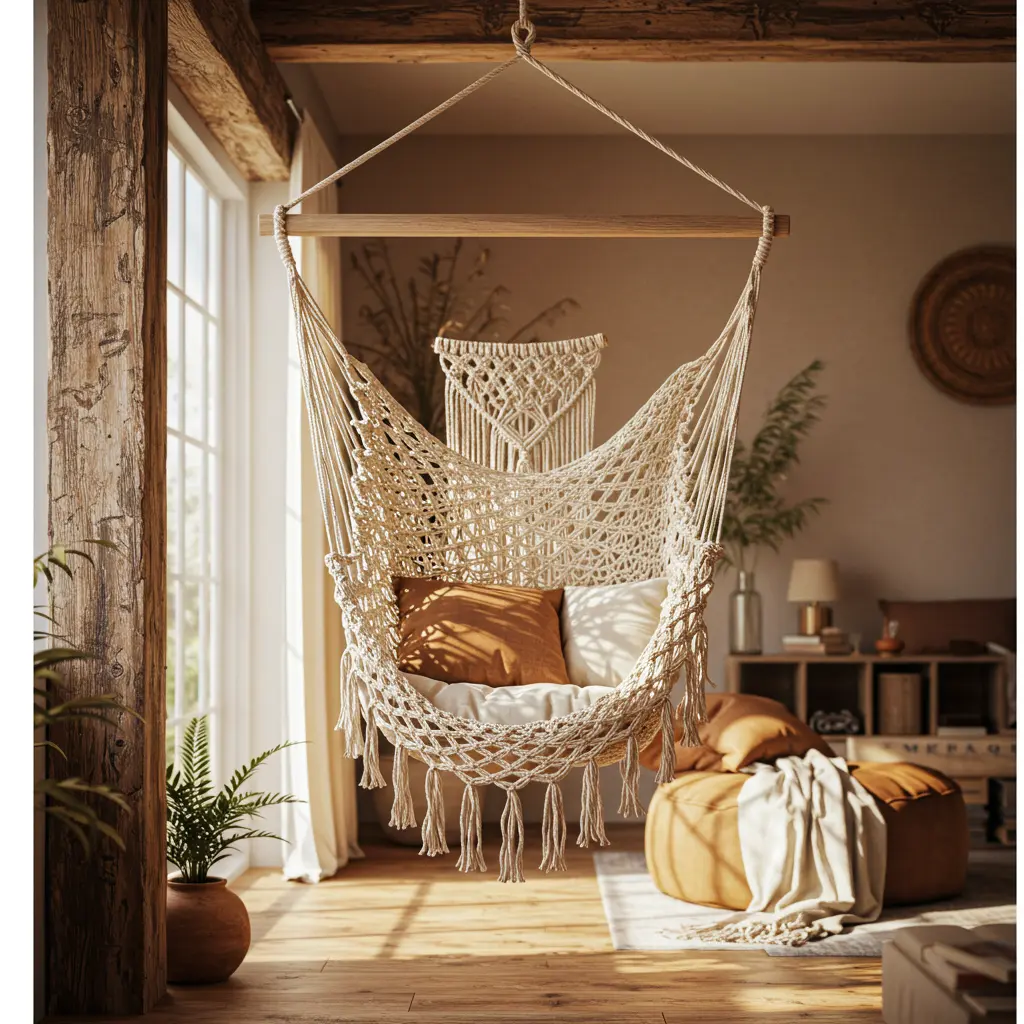
Best For: A cozy, boho-chic reading nook for a covered porch or under a large tree.
Pro-Tip: Use a strong, pre-made metal or wooden ring as your base. Choose a macramé cord designed for outdoor use to prevent mildew and rot.
Styling Cue: Hang it in a corner and add a small stool beside it for a book and a drink. It’s a “perfect personal retreat”.
11. The DIY Sectional Sofa
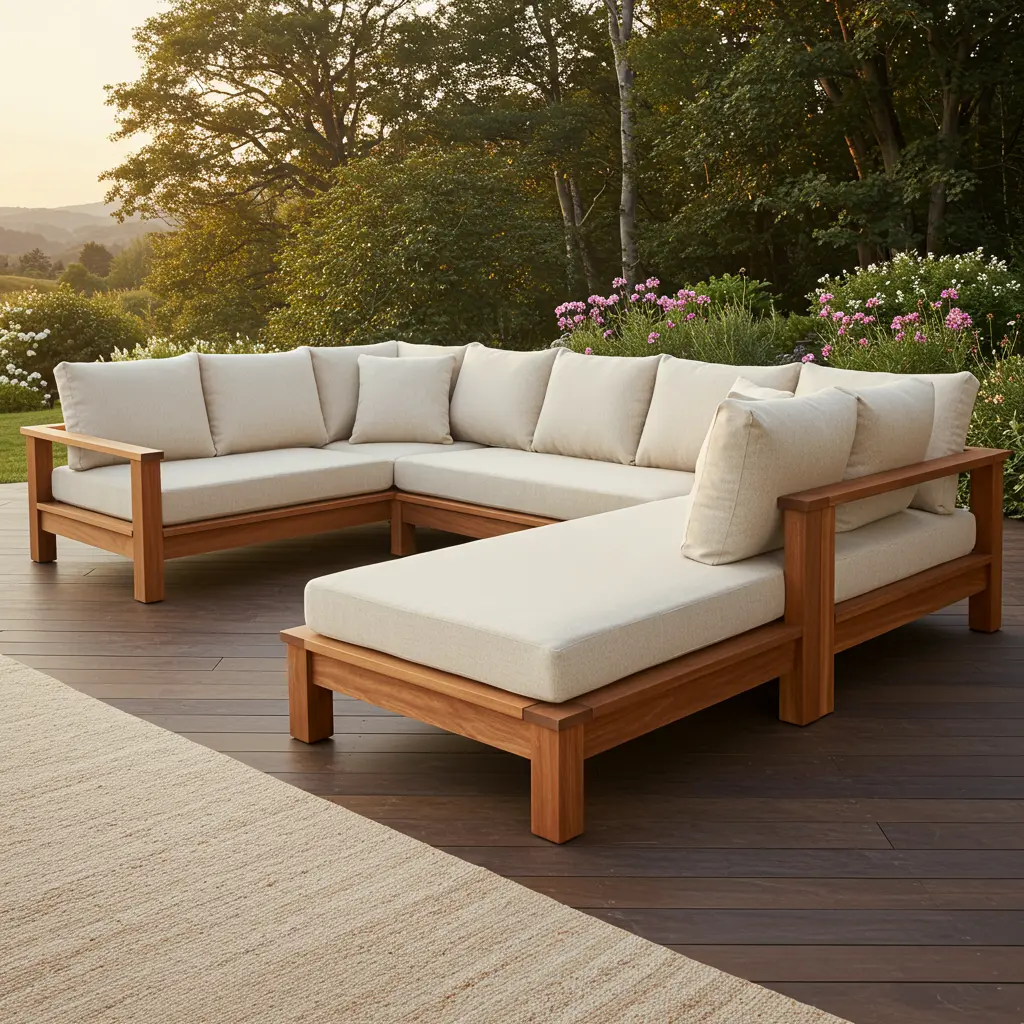
Best For: Creating a custom, high-end look for a large patio, perfect for entertaining.
Pro-Tip: Build the sectional in modular pieces. This makes it easier to move and allows you to reconfigure the layout later. Use pocket holes (with a Kreg Jig) for strong, invisible joints that look professional.
Styling Cue: Splurge on thick, comfortable cushions. Add a mix of patterned and solid throw pillows to break up the large piece.
12. The Wine Barrel Table

Best For: A charming, rustic side table or pub-style table with tons of character.
Pro-Tip: Real wine barrels can be found online or at wineries. Ensure the metal bands are secure, and give the whole thing a light sanding and a coat of exterior polyurethane to protect it.
Styling Cue: Top it with a large round piece of glass for a more finished, easy-to-clean surface.
13. The Floating Deck Bench
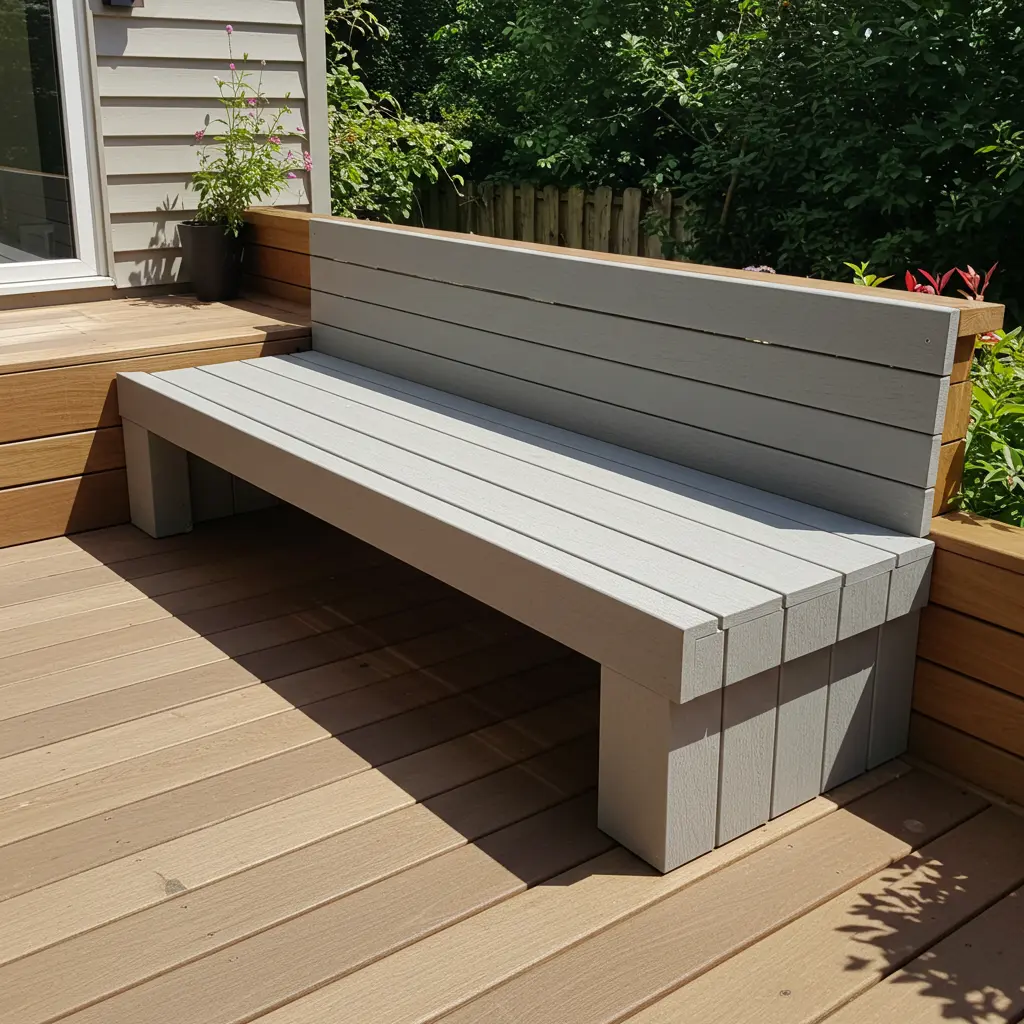
Best For: Sleek, space-saving, built-in seating that makes a patio feel larger and more custom.
Pro-Tip: This requires some construction know-how. Securely attach the support frame to the deck’s joists. Using cedar or redwood for the bench top will provide natural rot resistance.
Styling Cue: Add solar-powered LED strip lights underneath the “floating” edge for a dramatic, high-end glow at night.
14. The Upcycled Headboard Bench
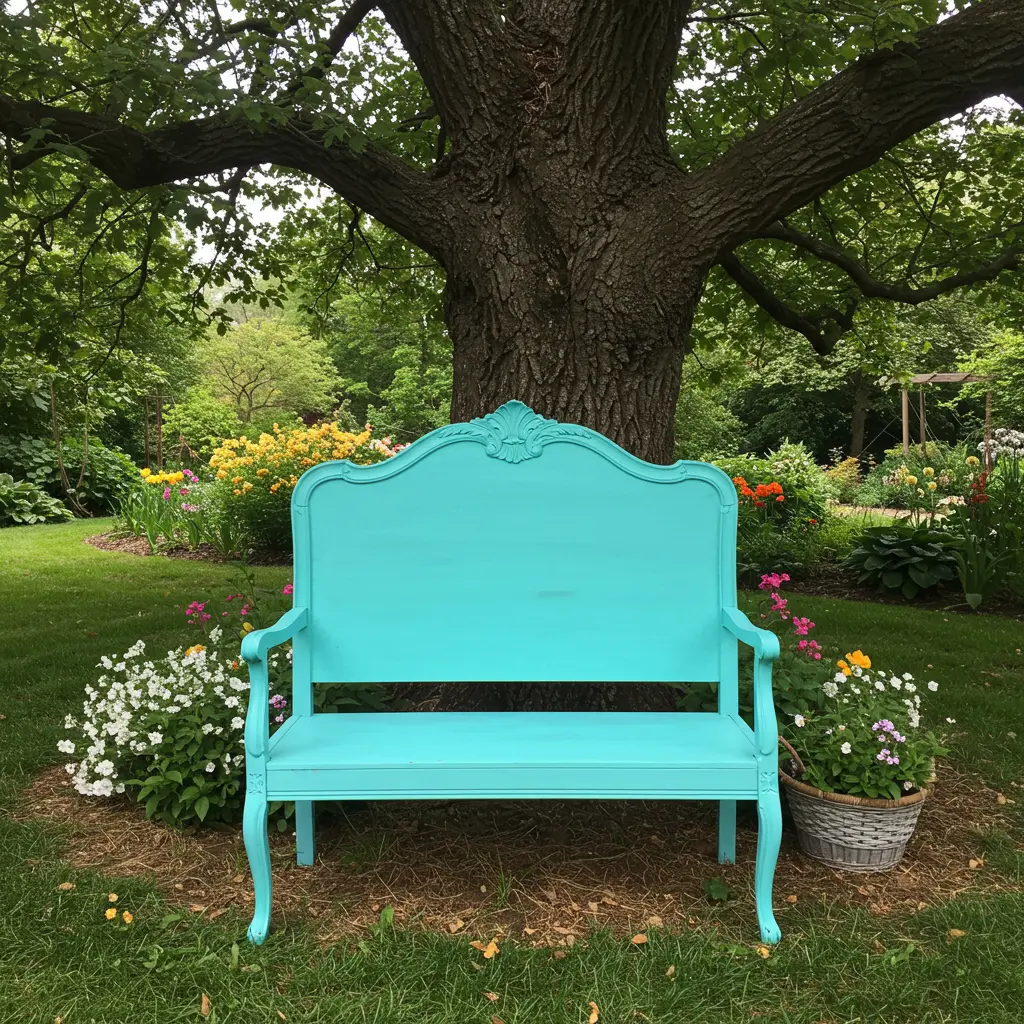
Best For: A quaint, shabby-chic bench that adds a touch of personality and charm.
Pro-Tip: Look for an old wooden headboard at a thrift store or flea market. A twin size makes a perfect small bench. Use a durable exterior paint and distress the edges with sandpaper for a “perfectly weathered” look.
Styling Cue: Place it in a flower garden or on a front porch with a cute, patterned cushion.
15. The Fire Pit Table
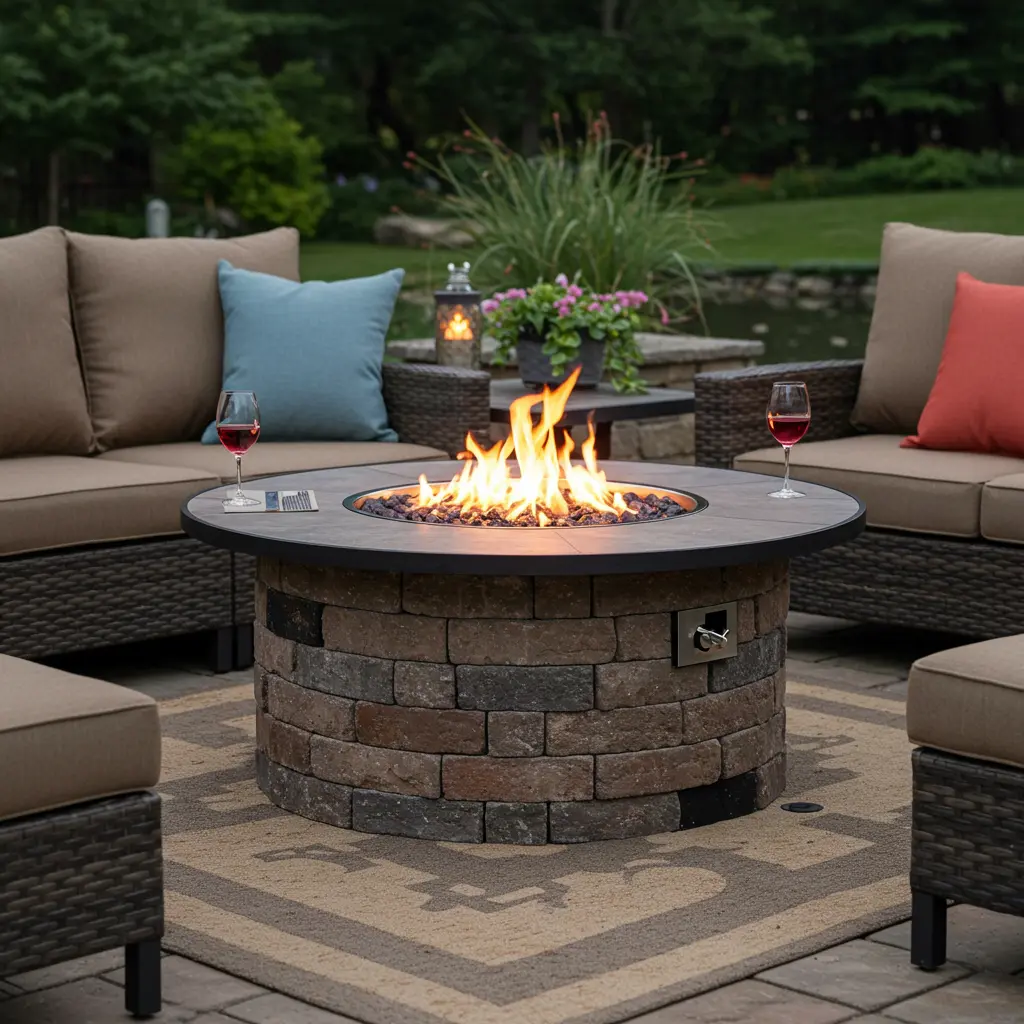
Best For: A cozy, functional centerpiece that provides warmth and ambiance.
Pro-Tip: Build a sturdy frame from concrete blocks or steel studs, then clad it in a non-combustible material like stone veneer or concrete backer board. Use a drop-in metal fire pit insert for a safe, professional finish.
Styling Cue: Build it “coffee table height” and make the ledge wide enough to safely hold drinks.
16. The Foldable Picnic Table
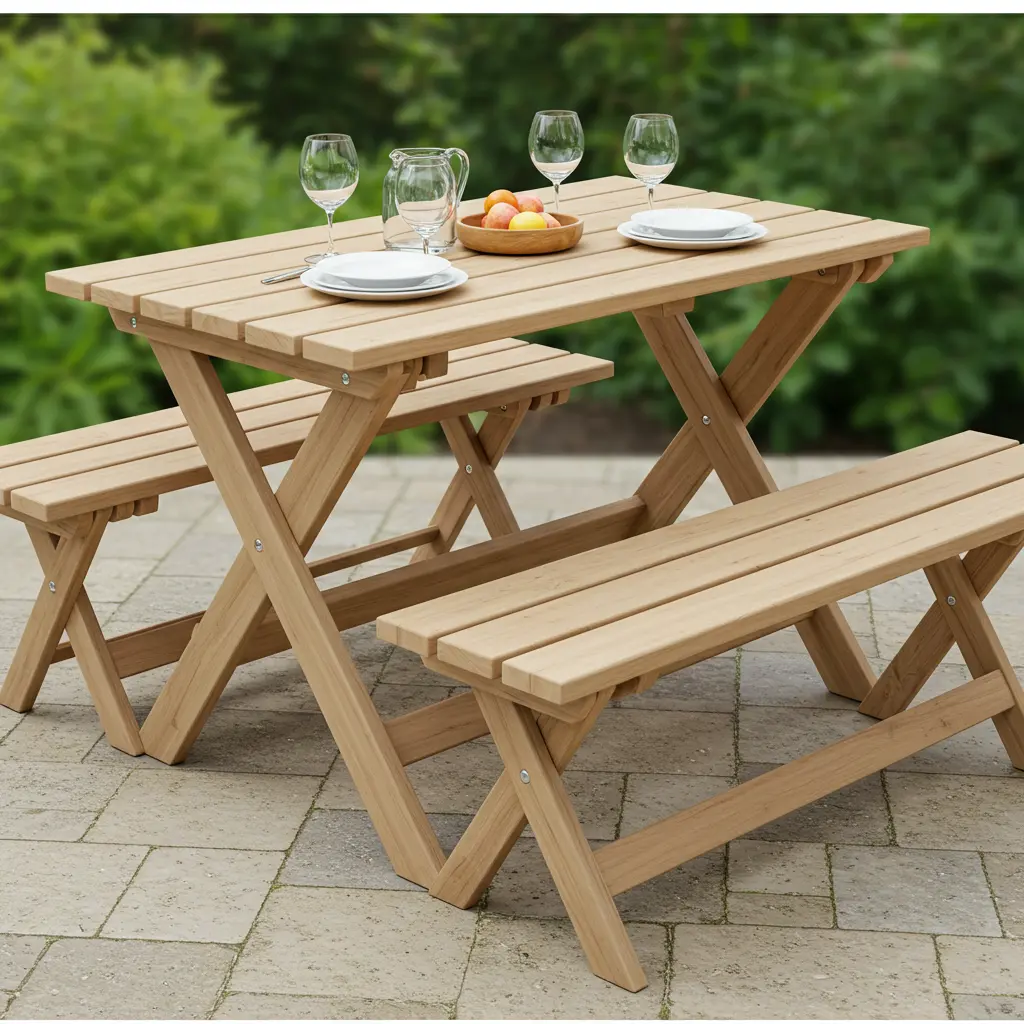
Best For: Small patios or balconies where space is at a premium.
Pro-Tip: This is an intermediate woodworking project that requires precise hardware placement. Look for high-quality, corrosion-resistant hinges and locking mechanisms.
Styling Cue: Paint it a fun, bright color that becomes a piece of “wall art” when folded up.
17. The Rope-Wrapped Stools
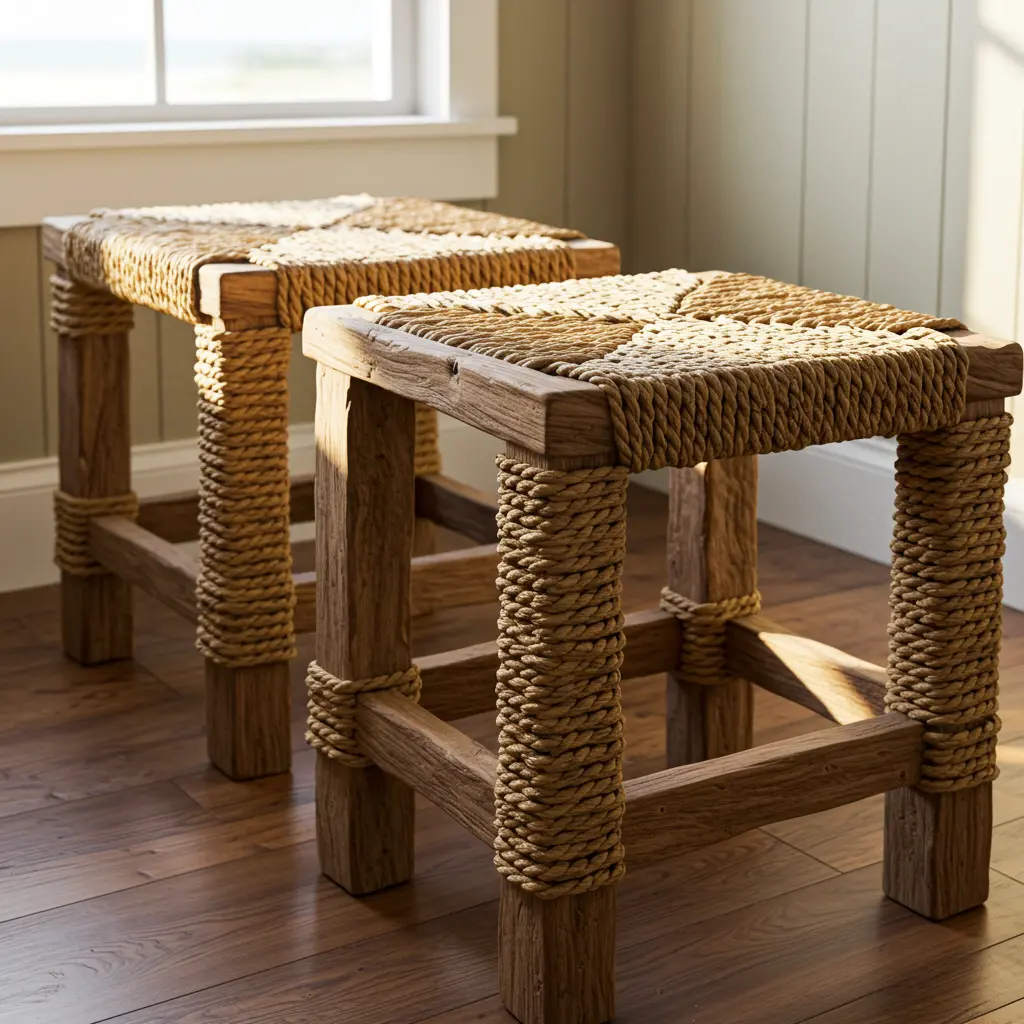
Best For: A budget-friendly, coastal-inspired way to add texture and extra seating.
Pro-Tip: Start with cheap wooden stools (like the IKEA Marius). Use a hot glue gun to secure the rope as you wrap, ensuring each coil is tight against the last for a seamless finish.
Styling Cue: Use them as side tables or group three together at different heights for a dynamic look.
18. The Convertible Bench/Table

Best For: The ultimate space-saving, multi-functional piece for small spaces.
Pro-Tip: The magic is in the hardware and the precise pivot points. Follow a detailed plan carefully. This is a project where measuring twice and cutting once is “absolutely critical”.
Styling Cue: Stain the wood in two tones to highlight its transformative design when it converts from bench to table.
19. The Outdoor Storage Bench
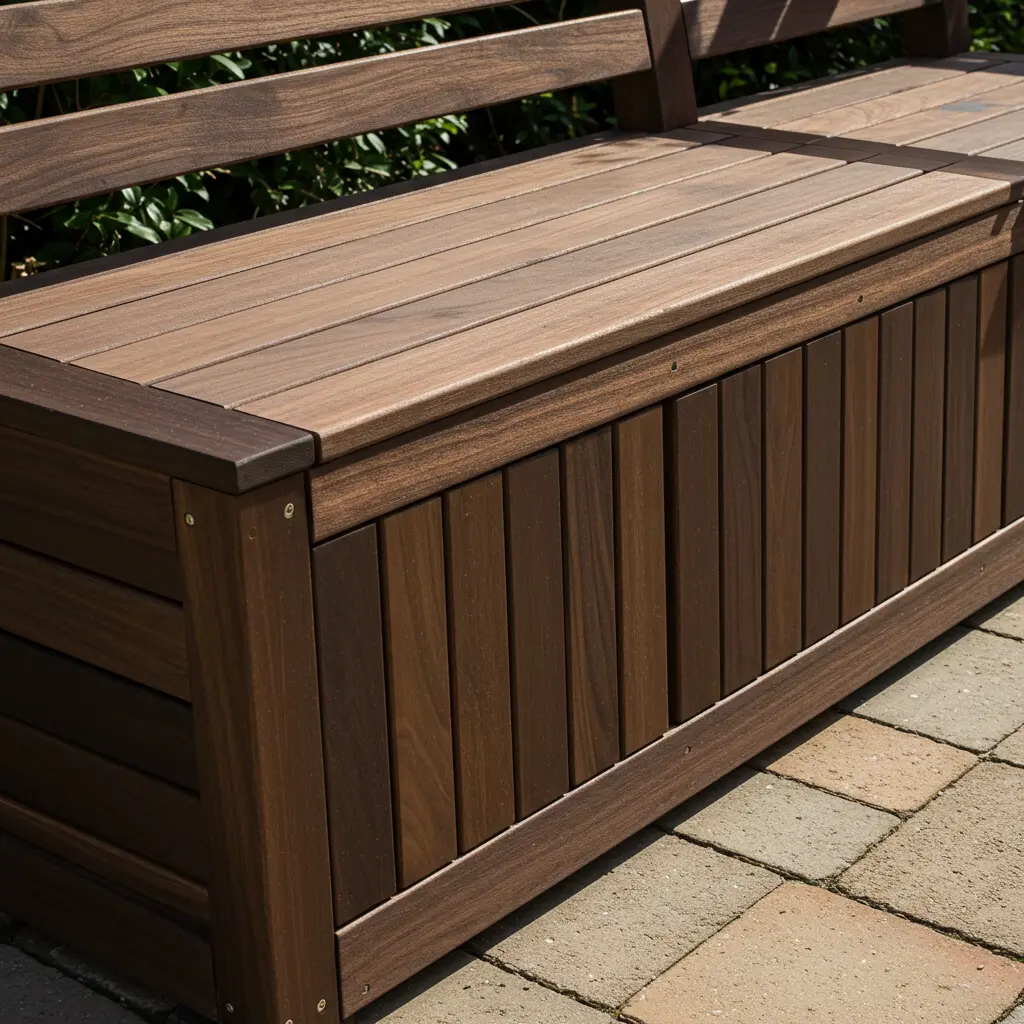
Best For: Hiding clutter (like cushions and garden tools) while providing extra seating.
Pro-Tip: The key is to make the lid as waterproof as possible. Design the lid with an overhang and consider adding a waterproof membrane or lining inside the box. Ensure there are small gaps for ventilation to prevent mildew.
Styling Cue: Place a long, comfortable cushion on top to make it look like a high-end custom daybed.
20. The Pergola with Built-In Seating

Best For: The ultimate DIY project to define a space and create a “true outdoor room”.
Pro-Tip: This is a major construction project. Ensure your posts are properly anchored in concrete footings. The built-in benches can be designed as part of the support structure, creating a seamless look.
Styling Cue: Hang string lights from the rafters, grow a climbing vine like wisteria up the posts, and hang outdoor curtains for a “dreamy, resort-like” haven.
Conclusion: Your Dream Retreat is Waiting
And just like that, you’re no longer just looking at an empty patio; you’re looking at a world of creative possibilities. You have the ideas, the insider tips, and the know-how to create a stunning outdoor living space that is personal, functional, and “shockingly affordable”. This isn’t just about building furniture; it’s about building a lifestyle and creating a space for future memories.
It all starts with a single choice. Pick the idea that sparked your imagination, grab your tools, and take the first step.
