Table of Contents
- 1. Waterproofing Solutions: DIY Flooring Ideas for Heavy Indoor Watering
- 2. Lighting the Jungle: DIY Installation of Aesthetic Grow Lights
- 3. Climate Control: Engineering Humidity Management to Protect Furniture
- 4. Vertical Space: DIY Ladder Shelves and Macrame for Maximum Density
- 5. Styling the Greenhouse: Integrating Biophilic Design and Boho Accents
- Cultivating Your Living Sanctuary
- Botanical Living Questions Answered
Transforming your living room into a lush sanctuary does not require a professional renovation.
By blending natural textures with vibrant plant life, you can create a space that feels both sophisticated and deeply restorative.
The secret lies in balancing architectural elements with the organic flow of greenery to achieve a professional finish.
Budget friendly updates often yield the most impactful results when approached with a clear design vision.
From selecting the right paint tones to arranging foliage strategically, these DIY greenhouse ideas prioritize functionality without sacrificing style.
Small changes in layout can significantly enhance how you experience your home daily.
Do not overlook the foundation of your room, as the right flooring sets the stage for your entire aesthetic. Whether you are working with hardwood or layering rugs for warmth, durable choices ensure your space remains practical for years to come.
Explore these curated tips to refine your interior and elevate your living environment.
1. Waterproofing Solutions: DIY Flooring Ideas for Heavy Indoor Watering

Transforming your living space into a lush indoor greenhouse brings vibrant energy, but it also brings water. Protecting your subfloor is the first step.
You need materials that can handle humidity, spills, and heavy pots without warping. The goal is to blend durability with a curated aesthetic.
Functional flooring does not mean sacrificing style. Modern waterproof solutions offer textures that mimic organic materials like raw wood or stone.
A home designed for life must handle the mess of living, including the water that feeds your garden.
The Water-Safe Edit
- Opt for Luxury Vinyl Plank (LVP) to achieve a warm, wood-grain aesthetic that is 100% waterproof and won’t warp under heavy humidity.
- Seal the room’s perimeter with silicone caulk behind baseboards to create a bathtub effect, preventing spills from seeping into the subfloor or drywall.
- Consider epoxy grout for tile installations; unlike traditional cement grout, it is non-porous and resists water absorption and mold growth.
Luxury Vinyl Plank (LVP) for Wood Aesthetics

Luxury Vinyl Plank is a top choice for indoor gardeners who crave a warm, rustic atmosphere. It is 100% waterproof and mimics hardwood grain perfectly.
Unlike real timber, LVP will not swell when you mist your ferns or spill from the watering can. It creates a seamless spatial flow in open layouts.
This material captures the cozy vibe found in many Refreshing Lake House Bedroom Decor Ideas: Modern & Rustic designs. It offers that same earthy charm.
Installation is often a simple click-lock mechanism, making it a manageable DIY project. The finish is durable enough to resist scratches from moving ceramic pots.
Designer Insight
- Install planks parallel to the room’s primary light source to visually elongate the space and enhance the realistic wood grain texture.
- Although LVP is durable, adhere felt pads to the bottom of heavy ceramic pots to prevent drag marks when rearranging your indoor jungle.
- Look for LVP with a wear layer of at least 20 mil for high-traffic gardening zones to ensure maximum resistance against grit and soil abrasion.
Creating a Tiled “Wet Zone” Vignette

If replacing the entire floor is not an option, consider tiling a specific corner. This creates a functional “wet zone” or focal point for your plants.
You can use decorative ceramic or porcelain tiles to create a rug-like effect directly on the floor. This adds visual interest and protects high-risk areas.
Planning this layout is similar to the zoning required in Simple Flower Gardening for Beginners: Design Your Oasis. You group plants where they thrive.
Ensure you seal the grout lines properly. Unsealed grout allows moisture to seep through to the subfloor, which defeats the purpose of the project.
When bringing the outdoors in, the durability of your surfaces is just as important as the light your plants receive. Choose materials that forgive spills.
Justina Blakeney, The Jungalow
Boho Builder’s Tip
- Renters can achieve this look damage-free by using high-quality peel-and-stick vinyl floor tiles to create a waterproof barrier without the grout work.
- Install a metal or wood transition strip (threshold) where your new tile meets the original floor to prevent tripping and protect the raw tile edges.
- Run a thin bead of clear silicone caulk around the perimeter of your tiled zone to prevent water spills from wicking underneath to the subfloor.
Polished Concrete and Epoxy Seals
For a modern, industrial aesthetic, polished concrete is unbeatable. It is impervious to water damage and creates a sleek, minimalist canvas.
Concrete acts as a thermal mass, retaining heat during the day and releasing it at night. This can help regulate the temperature for sensitive tropical plants.
An epoxy coating adds a high-gloss finish that reflects ambient lighting, making the room feel brighter. It is easy to mop and resistant to fertilizer stains.
| Flooring Material | Water Resistance | DIY Difficulty | Design Aesthetic |
|---|---|---|---|
| Luxury Vinyl Plank | High (100% Waterproof) | Low (Click-Lock) | Warm, Organic, Wood-Look |
| Ceramic Tile | Very High | Medium (Grouting) | Textured, Patterned, Cool |
| Sealed Concrete | Extreme | High (Pouring/Sealing) | Industrial, Modern, Minimal |
| Laminate | Low to Medium | Low | Budget-Friendly, Faux-Wood |
Choosing the right foundation ensures your indoor garden enhances your home rather than damaging it. Prioritize water resistance to keep your sanctuary stress-free.
The Industrial Edge
- Add a non-slip grit additive to your final epoxy seal to prevent accidents in high-moisture garden zones.
- Use metallic pigments or quartz chips in your epoxy mix to naturally camouflage water spots and minor scratches.
- Place heavy planters on felt pads or rolling dollies to prevent surface scuffs while maintaining the concrete’s thermal benefits.
2. Lighting the Jungle: DIY Installation of Aesthetic Grow Lights

Transforming your space into a lush sanctuary requires more than just water and soil.
Lighting acts as the heartbeat of any indoor jungle setup.
Standard living room lamps often fail to support tropical growth effectively.
However, industrial grow lights can cast a harsh, clinical purple glare.
The solution lies in full-spectrum bulbs that blend seamlessly with your decor.
You can achieve a thriving ecosystem without sacrificing your curated aesthetic.
Lighting is the silent artist of interior design, turning simple greenery into a living sculpture.
Understanding Light Temperature for Ambiance

The secret to a cozy atmosphere lies in the Kelvin (K) rating of your bulb.
Most commercial grow lights operate at 5000K or higher, which looks like blue daylight.
This stark brightness often clashes with warm wood tones and soft textiles.
For a living room, aim for full-spectrum bulbs around 3000K to 3500K.
These bulbs provide the necessary photons for photosynthesis while emitting a warm white glow.
This spectrum enhances the rich greens of your foliage without washing out the room.
You can easily swap standard bulbs in vintage floor lamps with these high-tech alternatives.
This simple switch maintains your retro vibe while keeping your Ficus happy.
Light is food for plants. If you want your plants to thrive, you need to place them where they can eat.
Hilton Carter, Architectural Digest Interview
Stealth Installation Techniques

Integrating grow lights should enhance the spatial flow, not disrupt it.
Track lighting is an excellent option for illuminating large statement trees.
Position the track specifically to highlight the canopy as a focal point.
For shelving units, conceal thin LED grow strips beneath each shelf lip.
This technique creates a dramatic, museum-like vignette for your smaller pots.
This is particularly effective when illuminating a vertical garden or tall bookshelf display.
Always ensure the light source is close enough to be effective but far enough to avoid leaf burn.
Pendant lights can also be hung directly above a coffee table arrangement.
Use a brass or matte black fixture to ground the airy feel of the plants.
Kelvin Temperature Guide for Living Areas
Selecting the right light temperature is crucial for balancing plant health with human comfort. This guide helps you choose the right spectrum for your specific needs.
| Kelvin Rating (K) | Visual Appearance | Best Application | Atmosphere Effect |
|---|---|---|---|
| 2700K – 3000K | Warm White / Yellow | Flowering plants, evening relaxation | Cozy, intimate, “Hygge” |
| 3500K – 4000K | Neutral White | General foliage growth, all-purpose | Clean, modern, crisp |
| 5000K – 6500K | Cool Daylight / Blue | Seedlings, high-intensity growth | Alert, clinical, energetic |
Using a timer is the final step in automating your indoor greenhouse.
Set your lights to run for 12 to 14 hours a day for optimal results.
Consistent light cycles encourage steady growth and reinforce your daily rhythm.
Glow-Up Hacks
- Hide unsightly power cords by using paintable cord covers that blend into your wall color for a seamless, professional look.
- To maximize efficiency, place a mirror behind your plants to bounce excess grow light back onto the lower leaves and into darker corners.
- Use a smart plug to program a ‘sunset’ effect, gradually dimming your lights to mimic nature and transition your space for evening relaxation.
3. Climate Control: Engineering Humidity Management to Protect Furniture

Bringing the outdoors in requires a delicate balance. Tropical plants crave moisture, but your furniture often demands dryness.
High humidity can warp wood and cause mildew on textiles. You must engineer the air to satisfy your greenery without sacrificing your decor.
True luxury in a green home is finding the perfect equilibrium between botanical health and architectural preservation.
Zoning Your Microclimates

The most effective strategy is to create specific zones. Group your moisture-loving plants together on a tray filled with pebbles and water.
This clustering raises humidity locally through transpiration. The moisture stays focused on the foliage rather than drifting to your sofa.
Keep this “wet zone” away from porous materials. It protects your vintage living room decor ideas from absorbing excess dampness.
Visual flow is key here. Use a metal or glass console table as a barrier between the lush jungle corner and your velvet seating area.
Selecting the Right Materials

Some materials handle the greenhouse vibe better than others. Rattan and teak are naturally resistant to moisture changes.
If you have sensitive antiques, keep them in the driest part of the room. Use air circulation fans to prevent stagnant, heavy air pockets.
Incorporating vertical garden ideas for balcony layouts indoors can also help by elevating plants away from wood floors.
High humidity causes wood to swell, while low humidity causes it to shrink. This movement can loosen joints and crack finishes.
The Editors, Better Homes & Gardens
Humidity Safety Guide by Material
Use this guide to place your furniture strategically around your humidifiers and plant clusters.
| Material | Ideal Placement | Care Requirement |
|---|---|---|
| Raw Wood | Far from mist/plants | Seal with wax annually; monitor for swelling. |
| Velvet/Linen | Central room (Dry zone) | Vacuum weekly to remove spores; ensure airflow. |
| Leather | Intermediate zone | Condition regularly to prevent mold or drying out. |
| Rattan/Cane | Near plants (Wet zone) | Actually benefits from humidity; prevents brittleness. |
Invest in a digital hygrometer. It is a small tool that monitors air quality, ensuring you stay within the sweet spot of 40% to 50% humidity.
The Preservation Playbook
- Invest in a smart hygrometer that syncs with your phone to receive real-time alerts if humidity levels fluctuate outside the 40-50% safety zone.
- Apply a high-quality furniture wax to raw wood pieces to create an invisible moisture barrier that prevents swelling and warping.
- Utilize open-back metal shelving as a physical buffer between your plant clusters and fabric upholstery to encourage constant airflow.
4. Vertical Space: DIY Ladder Shelves and Macrame for Maximum Density

Maximizing verticality is the secret weapon of any lush interior. By lifting greenery off the floor, you create a sense of immersion without clutter.
Using the walls and ceiling allows you to double your plant count easily. This approach draws the eye upward, making ceilings feel higher.
Vertical gardening indoors transforms flat walls into living tapestries. It is essential for smaller rooms where floor space is premium real estate.
If you have explored vertical garden ideas for balcony spaces, the same principles apply here. We focus on layering and light.
Design is not just about where you look, but where you live. Lift your greens to lift your spirit.
The Rustic DIY Ladder Shelf
A leaning ladder shelf is a staple for the greenhouse aesthetic. It offers a tiered stage for your botanical collection.
You can construct one from reclaimed wood for a rugged, organic look. Sand the wood down to reveal the grain, but leave some imperfections.

Structure the shelf by placing larger, heavier pots on the bottom rungs. This visually anchors the piece and ensures stability.
Reserve the upper rungs for trailing varieties. Vines like pothos or philodendrons create a cascading green curtain effect.
Material Tip: Use a matte sealant on the wood. This protects the shelf from water damage while maintaining a natural finish.
Macrame and Ceiling Suspension
Macrame hangers introduce softness to the room. The intricate knots and cotton texture contrast beautifully with glossy green leaves.
These hangers are perfect for filling empty corners. They utilize dead space near windows where light is often strongest.
This textile art aligns well with decorative tapestries and boho decor. Choose natural beige or cream cords to keep the focus on the plants.
When you have a small footprint, the only way to go is up. Vertical shelving and hanging planters draw the eye upward, creating the illusion of volume.
Bobby Berk, Architectural Digest
Choosing the Right Height for Plants
Placement is key for plant health and visual flow. Not every plant thrives at every height due to light and humidity.
Use this quick reference list to arrange your vertical garden effectively:
- Top Tier (High Light/Heat): Succulents, String of Pearls, and Cacti love the bright, warm air near the ceiling.
- Mid-Level (Eye Level): Philodendrons, Pothos, and Spider Plants offer lush foliage that fills the visual gap.
- Lower Tier (Shade/Humidity): Ferns, Calatheas, and Peace Lilies prefer the cooler, shaded spots near the floor.
- Floor Anchors: Large Monstera or Fiddle Leaf Figs work best sitting directly on the floor to ground the vignette.
Ensure your ceiling hooks are drilled into joists. Wet soil is heavy, and secure anchoring prevents accidents.
Group hangers at varying lengths. This asymmetry creates a more organic, collected vibe rather than a rigid display.
The Vertical Edge
- Use swivel ceiling hooks for your macrame hangers; they allow you to easily rotate your plants 180 degrees every few weeks, ensuring even growth and sunlight exposure on all sides.
- When styling a ladder shelf, place a ‘spiller’ plant like a String of Hearts on the very top rung to create a natural, flowing frame that connects the upper levels to the floor.
- To protect your reclaimed wood shelves from moisture, place a discreet cork or felt coaster under every pot to prevent water rings and wood rot without ruining the aesthetic.
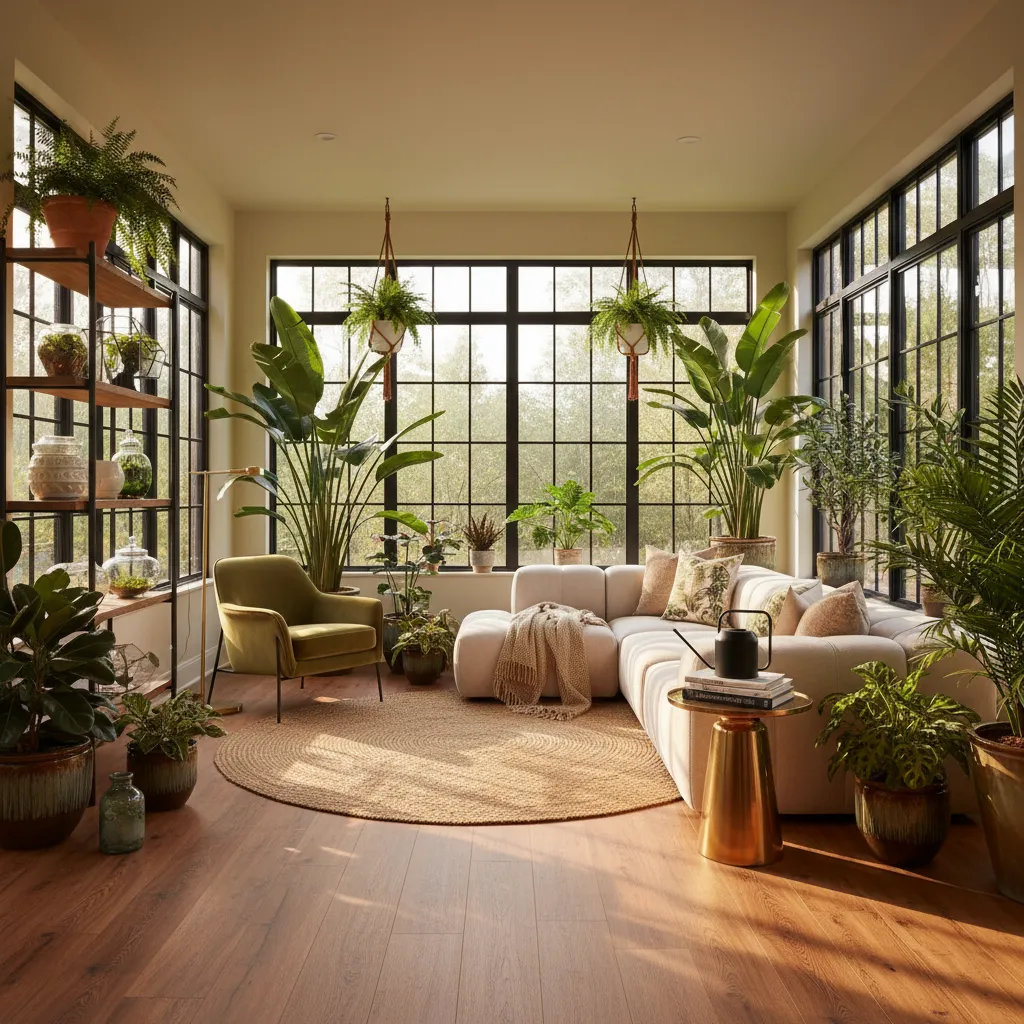
5. Styling the Greenhouse: Integrating Biophilic Design and Boho Accents

Creating a greenhouse living room requires more than just accumulating potted plants. It is about blurring the physical lines between indoors and outdoors.
Biophilic design focuses on natural light, organic shapes, and raw materials to boost well-being.
When you pair these biological elements with boho accents, the space feels curated rather than chaotic. The goal is to design a room that breathes.
This aesthetic prioritizes comfort, using soft textures to balance the wildness of indoor foliage.
True luxury is living amongst nature, even when you are indoors.
The Botanical Edit
- Layer diverse textures like hand-woven jute rugs and macrame hangers to soften the structure of large leafy plants.
- Create depth by staggering plant heights using vintage wooden stools or floating shelves to mimic a natural forest canopy.
- Place large mirrors opposite windows to double your indoor greenery and maximize the reach of natural sunlight throughout the room.
Layering Natural Textures

Texture is the secret ingredient that prevents a plant-filled room from feeling like a damp conservatory.
Start with a neutral base using jute or sisal rugs. These rough, organic materials ground the airy greenhouse vibe and hide soil spills.
Contrast these hard surfaces with soft, inviting textiles draped over furniture.
Incorporating woven wall art or decorative tapestries adds immediate warmth to vertical surfaces.
This layering creates sound absorption, making the room feel quiet and sanctuary-like.
Biophilic design is the theory that humans have an innate tendency to seek connections with nature… It’s about creating spaces that are healthier and more supportive of human well-being.
Oliver Heath, Oliver Heath Design
The Texture Edit
- Layer a soft wool rug over a durable jute base to balance ruggedness with underfoot comfort.
- Incorporate woven wall hangings or macramé to soften vertical lines and improve room acoustics.
- Mix diverse material weights, like heavy linen cushions alongside delicate rattan furniture, to add visual depth.
Curating Plant Vignettes

Avoid scattering pots randomly across the floor, which can clutter your walking path.
Instead, group plants together to form lush vignettes. Use plant stands of varying heights to create a tiered canopy effect that mimics a forest floor.
Choosing the right vessel is as important as the plant itself. Creating a cohesive look often involves mixing materials like terracotta, ceramic, and baskets.
You can explore plant pot ideas that introduce seasonal colors or earthy tones to match your palette.
Place trailing plants on high shelves or in macrame hangers to draw the eye upward. This technique maximizes vertical space, making small rooms feel larger.
It also keeps delicate vines safe from pets while adding a cascading visual element.
Material Pairing Guide for Boho-Greenhouse Style
To achieve a balanced look, match your plant structures with specific decor materials. This table suggests pairings that enhance both the botanical and bohemian aesthetic.
| Plant Structural Type | Recommended Vessel Material | Best Boho Decor Companion |
|---|---|---|
| Architectural (e.g., Snake Plant) | Concrete or Glazed Ceramic | Geometric patterned rugs or brass hardware |
| Trailing (e.g., Pothos, Ivy) | Woven Seagrass or Macrame | Sheer linen curtains and dreamcatchers |
| Bushy/Leafy (e.g., Monstera) | Raw Terracotta or Rattan Basket | Leather ottomans and chunky knit throws |
| Delicate (e.g., Ferns) | Glass Terrarium or Moss Ball | Vintage wood shelving and old books |
The Lush Edit
- Follow the ‘Rule of Three’ by grouping plants in odd numbers to create a naturally balanced and visually appealing arrangement.
- Incorporate a mix of leaf textures; pair broad-leafed Monsteras with feathery Ferns; to give your vignette professional depth and contrast.
- Ensure all plants in a single grouping share similar light and humidity requirements so they can thrive together as a mini-ecosystem.
Lighting the Indoor Garden

Lighting is crucial for both plant health and the room’s atmosphere. Relying solely on overhead lights can make the space feel sterile.
Layer warm ambient lamps in corners to highlight the texture of broad leaves and cast dramatic shadows.
For darker corners, incorporate full-spectrum grow bulbs into stylish floor lamps.
This functional choice ensures your “greenhouse” thrives year-round.
The glow from these lights often mimics daylight, keeping the room feeling energetic and bright.
The Glow-Up Guide
- Automate your lighting with smart plugs to ensure your indoor garden receives a consistent 12-hour cycle of light without manual effort.
- Position full-spectrum bulbs 6 to 12 inches away from foliage to prevent leaf burn while providing optimal energy for growth.
- Place a decorative mirror behind your plant collection to reflect light onto the undersides of leaves and brighten darker corners of the room.
Cultivating Your Living Sanctuary
Merging your living space with a greenhouse aesthetic is about more than just buying plants. It requires a solid foundation that handles nature’s elements gracefully.
Whether you choose rugged concrete or warm vinyl, the right flooring ensures your indoor oasis remains damage-free and stylish for years to come.
Start small with a wet zone or go big with full waterproofing. Your home is ready to bloom into a vibrant, breathable retreat.
Botanical Living Questions Answered
Use a hygrometer to track moisture levels. If humidity rises above 60%, ensure good ventilation or use a dehumidifier to protect your drywall and furniture.
It is risky. Constant moisture can cause warping. We recommend Luxury Vinyl Plank (LVP) or ceramic tile to achieve the wood look without the anxiety.
Supplement natural light with full-spectrum LED grow bulbs. Many modern fixtures are designed to look like chic pendant lamps rather than industrial gear.
Always use deep, non-porous saucers under pots. Alternatively, place cork pads with a moisture barrier underneath to shield the floor from cold and dampness.
