Is your home looking frightfully bare as Halloween creeps closer? Are you haunted by the high prices of store-bought decor that lacks personality and soul? You’re in the right place to change that.
Halloween decorations shouldn’t just be plastic skeletons from a box; they should be a manifestation of your spooky spirit, a backdrop for trick-or-treaters’ delight, and a fun, creative project for a crisp autumn afternoon.
This is your creative playbook for transforming everyday items into a haunt that’s not only impressive and atmospheric but feels deeply, personally you.
We’ll explore eerie designs, decode the secrets of a high-impact haunt on a low budget, and walk through the practical steps to bring your vision to life.
By the end, you’ll see a trash bag not as garbage, but as a giant, terrifying spider waiting to be born.
Before You Begin: The Haunter’s Mindset
The most impressive Halloween displays start with atmosphere, not a shopping spree. Before you buy a single craft item, let’s lay the groundwork for a design that’s clever, cohesive, and chillingly effective. The goal is to be spooky, not spendy.
The Secrets of Style: Simple Rules for a Stunning Haunt
“Cheap and easy” doesn’t have to mean “lame and lazy.” These simple secrets are what elevate basic crafts into a truly terrifying tableau.
- Lighting is Everything (Literally): This is the #1 rule of Halloween. A well-placed colored lightbulb or a hidden uplight can make a simple ghost look terrifying. Shadows are your best friend. Your decorations are only half the story; how you light them is the other, more important half.
- The Power of Repetition: One paper bat is a craft. Fifty paper bats swooping across a wall is an infestation. One small ghost is cute. A dozen hanging from a tree is haunting. Grouping cheap, simple items in large numbers is the fastest way to create a massive visual impact.
- The 80/20 Rule of Spookiness: 80% of your best decorations can be made from things you’d normally throw away: cardboard, toilet paper tubes, old sheets, plastic bottles, and trash bags. The other 20% is the craft supply that brings them to life: a can of black spray paint, a hot glue gun, or a pack of googly eyes.
- Embrace the Imperfection: This is DIY! Crooked lines, frayed edges, and a slightly lopsided look don’t ruin a Halloween craft; they make it look more authentic, creepy, and handmade. Lean into the rustic, “found object” horror vibe.
What’s the Real Cost? A No-Fuss Budget Breakdown
| The Approach | Estimated Cost | What Your Money Buys | The Little Extras (Don’t Skip These!) |
| The Found Object Fright | $0 – $20 | • Using cardboard, paper, and trash bags • Sticks and leaves from the yard • Recycled jars and bottles | • A roll of black electrical tape • A bottle of school glue • A black permanent marker |
| The Craft Store Conjurer | $25 – $60 | • A bag of plastic spiders or eyeballs • Several yards of cheesecloth • Styrofoam balls & heads | • A hot glue gun & glue sticks • Fishing line for “floating” things • A can of black spray paint |
| The Ambitious Haunter | $60 – $150+ | • A basic fog machine • Blacklight bulbs or colored floodlights • A simple outdoor projector | • An outdoor extension cord • A timer for your lights • Zip ties for securing props |
The Design Menu: Finding Your Signature Spooky Style
Here are the ingredients for your perfect DIY haunt. Each one comes with a breakdown to help you create with confidence.
Spooky Silhouettes & Window Wonders
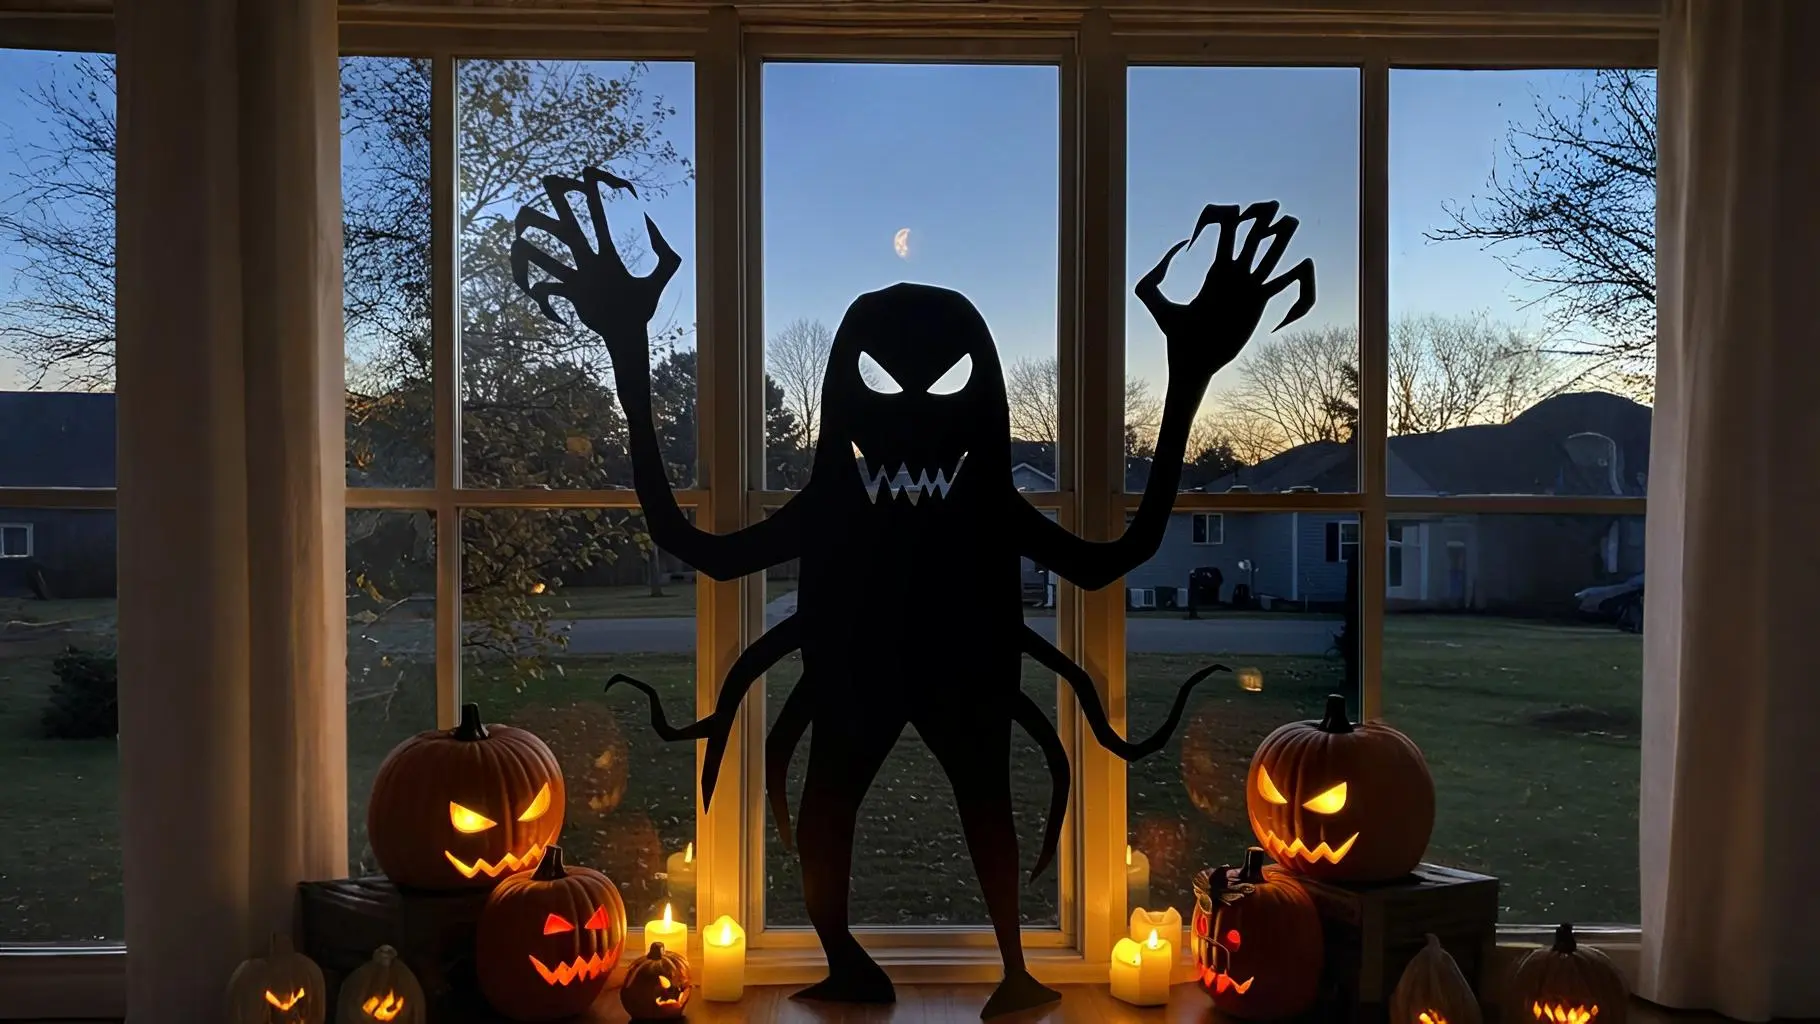
1. Window Monster Silhouettes
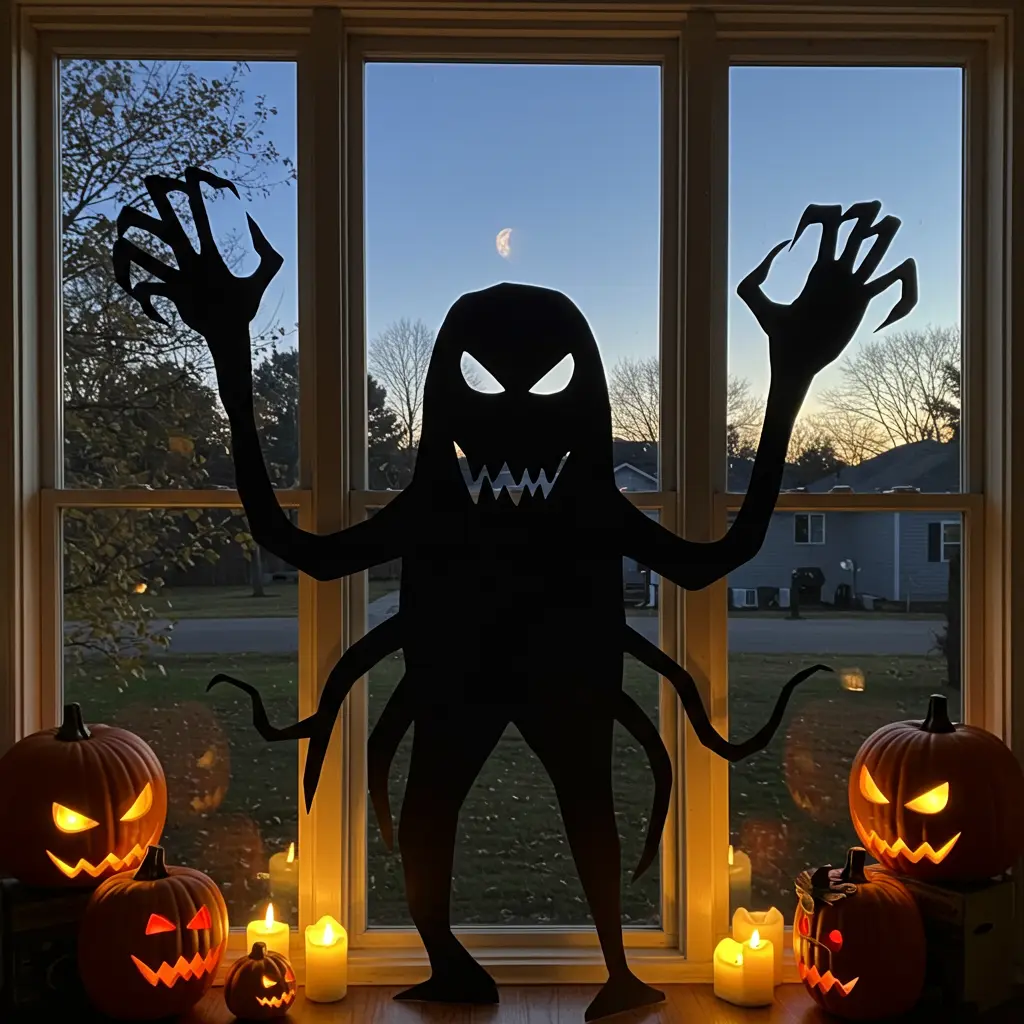
Best For: Creating a huge impact for trick-or-treaters with minimal effort and cost.
- Key Materials: Black poster board or construction paper, scissors, tape.
- Pro-Tip: Draw your monster shape (claws, tentacles, a looming head) in pencil first. Don’t worry about being a great artist; a jagged, simple shape is often creepier.
- Placement Cue: Tape the silhouettes to the inside of your windows. At night, turn on the lights in that room to make them pop.
2. Floating Witch Hats
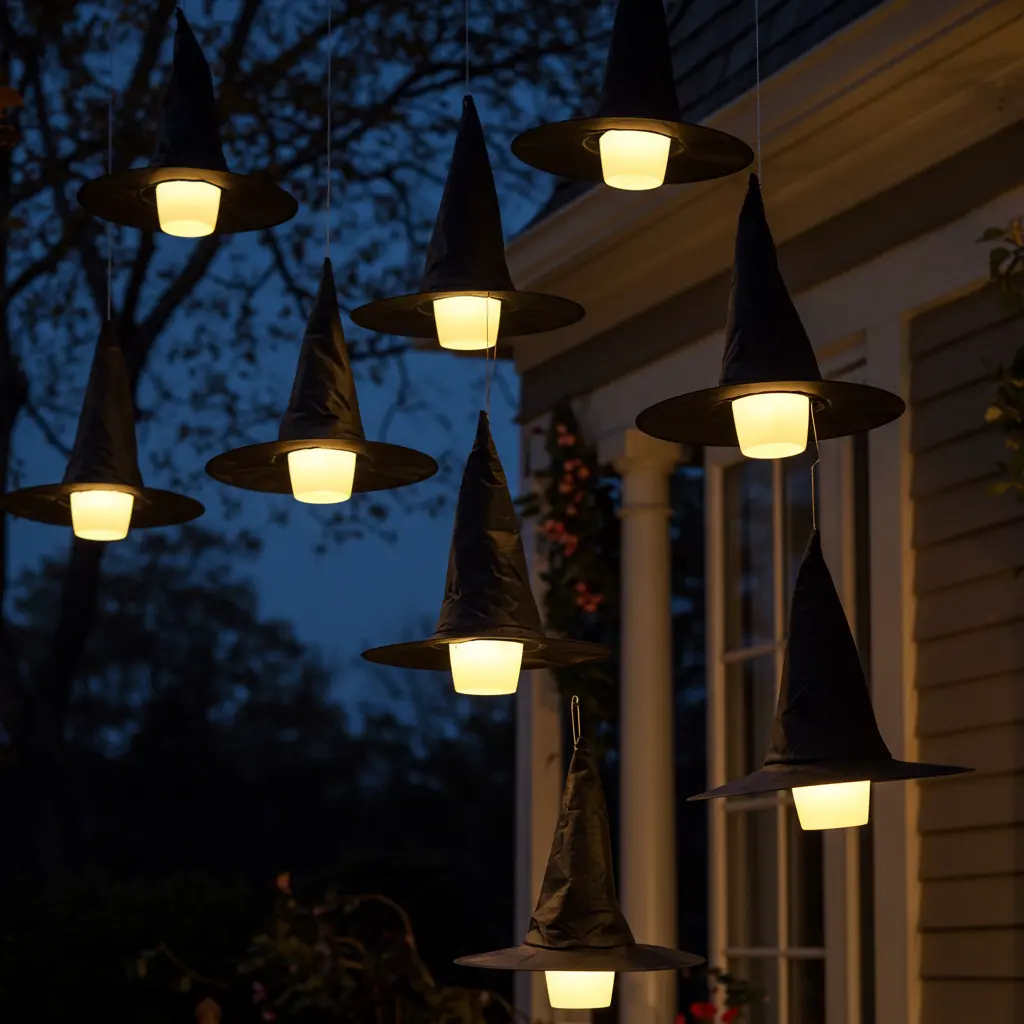
Best For: A magical, “Wizarding World” feel over a porch, walkway, or in a living room.
- Key Materials: Cheap witch hats, fishing line, safety pins, battery-powered LED tea lights.
- Pro-Tip: Use a long needle to easily thread the fishing line through the point of the hat. Use a safety pin on the inside to create a small hook for the tea light.
- Placement Cue: Hang them at varying heights from your porch ceiling or a large tree branch to create a sense of movement and depth.
3. Spooky Glowing Eyes
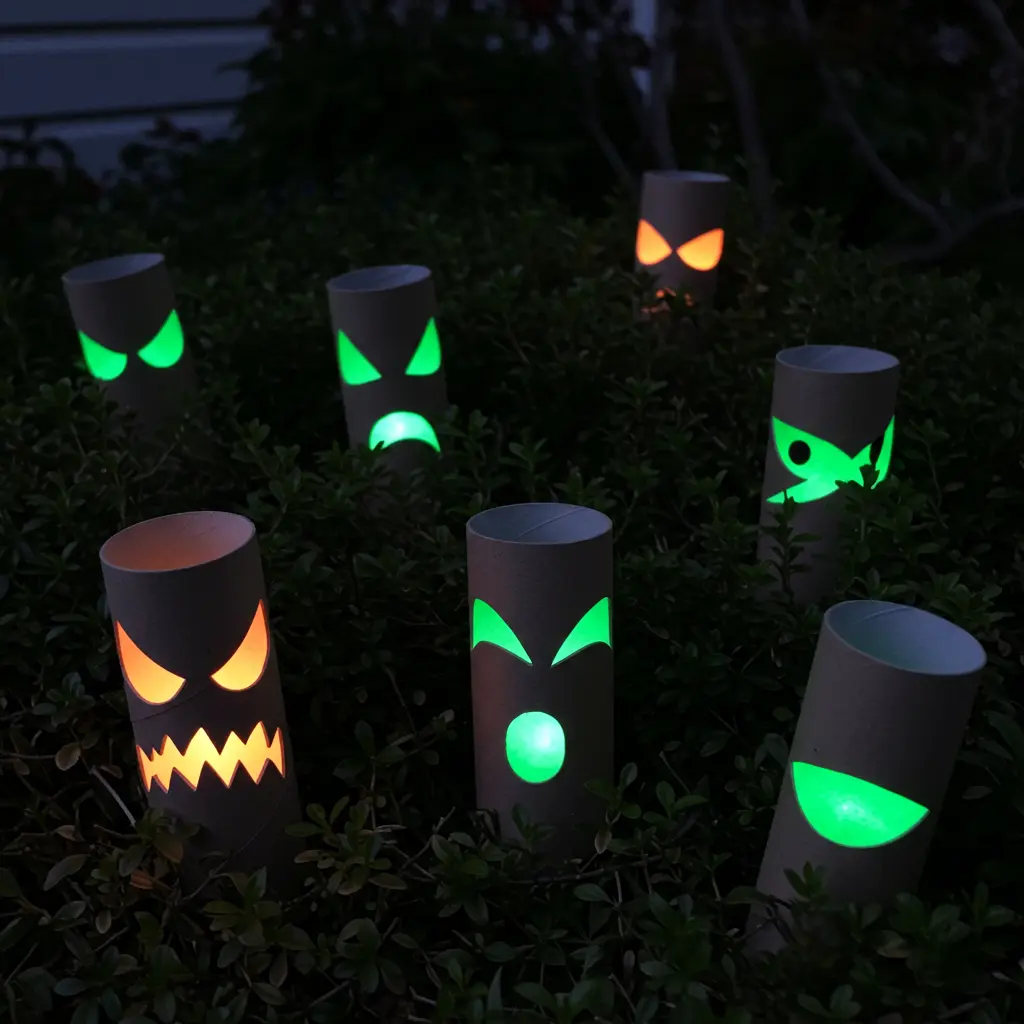
Best For: A creepy, “being watched” feeling hidden in your bushes or trees.
- Key Materials: Empty toilet paper or paper towel tubes, duct tape, and non-flammable glow sticks.
- Pro-Tip: Cut different eye shapes (angry, surprised, slanted) into the sides of the cardboard tubes. The variety makes the effect more realistic.
- Placement Cue: Activate the glow sticks, place them inside the tubes, and tape the ends shut. Tuck them deep inside hedges, bushes, or dark corners of your porch.
4. “Bloody” Handprint Clings
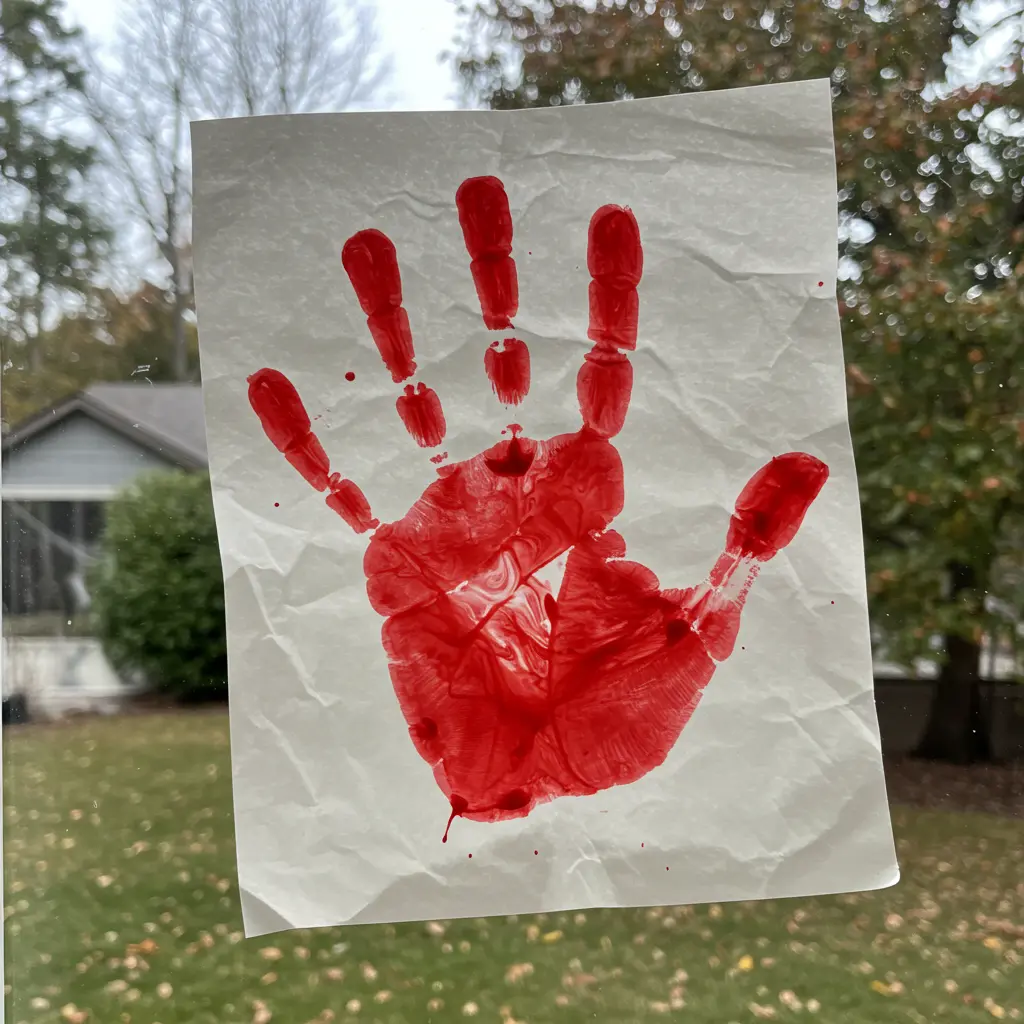
Best For: A gruesome, terrifying touch for any window or glass door.
- Key Materials: School glue, red food coloring, and wax paper.
- Pro-Tip: On a sheet of wax paper, create a handprint shape with the glue. Drip red food coloring into it and swirl with a toothpick. Let it dry completely (1-2 days), then peel it off. It will cling to glass like a window decal.
- Placement Cue: Perfect for a sliding glass door or a front storm door to greet your guests with horror.
5. Boarded-Up Windows
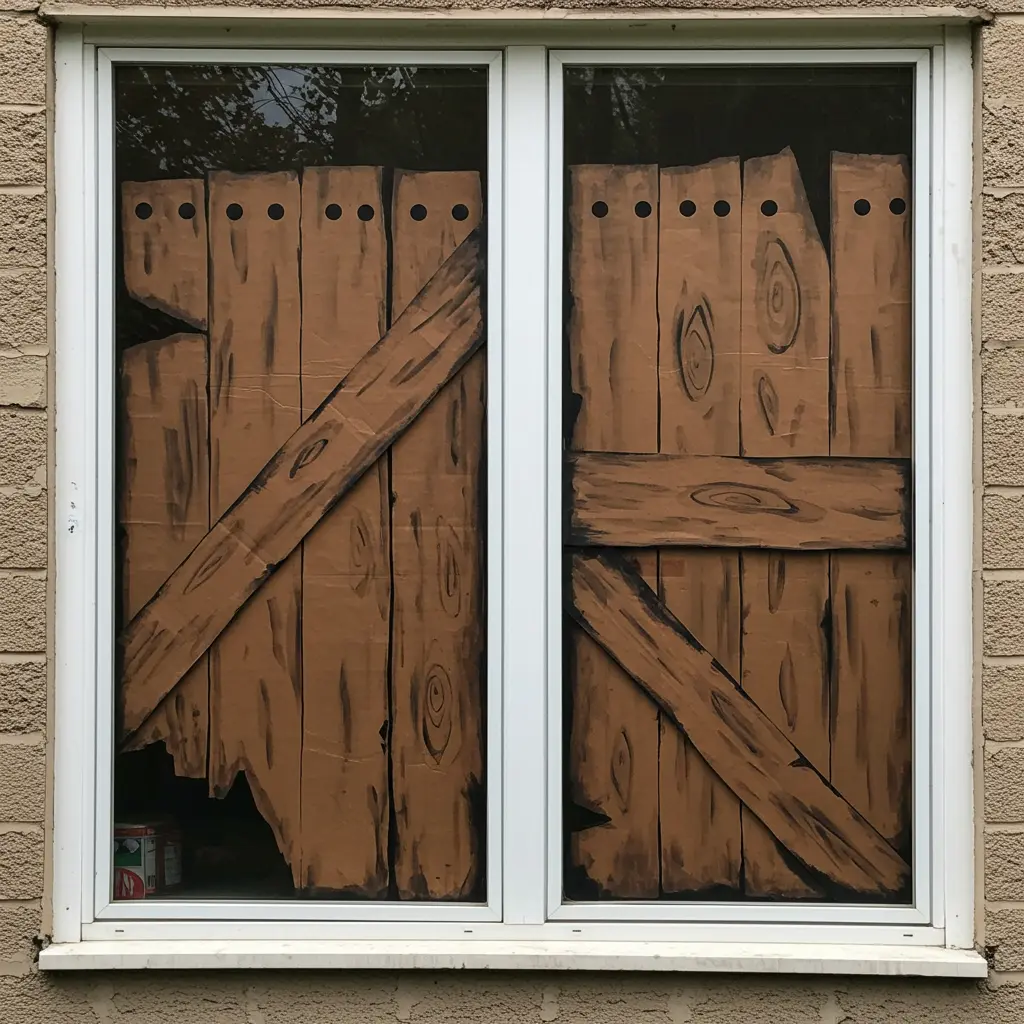
Best For: A “condemned house” or “zombie apocalypse” vibe that looks surprisingly realistic.
- Key Materials: Large cardboard boxes, brown and black paint, a box cutter.
- Pro-Tip: Cut the cardboard into plank shapes. Paint them with brown paint, then dry-brush black paint over them to create a faux wood grain. Add circles for “nail heads.”
- Placement Cue: Use strong duct tape or removable hooks to attach the cardboard “planks” across your exterior windows.
Ghoulish Garden & Porch Phantoms
6. Tomato Cage Ghosts
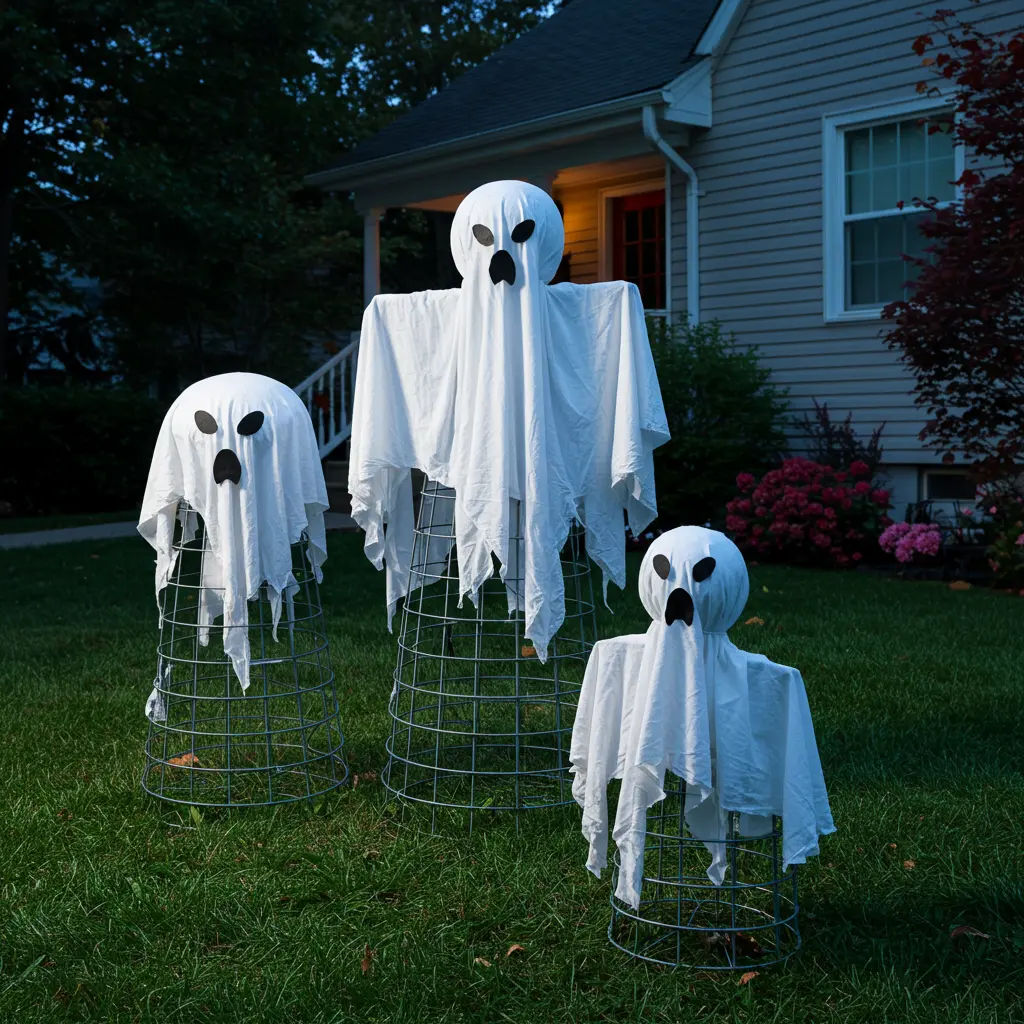
Best For: Creating life-sized ghostly figures to haunt your lawn.
- Key Materials: A wire tomato cage, an old white sheet, a foam ball, and black felt.
- Pro-Tip: Place the tomato cage upside down. Shove the foam ball over the top pointy end to create the head. Drape the sheet over the top and cut out eyes and a mouth from the felt.
- Placement Cue: Group a family of three ghosts together in your front yard. Use a colored uplight (green or blue) to make them glow menacingly at night.
7. Giant Trash Bag Spider Webs
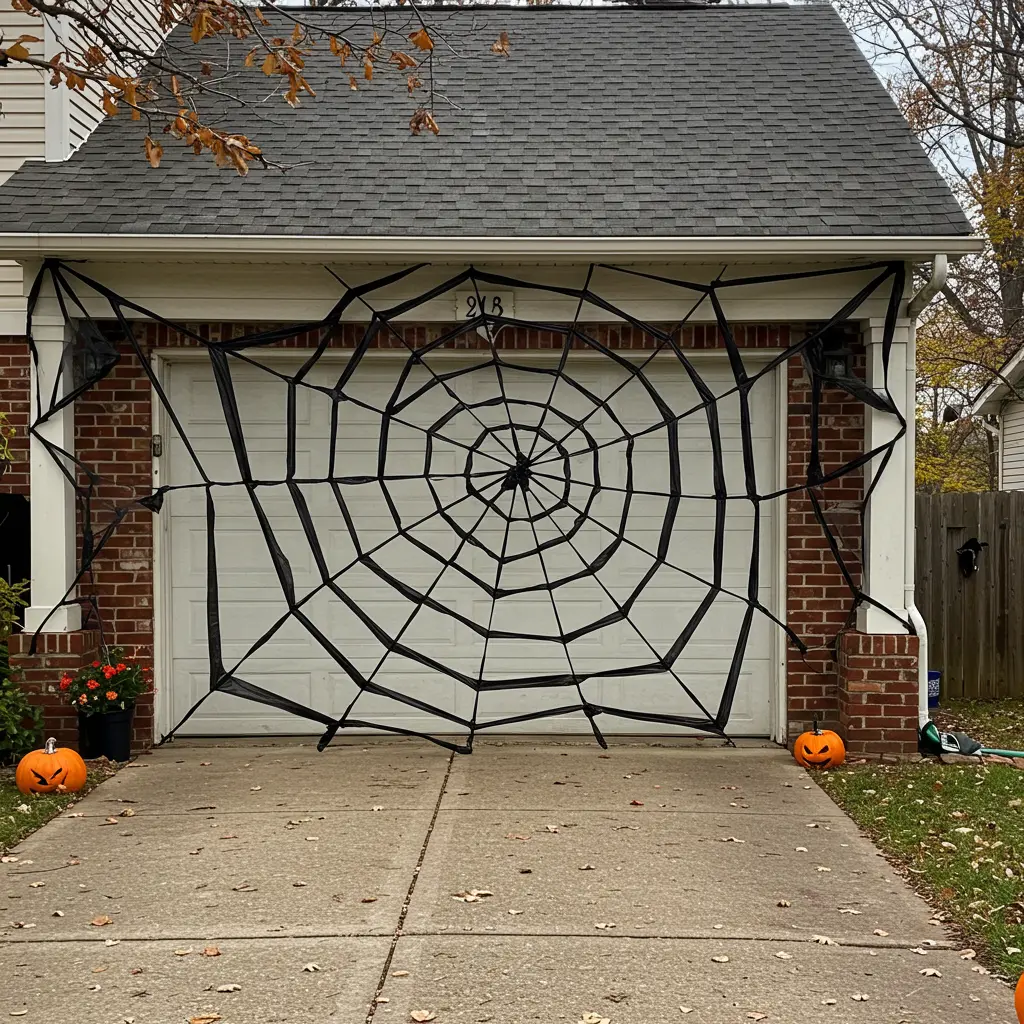
Best For: Covering a huge area (like the whole front of your house) with an impressive web on a near-zero budget.
- Key Materials: Black trash bags, sharp scissors.
- Pro-Tip: This is made exactly like a paper snowflake. Fold the trash bag multiple times into a small triangle, then cut shapes out of the folded edges. When you unfold it, you’ll have a giant web.
- Placement Cue: Stretch it across your garage door, between porch columns, or from the roofline to the ground.
8. Spooky Front Door Mummy
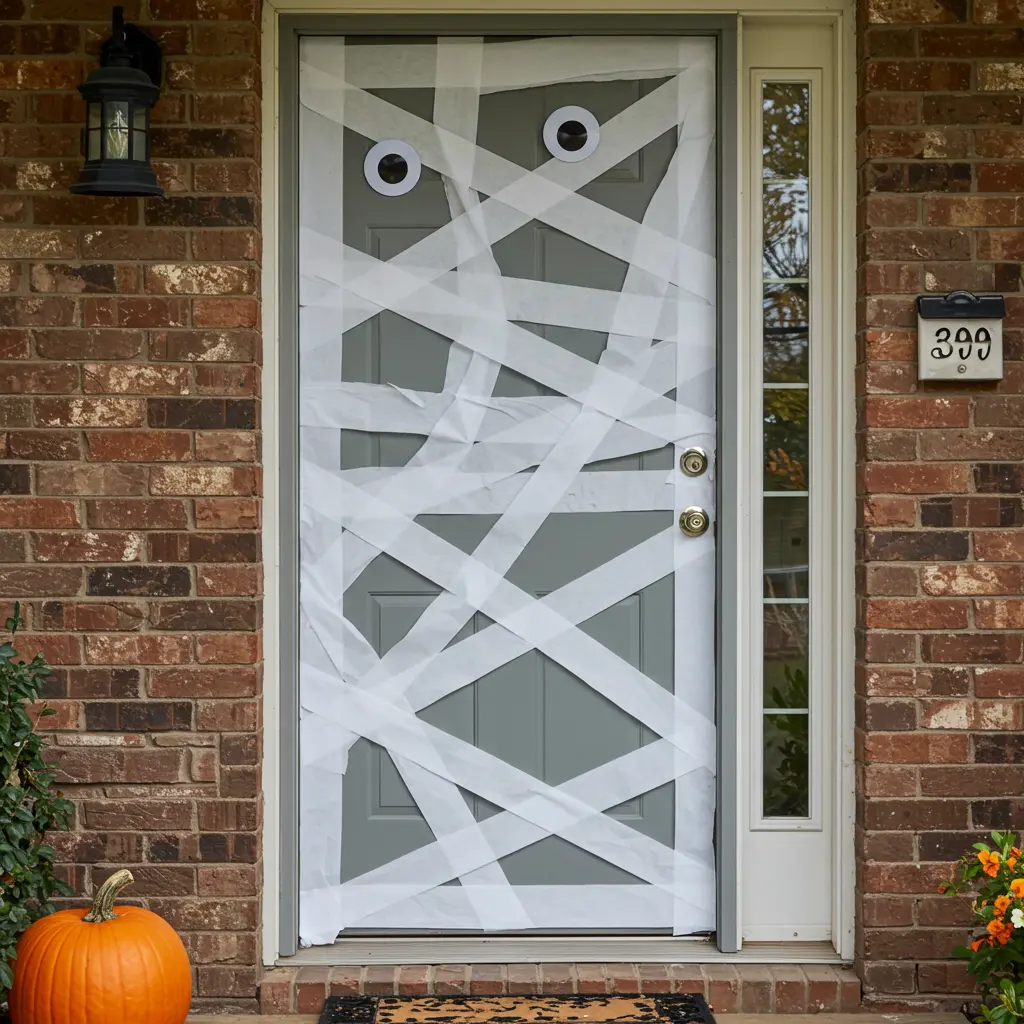
Best For: A fun, non-scary decoration that’s great for a home with young kids.
- Key Materials: White crepe paper streamers, tape, two large googly eyes, or paper plates.
- Pro-Tip: Wrap your front door with the streamers, crisscrossing them randomly. Leave a small gap near the top to tape on your giant eyes.
- Placement Cue: This works best on a solid-colored door where the white streamers will pop.
9. Floating Cheesecloth Ghosts
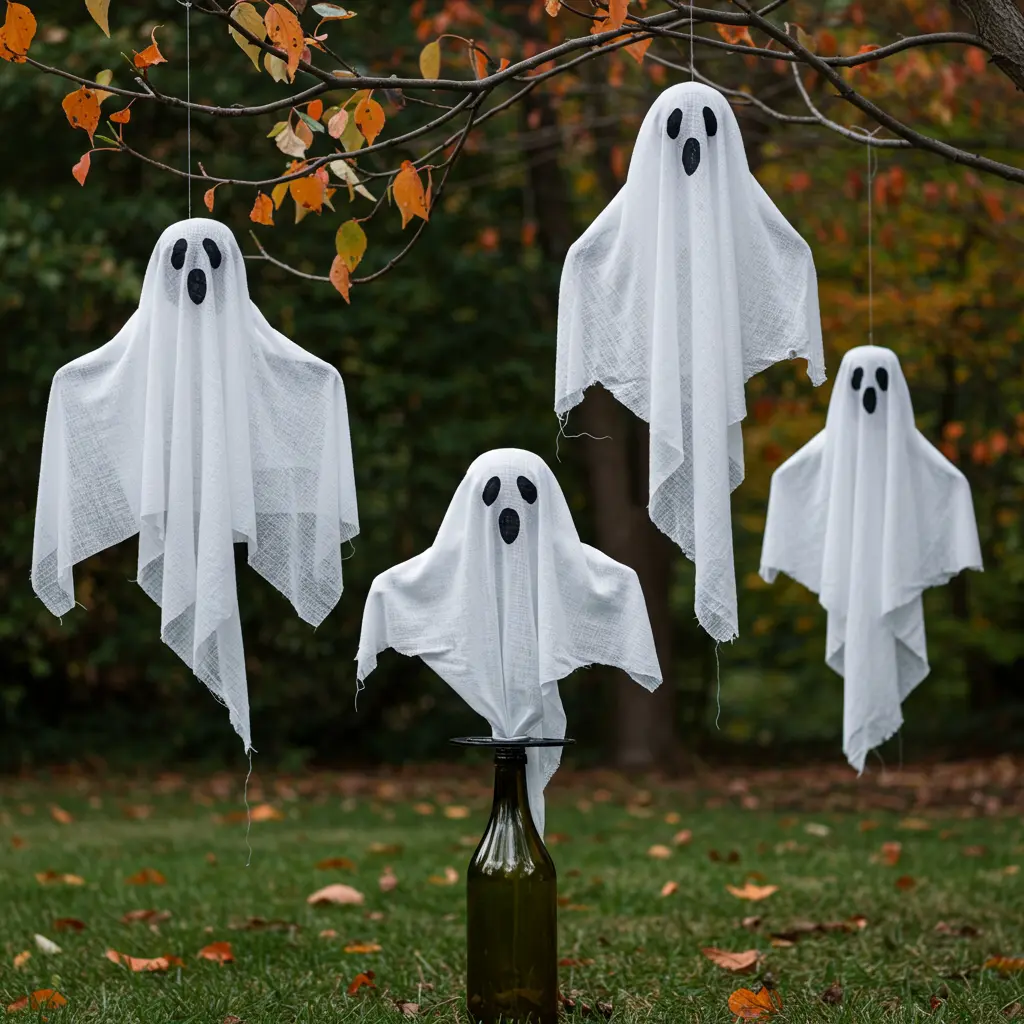
Best For: Creating ethereal, lightweight phantoms that dance in the wind.
- Key Materials: Cheesecloth, liquid starch, a balloon, a bottle, or a stand.
- Pro-Tip: Drape the starch-soaked cheesecloth over a balloon that’s resting on a bottle. Let it dry completely. When you pop the balloon, the cheesecloth will hold its ghostly shape.
- Placement Cue: Hang them from tree branches with fishing line so they appear to float weightlessly.
10. Chicken Wire Ghost Figures
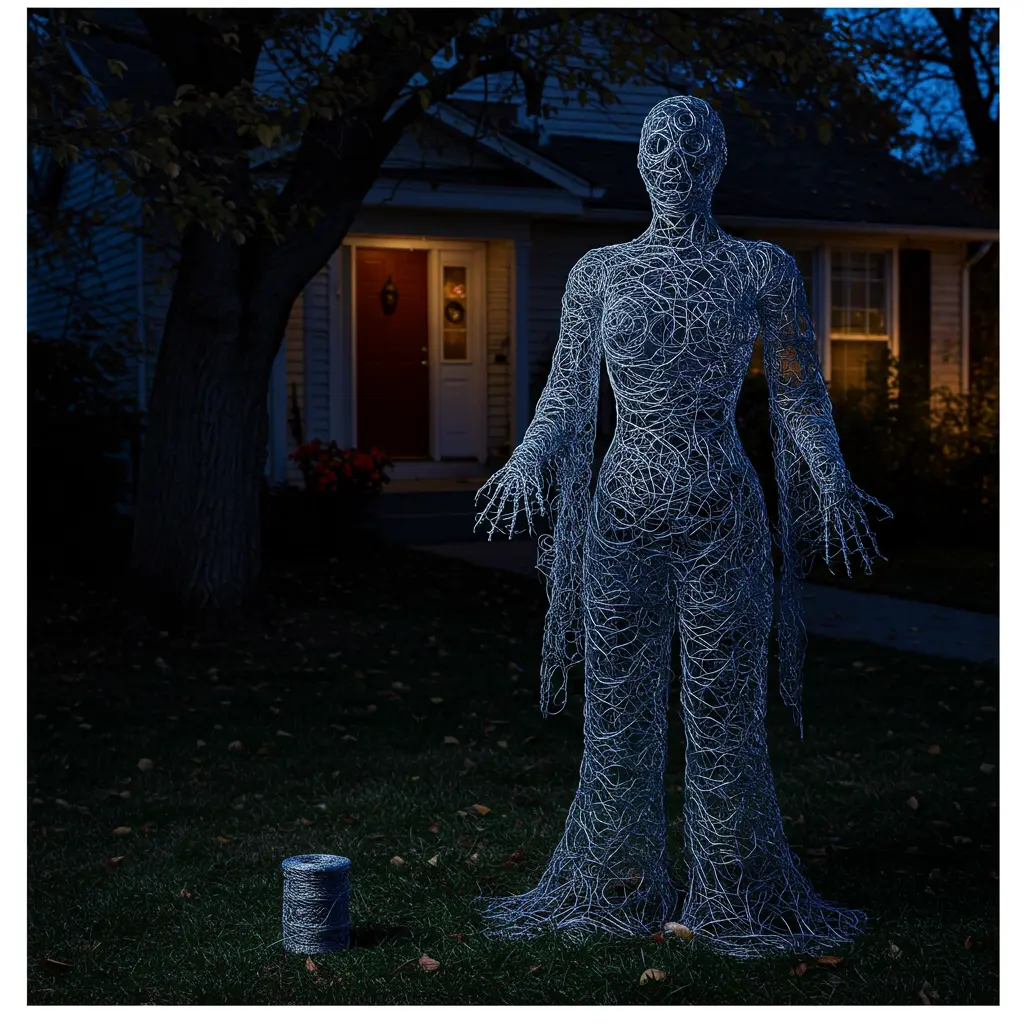
Best For: An advanced but incredibly effective way to create haunting, life-sized sculptures.
- Key Materials: A roll of chicken wire, wire cutters, and gloves.
- Pro-Tip: Mold the chicken wire around your own body (or a dress form) to create a ghostly human shape. Wear thick gloves! This is a project that requires patience.
- Placement Cue: Place a single, eerie blue or white spotlight on the finished figure in your yard. The effect is breathtakingly creepy.
11. Yard Sign Tombstones
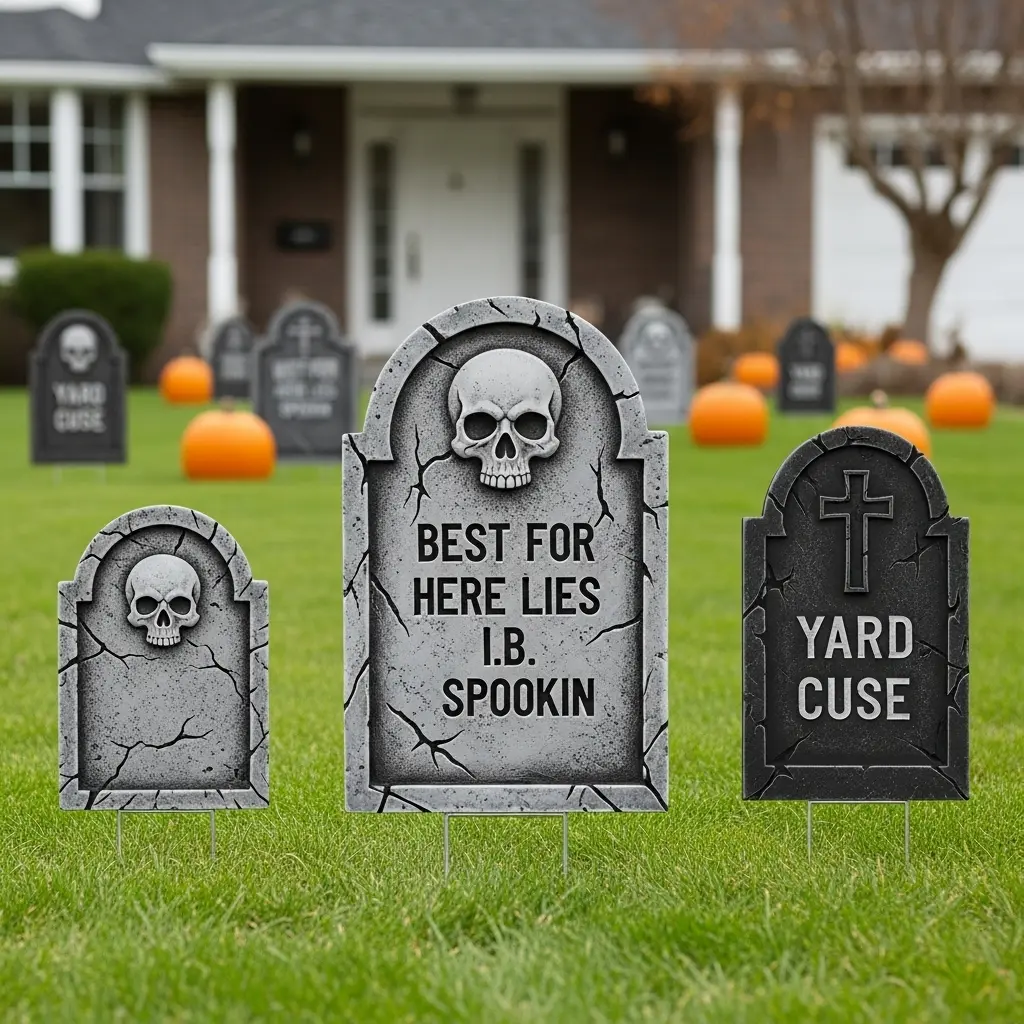
Best For: Turning your front lawn into a classic haunted graveyard.
- Key Materials: Cardboard or foam core board, gray and black paint, wooden stakes.
- Pro-Tip: Write funny epitaphs on the tombstones (“Here lies I.B. Spookin,” “I told you I was sick”). A little humor goes a long way.
- Placement Cue: Stick them in your yard at jaunty angles, as if the ground is unsettled.
Creepy Crawlies & Critters
12. Paper Bat Swarm
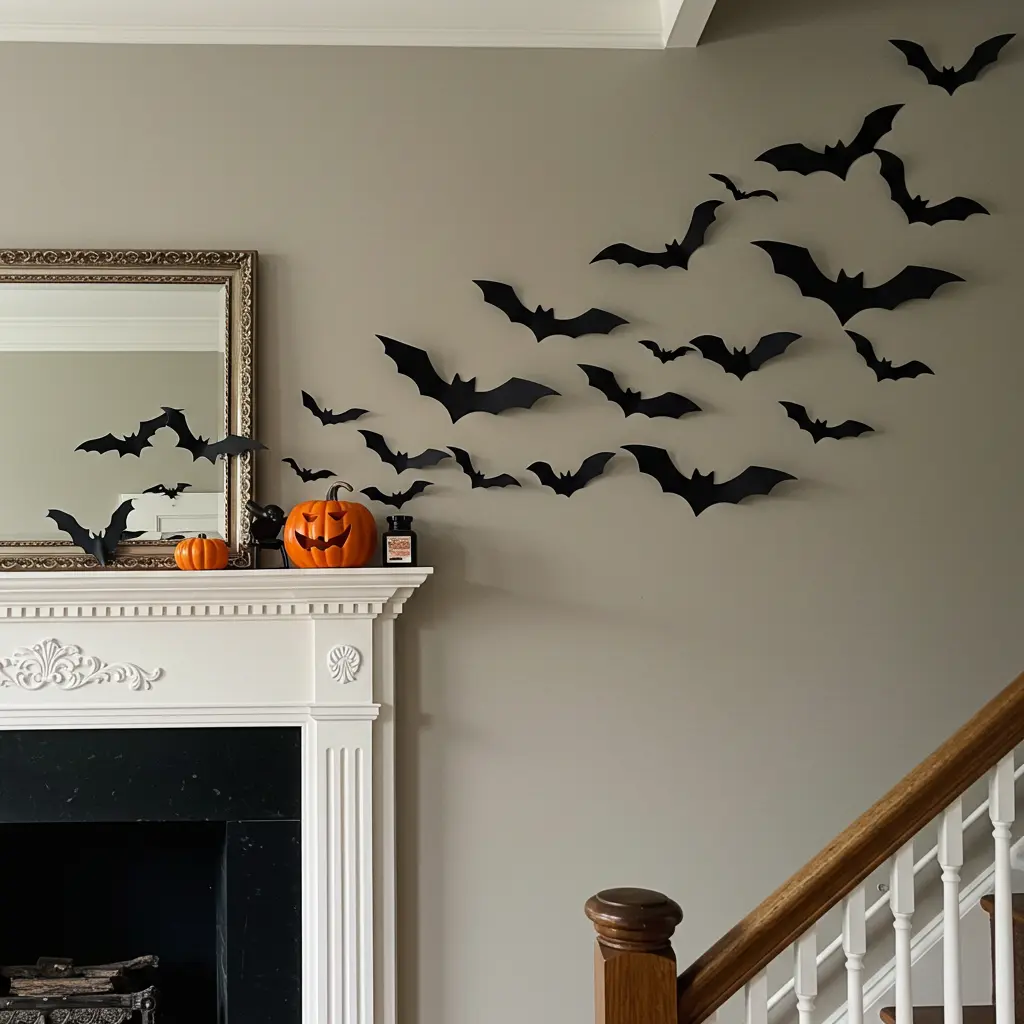
Best For: A dramatic, high-impact indoor decoration that costs pennies.
- Key Materials: Black construction paper, scissors, a bat template (easily found online), and double-sided tape.
- Pro-Tip: Cut out bats in three different sizes. Fold them all slightly in the middle to give them a 3D, in-flight look.
- Placement Cue: Arrange them in a swooping swarm coming out of a fireplace, across a large wall, or up a staircase.
13. Trash Bag Spiders
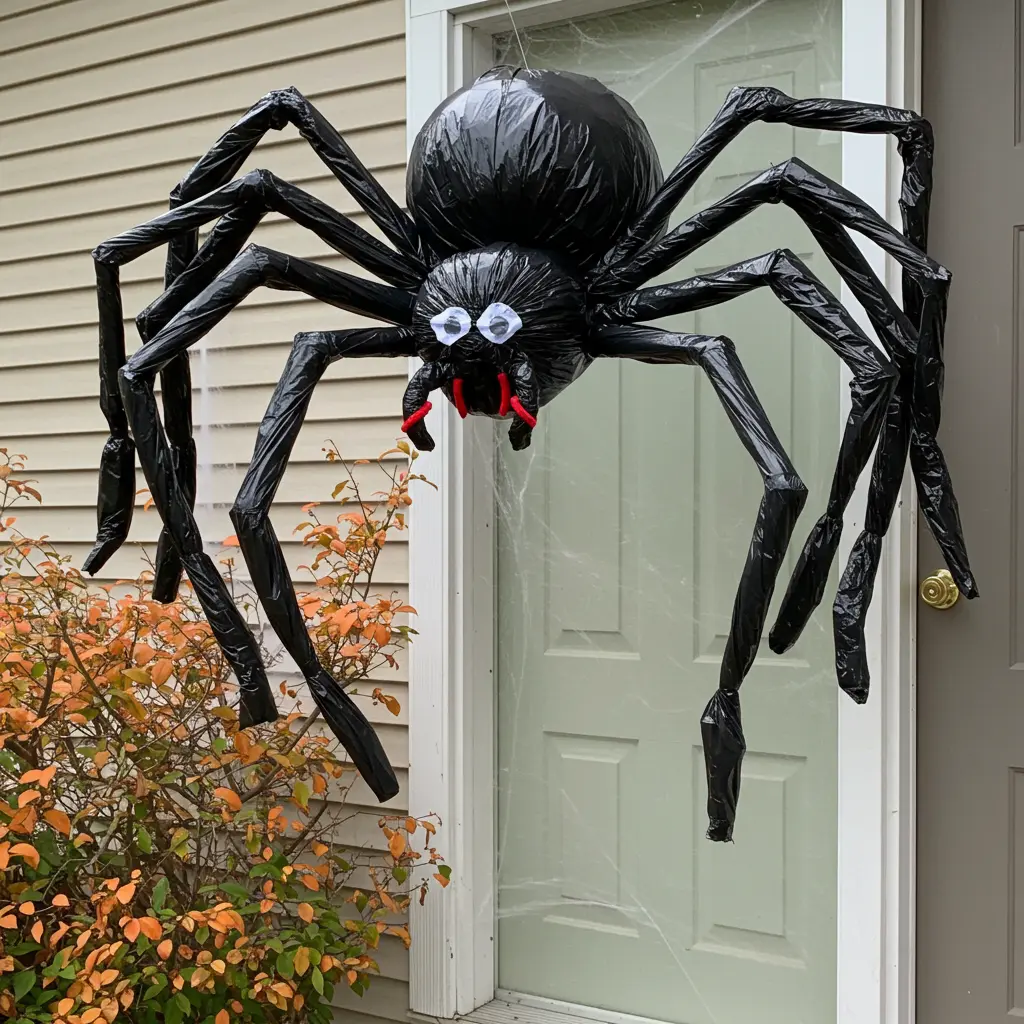
Best For: Creating giant, terrifying spiders to hang on your house or in a web.
- Key Materials: Two black trash bags (one for the head, one for the body), leaves or newspaper for stuffing, black duct tape.
- Pro-Tip: Create the legs by cutting long strips from another trash bag, stuffing them, and taping the ends.
- Placement Cue: Attach a giant spider to the center of your giant trash bag spider web for a complete scene.
14. Spider Egg Sacs
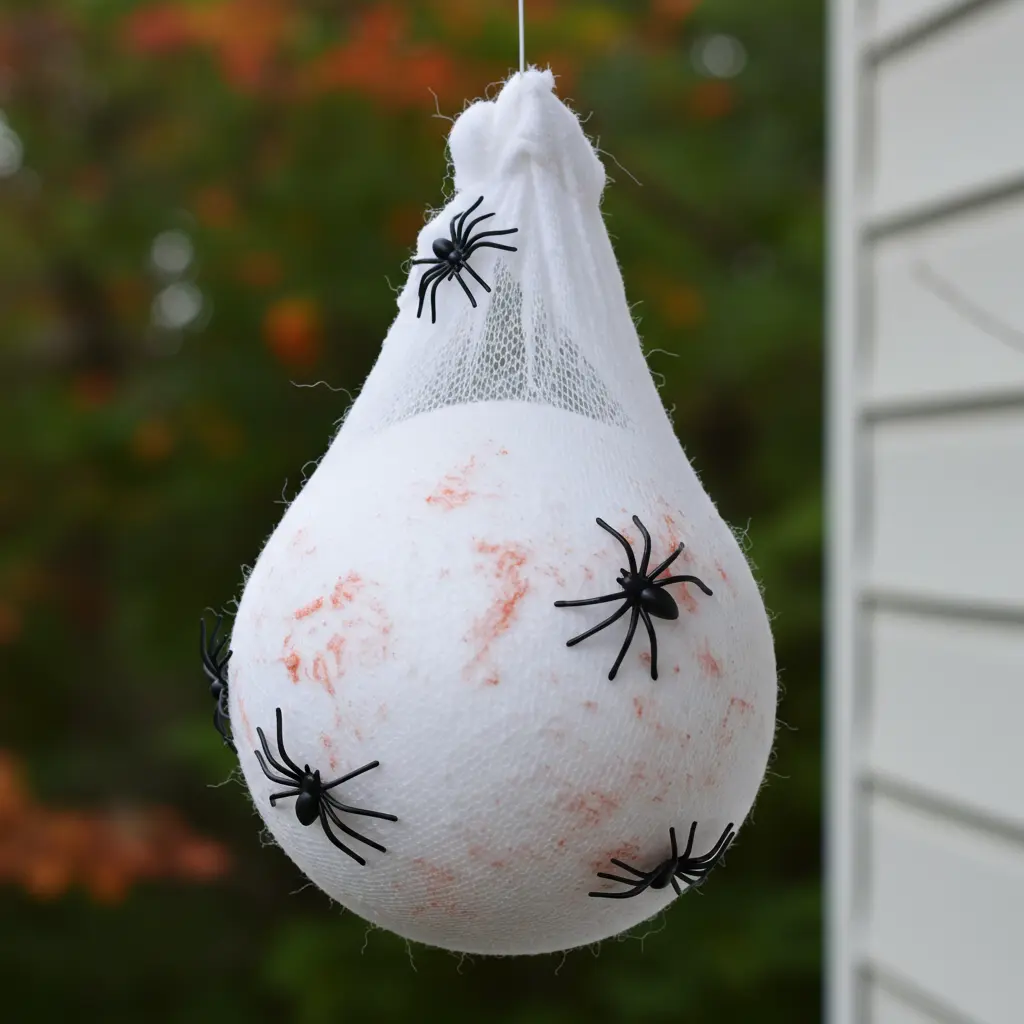
Best For: A truly disgusting and creepy addition to a porch or tree.
- Key Materials: A foam ball, white quilt batting or stuffing, a pair of old white stockings/tights, a hot glue gun, and small plastic spiders.
- Pro-Tip: Stretch the batting over the foam ball, then pull the stocking over the top to create the lumpy, sac-like shape.
- Placement Cue: Hot glue a few plastic spiders on the outside of the sac and hang it from a porch ceiling or a tree branch.
15. Cardboard Tube Bats
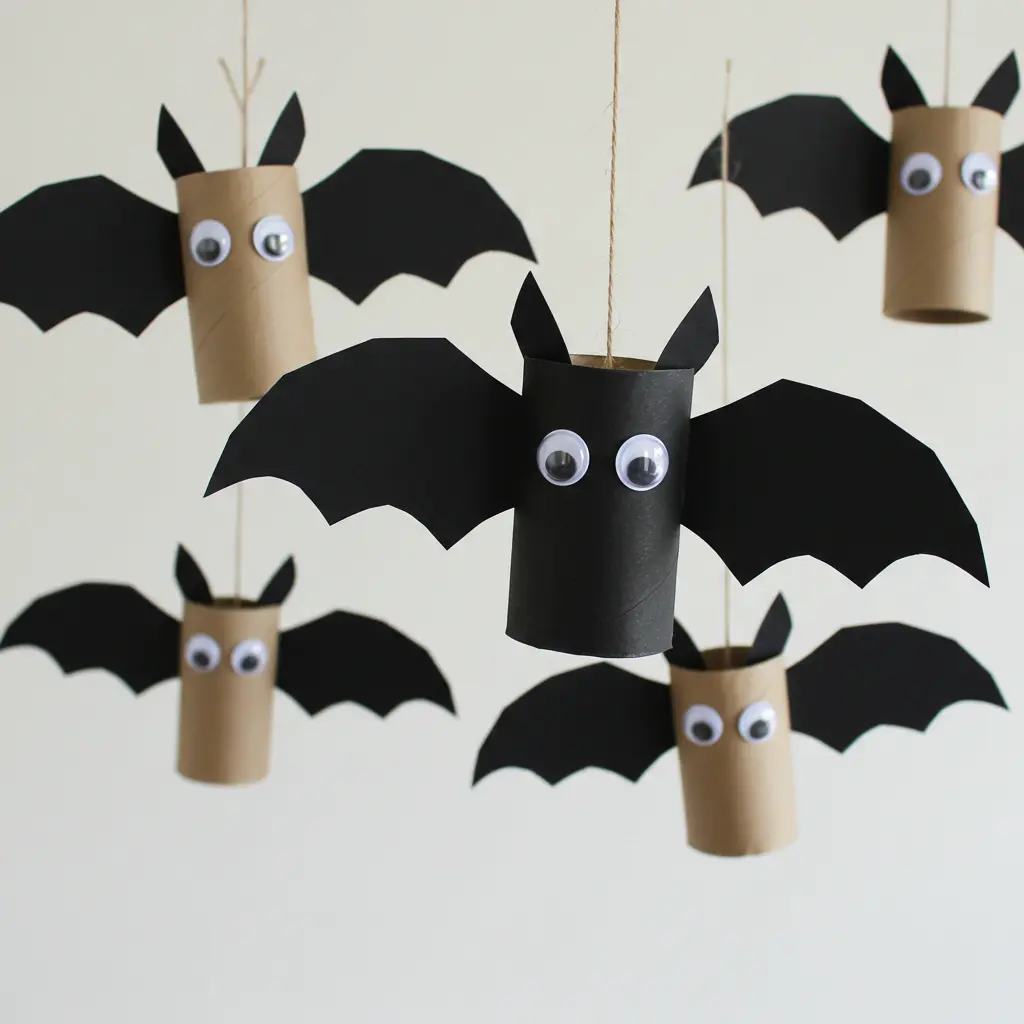
Best For: A fun, simple craft to do with kids.
- Key Materials: Empty toilet paper tubes, black paint, black paper, googly eyes, glue.
- Pro-Tip: Fold the top of the black-painted tube inwards to create the pointed ear shapes.
- Placement Cue: String them together to create a garland or hang them individually from a chandelier.
16. Snake-Infested Wreath
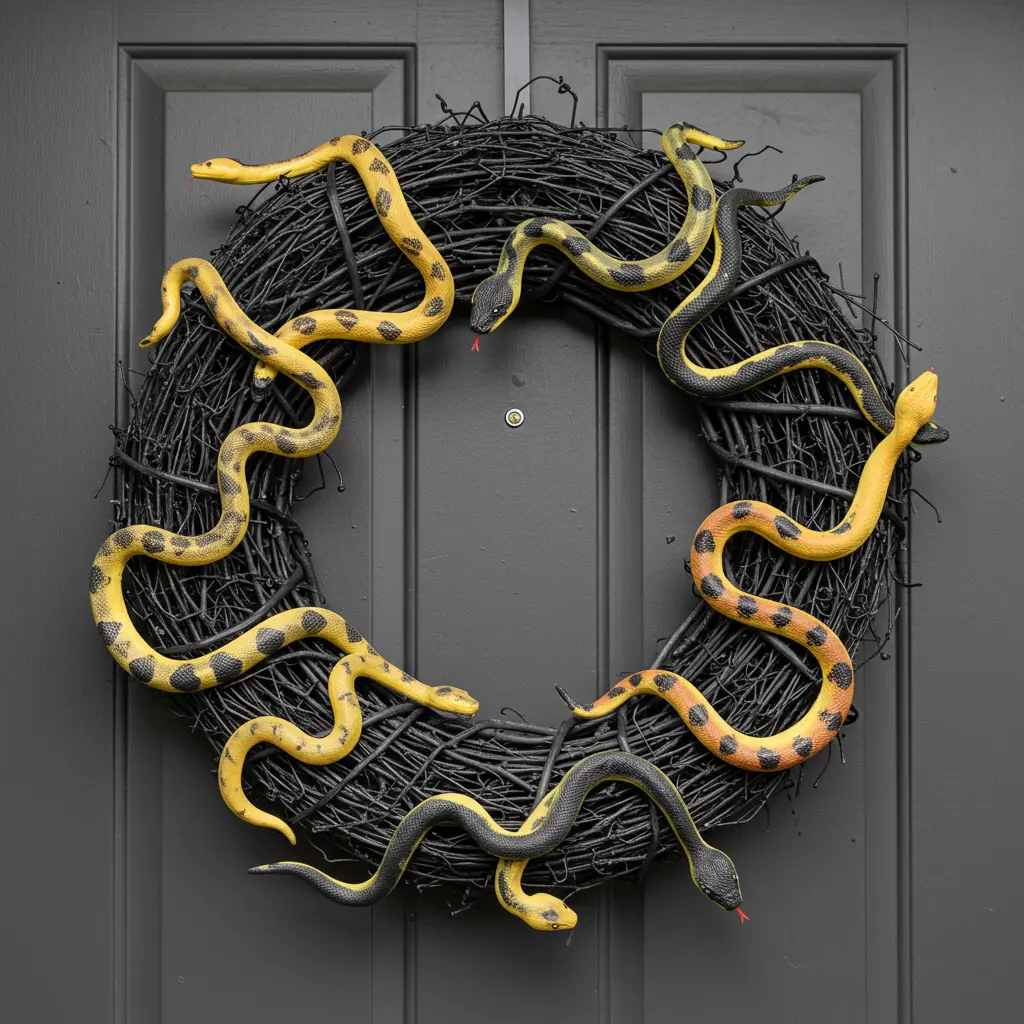
Best For: A creepy, surprising twist on a traditional front door welcome.
- Key Materials: A grapevine wreath, black spray paint, a bag of rubber snakes, and hot glue.
- Pro-Tip: Spray paint the entire wreath black. Then, use hot glue to arrange the rubber snakes as if they are slithering in and out of the branches.
- Placement Cue: The perfect creepy greeter for your front door.
Eerie Ambiance & Indoor Accents
17. Apothecary Potion Bottles
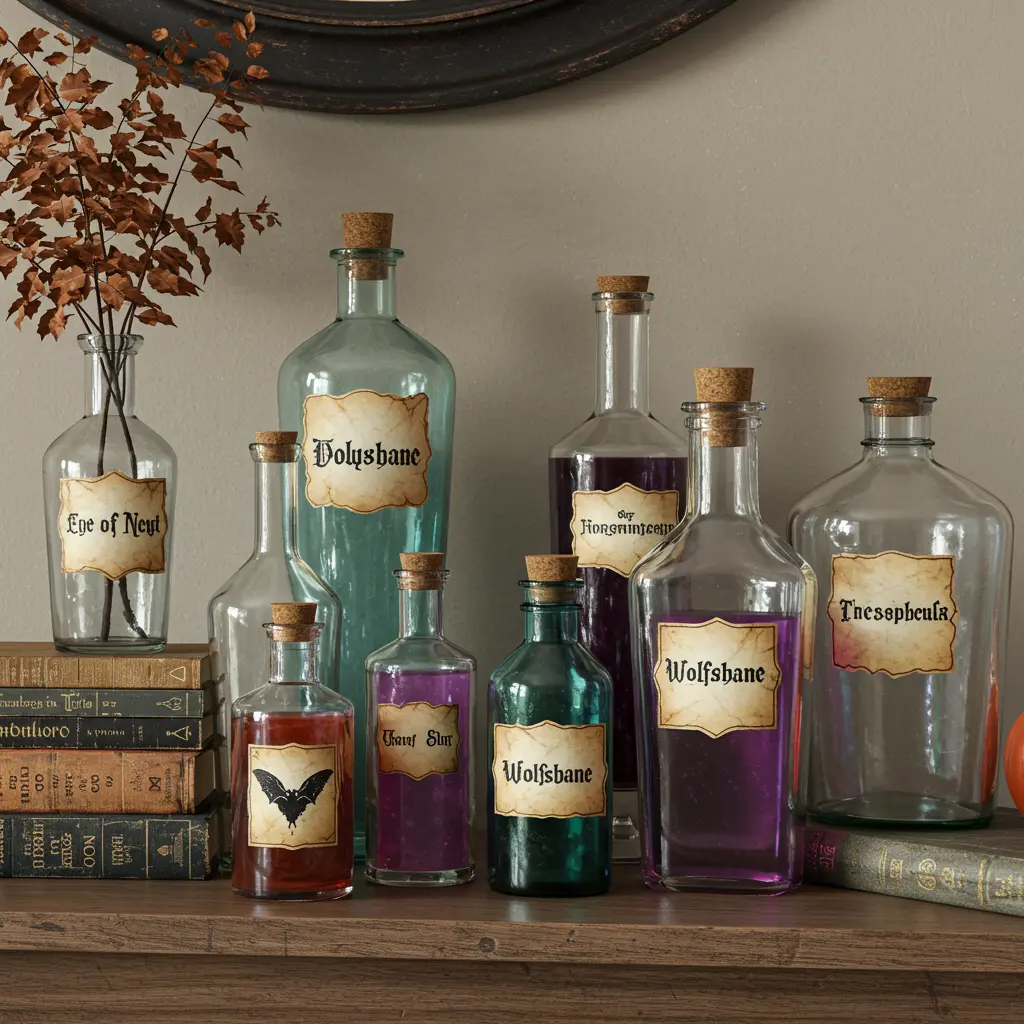
Best For: Styling a mantel or shelf with a “witch’s workshop” vibe.
- Key Materials: Old glass bottles and jars of various shapes, water, food coloring, spooky labels.
- Pro-Tip: Print out potion labels (“Eye of Newt,” “Wolfsbane”) on regular paper, then stain them with a wet tea bag and singe the edges carefully with a lighter for an aged look.
- Placement Cue: Group a collection of 5-7 bottles of varying heights on a bookshelf or entryway table.
18. Ghostly Family Portraits
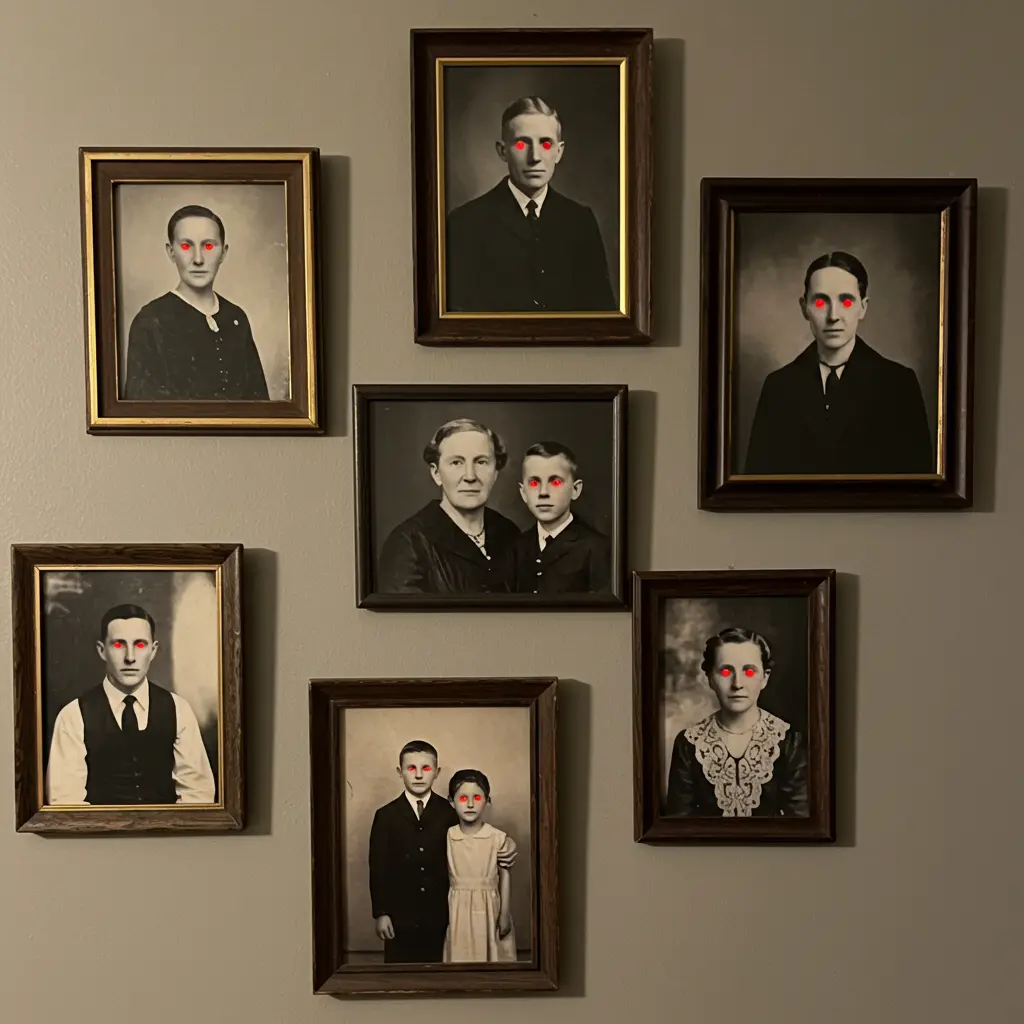
Best For: A subtle, creepy detail for a hallway or gallery wall.
- Key Materials: Old portraits or photos from a thrift store, red craft paint, or red LEDs.
- Pro-Tip: For a temporary effect, use a red dry-erase marker to give the portraits glowing red eyes on the glass. For a permanent version, tape a tiny red LED behind the eyes of the photo.
- Placement Cue: Mix them in with your real family photos for a “haunted mansion” feel.
19. Floating “Haunted” Books

Best For: A magical, gravity-defying decoration for a bookshelf or corner.
- Key Materials: An old hardcover book, fishing line, and a thumbtack.
- Pro-Tip: Open the book to the middle. Use a needle to thread the fishing line through the spine of the book and tie a secure knot.
- Placement Cue: Hang it from the ceiling near a bookshelf so it looks like it’s floating off the shelf on its own.
20. Specimen Jars
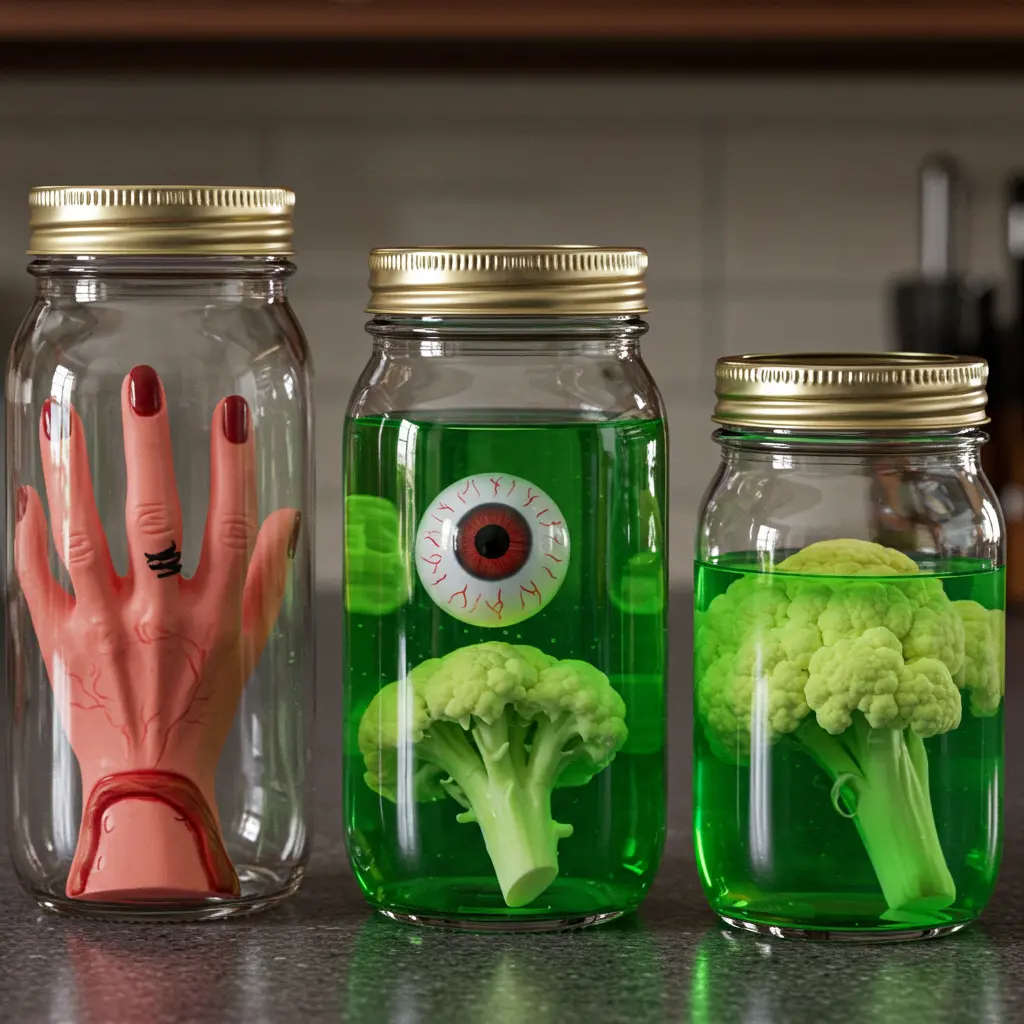
Best For: A gross-out prop for a “mad scientist” lab or a creepy shelf display.
- Key Materials: A glass jar, water, food coloring (green or yellow), and a creepy object (a plastic eyeball, a rubber monster finger, cauliflower for a “brain”).
- Pro-Tip: Add a drop of dish soap to the water to create a few bubbles and a more “pickled” look.
- Placement Cue: Line a few different jars up on a kitchen counter or a mantelpiece.
21. Ghostly Mirror Message
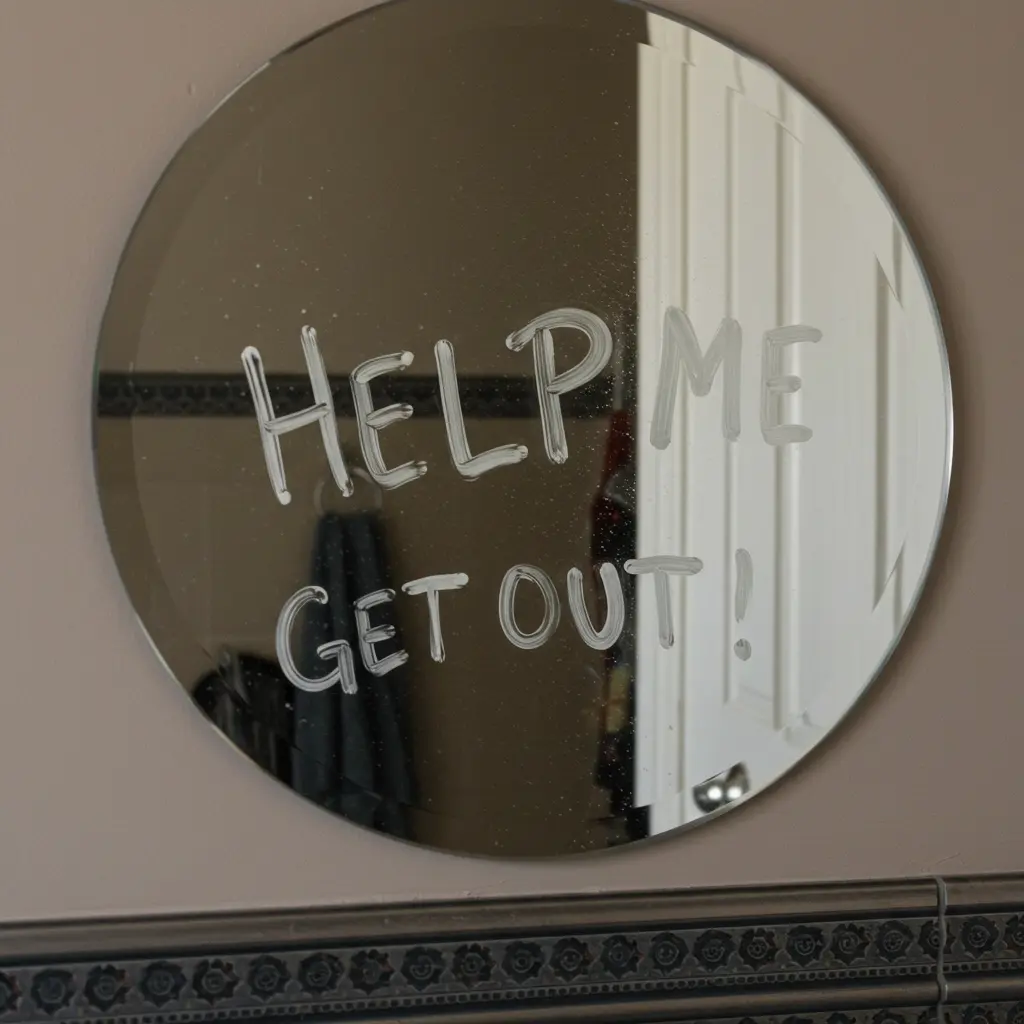
Best For: A terrifying surprise for anyone who looks in a mirror.
- Key Materials: A mirror, a bar of soap.
- Pro-Tip: Write a creepy message (“Help Me,” “Get Out”) on the mirror with the bar of soap. It will be nearly invisible until the mirror fogs up from a hot shower.
- Placement Cue: The perfect prank for a bathroom mirror.
22. Head in a Jar
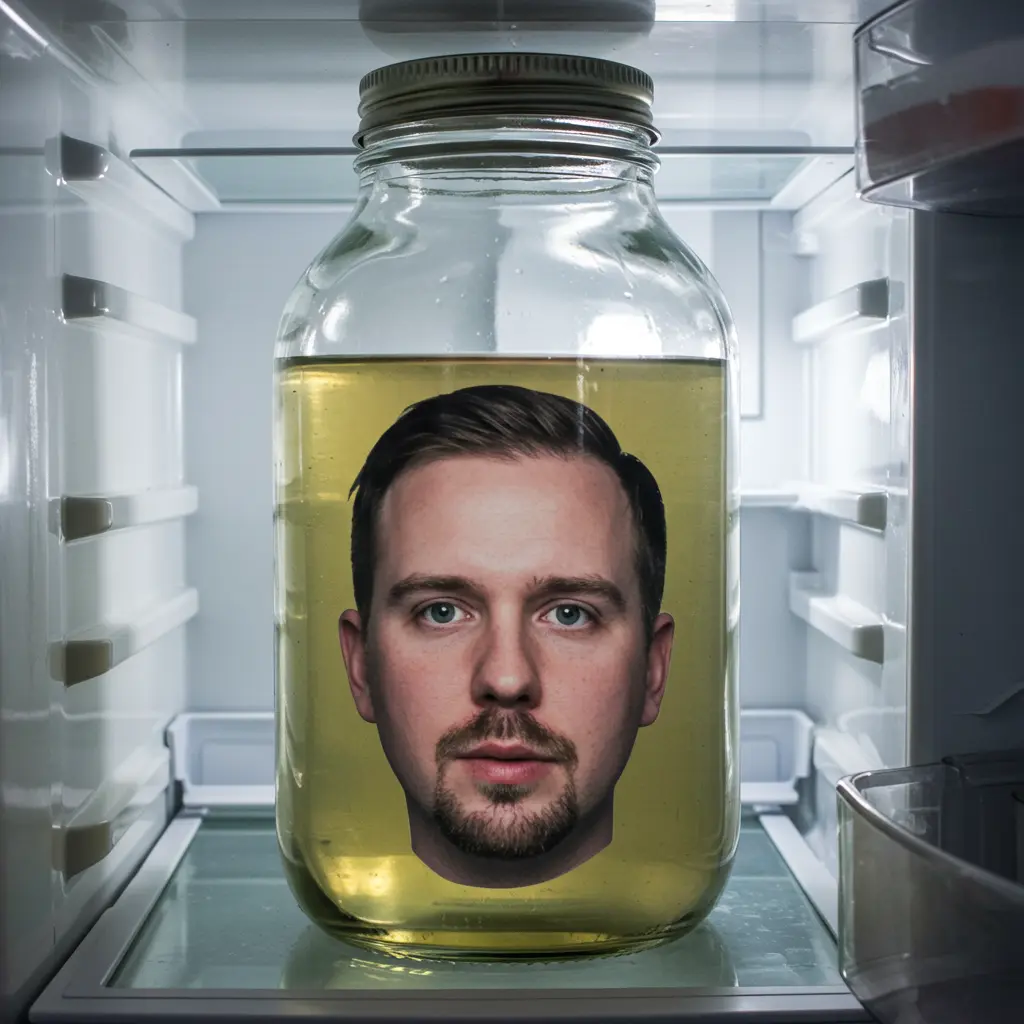
Best For: The ultimate shocking prop to hide in your refrigerator.
- Key Materials: A large glass jar, a laminated photo of a person’s head, and food coloring.
- Pro-Tip: Use a photo editing program to stretch a photo of someone’s face horizontally to counteract the distortion of the curved jar.
- Placement Cue: Place it in the fridge behind the milk for an unforgettable surprise when someone goes for a midnight snack.
23. Creepy Cheesecloth Table Runner
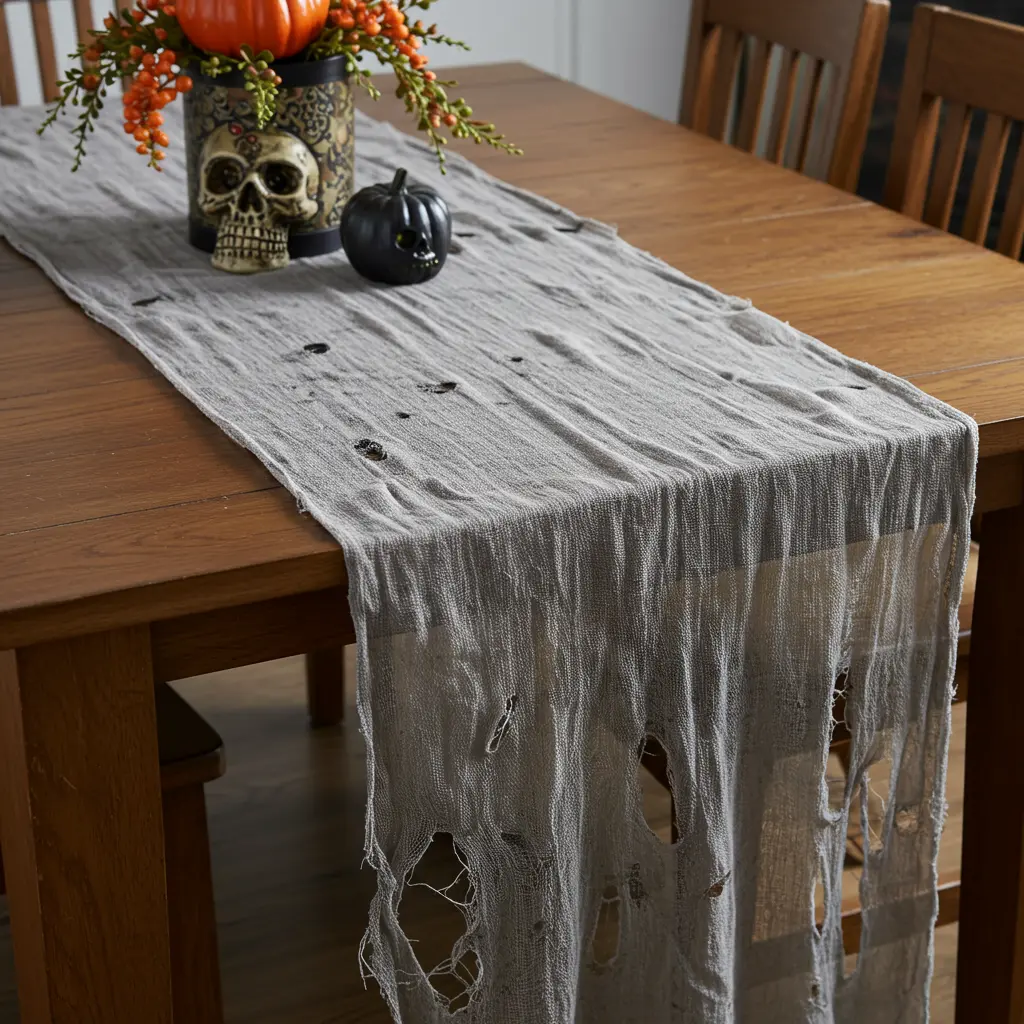
Best For: Instantly turning a dining table or buffet into a spooky, aged surface.
- Key Materials: A long piece of cheesecloth, black or grey fabric dye, or tea.
- Pro-Tip: Don’t dye it evenly. Let the dye be patchy and uneven. Then, stretch, pull, and tear holes in the cheesecloth to make it look ancient and decayed.
- Placement Cue: Drape it over your dining table, a sideboard, or a fireplace mantel.
24. Spiderweb Tablecloth
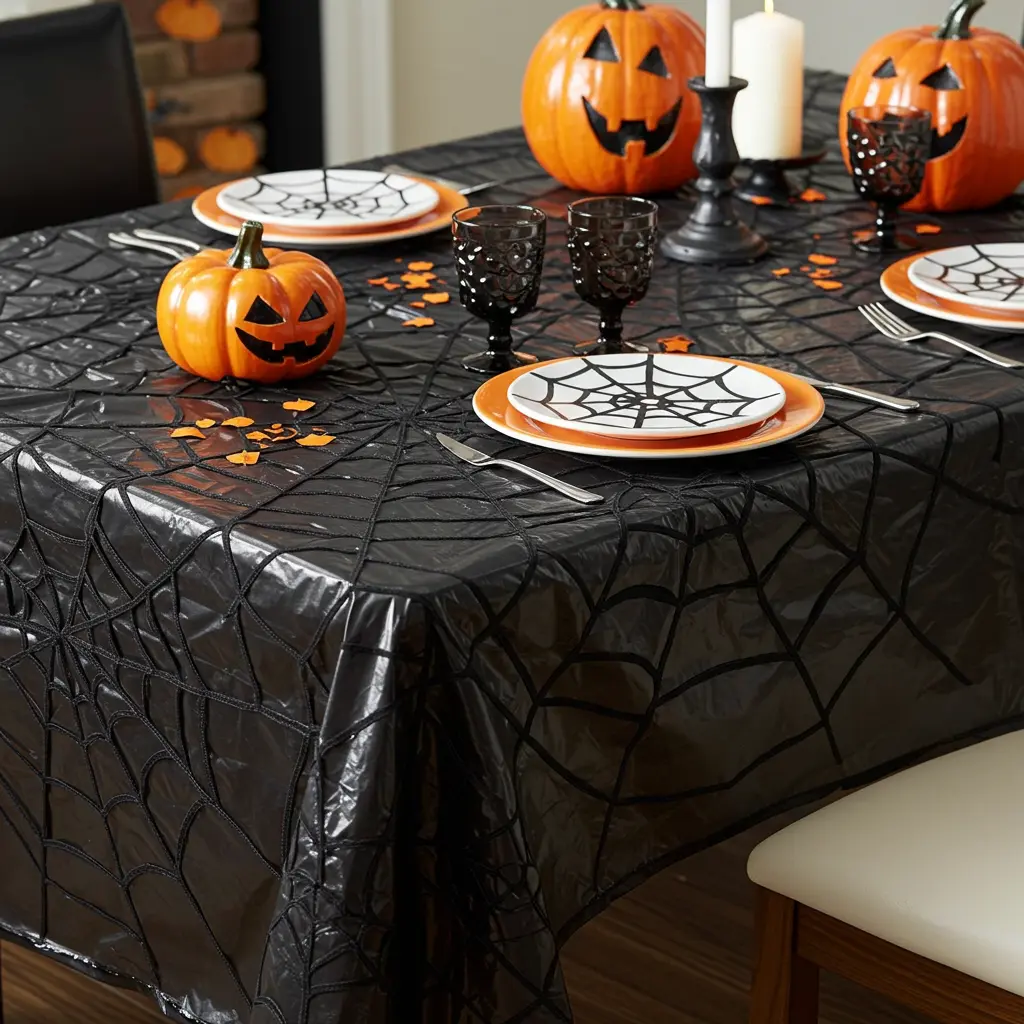
Best For: A quick, cheap, and effective way to decorate a party table.
- Key Materials: A black plastic tablecloth, scissors.
- Pro-Tip: Just like the giant trash bag web, fold the tablecloth into a triangle and cut shapes out of it like a paper snowflake to create a web pattern.
- Placement Cue: Layer it over a contrasting colored tablecloth (like orange or white) to make the web pattern pop.
25. Dripping “Blood” Candles
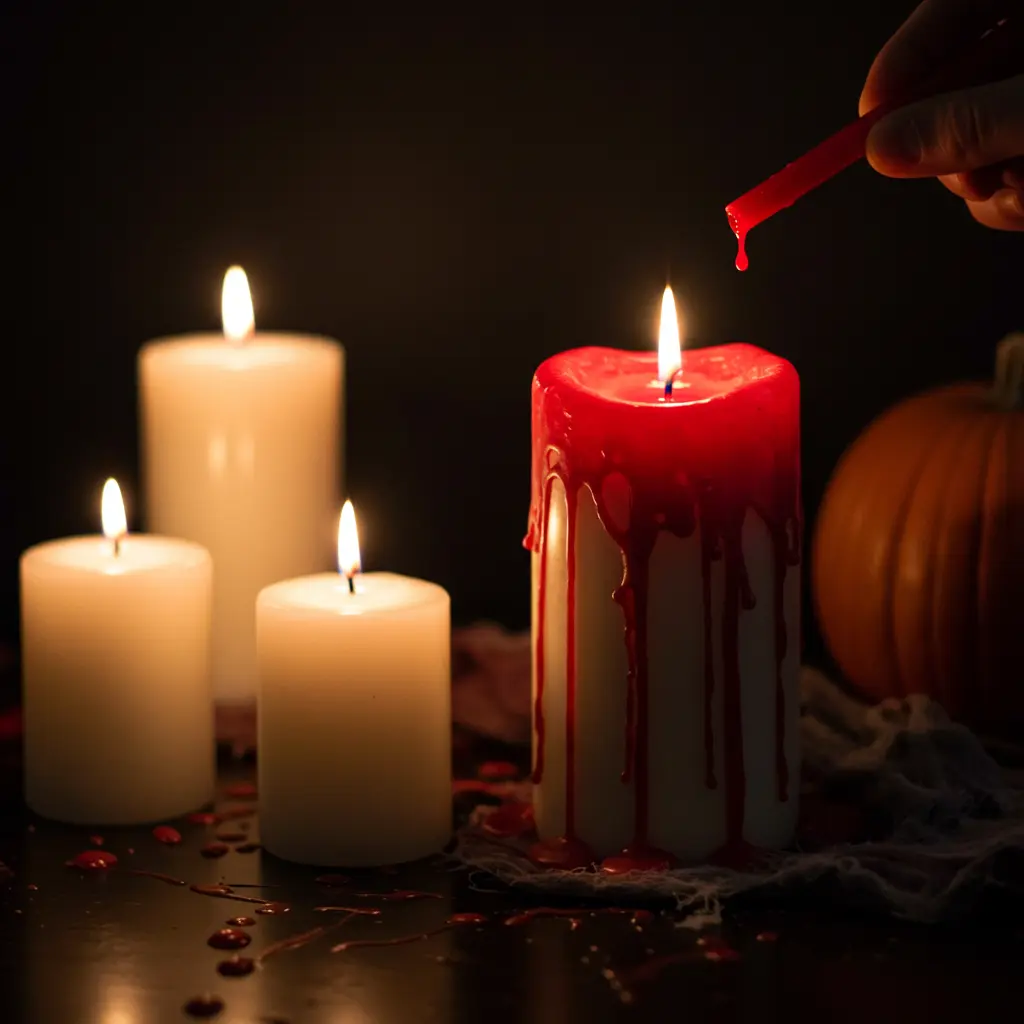
Best For: A classic gothic horror look for a candelabra or table setting.
- Key Materials: Plain white pillar candles, a red candle.
- Pro-Tip: Light the red candle and hold it over the white candles, letting the red wax drip down the sides to create a gruesome, bloody effect.
- Placement Cue: Perfect for a dining table centerpiece or a “haunted mansion” mantel display.
26. Ghostly Leaf Bags

Best For: A super easy way to turn a yard chore into a cute decoration.
- Key Materials: White trash bags, fallen leaves, a black permanent marker.
- Pro-Tip: Fill the bags with leaves, but don’t overstuff them. You want them to have a slightly lumpy, amorphous shape.
- Placement Cue: Line your walkway with them or group them under a tree in your front yard.
27. Severed Fingers in a Hot Dog Bun

Best For: A gruesome (but delicious) party food that doubles as decor.
- Key Materials: Hot dogs, hot dog buns, ketchup, a nd a knife.
- Pro-Tip: Cook the hot dogs. Use a small knife to carve “knuckle” lines into them and slice off a small area for a “fingernail bed.”
- Placement Cue: Serve them on a platter with plenty of ketchup “blood” for a truly horrifying snack table.
28. Eyeball Flower Bouquet
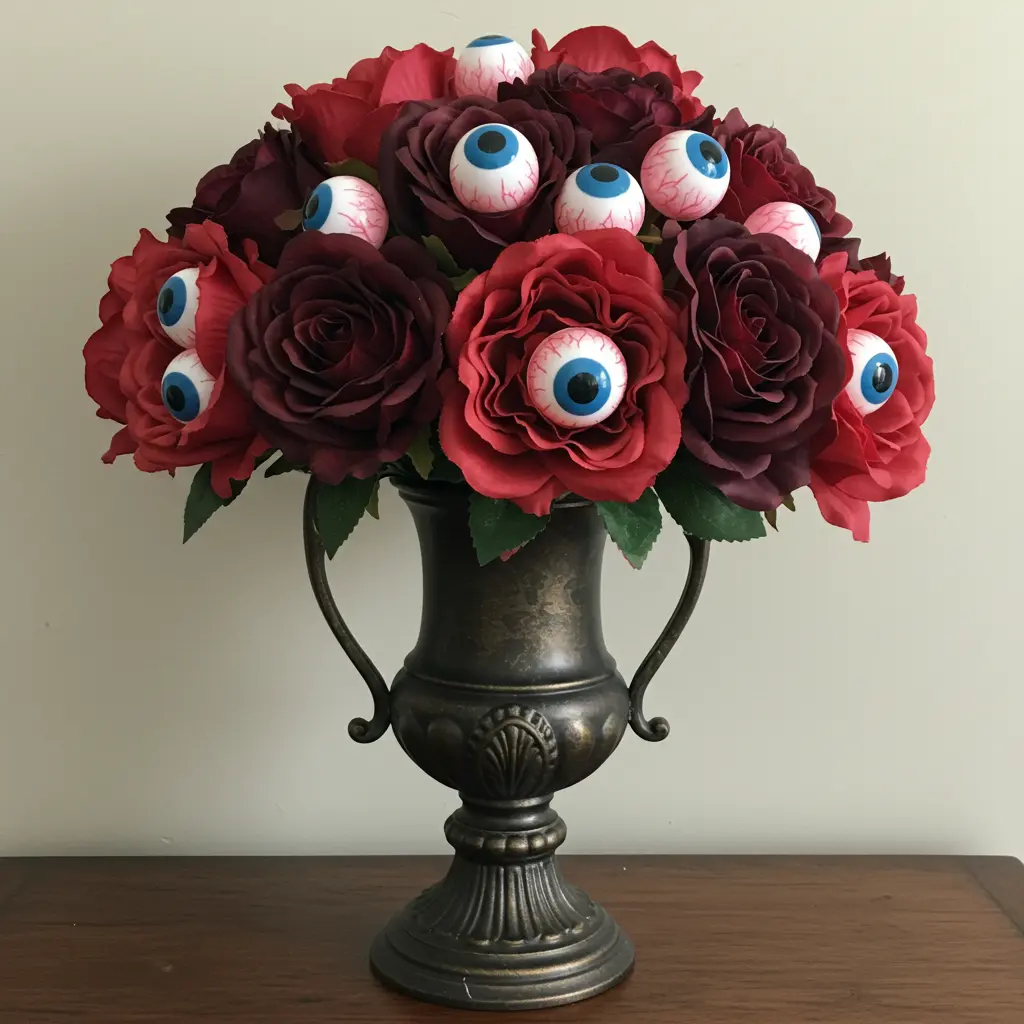
Best For: A creepy, surreal twist on a traditional home accent.
- Key Materials: A bouquet of faux flowers (preferably dark-colored), a bag of plastic eyeballs, and a hot glue gun.
- Pro-Tip: Hot glue a single plastic eyeball into the center of each flower.
- Placement Cue: Place the “eyeball bouquet” in a dark, antique-looking vase on an entryway table.
29. Doll Parts Garden
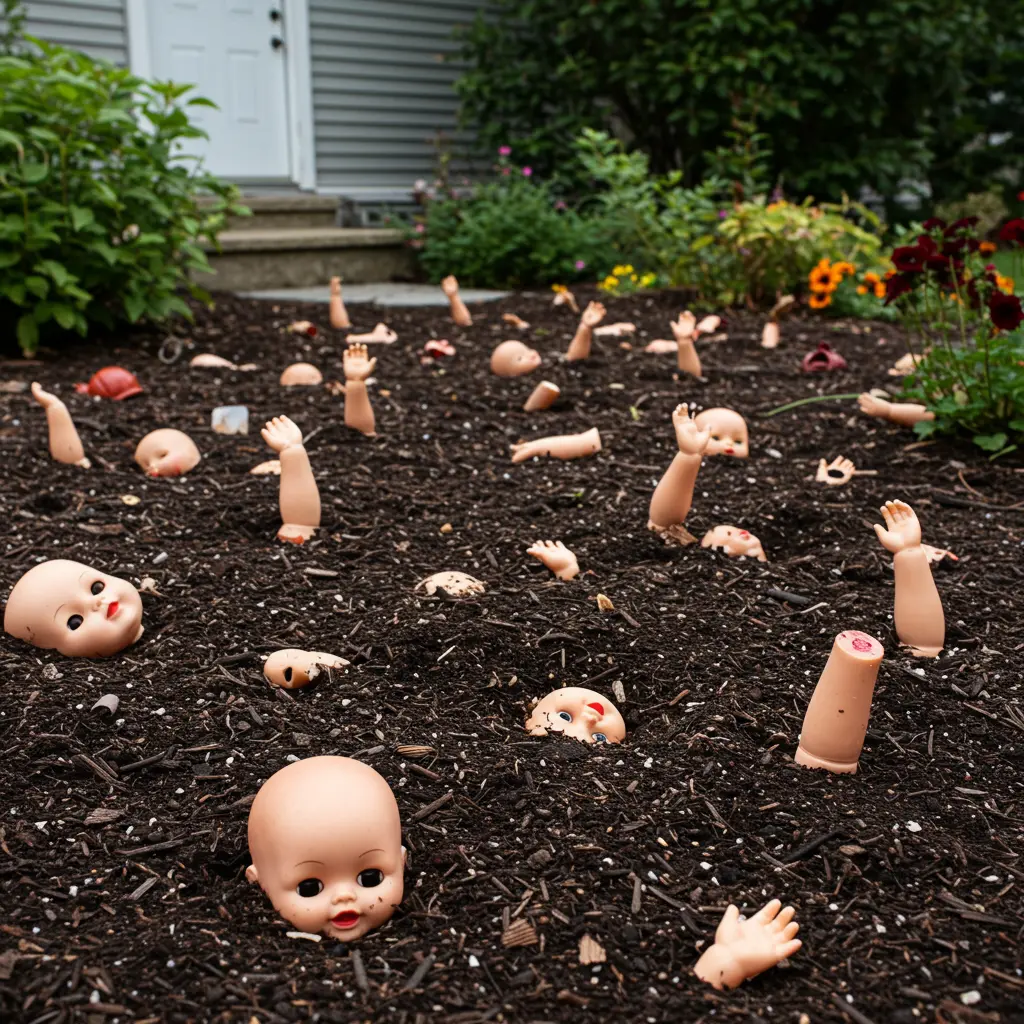
Best For: A genuinely disturbing and unsettling yard decoration.
- Key Materials: Old dolls from a thrift store.
- Pro-Tip: “Plant” doll arms, legs, and heads in your garden beds so they look like they are crawling out of the dirt.
- Placement Cue: Scatter them throughout your flowerbeds for an unexpected and terrifying surprise for anyone who looks too closely.
30. Jack-o’-Lantern Scarecrow
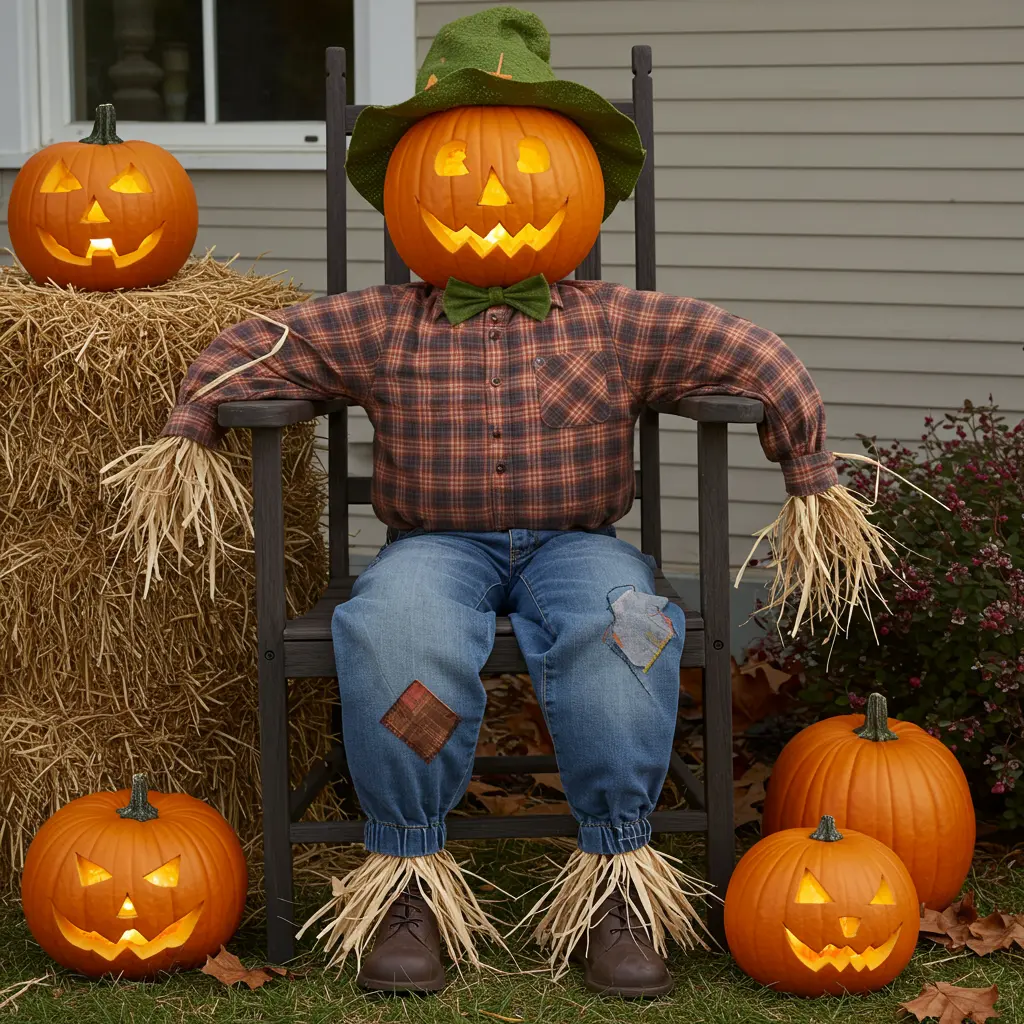
Best For: A classic, iconic front porch greeter.
- Key Materials: Old clothes (flannel shirt, jeans), straw or leaves for stuffing, a carved pumpkin.
- Pro-Tip: Build a simple “T” frame out of wood to act as the scarecrow’s skeleton. This makes it much easier to stuff and pose.
- Placement Cue: Place him in a chair on your front porch to greet trick-or-treaters.
31. Floating Head Ghosts
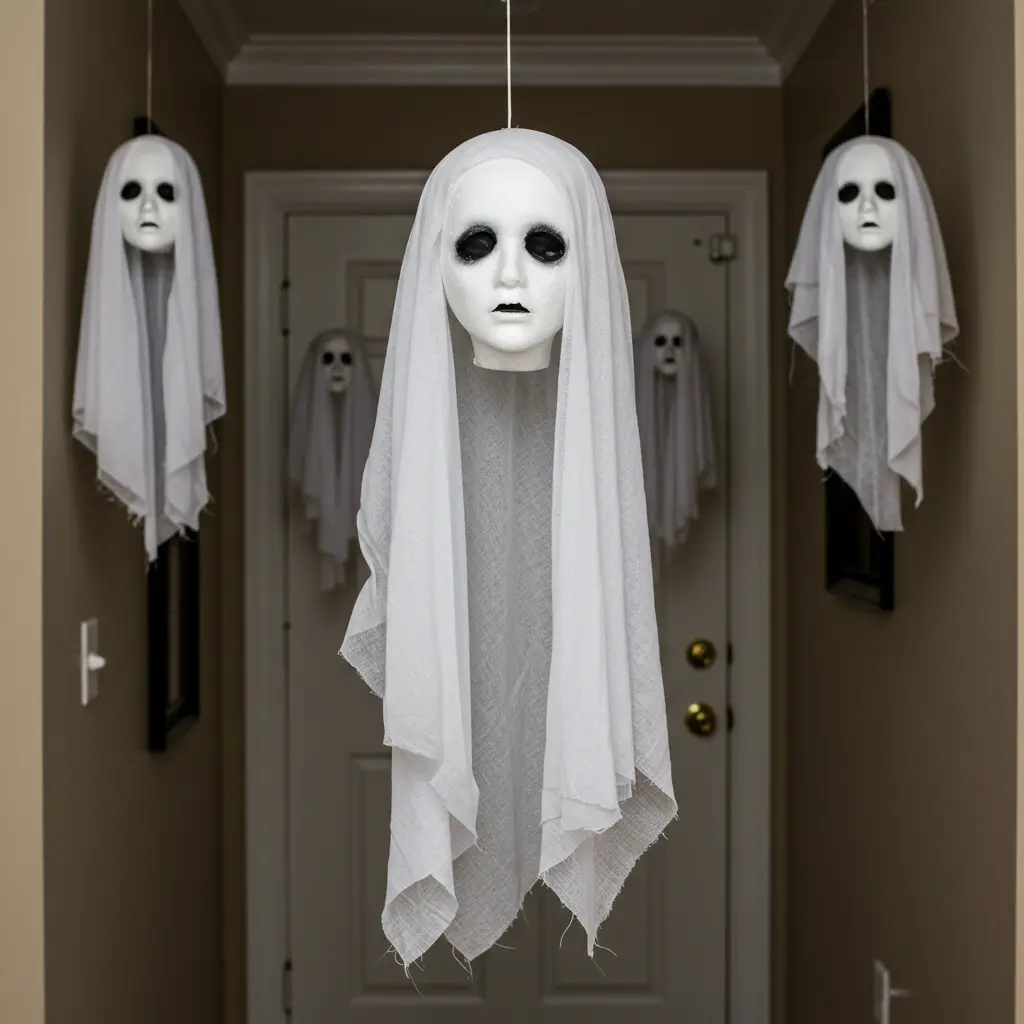
Best For: An easy, high-impact indoor decoration.
- Key Materials: Styrofoam wig heads, cheesecloth or sheer white fabric, fishing line.
- Pro-Tip: Drape the fabric over the foam head and use a thumbtack or pin to secure it at the top before hanging.
- Placement Cue: Hang several in a dark hallway or from a high ceiling in a living room.
32. Spooky Spellbook
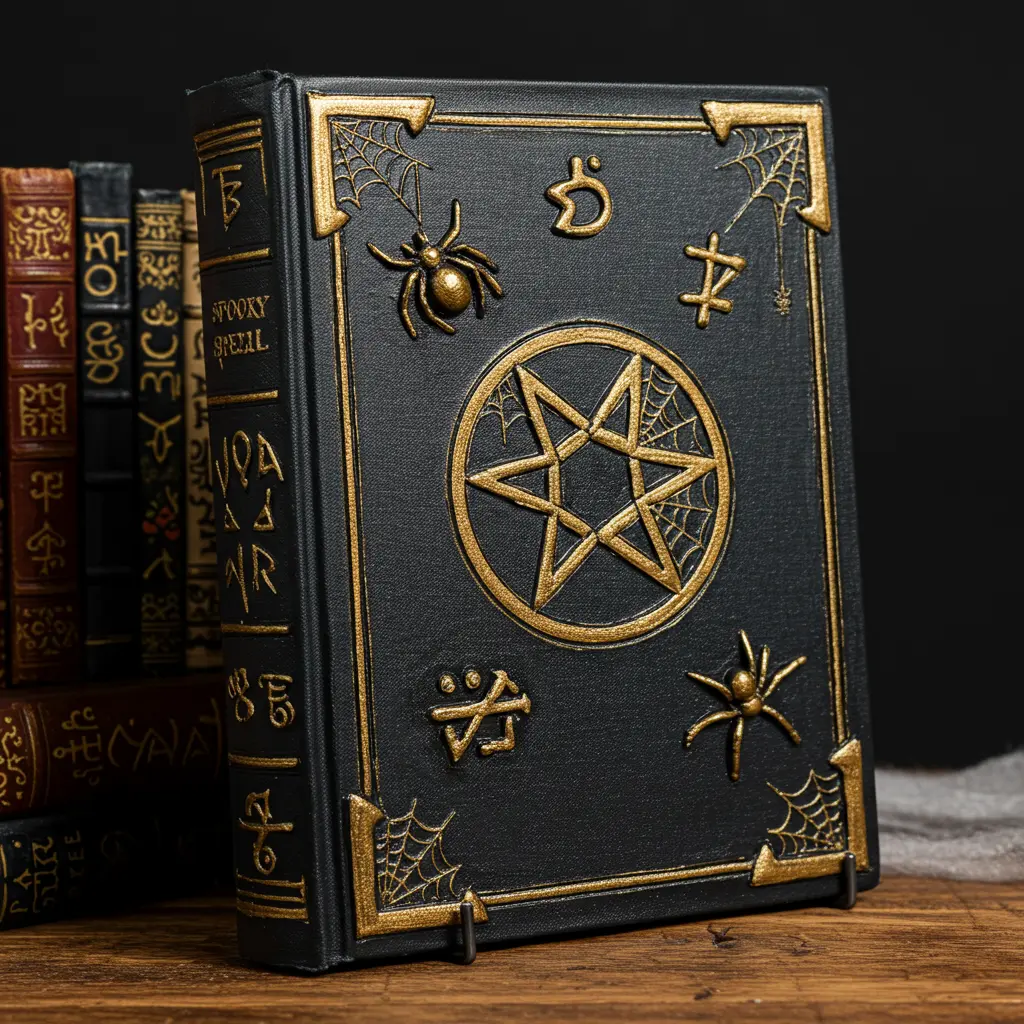
Best For: A perfect prop for a witch’s lair or a haunted library shelf.
- Key Materials: An old, thick hardcover book, a hot glue gun, black paint, metallic paint (gold or silver).
- Pro-Tip: Use the hot glue gun to draw a pentagram, a spiderweb, or spooky symbols on the cover of the book. Once the glue is dry, paint the entire cover black, then dry-brush it with the metallic paint to make the raised symbols pop.
- Placement Cue: Place it on a stand or lectern as if a witch just left it open.
33. Crystal Ball
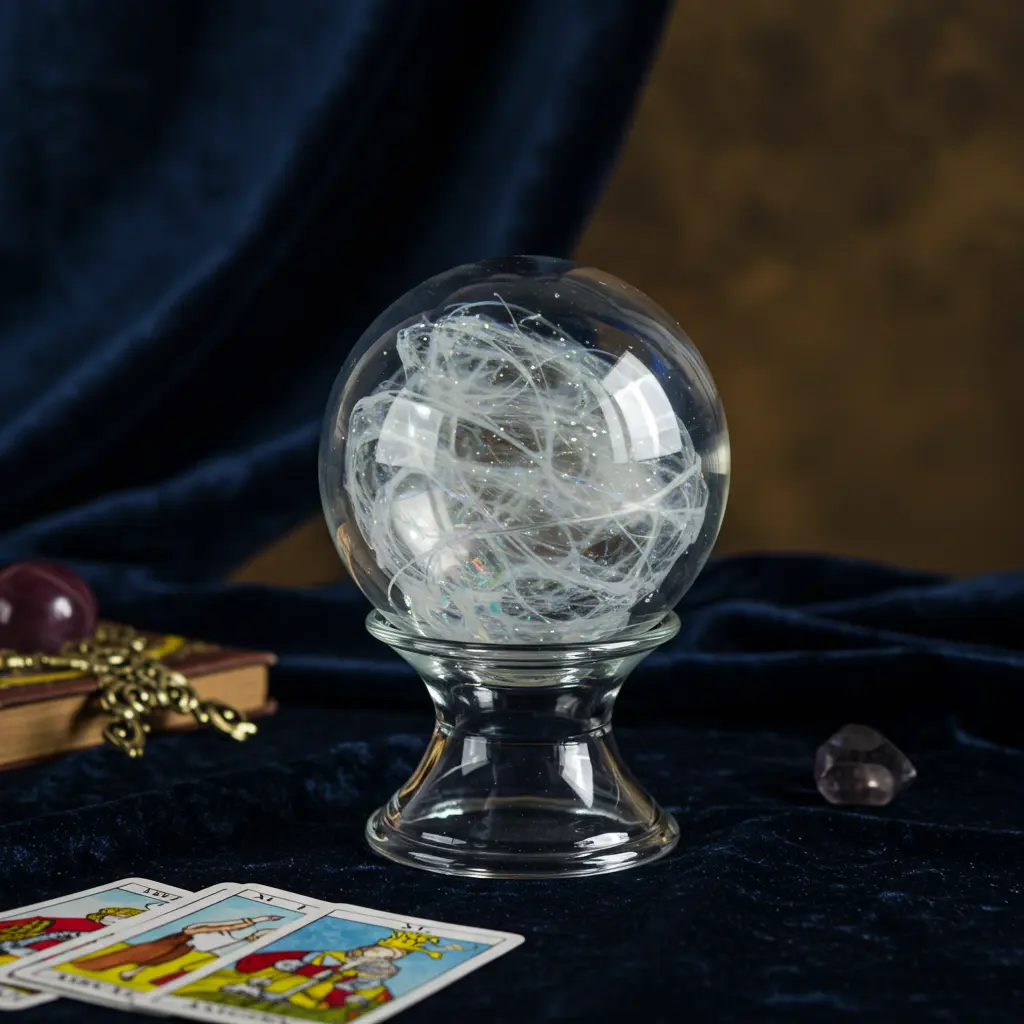
Best For: A fortune teller’s table or a magical accent piece.
- Key Materials: A clear glass ball ornament or a repurposed glass globe from a light fixture, a small stand (a napkin ring or a small bowl works).
- Pro-Tip: For a “misty” effect, swirl a small amount of iridescent or pearly white craft paint inside the glass ball and let it dry.
- Placement Cue: Place it on a table draped with a dark velvet cloth, surrounded by a few tarot cards.
34. Glowing Water Orbs
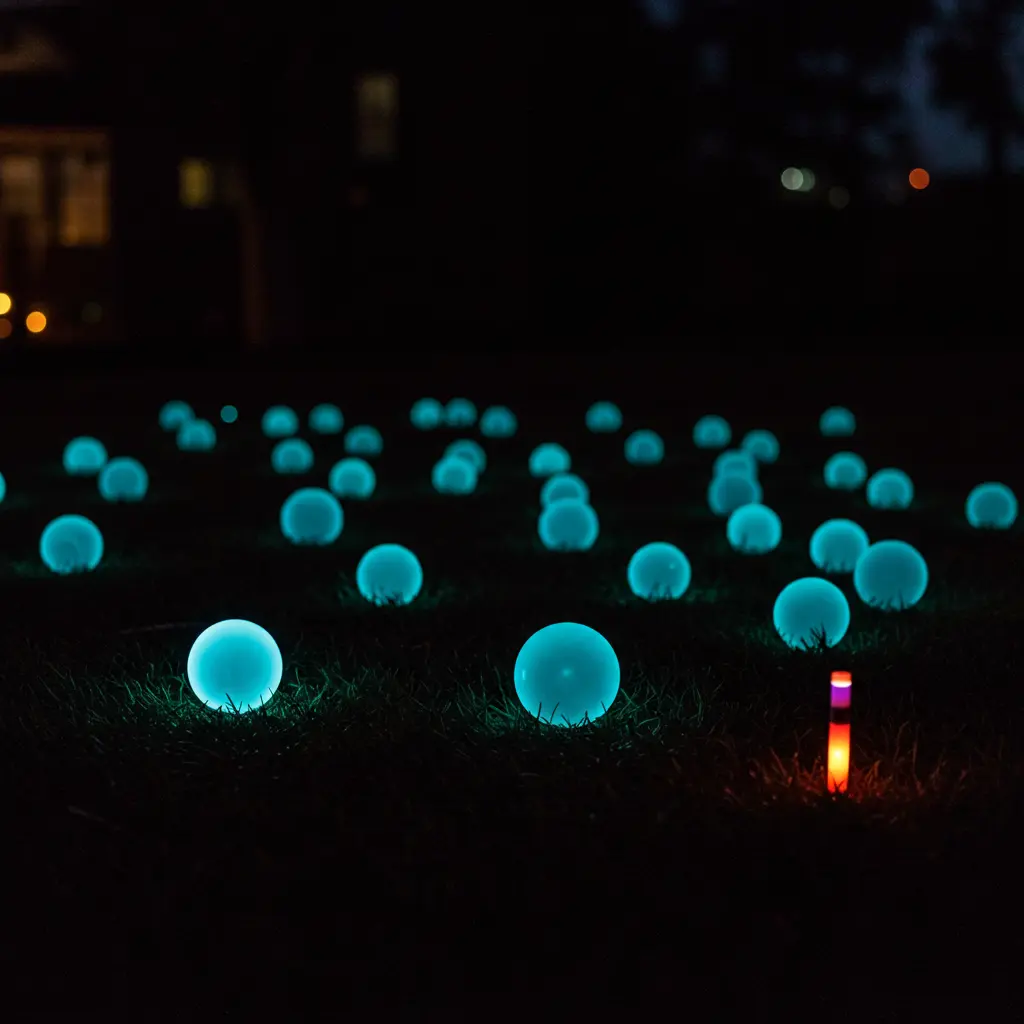
Best For: A mysterious and beautiful outdoor lighting effect.
- Key Materials: A water balloon, a non-toxic glow stick.
- Pro-Tip: Activate a glow stick and place it inside a balloon. Then, carefully fill the balloon with water and tie it off.
- Placement Cue: Scatter these glowing orbs throughout your yard at night for a magical, “will-o’-the-wisp” effect.
35. Petri Dish Specimens
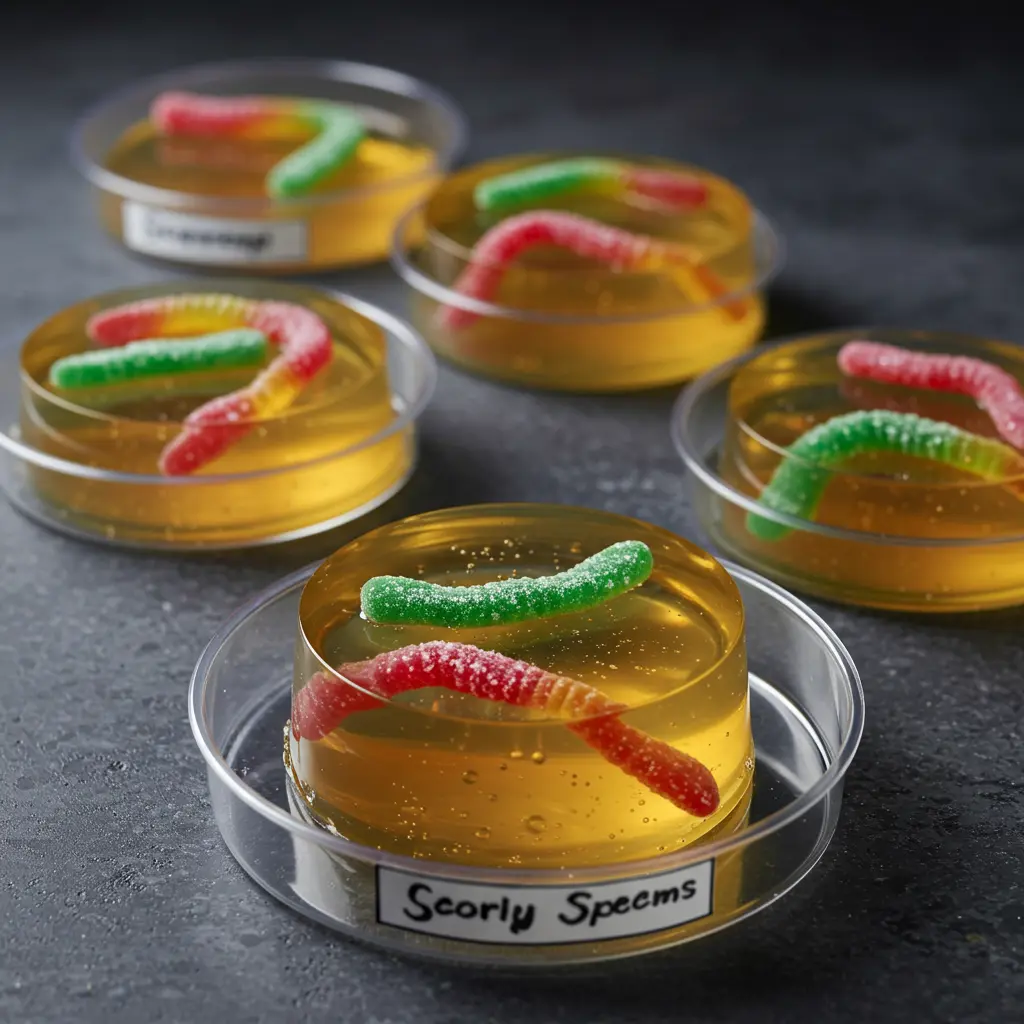
Best For: A creepy “mad scientist lab” party prop.
- Key Materials: Clear plastic petri dishes (from a party or craft store), clear gelatin, gummy worms or other creepy crawly candies.
- Pro-Tip: Prepare the gelatin according to the package directions and pour it into the petri dishes. Before it sets, suspend the gummy worms inside.
- Placement Cue: Label them with scientific-sounding names and arrange them on a “lab” table for your party guests to inspect.
Conclusion: Your Spookiest Season Yet
nd just like that, you’re no longer just looking at a pile of recycling, you’re looking at a world of spooky, creative possibilities. You have the ideas, the inspiration, and the know-how to create a Halloween haunt that is impressive, personal, and shockingly affordable. This isn’t just about decorating; it’s about having fun, embracing creativity, and making your home the most memorable stop on the block.
It all starts with a single choice. Pick an idea that made you shiver with delight, grab your hot glue gun, and take the first spooky step.
You’ve got this.
