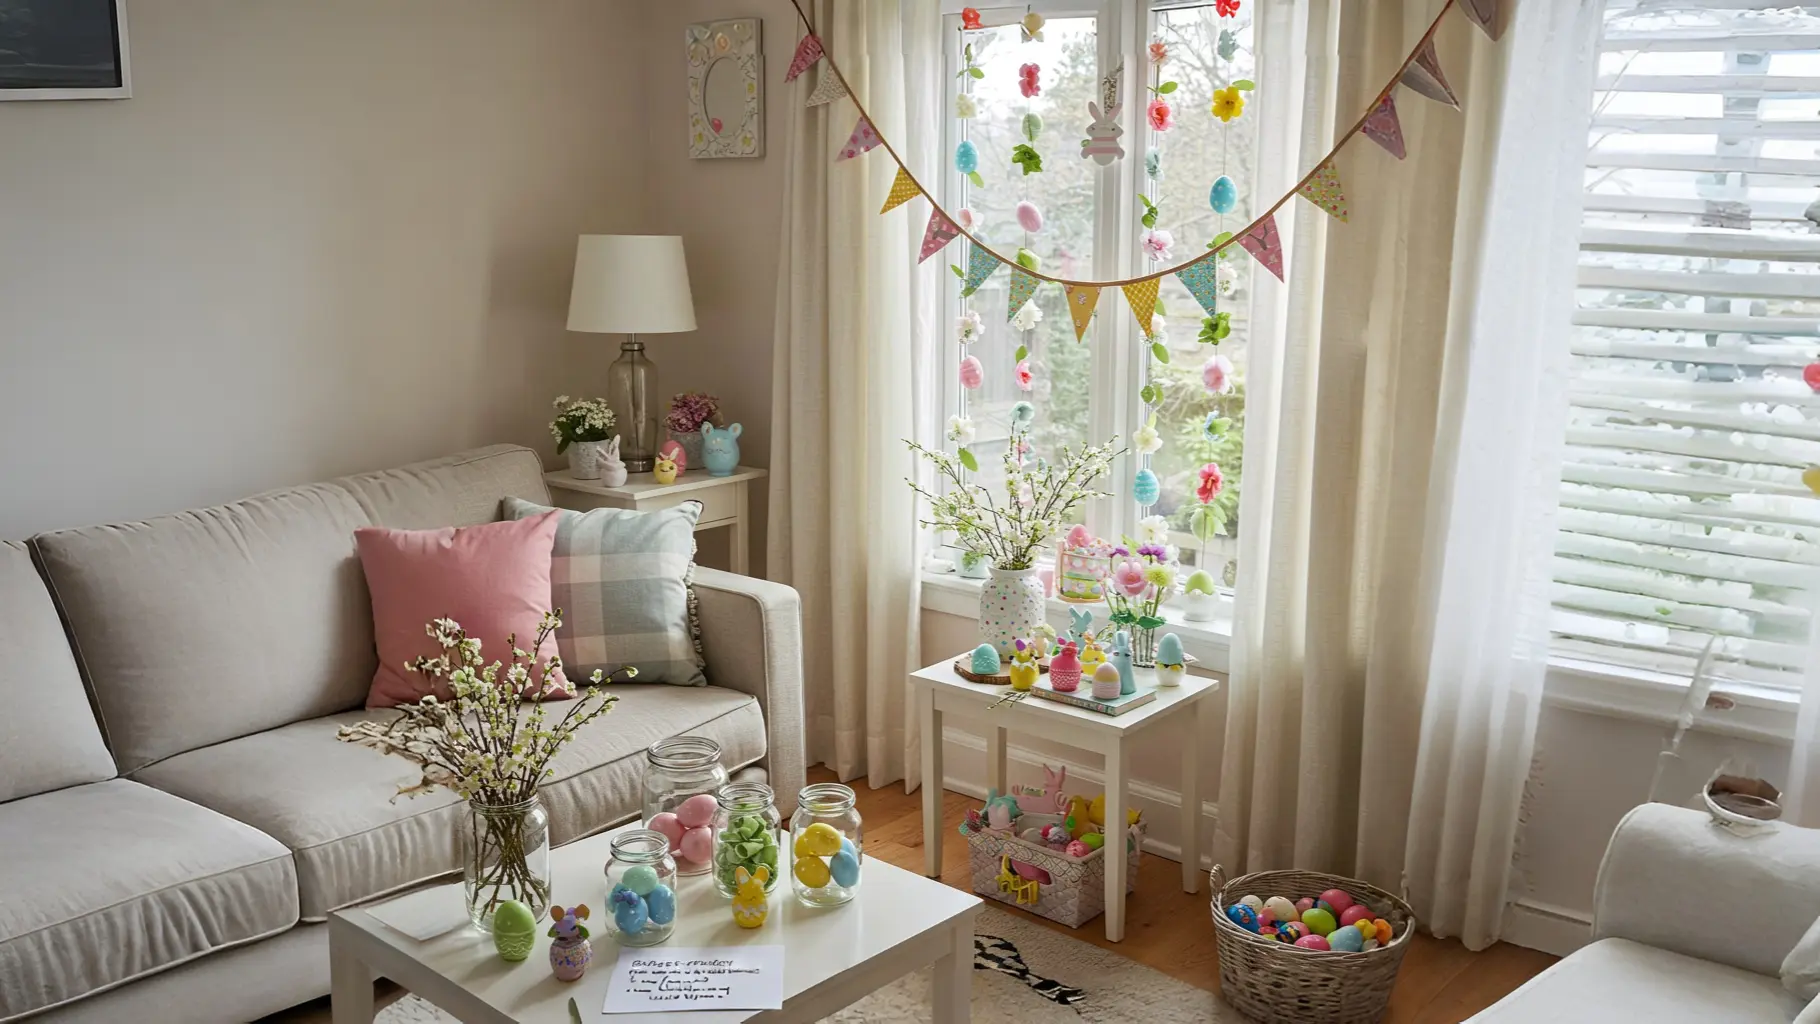
Have you ever looked around your home as the seasons turn and felt a quiet yearning for a little more joy, a little more light? It can feel like a blank page in a book full of memories. I believe we can change that. I believe we can invite the story of spring indoors and make it a part of our home’s gentle hum.
Easter decor shouldn’t just be about bunnies and eggs; it should be about bringing the heart of the season into your home, creating a warm and welcoming backdrop where new memories unfold. It’s a space waiting to be gathered, to be curated with love and intention.
Think of this as your personal scrapbook of ideas. We’ll wander through gentle designs, listen to the whispers of style, and walk through the mindful steps to bring a little piece of spring’s heart to life within your walls.
By the end, I hope you’ll see your home not as a space to fill, but as a beautiful, welcoming canvas, just waiting for you to tell its Easter story.
Before You Begin: Listening to Your Space
The most soulful rooms begin not with a plan, but with a feeling. They ask us to slow down, to listen, and to dream. Before we gather a single ribbon, let’s sit with our space and lay the groundwork for a design that will feel like coming home to spring for years to come.
The Whispers of Style: Gentle Notes for a Harmonious Look
Design theory sounds so formal, doesn’t it? I like to think of it as the quiet wisdom a room shares with us about what makes it feel balanced and at peace. Here are a few of those gentle secrets:
- A Sense of Scale: Think of your decorations as a loving accent for your home. A tiny garland is a sweet whisper along a mantelpiece, while a large, generous wreath sings a welcome on the front door. The key is to match the decoration’s presence to the space it will inhabit.
- Creating a Gentle Balance: We can create a sense of harmony in our vignettes:
- Symmetrical Balance: Picture a beautiful Easter tree perfectly centered on a mantel, flanked by two identical sock bunnies. This creates a feeling of serenity, calm, and timeless tradition.
- Asymmetrical Balance: Now, imagine the Easter tree on one side, its height answered by a low, sprawling collection of painted rocks and a cheerful bunny figure on the other. This feels more like a gentle dance, full of life, warmth, and modern ease.
- The 60-30-10 Color Harmony: This is a simple recipe for a color palette that sings together beautifully.
- 60% is your main room color (your walls and large furniture).
- 30% is your secondary color, a lovely harmony (perhaps the soft pastels of your main Easter decor).
- 10% is your accent, a little twinkle of light (a pop of bright yellow in a floral arrangement or a touch of gold on a painted egg).
- Let the Story Shine: Your beautiful Easter vignette is becoming the heart of the room. Try to let it have its moment. Placing another very loud or vibrant piece right beside it can feel like two people talking at once. Let your beautiful new decorations be the one to tell this particular story.
What Will It Ask of You? A Gentle Look at Your Budget
Let’s talk softly about the resources we might gather for this journey. Every path has its own needs, from a simple project using what you have, to a dream brought to life with a trip to the craft store.
| The Approach | Estimated Cost | What Your Resources Gather | The Little Treasures (Don’t Forget These!) |
| The Weekend Makeover | $0 – $20 | • Items from your recycling bin• Paper, paint, and twine• Twigs from the yard | • A good glue gun• Sharp scissors• A hole punch |
| The Polished Upgrade | $25 – $75 | • A wreath form & faux florals• Quality craft supplies like felt & wood cutouts• A tiered tray or glass cloche | • Good paint brushes• Floral wire• A can of spray paint |
| The Custom Dream | $80 – $200+ | • Materials for a large outdoor sign• A balloon arch kit• Multiple high-quality decor pieces for a full-home theme | • A staple gun• A quality saw• Wood stain or sealer |
The Design Menu: Finding Your Signature Style
Here are the ingredients you can choose from to create your perfect Easter decor. Each one holds a different feeling. Listen to your heart and see which one speaks to you.
The Foundation: Wall Treatments & Textures
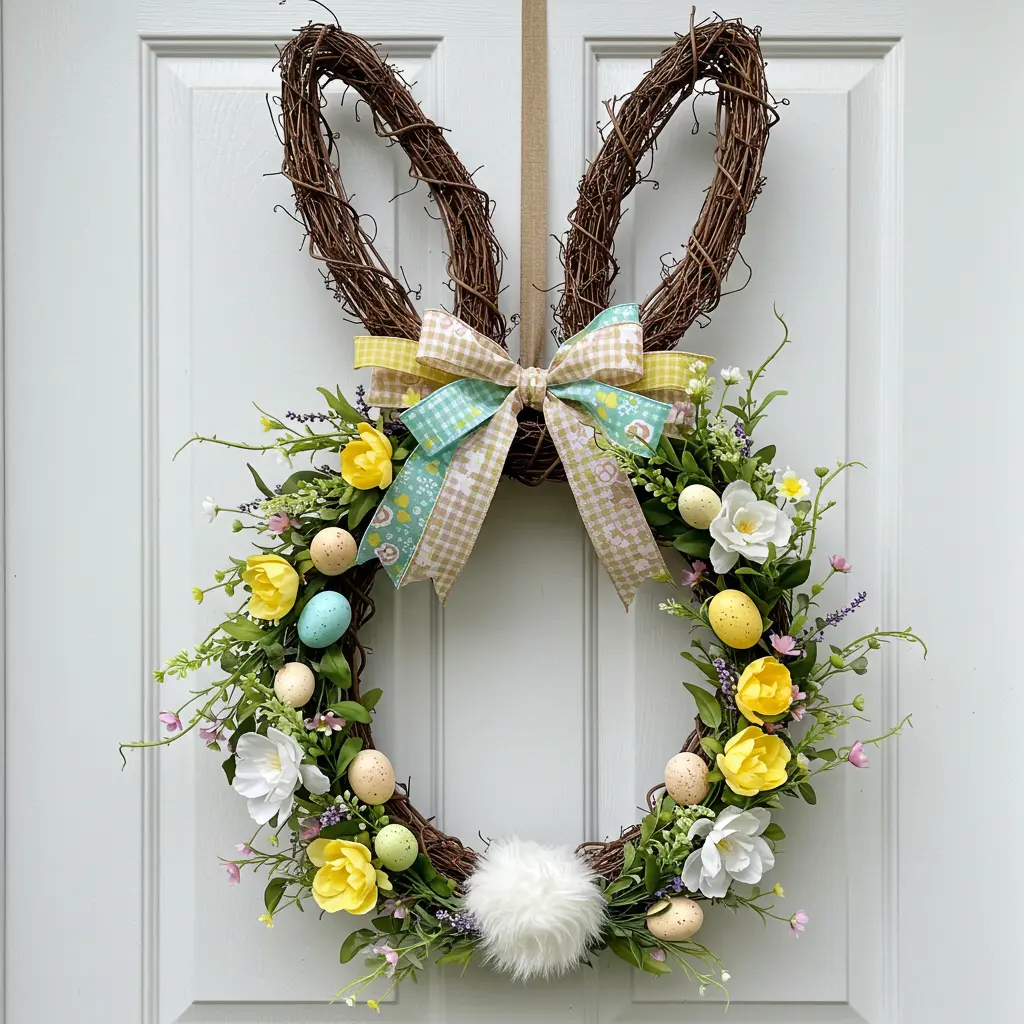
1. The Rustic Burlap Wreath
- Best For: Farmhouse or country homes looking for a warm, textured welcome on the front door.
- Pro-Tip: Use floral wire to attach your embellishments instead of just glue. It creates a more secure and professional-looking hold, especially for outdoor use.
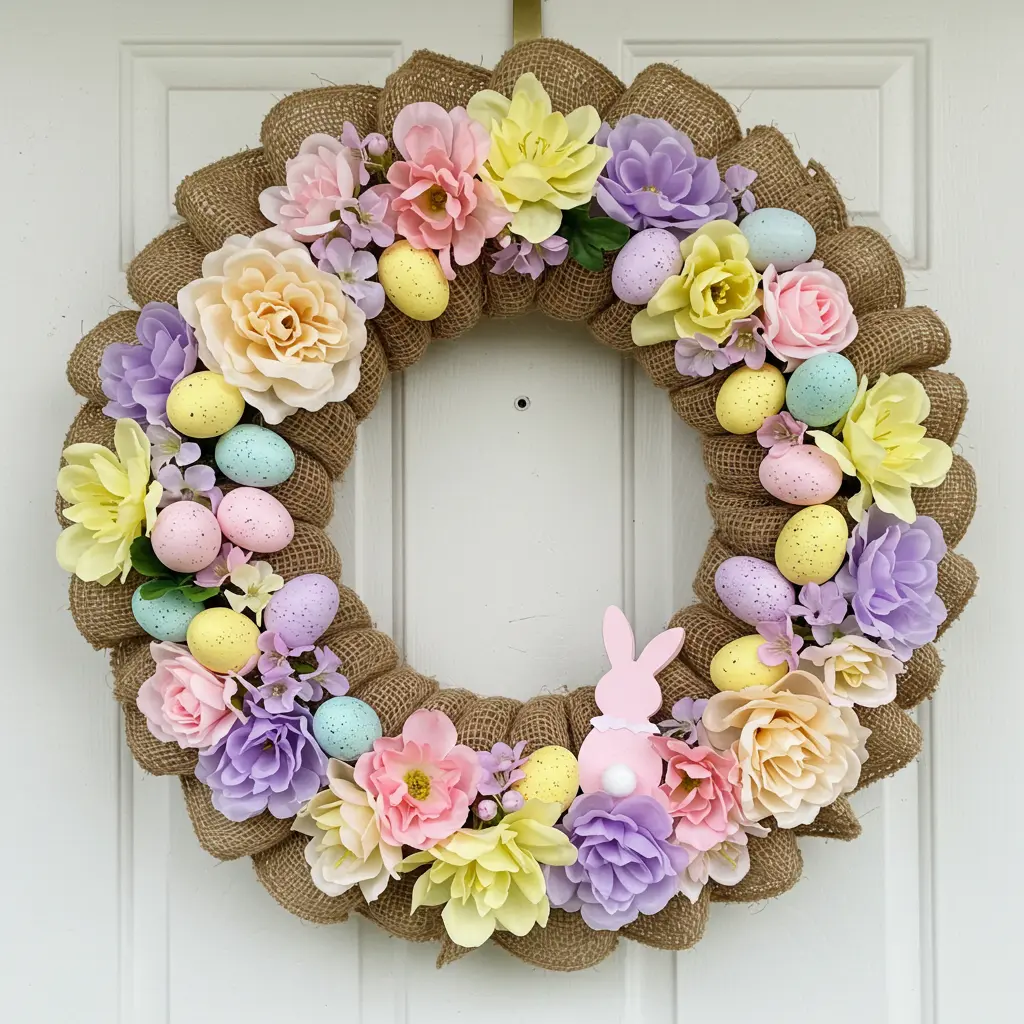
2. The Floral Bunny-Shaped Wreath
- Best For: Creating a truly unique and whimsical statement piece for your front door that stands out from the crowd.
- Pro-Tip: Secure the two grapevine wreaths together with zip ties first, then cover the ties with your flowers and greenery for a seamless look.
3. The DIY Bunny Garland
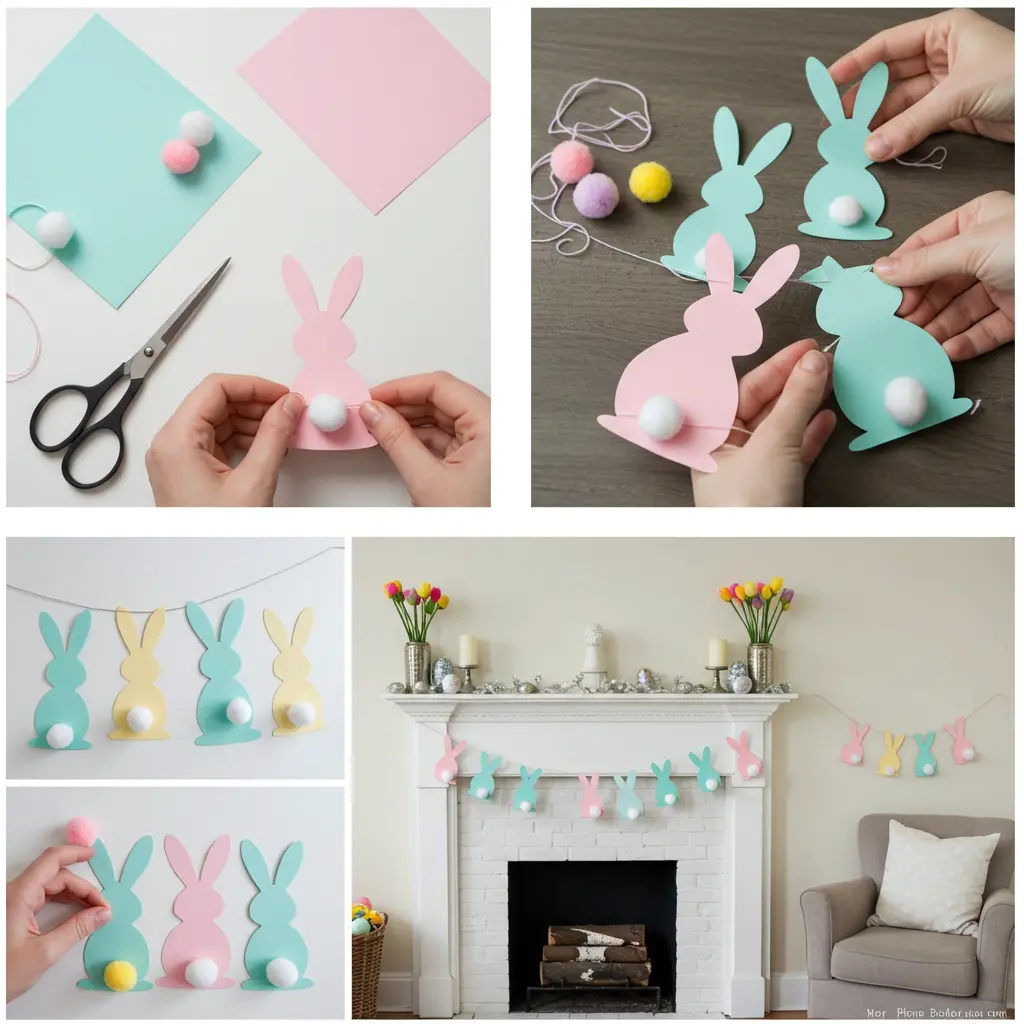
- Best For: Adding a touch of playful charm to mantels, walls, or doorways. It’s a simple, high-impact craft.
- Styling Cue: Intersperse the bunnies with other shapes cut from complementary paper, like carrots or simple eggs, to create a more dynamic story.
4. The Bunny Silhouette Canvas Art
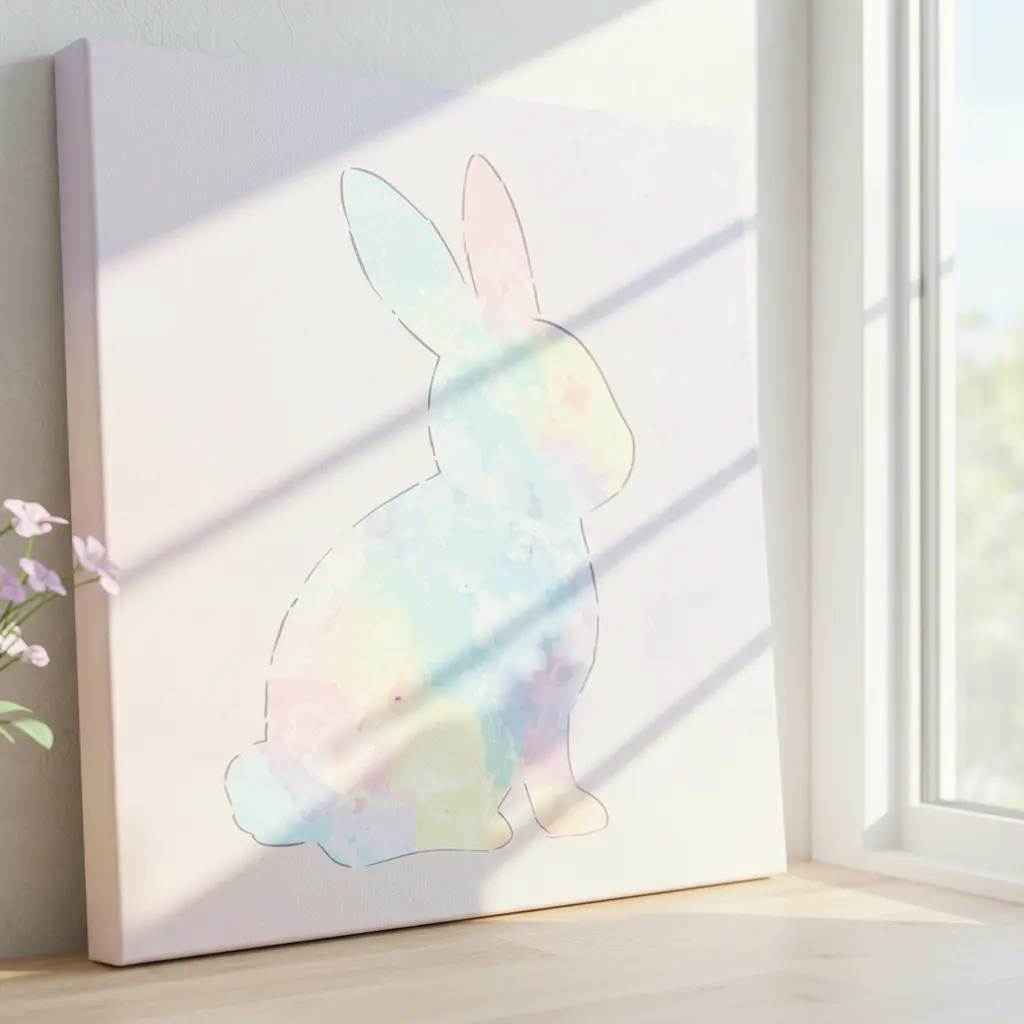
- Best For: Creating a lasting piece of art that can be brought out year after year.
- Pro-Tip: Use a removable vinyl stencil. It will give you the crispest, cleanest edges for a professional look.
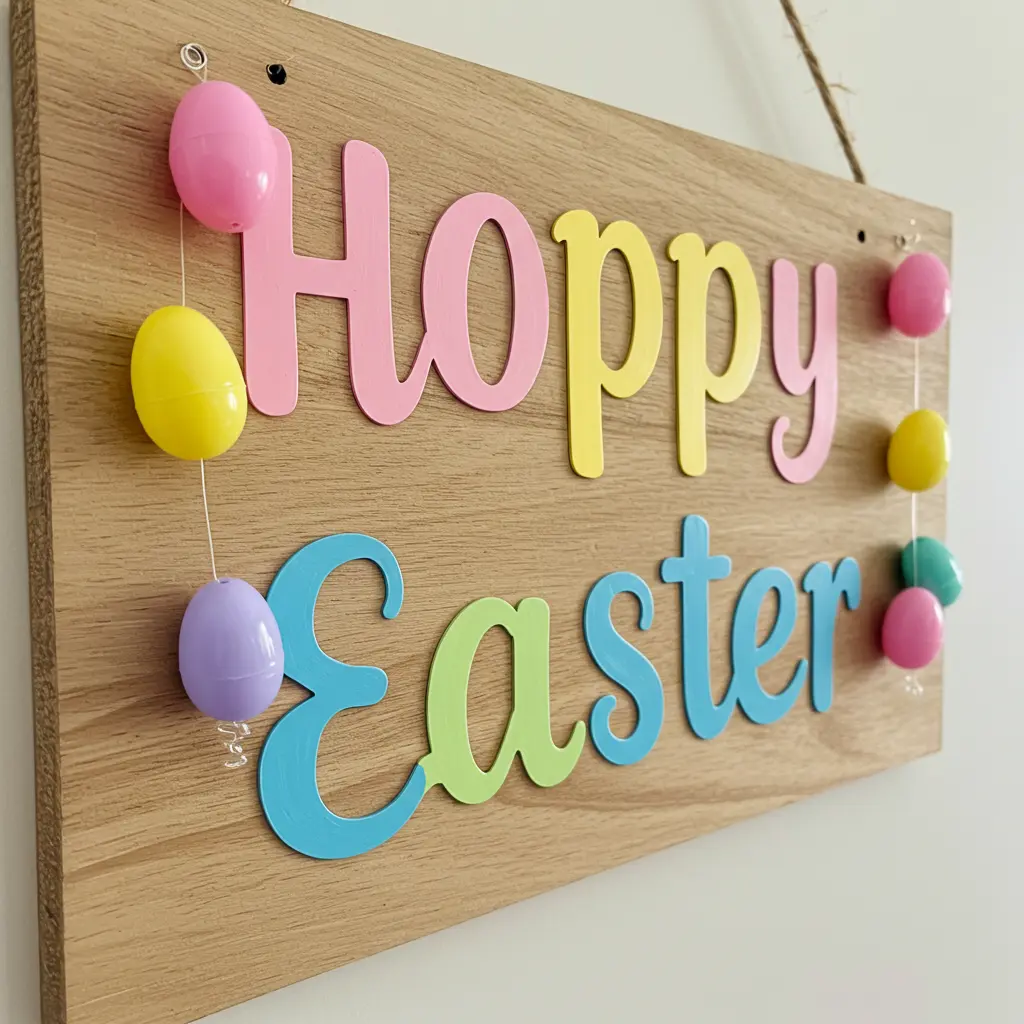
5. The DIY Easter Scroll Sign

- Best For: Adding a touch of vintage, hand-lettered charm to a blank wall or mantel.
- Key Consideration: The beauty of this is in the imperfection. Don’t worry about perfect handwriting; your personal touch is what makes it special.
6. The Washi Tape Easter Egg Wall Art
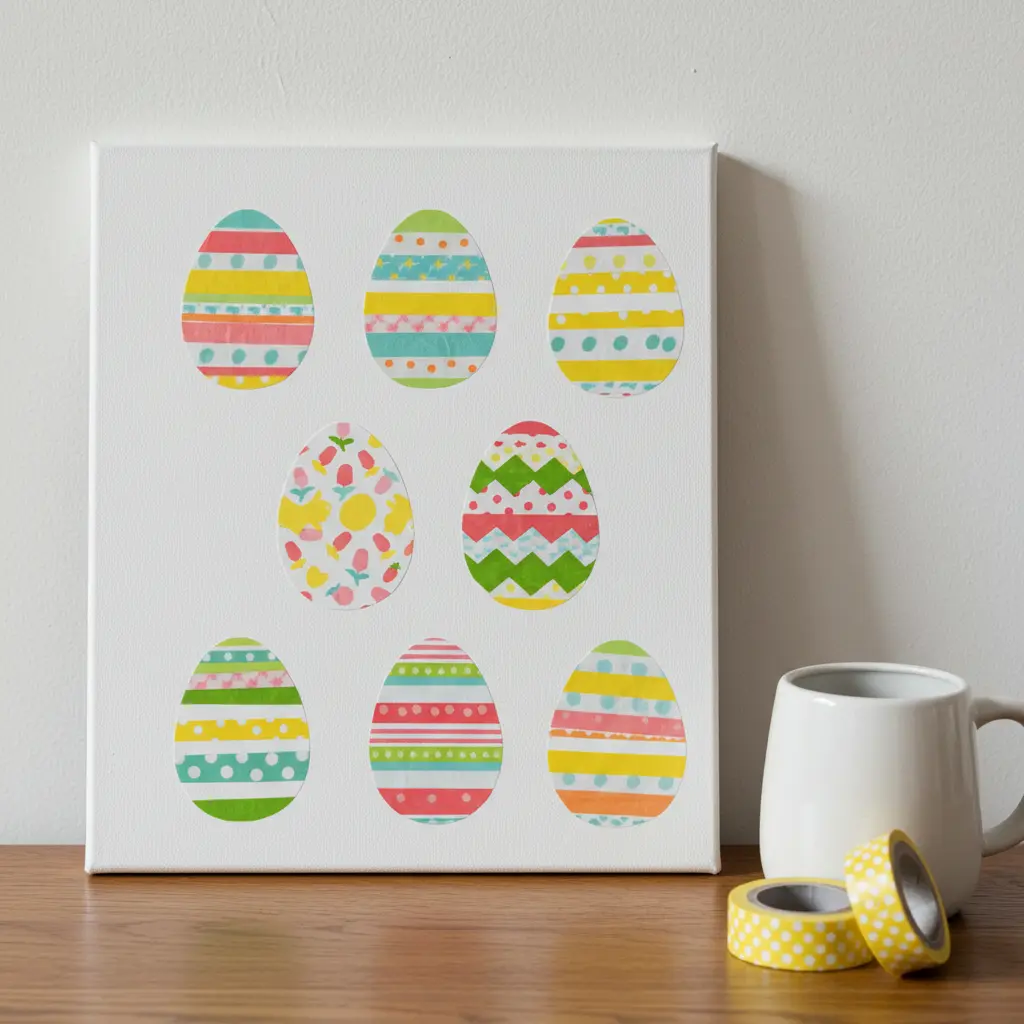
- Best For: Renters and lovers of modern, graphic design. It’s a non-permanent way to create a large, festive focal point.
- Pro-Tip: Lightly sketch your egg shape on the canvas with a pencil first. This gives you a guide to follow for a perfect shape.
7. The Pastel Egg Door Hanging
- Best For: An eye-catching and inexpensive decoration for a front door, especially in a covered area.
- Key Consideration: Use plastic eggs for this project, as they are lightweight and weather-resistant.
The Arrangement: How to Gather It All
8. The No-Sew Sock Bunnies
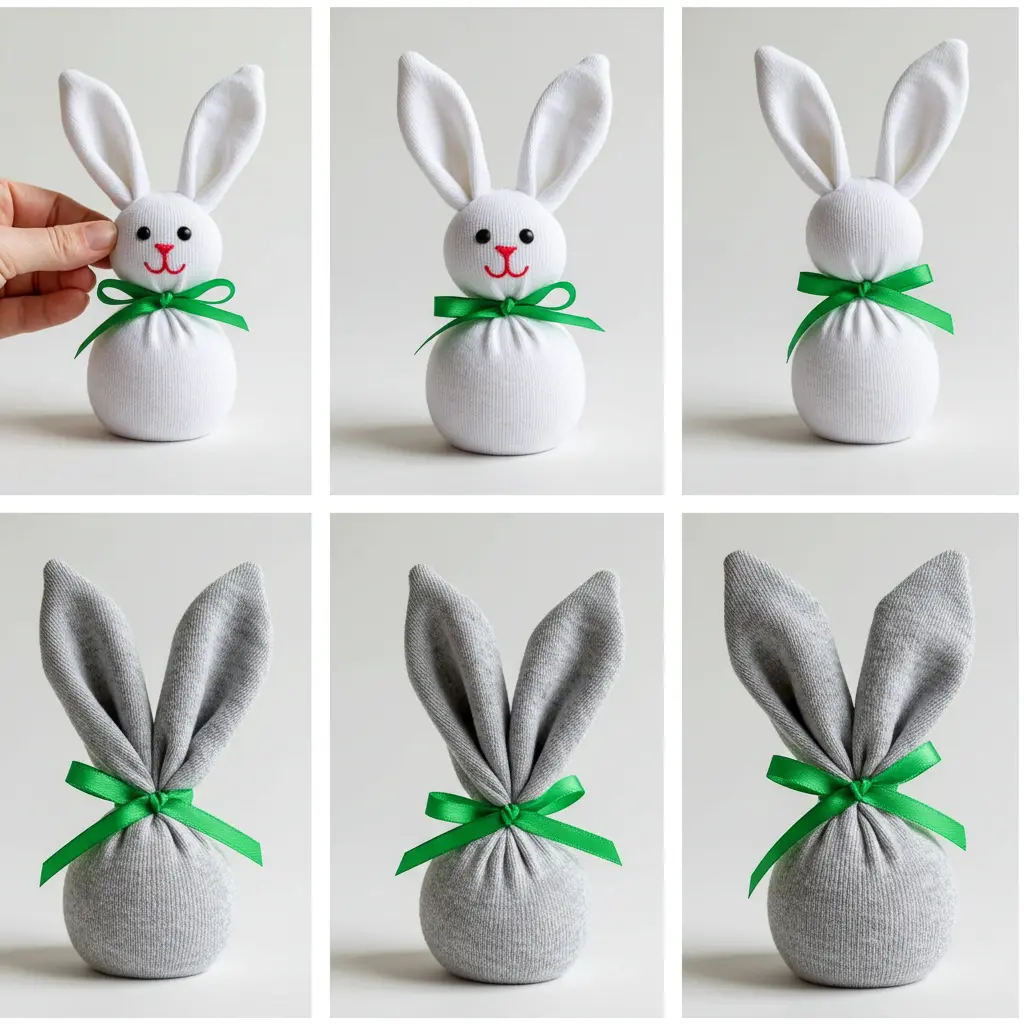
- Best For: A charming, kid-friendly craft that adds a soft, handmade touch to any shelf or tablescape.
- Styling Cue: Group them in a family of three (two large, one small) for a sweet and balanced little vignette.
9. The DIY Easter Egg Tree
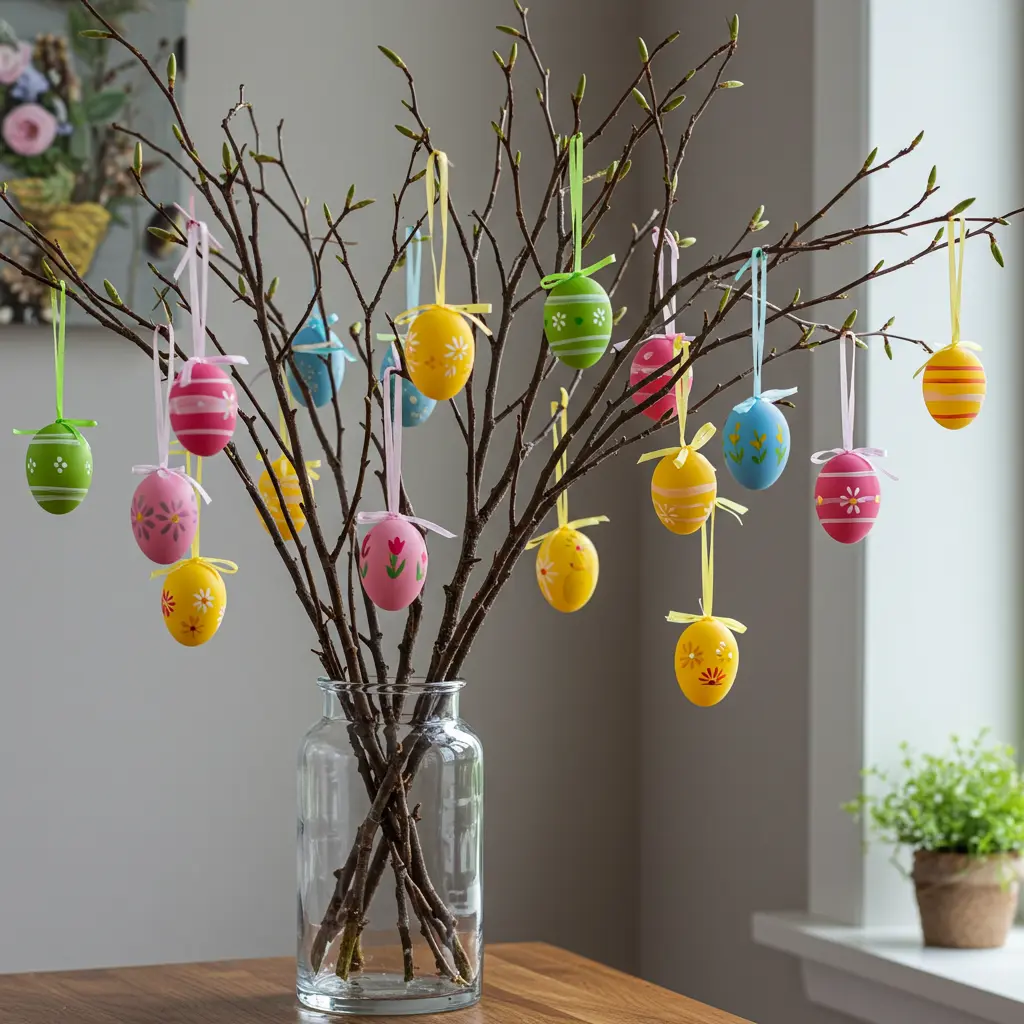
- Best For: Creating a simple, elegant, and Scandinavian-inspired centerpiece for a table or sideboard.
- Styling Cue: Use a clear glass vase so the simple beauty of the branches can be seen. Add a few inches of water to keep the branches fresh if they are real.
10. The Personalized Bunny Napkin Rings
- Best For: Making each guest at your Easter table feel special and seen with a thoughtful, personalized touch.
- Pro-Tip: Use a fine-tipped paint pen for the names. It’s much easier to control than a brush and provides a clean, crisp line.
11. The Tiered Tray Easter Display
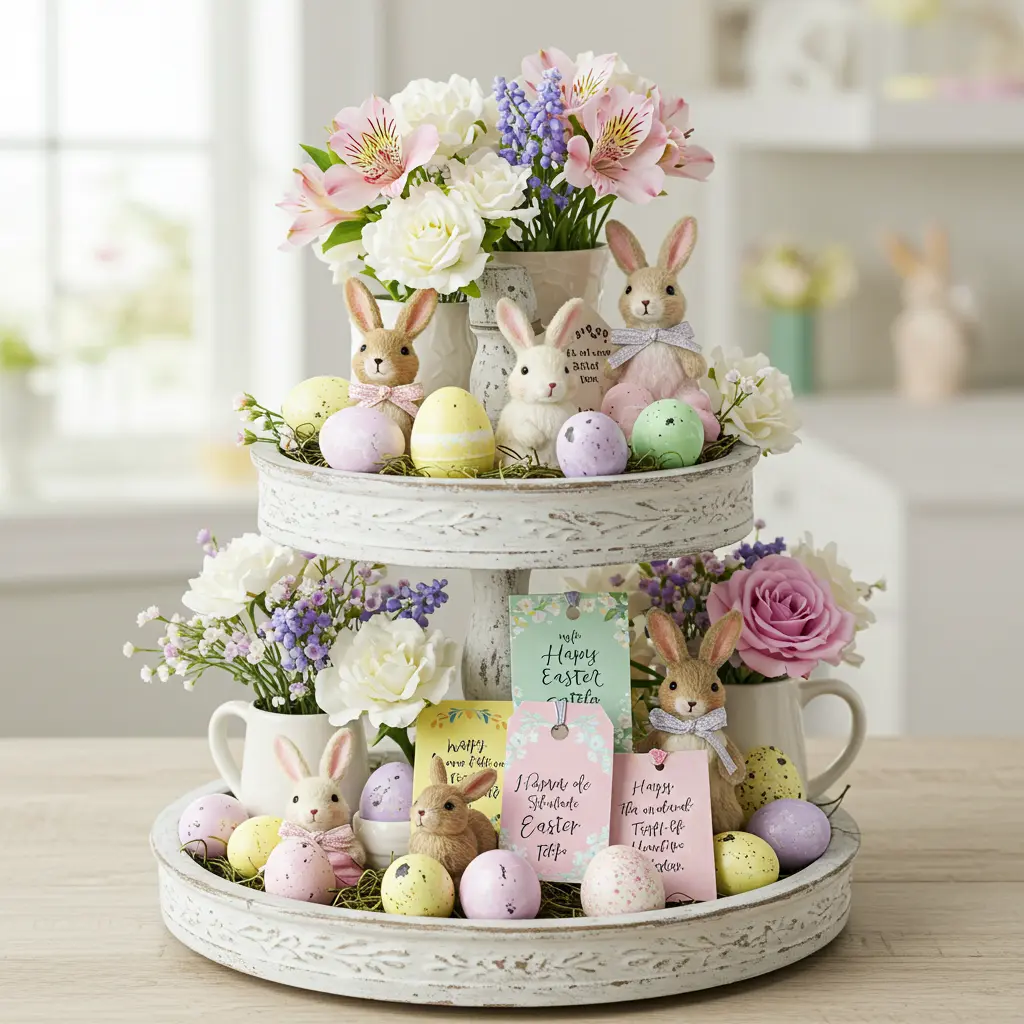
- Best For: Creating a contained, curated, and beautiful focal point on a kitchen island, coffee table, or entryway.
- Pro-Tip: Start with your largest items first (like a mug or a small sign), then fill in the gaps with smaller items like eggs, bunnies, and greenery.
12. The Hand-Painted Easter Rocks
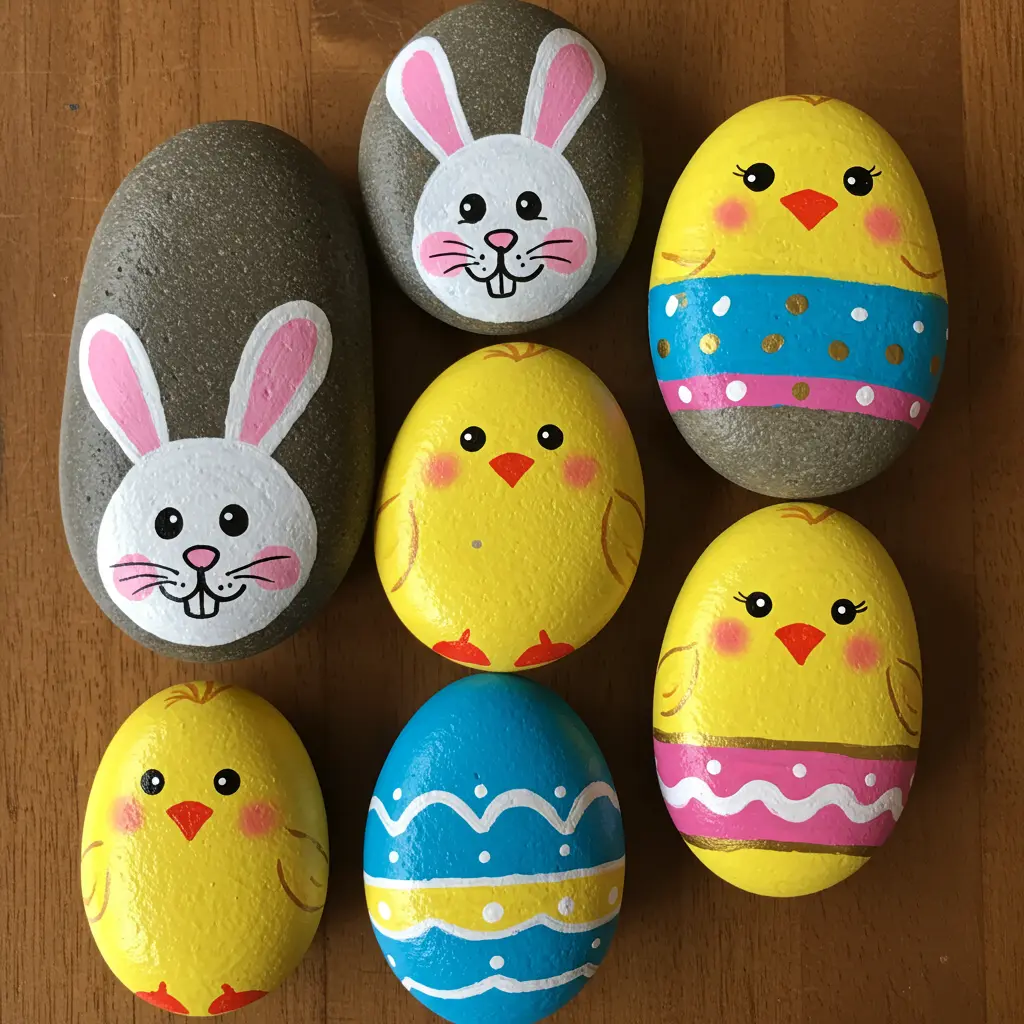
- Best For: A fun craft for all ages and a lovely way to add a tiny pop of color to planters, shelves, or your garden path.
- Pro-Tip: Seal the painted rocks with a clear coat of Mod Podge or spray sealant to protect the design and give it a finished sheen.
13. The Carrot-Themed Centerpiece
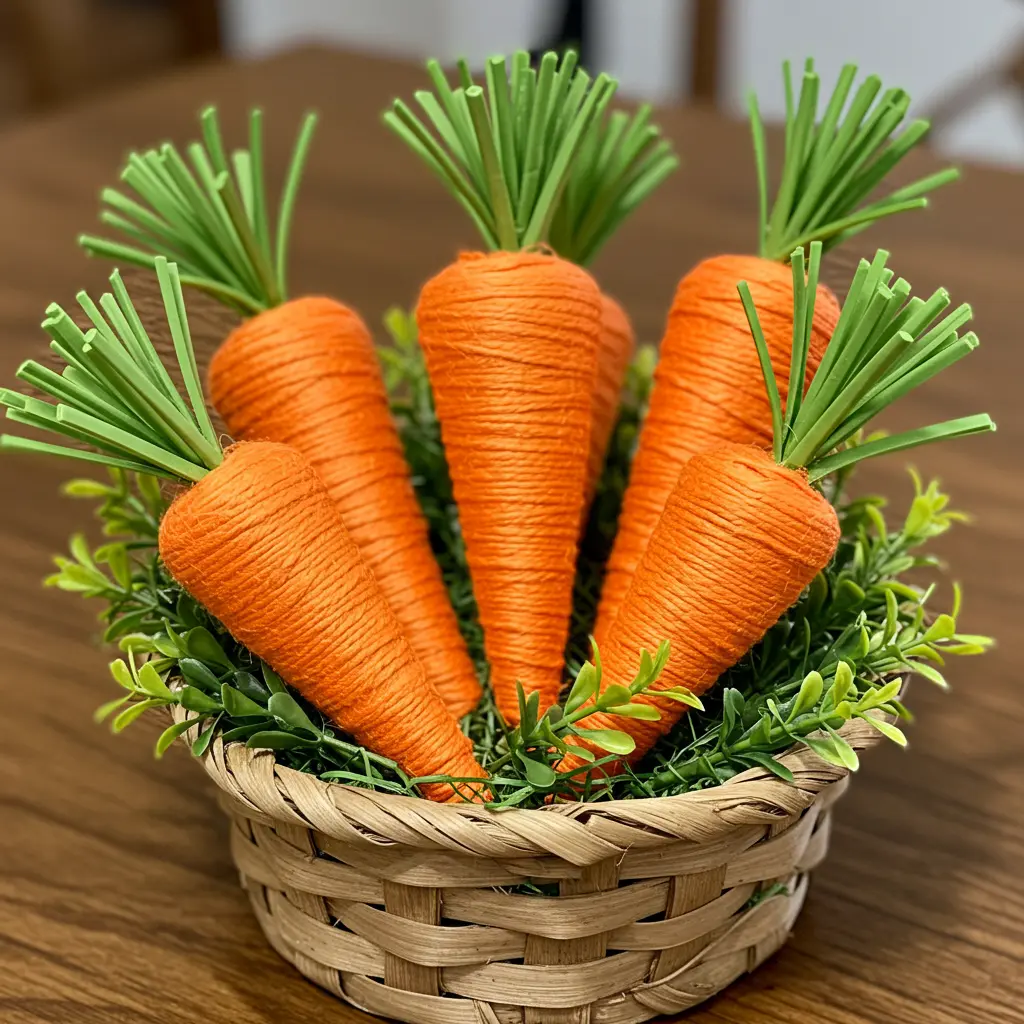
- Best For: A rustic, farmhouse-style centerpiece that’s charming and long-lasting.
- Styling Cue: Use a mix of different textured orange materials like twine, yarn, and ribbon to wrap your foam cones for a more varied and interesting look.
14. The Mason Jar Easter Bouquets
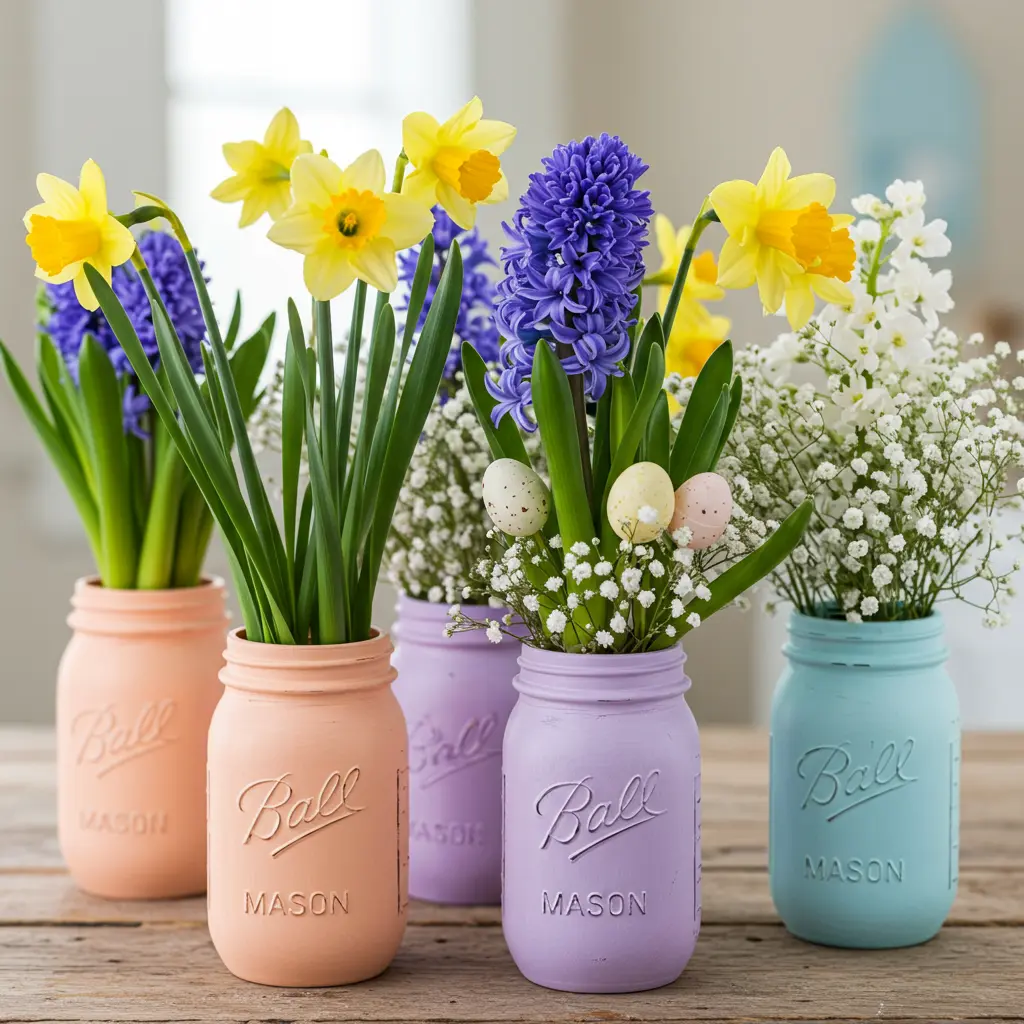
- Best For: A simple, charming, and endlessly versatile way to bring fresh spring flowers to any table.
- Key Consideration: Paint the jars on the outside only if you plan to use them with water for fresh flowers.
The Wow Factor: Features That Elevate
15. The Gold-Dipped Easter Eggs
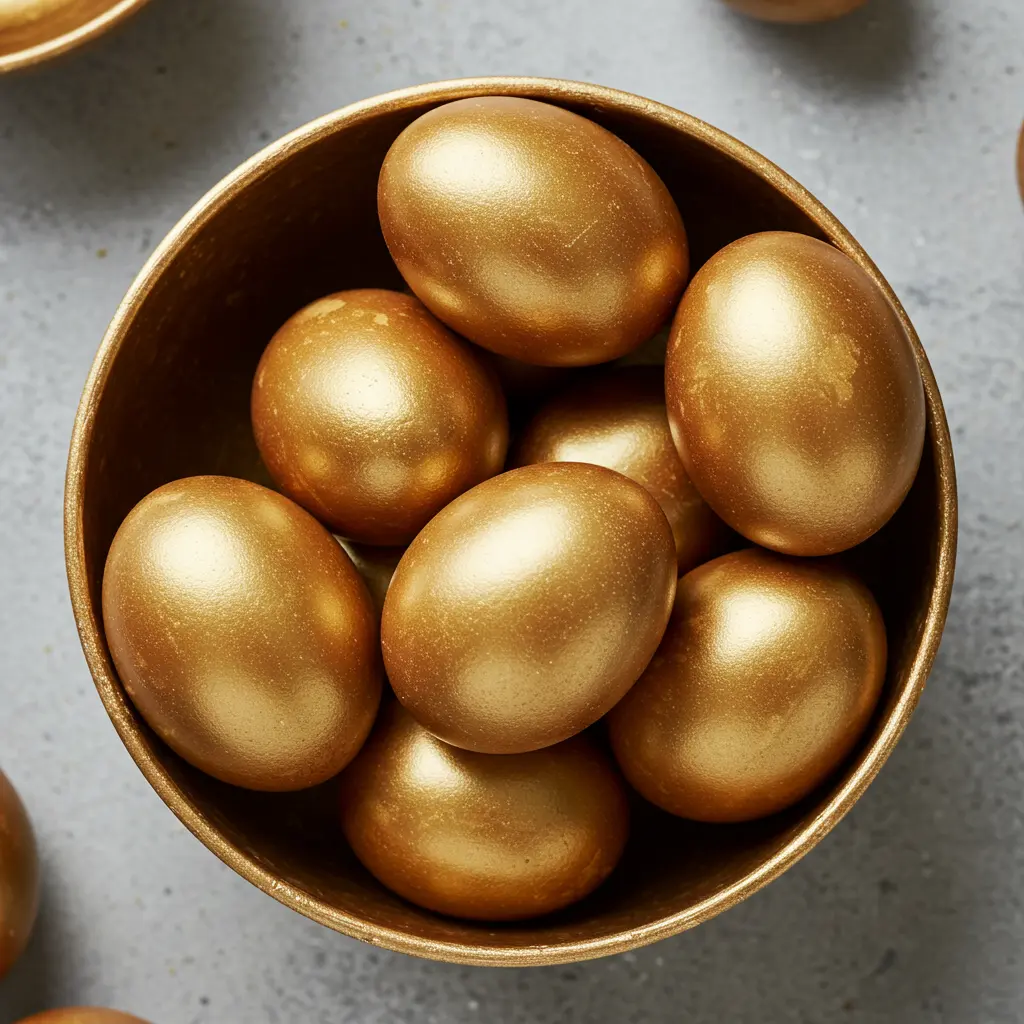
- Best For: Adding a touch of instant elegance and glamour to your decor. Perfect for a more sophisticated, adult aesthetic.
- Styling Cue: Display them in a simple glass bowl or cloche to let their metallic shine be the star of the show.
16. The Giant Wooden Easter Bunny
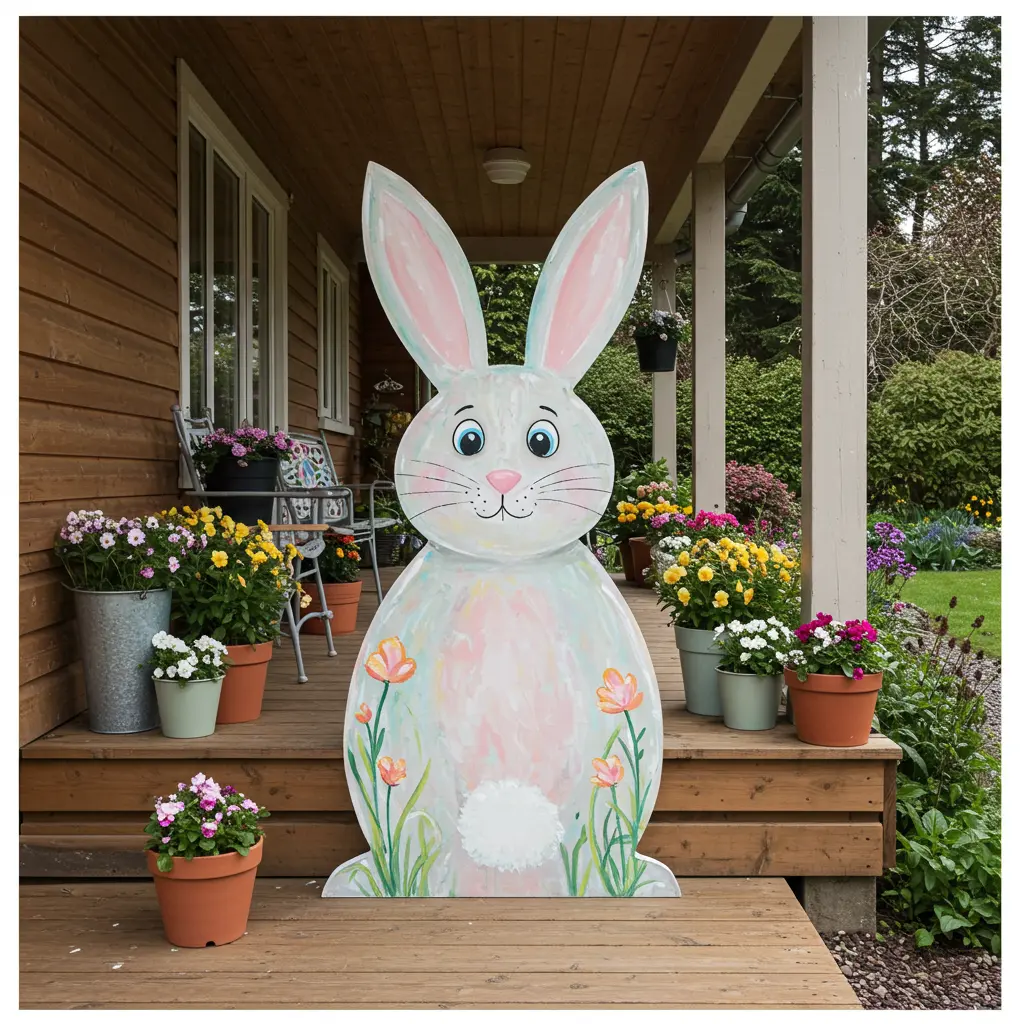
- Best For: Creating a Pinterest-worthy welcome on your front porch or in your yard. It’s a statement piece with major charm.
- Key Consideration: Use exterior-grade paint and a weather-proof sealer to ensure your bunny can withstand spring showers and last for years.
17. The DIY Easter Balloon Arch
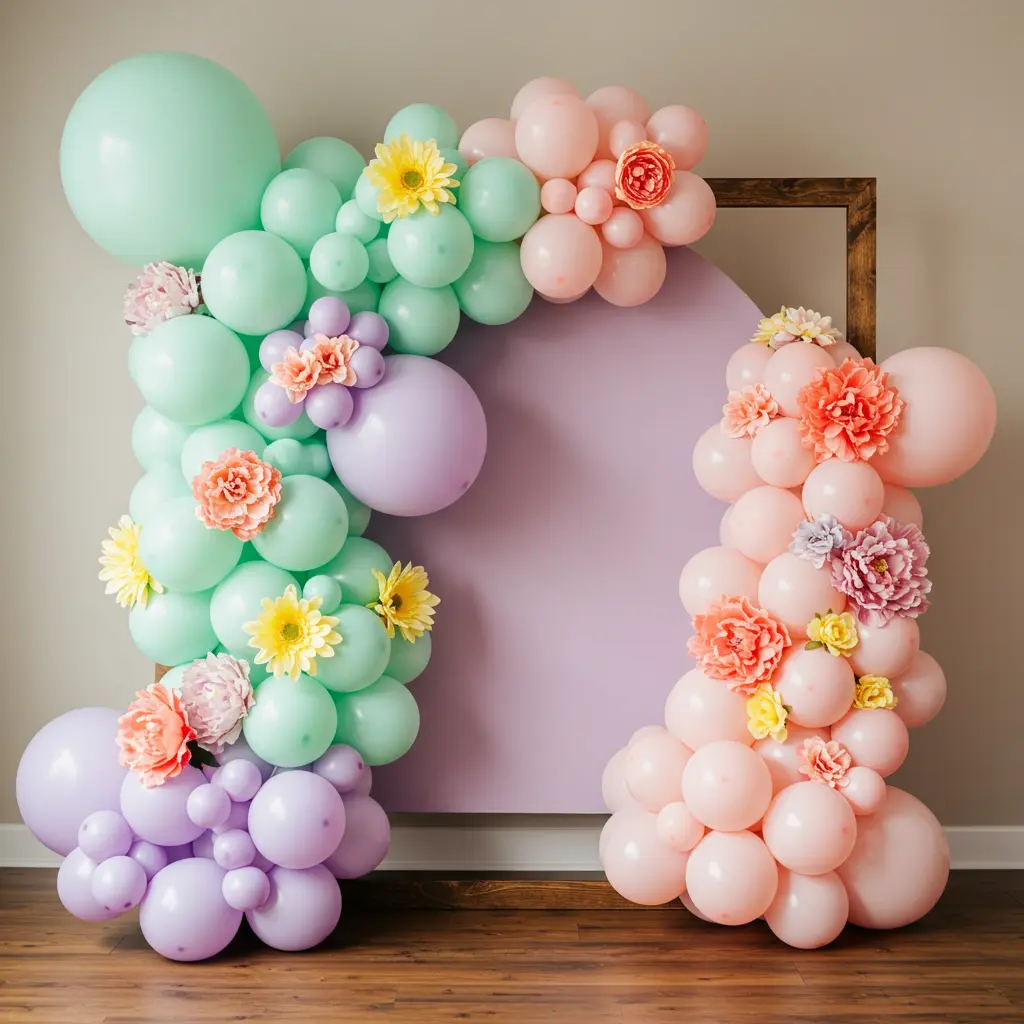
- Best For: A jaw-dropping party backdrop for family photos or a dessert table. It brings a professional party-planner look to your home.
- Styling Cue: Intersperse the balloons with faux eucalyptus stems or other greenery. It elevates the look and gives it a sophisticated, organic feel.
18. The Carrot Bouquet Vase
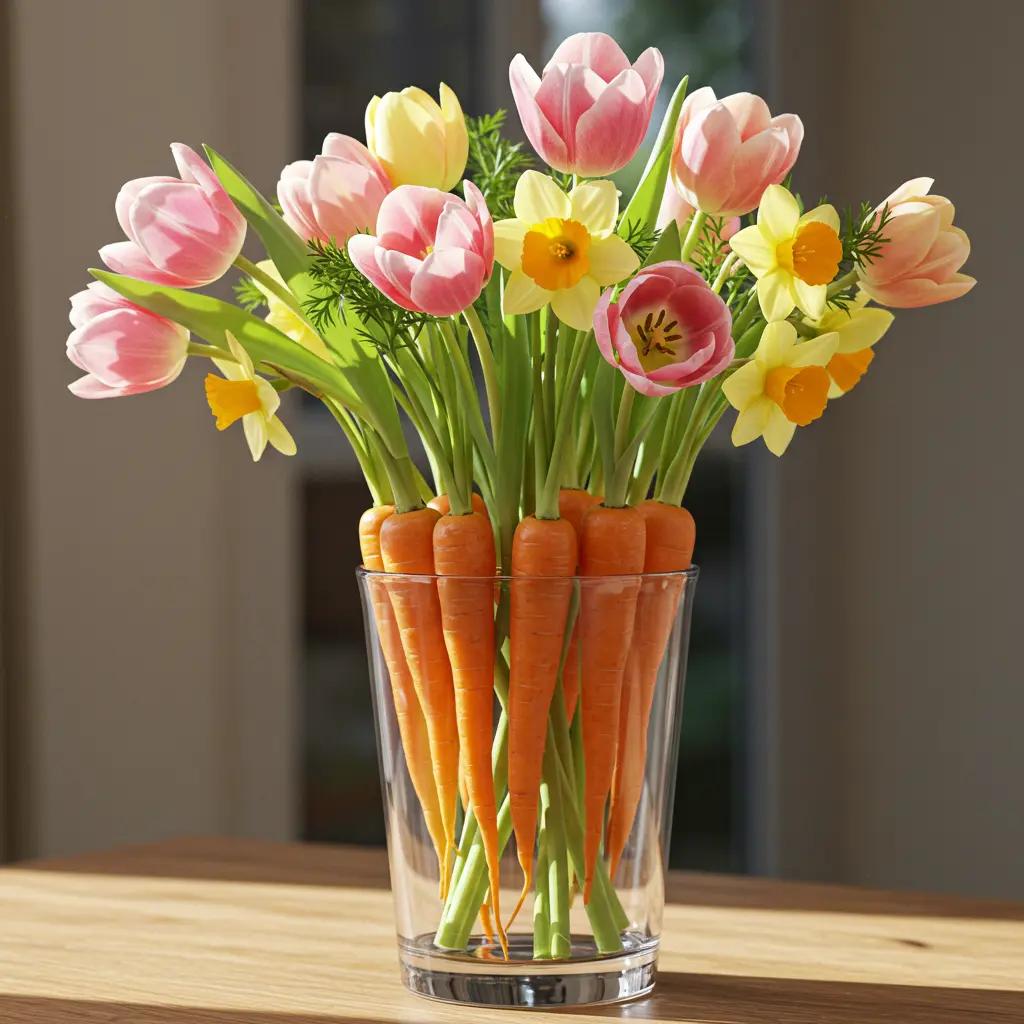
- Best For: A completely unique and clever floral display that is sure to be a conversation starter at your Easter brunch.
- Pro-Tip: Place a smaller, narrower vase inside the larger vase. Put the flowers and water in the small vase, and arrange the carrots in the gap between the two.
19. The Candy Bouquet Centerpiece

- Best For: A playful, edible centerpiece that is especially delightful for a table with lots of children.
- Pro-Tip: Use a block of floral foam in the bottom of your vase to securely anchor the skewers for the candy and lollipops.
20. The Marbled Shaving Cream Eggs
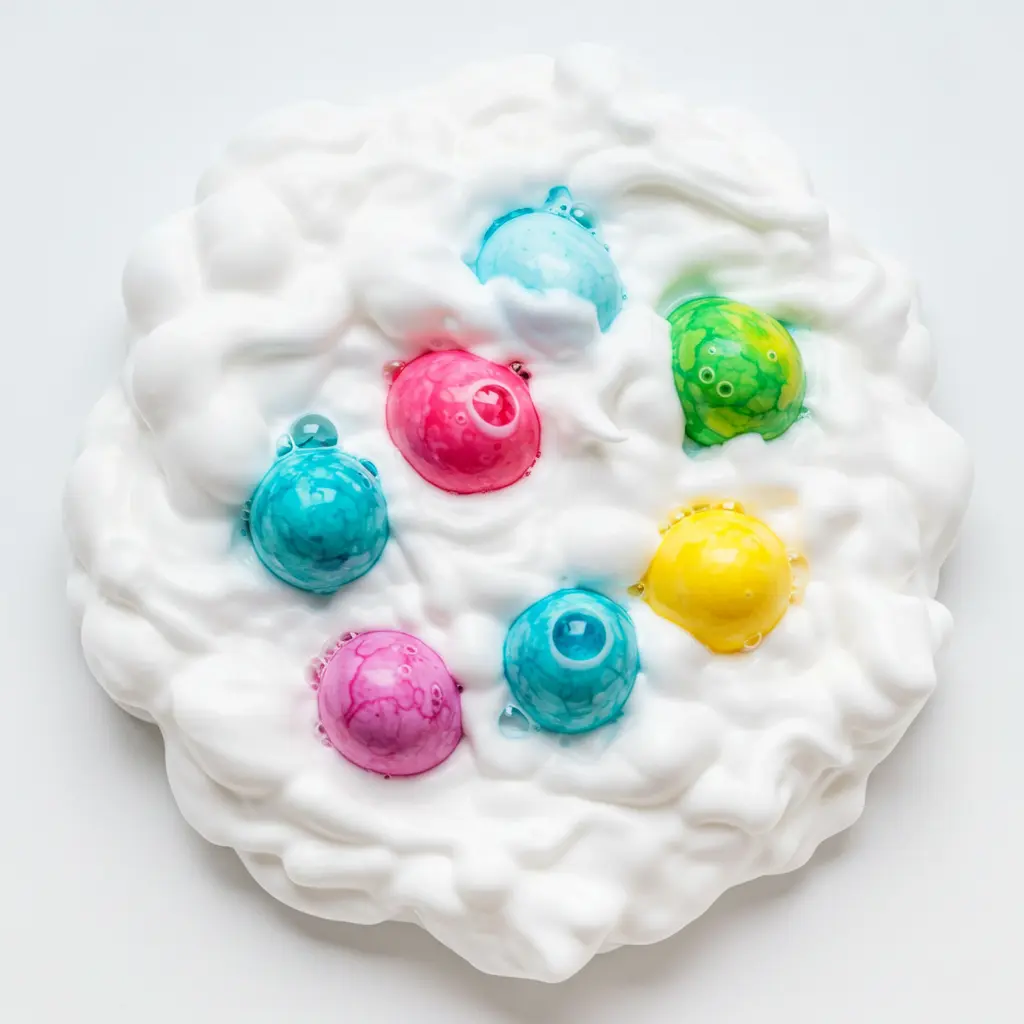
- Best For: A magical, messy, and incredibly fun way for kids and adults to decorate eggs with stunning results.
- Pro-Tip: Wear disposable gloves! It makes cleanup much easier. Let the eggs sit in the dyed foam for a few minutes before wiping them clean to get the most vibrant colors.
The Smart Stuff: Tech & Function
21. The Eggshell Candle Holders

- Best For: A charming and functional way to add a soft, flickering glow to your Easter table.
- Key Consideration: Carefully crack only the top third of the egg to create a deep enough shell. Use a small, unscented tea light or melt soy wax to fill.
22. The Tin Can Bunny Planters
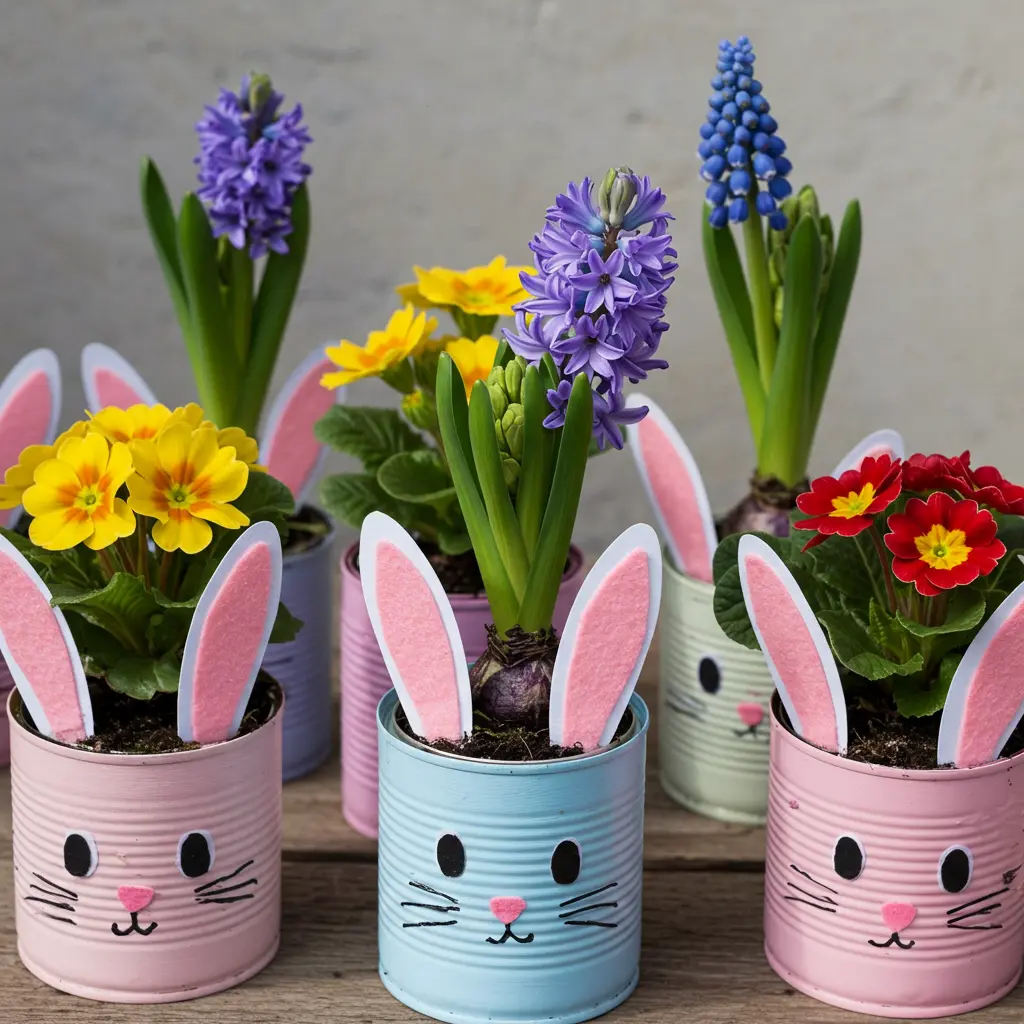
- Best For: An adorable and eco-friendly way to display small spring plants like pansies or succulents.
- Pro-Tip: Be sure to drill a few small holes in the bottom of the can for drainage before you add your soil and plant.
23. The Hanging Easter Egg Planters
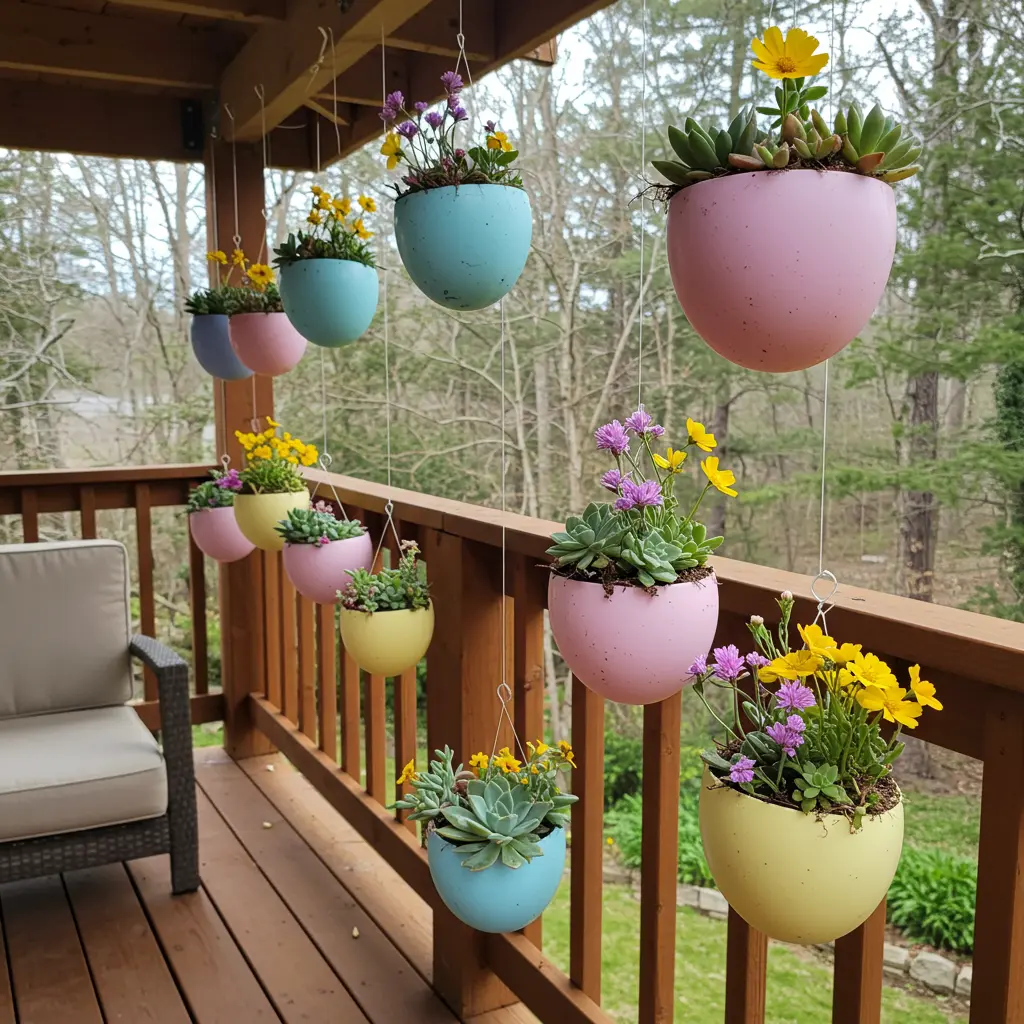
- Best For: A clever way to use plastic eggs to add a touch of green to a patio, porch, or a sunny window.
- Styling Cue: Fill them with air plants (Tillandsia). They require no soil and very little care, making them perfect for these tiny planters.
24. The Easter Yard Signposts
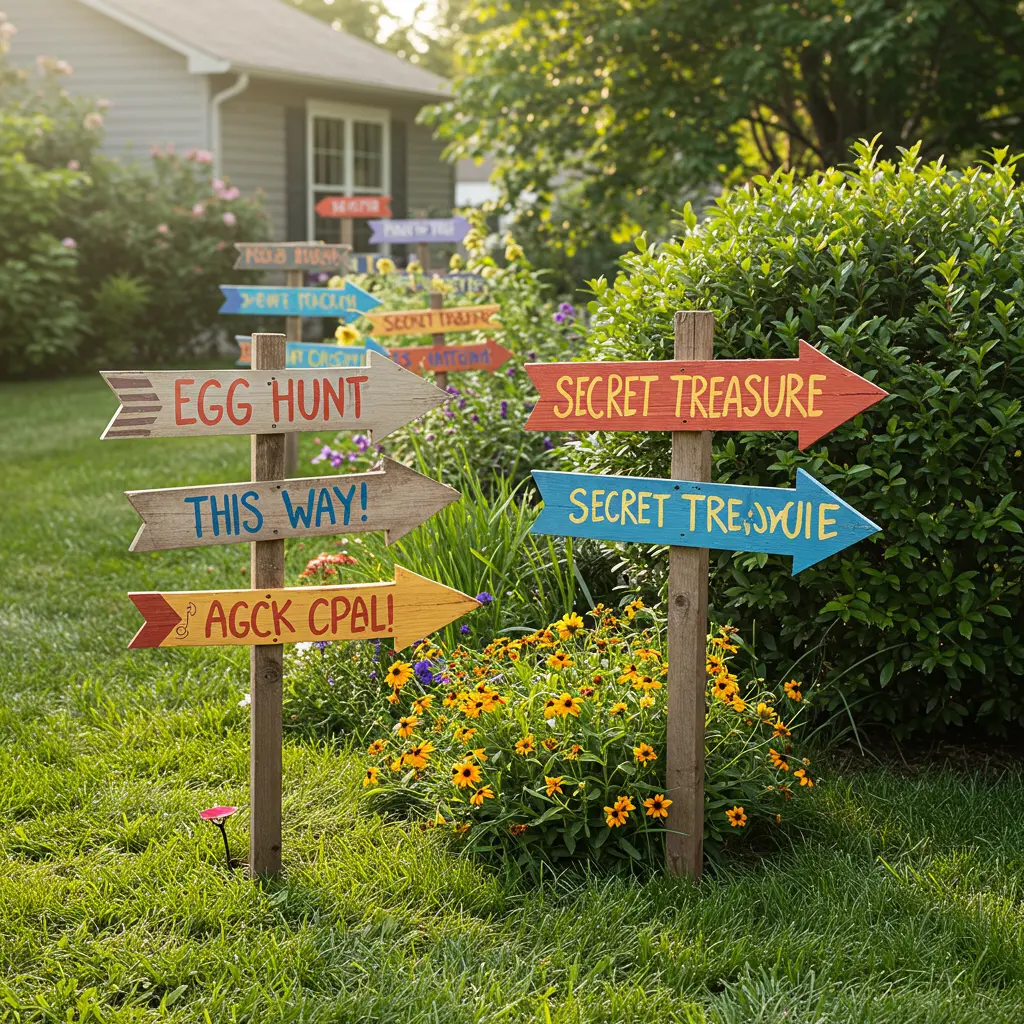
- Best For: A fun and functional way to guide guests to your home or direct children on an egg hunt.
- Pro-Tip: Attach the painted arrow signs to garden stakes, which can be easily pushed into the ground without any digging.
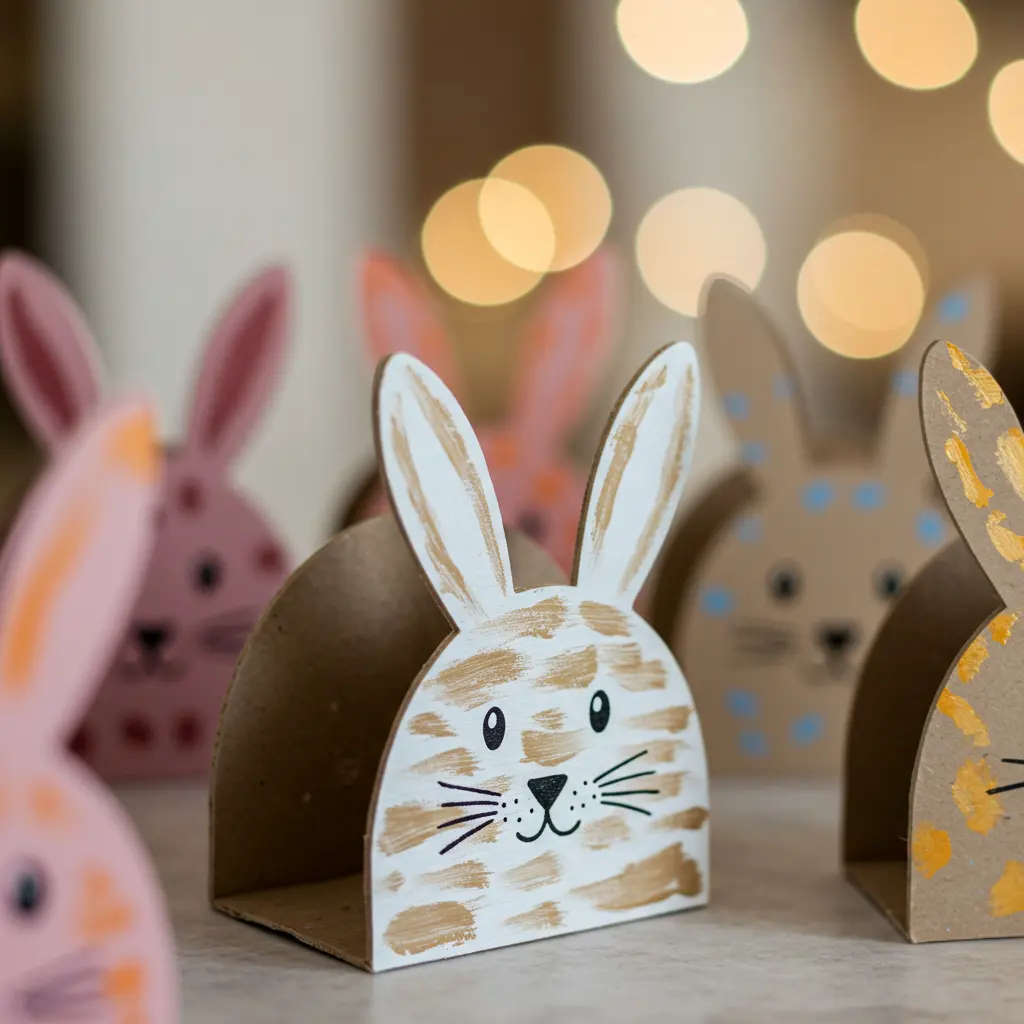
25. The DIY Easter Basket from a Shoebox
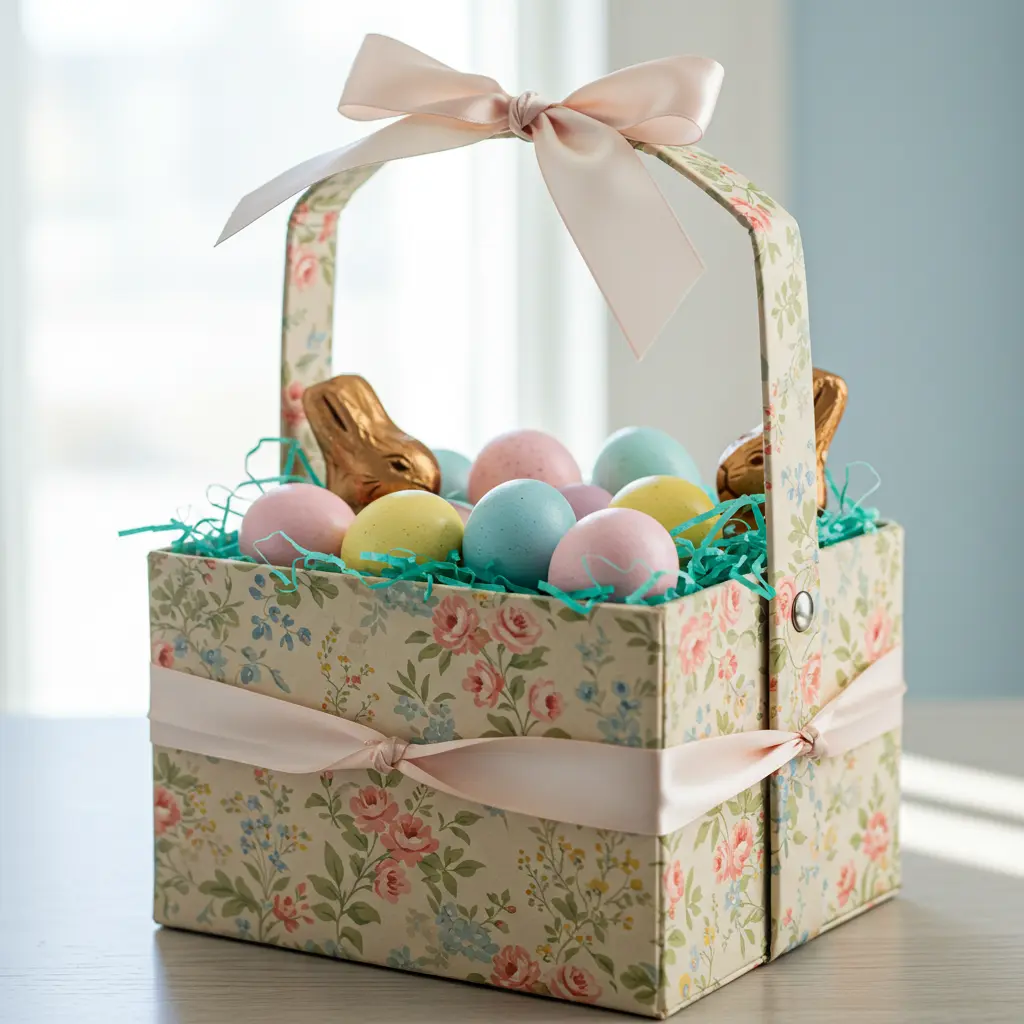
- Best For: A wonderfully resourceful craft that turns everyday trash into a chic and functional Easter basket.
- Key Consideration: Reinforce the handle by attaching it with metal brads instead of just glue for a sturdier hold.
26. The DIY Easter Egg Lanterns
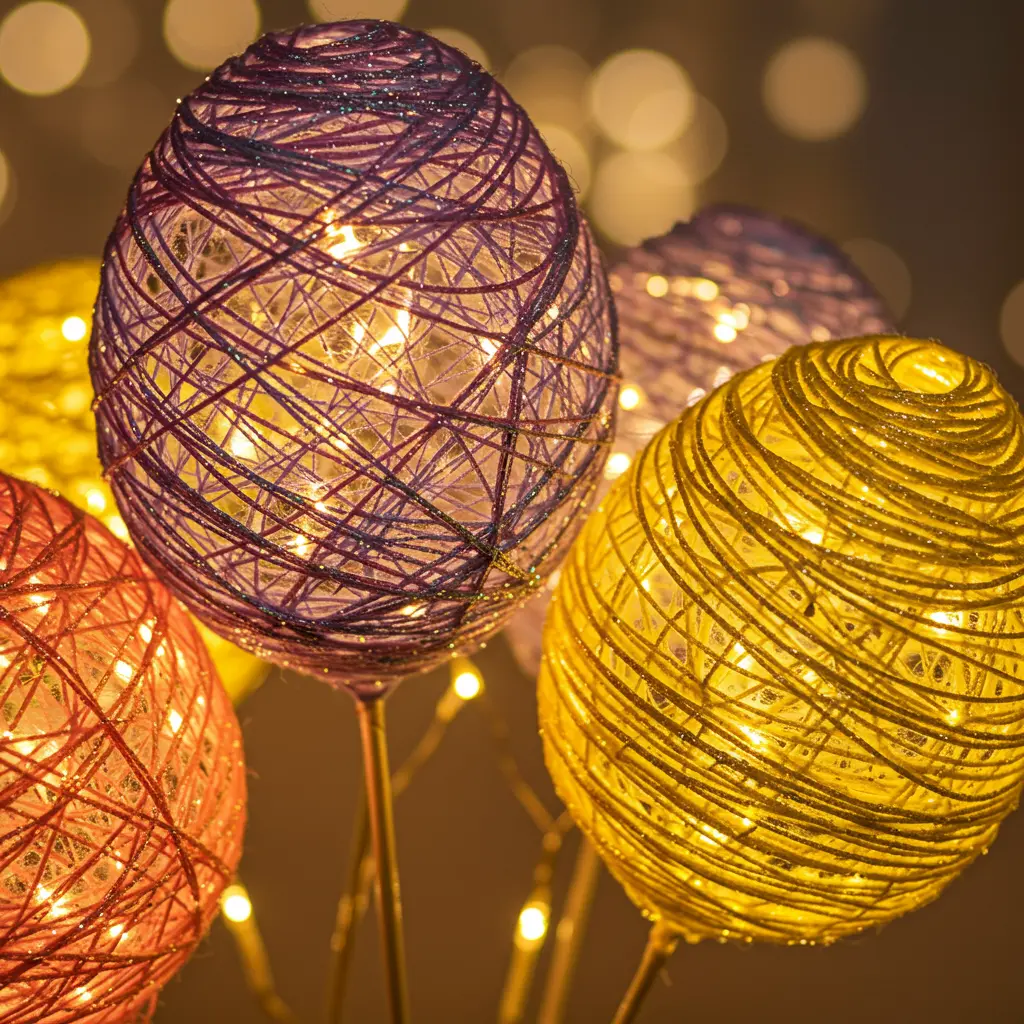
- Best For: Adding a magical, ambient glow to your home in the evening.
- Key Consideration: Use only battery-operated LED lights inside. Never use a real candle or flame.
27. The DIY Hatching Chick Surprise
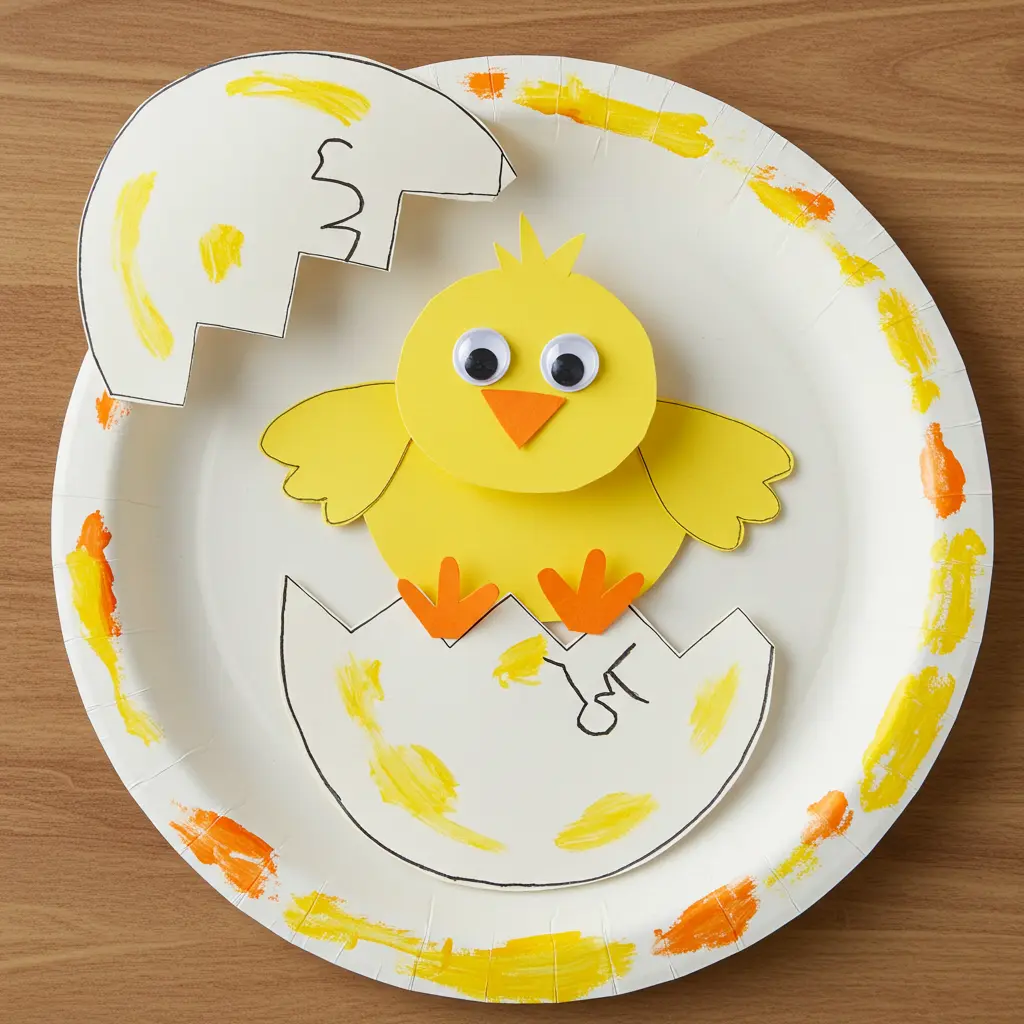
- Best For: A fun, interactive craft that doubles as a toy for young children.
- Pro-Tip: Use a sturdy metal brad to attach the pieces so the pop-up mechanism can be used over and over without tearing the paper.
28. The Easter Bunny Masks
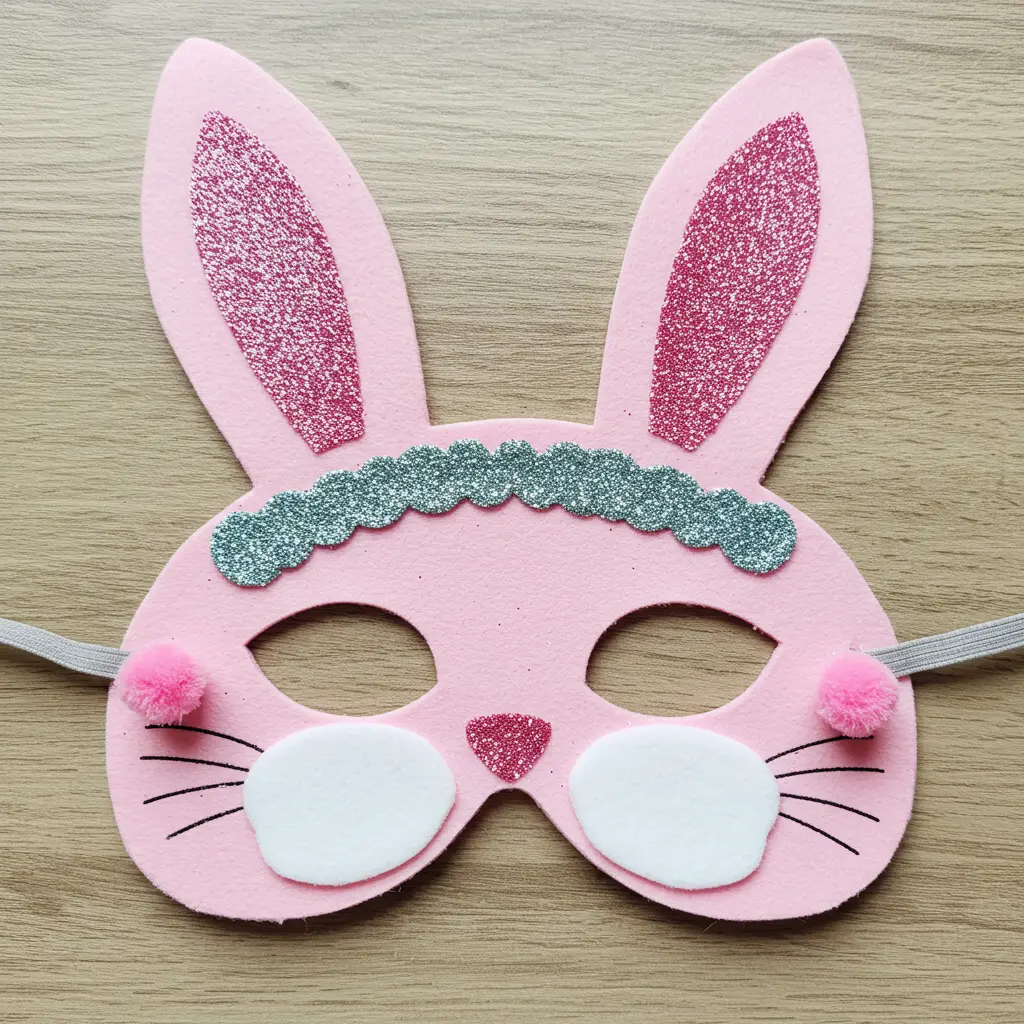
- Best For: A fun party activity or a great addition to an Easter basket for imaginative play.
- Styling Cue: Set up a decorating station at your Easter gathering with masks and craft supplies, and let guests create their own.
29. The Decoupage Easter Eggs
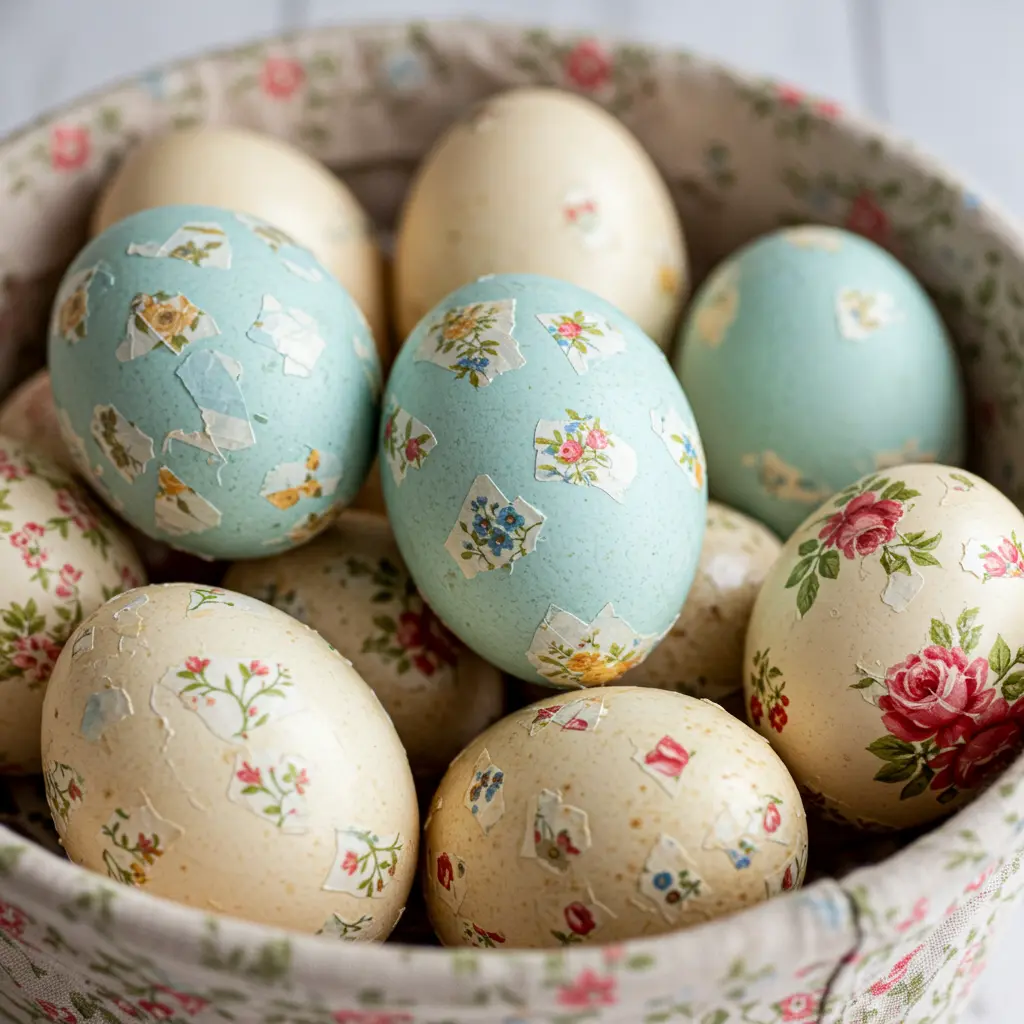
- Best For: Creating elegant, vintage-inspired eggs with intricate patterns that look hand-painted.
- Key Consideration: Use only the top, printed layer of the napkin. Separating the layers is the key to a smooth, seamless finish.
30. The Glitter-Dipped Easter Eggs
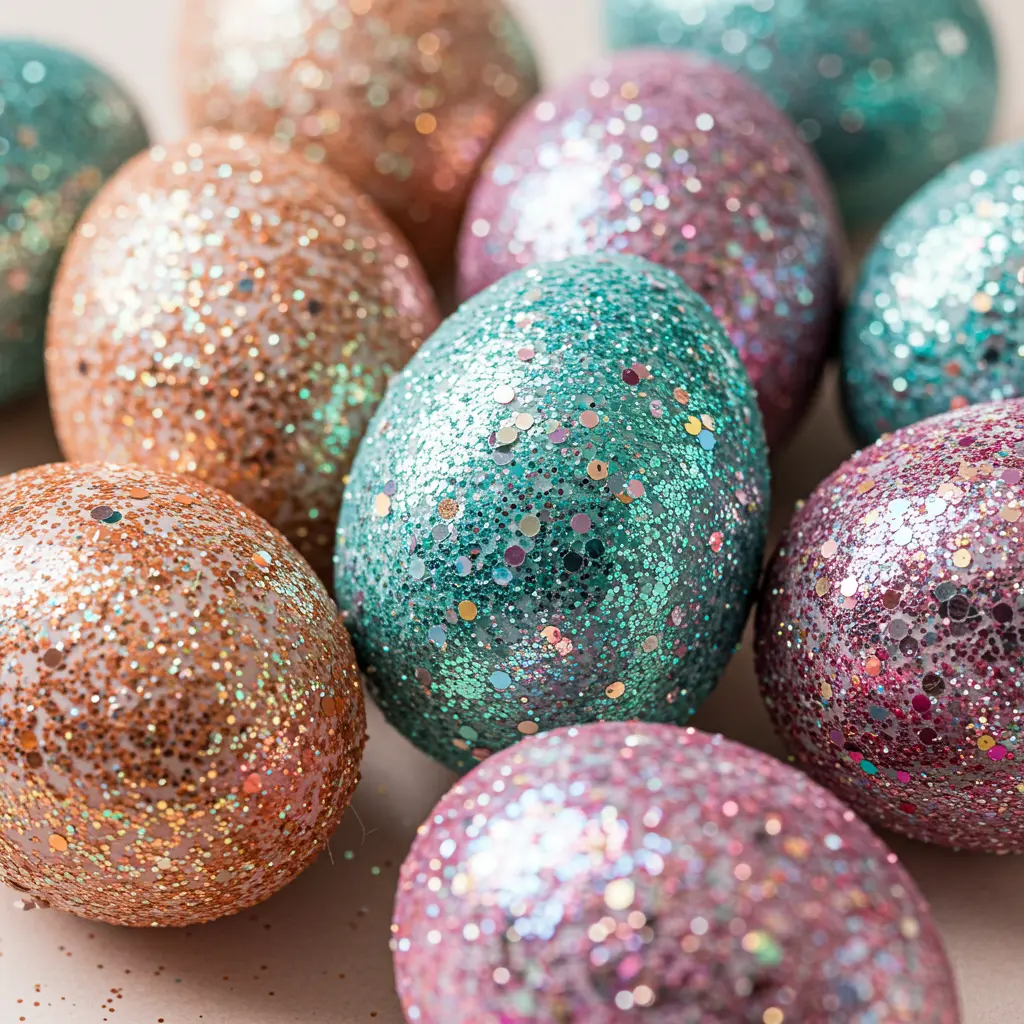
- Best For: Adding instant, unapologetic glam to your Easter decor.
- Styling Cue: Use different glitter colors like gold, silver, and iridescent and display them together for a rich, jeweled effect.
Bringing Your Vision to Life
With a dream in your heart and a story in your head, it’s time for the gentle act of making it real.
Design Recipes for Tricky Spaces
- For the Long, Narrow Hallway: To keep the space from feeling like a tunnel, you could try an Asymmetrical Balance. Hang a Bunny Garland (#3) along one wall, and place a single, charming No-Sew Sock Bunny (#8) on a small entry table at the end.
- For the Small Apartment or Studio: Think vertically. A simple DIY Easter Egg Tree (#9) adds height without taking up much space. Use wall-safe tape to hang a few Decoupage Easter Eggs (#29) from ribbons on the wall as art.
- For the Open-Concept Great Room: Create a clear anchor to define the living area. A large DIY Easter Balloon Arch (#17) over a sideboard or a significant Tiered Tray Display (#11) on the coffee table can create a festive zone.
The Practical Stuff: Wires, Vents & Safety
- Hanging with Care: You can use removable adhesive hooks or clear tape to hang garlands and light decorations without damaging your walls.
- Let it Breathe! Candle Safety: Never leave any candles, even tiny eggshell ones, unattended. Keep them far from flammable materials like paper napkins and faux greenery.
- The Glitter Monster: When working with glitter, lay down a large sheet of newspaper first. It makes cleanup five times easier and keeps the sparkle contained.
- Outdoor Safety: Ensure any large outdoor decor, like a Giant Wooden Bunny (#16), is securely fastened so it won’t blow over in a spring storm.
The Finishing Touches: Styling & Smart Solutions
Your decorations are crafted. Now for the most personal part, making your home truly sing.
The Art of Styling: Bringing Your Wall to Life
- Little Families of Objects: Grouping decor in odd numbers (1, 3, 5) often feels more natural. Try a trio of sock bunnies or a cluster of five painted rocks.
- A Gentle Landscape: Mix tall, medium, and low objects to create a beautiful, varied rhythm across your surfaces. Place a tall vase next to a medium bunny and a low bowl of eggs.
- A Conversation of Textures: Combine something rustic (burlap) with something smooth (a ceramic egg), something soft (a felt bunny) with something hard (a wooden sign).
- Breathing Room: You don’t need to cover every surface. Empty space is a design element, too. It gives your favorite pieces a quiet moment to shine.
- Add Life: The simplest and most beautiful decoration is life itself. A small vase of fresh daffodils or tulips will bring the scent and soul of spring right into your home.
A Few Gentle Reminders
- Caring for Your Comfort: Decorating should be a joy, not a stress. Put on some music, pour a cup of tea, and enjoy the process.
- Remembering Scale: Don’t let your beautiful decor get lost. A tiny bunny on a huge mantel needs a few friends to make a statement.
- The Gift of Imperfection: Don’t strive for store-bought perfection. The little quirks in your handmade decor are what hold the love and the memory.
- The Safety Dance: Always be mindful of candle safety and ensure any outdoor decor is securely fastened.
- Too Many Stars: Let one area, like your mantel or dining table, be the main focal point. A few simple touches elsewhere are all you need.
No Demo Required: A Renter’s Guide to a Beautiful Media Wall
- Lean Into It: A beautiful Tiered Tray Display (#11) can bring a huge amount of festive cheer to a small space without a single hole in the wall.
- The Power of Paint: The projects here use craft paint, not wall paint. Focus on creating moveable art like a Bunny Silhouette Canvas (#4).
- Peel-and-Stick Wonders: Create Washi Tape Wall Art (#6) directly on your wall or a canvas. It’s a modern and completely removable statement.
- Command Your Gallery: Use damage-free Command Strips to hang a lightweight wreath, garland, or canvas art.
Solving a Few “What Ifs…”
- My only TV wall has a window or doorway?
- (Adapted for Decor) My mantel has a TV over it? Embrace asymmetry. Arrange your decor on one side of the mantel, balancing the visual weight of the TV with a tall vase or Easter tree.
- I have a slanted attic ceiling?
- (Adapted for Decor) I have limited flat surfaces? Go low and long. A simple Bunny Garland (#3) hung on the wall, or a long, low bowl filled with decorated eggs creates a beautiful line without needing height.
- My TV has to go in a corner?
- (Adapted for Decor) I only have one corner to decorate? Make the corner feel intentional. Place a small table there with an Easter Egg Tree (#9) and a few No-Sew Sock Bunnies (#8) to create a cozy, dedicated nook.
Designing for Tomorrow
- Think About Your Next TV: (Adapted for Decor) Think About Next Easter: When crafting, consider how you’ll store the item. A flat garland is easier to store than a bulky wreath.
- Make Access Easy: Store all your Easter decor in one or two clearly labeled bins. It’s a kindness to your future self and makes decorating next year a joy, not a hunt.
- Choose Timeless Materials: Simple wooden figures, classic ceramic eggs, and fabric bunnies have a wonderful staying power and will feel stylish for years to come, allowing you to build on your collection over time.
Conclusion: Your Living Room’s Next Chapter
And just like that, you’re no longer just looking at a craft project; you’re looking at a world of possibilities. You have the ideas, the inspiration, and the gentle know-how to fill your home with decorations that are a true reflection of you. This isn’t just about making your home look pretty for a holiday; it’s about participating in the story of spring’s return.
It all starts with a single choice. Pick a style that made your heart skip a beat, and take the first small, joyful step. You’ve got this.
May your home tell its story,
