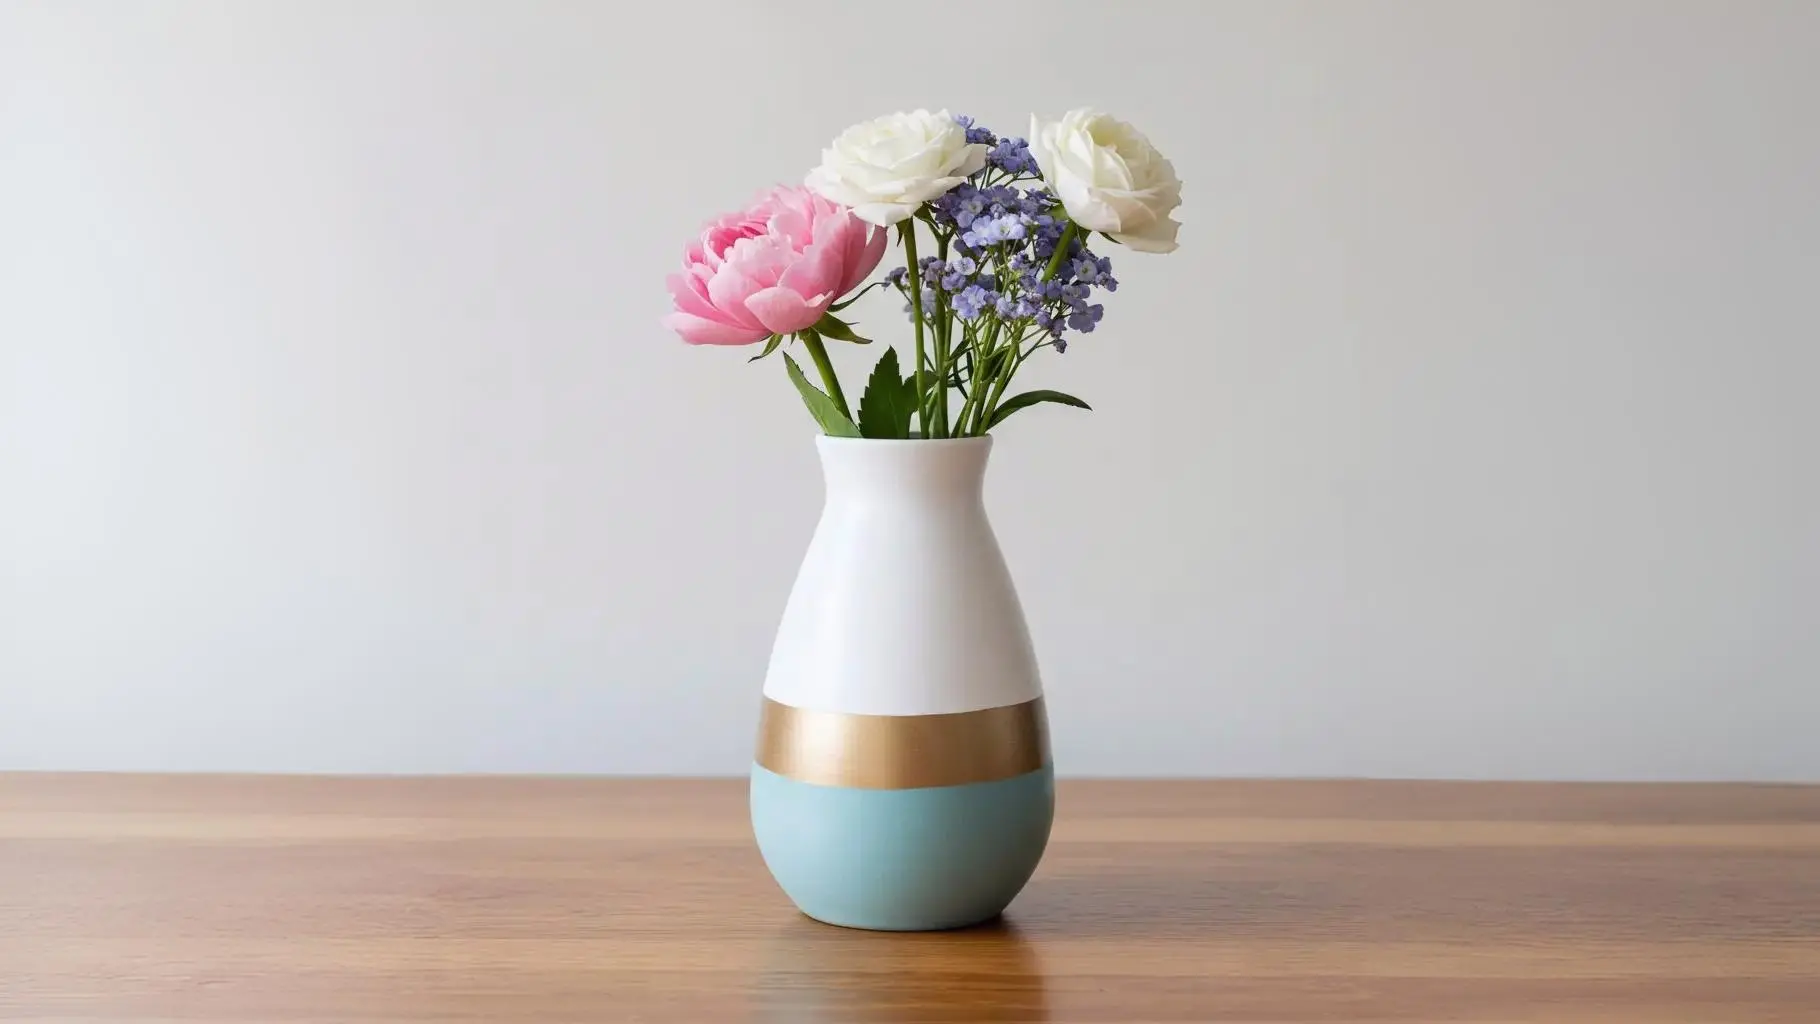
Hey bestie! Are your vases looking a little… lonely?Like they’re just holding flowers, not really living their best life?
A vase isn’t just a container; it’s a canvas for your creativity!
Get ready to transform those plain Janes into personality-packed statement pieces. These 24 creative vase decorating ideas are about to blow your mind.
If your vases are basic, your room is missing out on a major style moment. Prepare for an inspo overload that will have you raiding your craft supplies. It’s time to give your vases (and your room) a serious glow-up.
Beyond the Bouquet: Vase Decor That Slays All Day
Your vases deserve to be stars, even when they’re empty. These ideas will turn them into works of art. Don’t just fill them, style them. Get ready to make every corner of your room Instaworthy.
1. The “Paint Dip” Chic: Effortless Color Pop
This is so easy, it’s almost criminal how good it looks. Dip the bottom third (or half) of a plain glass or ceramic vase into paint. Let the excess drip off for a cool, organic edge, or tape for a crisp line.
Choose a bold accent color, a metallic, or even a soft pastel. It’s a modern, minimalist way to add a splash of color.
This instantly updates any boring vase, no joke.
The contrast between the original vase and the painted section is key. Your friends will think you bought a fancy new designer vase. Use acrylic craft paint for glass or ceramic. This is a quick DIY with seriously high-impact results.
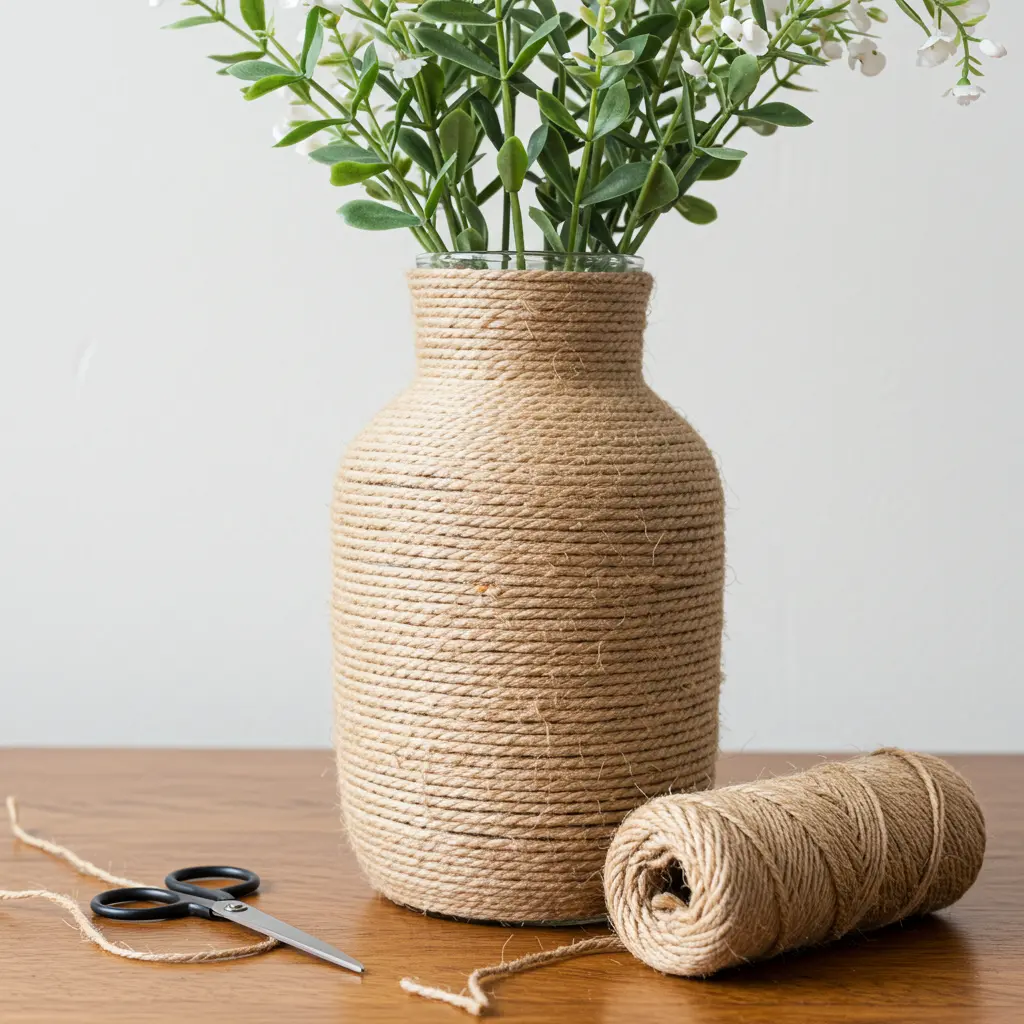
2. The “Wrapped Up” Texture Tease: Twine or Yarn
Add instant warmth and texture with a simple wrap. Tightly wrap twine, jute, or chunky yarn around your vase.
You can cover the whole thing or just a section. Secure the ends with a dab of hot glue.
It’s rustic, cozy, and adds a touch of handmade charm. This is perfect for a farmhouse, bohemian, or coastal vibe.
The different textures of yarn or twine can create cool effects.
It’s a super budget-friendly way to transform a plain vase. Try ombre yarn for a subtle color gradient.This is a satisfying and surprisingly quick DIY.
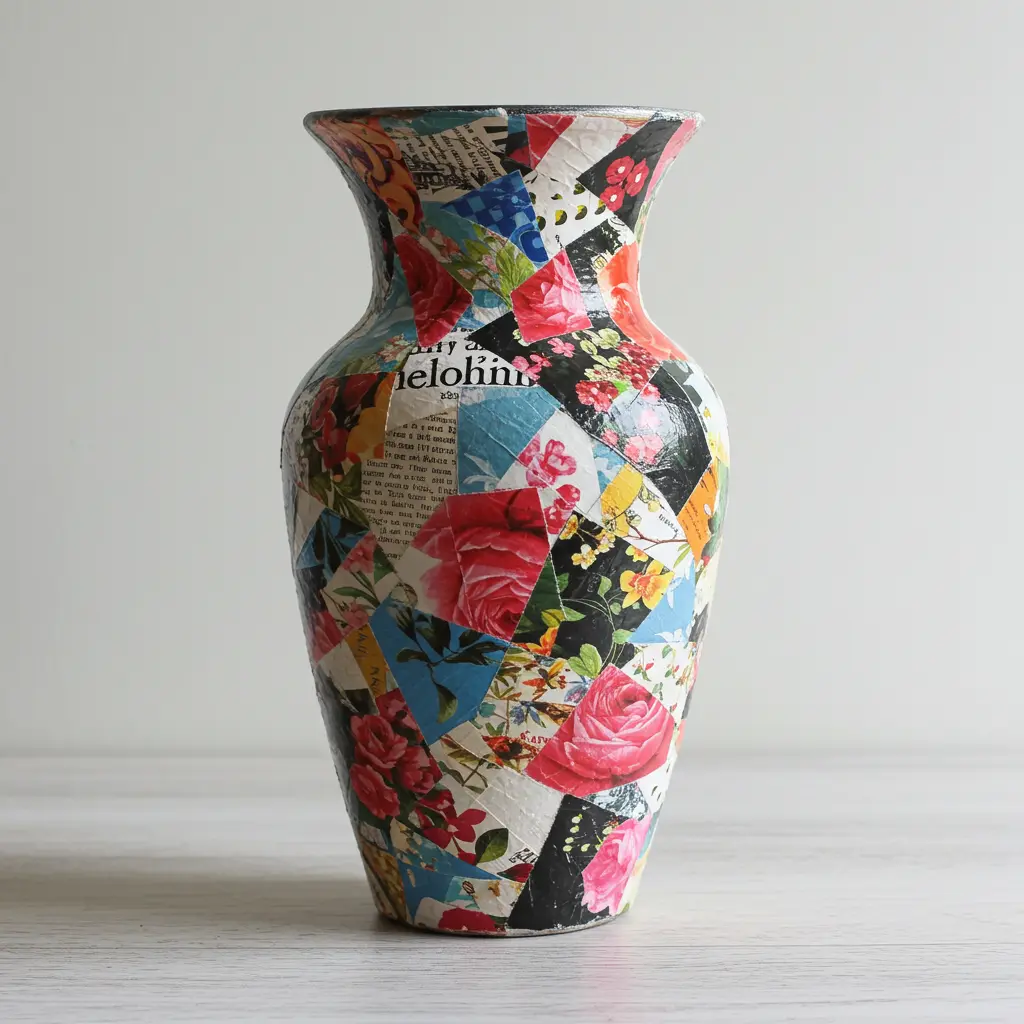
3. The “Decoupage Dream” Paper Pretties
Unleash your inner collage artist with decoupage. Cut out images from magazines, napkins, tissue paper, or wrapping paper. Apply Mod Podge (or diluted PVA glue) to the vase, stick on your paper, then seal with another coat.
It’s a fun way to create a truly unique, personalized vase. This lets you add patterns, colors, and themes to any plain surface.
Think floral, geometric, abstract – the possibilities are endless. Your vase will become a one-of-a-kind piece of art.
Overlap pieces for a more layered, interesting look. This is a great way to upcycle old magazines or pretty paper scraps.
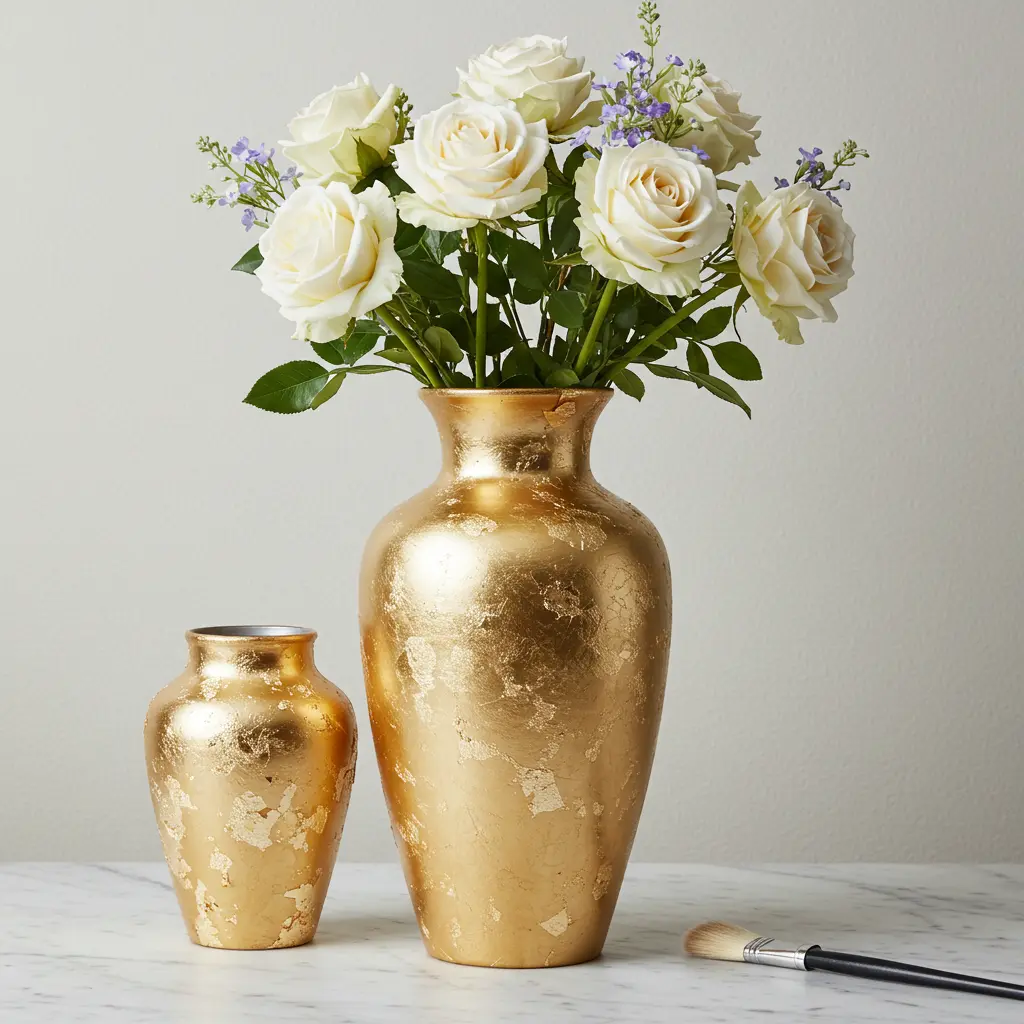
4. The “Metallic Leaf” Luxe: Gold, Silver, or Copper
Add a touch of instant glamour with metallic leaf. Apply adhesive size to the areas you want to gild.
Once tacky, carefully press on sheets of gold, silver, or copper leaf.
Brush away the excess with a soft brush. Seal if desired. It’s opulent, sophisticated, and looks incredibly expensive.
This adds a serious dose of luxury to any simple vase.
The way the metallic leaf catches the light is stunning. Your room will instantly feel more boujee. You can do a full cover, a distressed look, or just accents. This technique takes a little practice but the results are SO worth it.
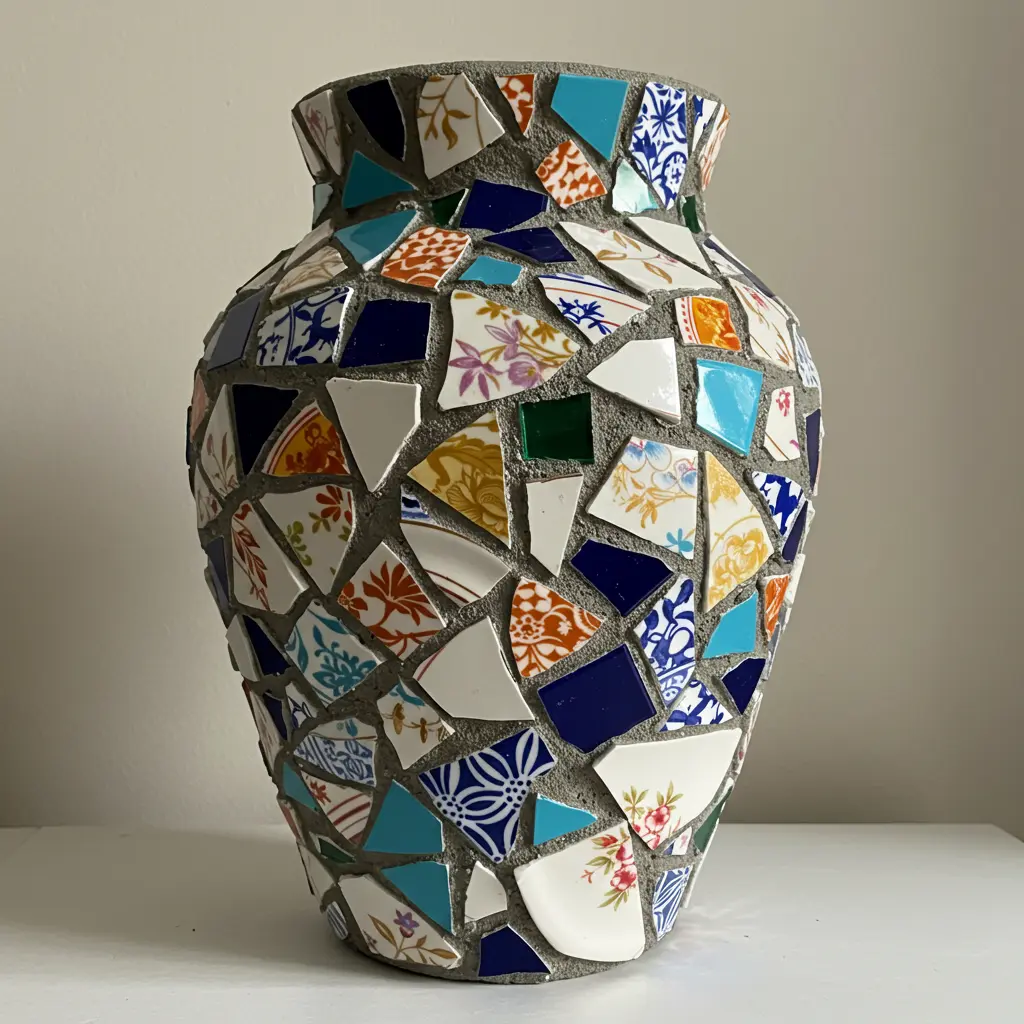
5. The “Mosaic Magic” Broken China or Tiles
Don’t throw away that chipped plate! Turn it into art. Carefully break old china, tiles, or even colorful glass into small pieces. Glue them onto your vase in a pattern or randomly.
Once dry, fill the gaps with grout, then wipe clean. It’s a beautiful way to upcycle and create a textured masterpiece.
This adds incredible color, pattern, and dimension.
Your vase will look like a treasure from an artisan market. It’s a bit more involved, but the unique result is a showstopper. Wear safety glasses when breaking materials!This is true trash-to-treasure artistry.
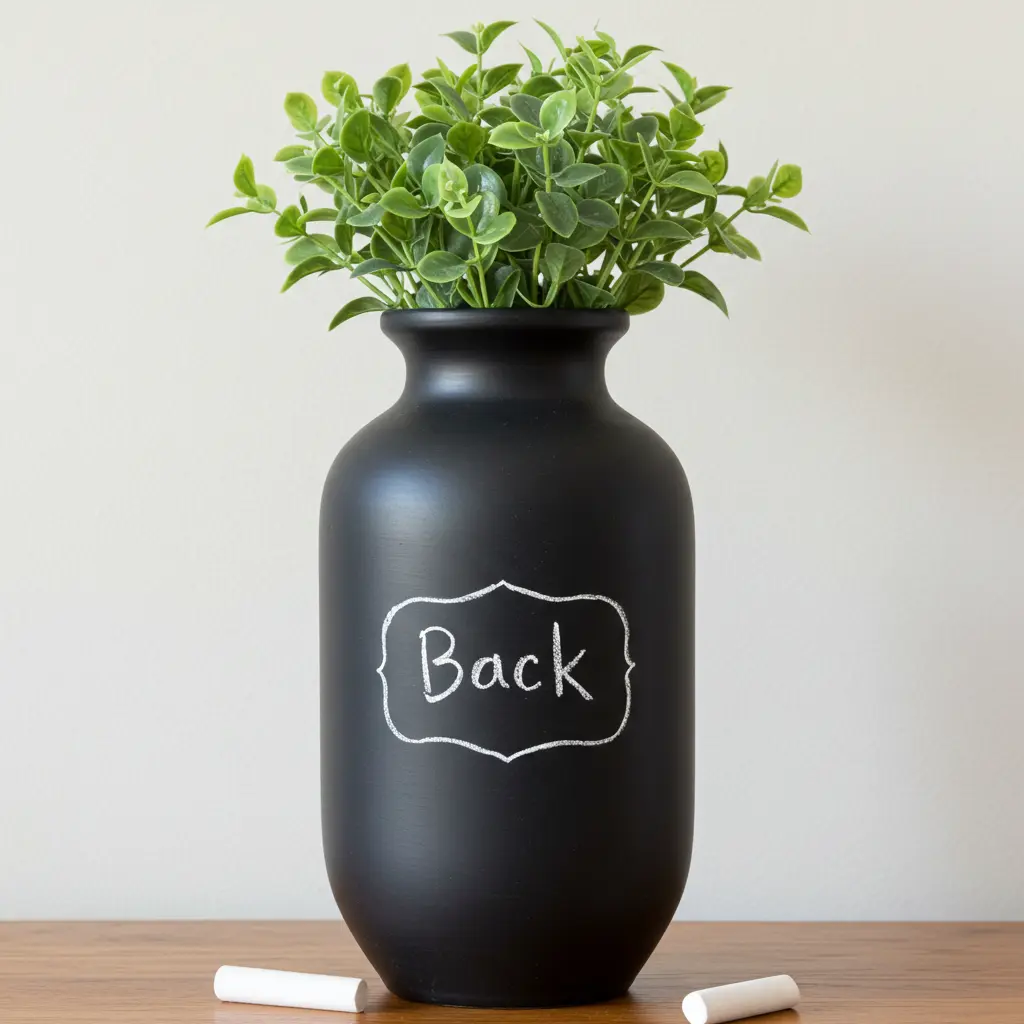
6. The “Chalkboard Charm” Write On, Wipe Off
Paint your vase with chalkboard paint for a fun, interactive piece. You can then write messages, draw doodles, or label what’s inside.
Change it up as often as you like with chalk or chalk markers. It’s playful, practical, and adds a touch of rustic cool.
This is perfect for a kitchen vase (labeling herbs!) or a kid’s room.
The matte black finish is inherently chic. Your friends will love leaving little notes on it. Use a smooth vase for the best writing surface. This is a DIY that keeps on giving.
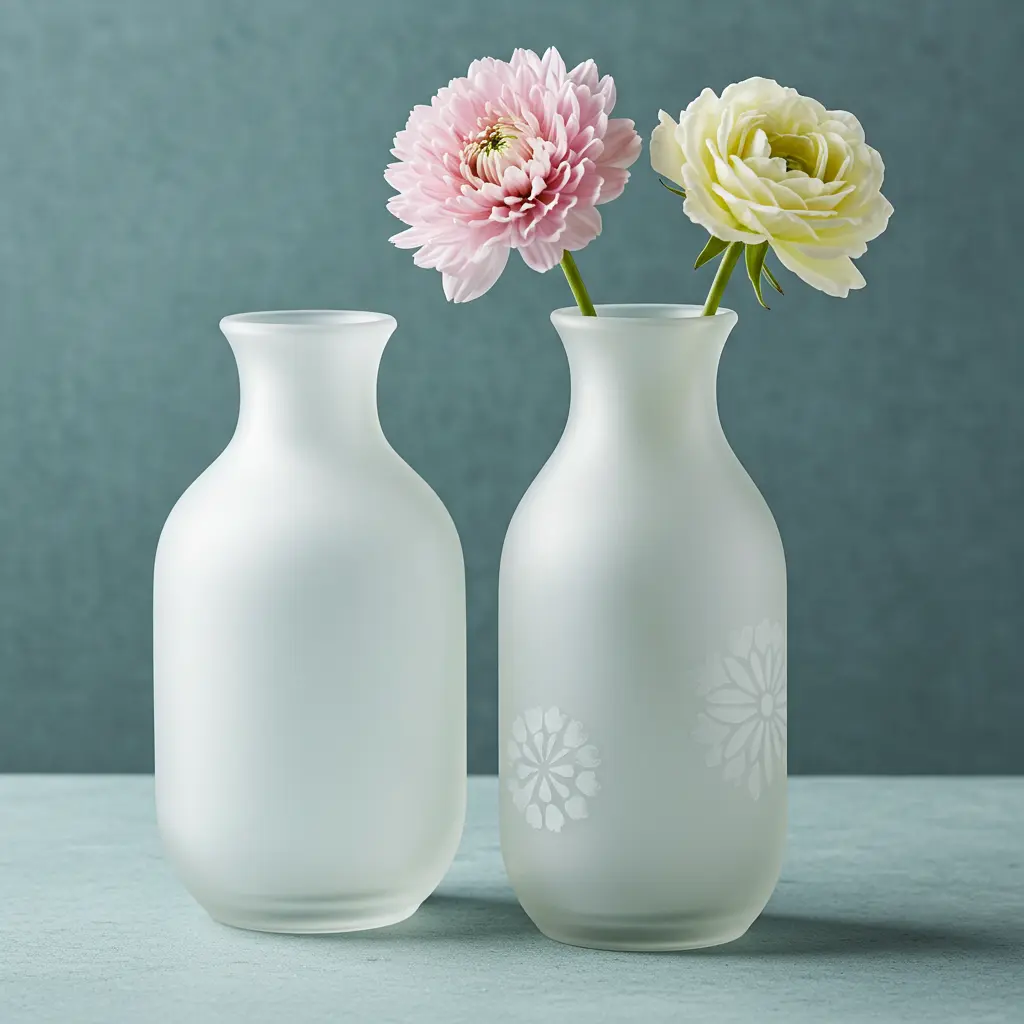
7. The “Frosted Glass” Ethereal Elegance
Give plain glass vases a soft, sophisticated makeover. Use frosted glass spray paint (available at craft stores).
Apply thin, even coats for a smooth, translucent finish.
It diffuses light beautifully and adds a touch of mystery. This creates a dreamy, almost sea-glass effect. It’s perfect for a minimalist or coastal aesthetic.
The soft, muted look is incredibly chic. You can also use stencils to create frosted patterns. This is a quick way to make cheap glass look expensive.
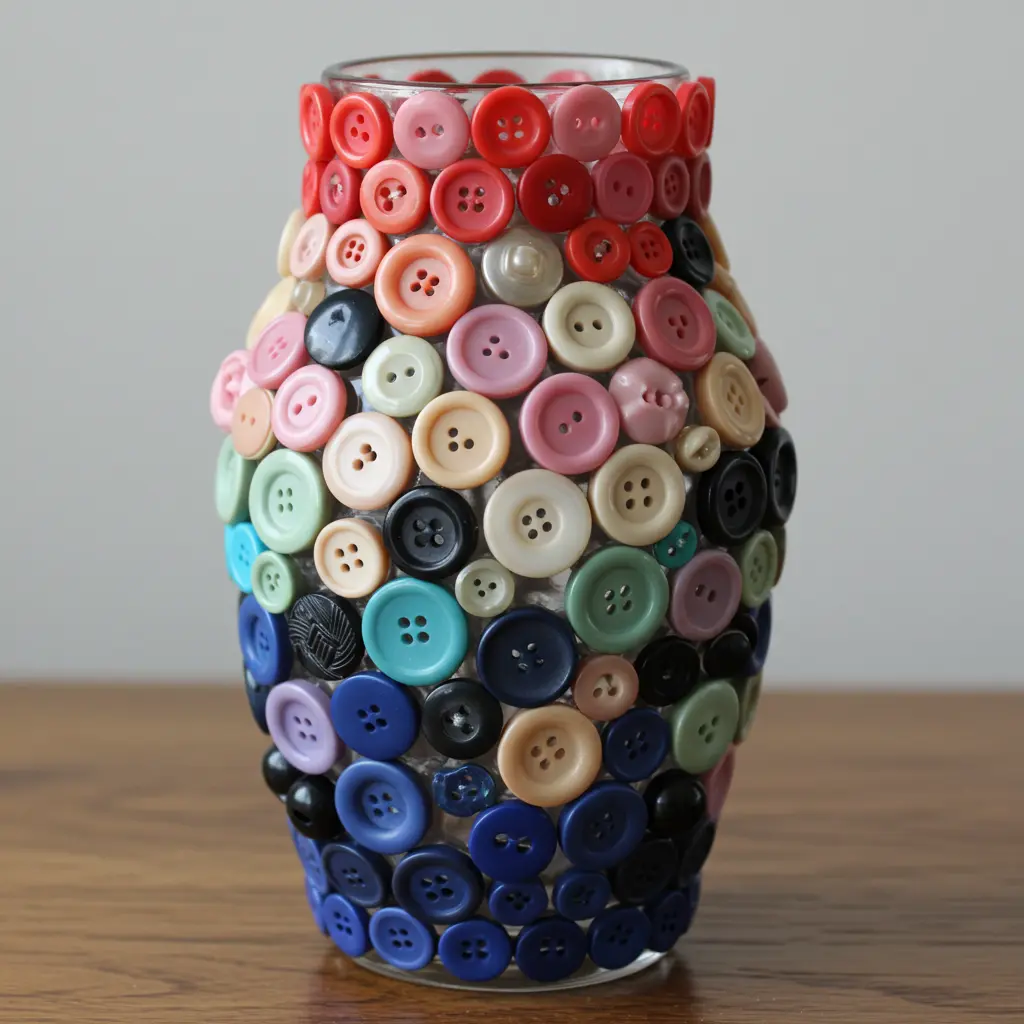
8. The “Buttoned Up” Quirky & Cute
Cover your vase in a collection of colorful or vintage buttons. Use a strong adhesive like E6000 or hot glue.
You can create patterns, color gradients, or a random, playful mix.
It’s whimsical, textural, and a great way to use up old buttons. This adds a touch of nostalgic, handmade charm.
The variety of button shapes and sizes creates a fun look.
Your vase will be a unique, tactile delight. This is perfect for a craft room or a shabby chic vibe. Layer buttons for even more dimension.
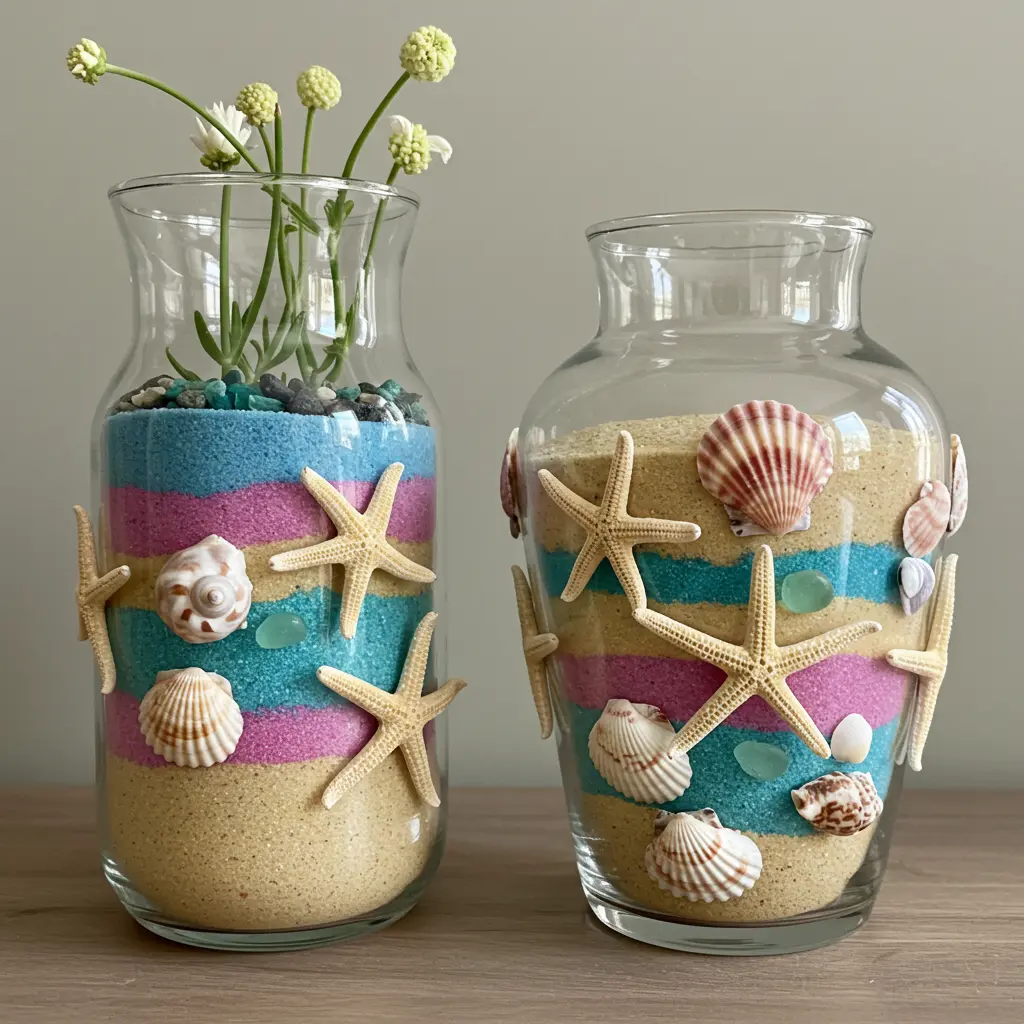
9. The “Beachy Keen” Sand & Shells (Inside or Out)
Bring the coast to your vase, literally. For a clear glass vase, layer different colors of craft sand inside. Or, glue small shells, sea glass, or pebbles to the outside of the vase.
You can even combine both for an ultimate beachy feel. It’s natural, serene, and perfect for a coastal-themed room.
This creates a mini beachscape right in your home.
The textures of sand and shells are so inviting. Your room will instantly feel more relaxed and vacation-like.
Use a strong glue if applying shells to the exterior. This is a lovely way to display your beachcombing treasures.
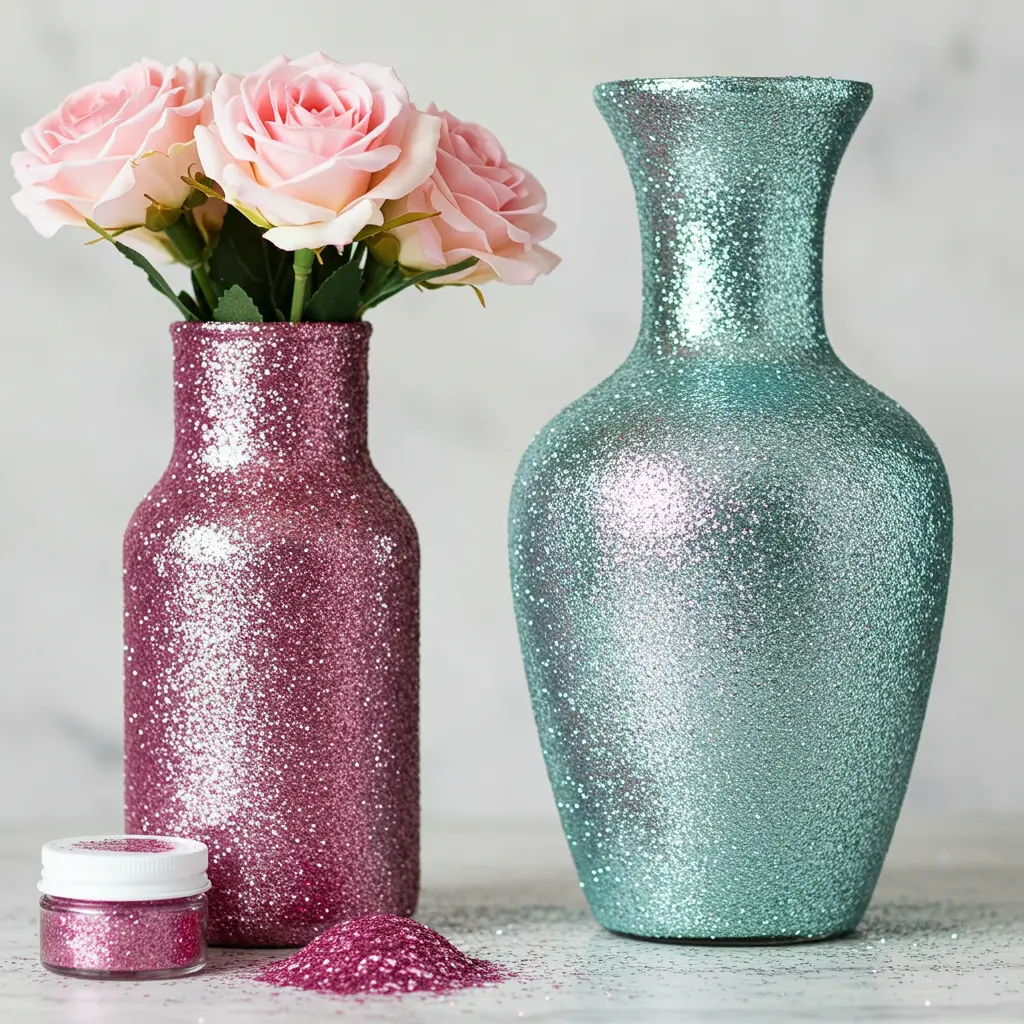
10. The “Glitter Bomb” Sparkle & Shine
For the unapologetically glam, glitter is always the answer. Coat your vase in Mod Podge or spray adhesive. Then, sprinkle generously with your favorite glitter. Tap off excess.
Seal with another coat of Mod Podge or a clear spray sealant. It’s dazzling, fun, and adds a serious dose of sparkle.
This is perfect for parties, holidays, or just because you love glitter.
The way it catches the light is pure magic. Your vase will be the star of the show. Use fine glitter for a more sophisticated shimmer, or chunky for bold glam. This is how you make a statement, honey.
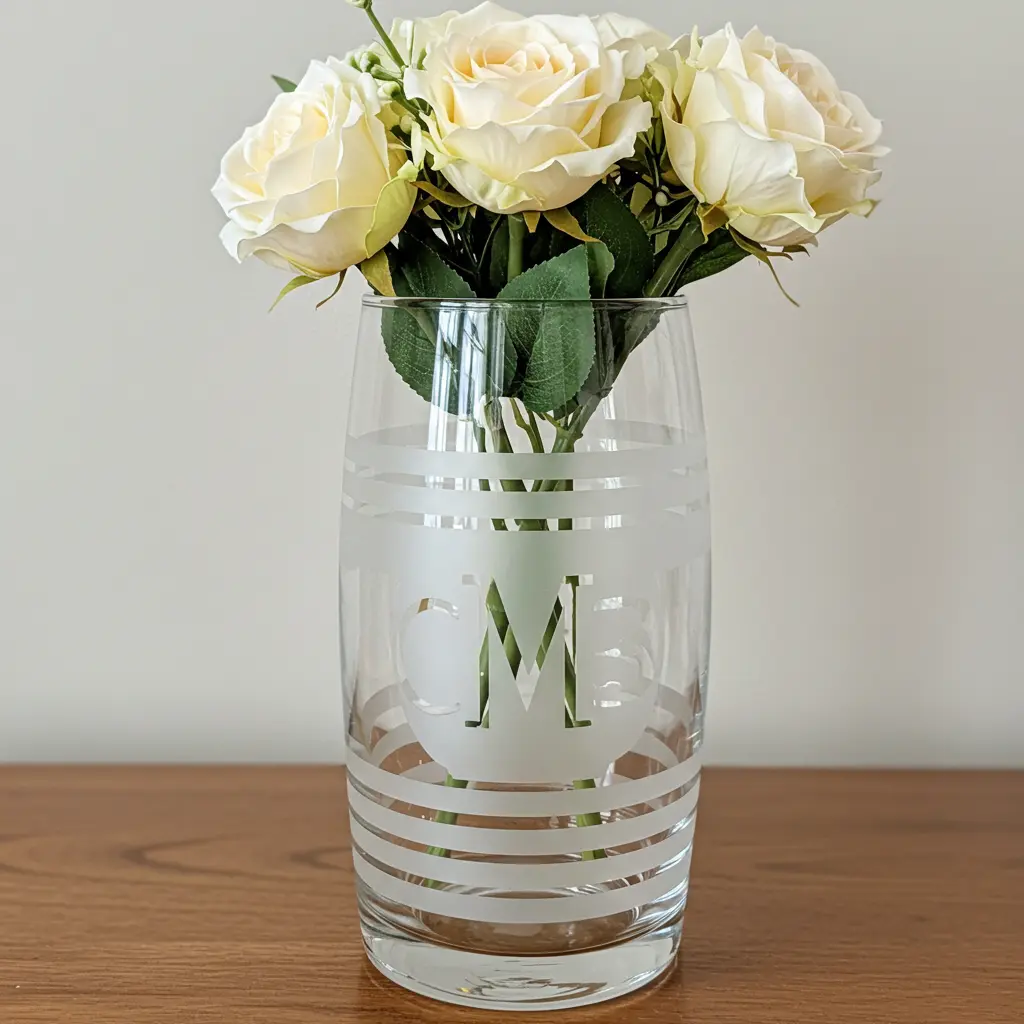
11. The “Etched Elegance” Custom Glass Designs
Create subtle, sophisticated patterns on glass vases with etching cream. Apply stencils (adhesive vinyl works great) to your clean glass vase.
Carefully apply etching cream according to the product instructions. Rinse off to reveal your permanent, frosted design.
It’s a chic, custom look that appears professionally done. This adds a touch of understated, personalized elegance.
The frosted design is subtle but so beautiful.
Your friends will wonder where you bought such a fancy vase. You can create monograms, patterns, or simple stripes.
Always use etching cream in a well-ventilated area and wear gloves.
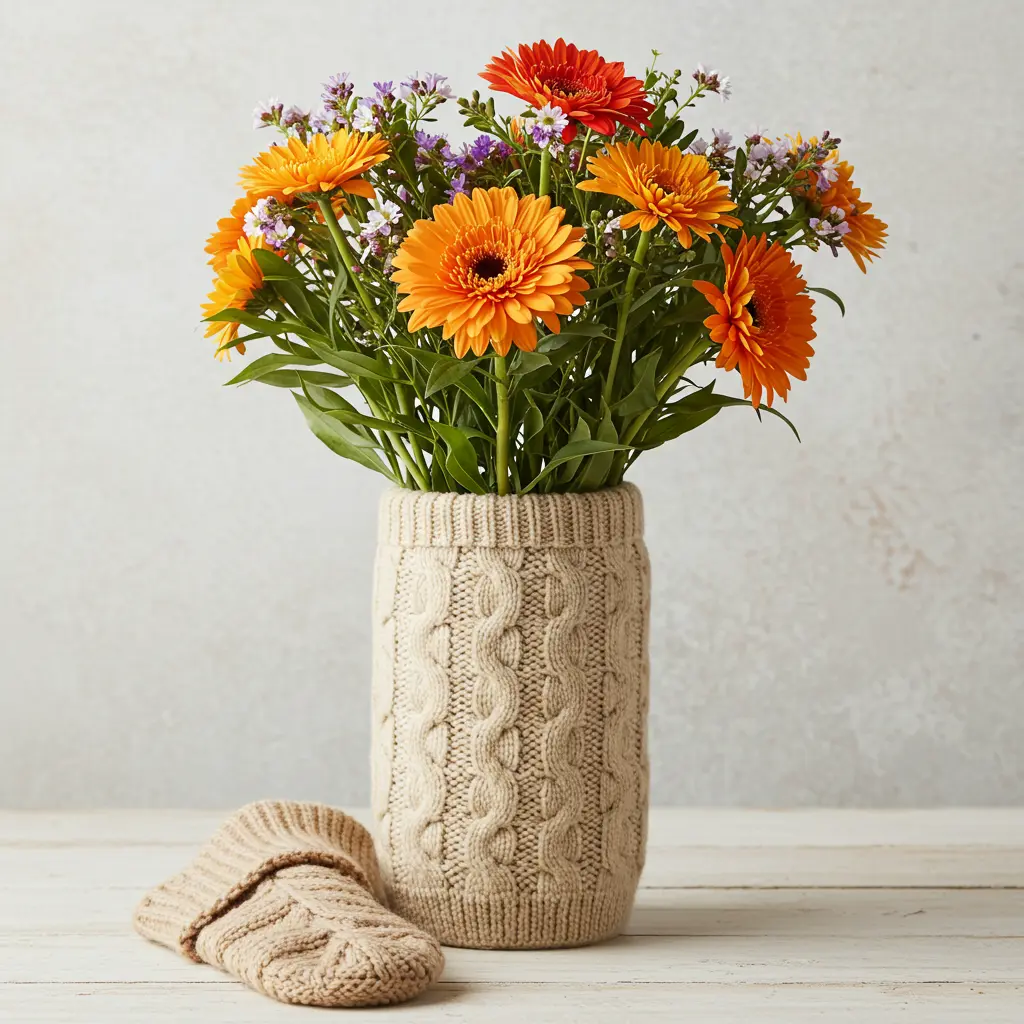
12. The “Fabric Scrap” Soft & Cozy Cover
Use fabric scraps to create a cozy sleeve or cover for your vase. Simply wrap a piece of fabric around and secure with glue, stitches, or a ribbon.
Or, sew a custom “sock” for your vase. Think chunky knits, soft flannel, pretty florals, or bold prints. It’s a great way to add softness, color, and pattern.
This is perfect for using up leftover fabric pieces. It adds a touch of warmth and handmade charm. You can easily change the fabric with the seasons or your mood. A cable-knit sweater sleeve is perfect for fall and winter. This is a super versatile and easy DIY.
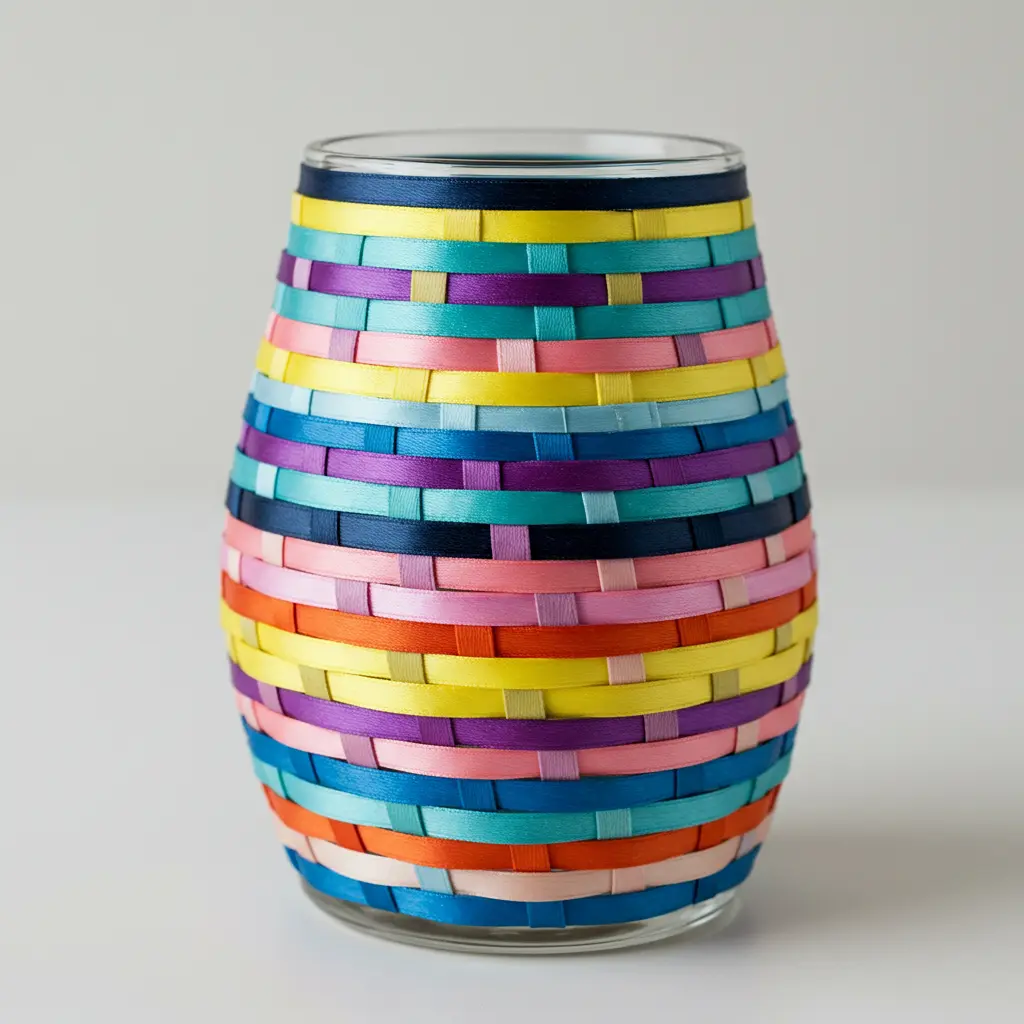
13. The “Ribbon Weave” Colorful & Graphic
Create a woven effect using colorful ribbons. Wrap vertical strips of ribbon around the vase, securing at top and bottom.
Then, weave horizontal strips of ribbon over and under the vertical ones. Use contrasting colors or different textures for more impact.
It’s a playful, graphic way to add pattern and color. This creates a unique, almost basket-like texture. The interwoven colors can be really eye-catching.
Your vase will look like a little work of textile art. Secure ribbon ends neatly with glue. This is a fun project for those who love working with color.
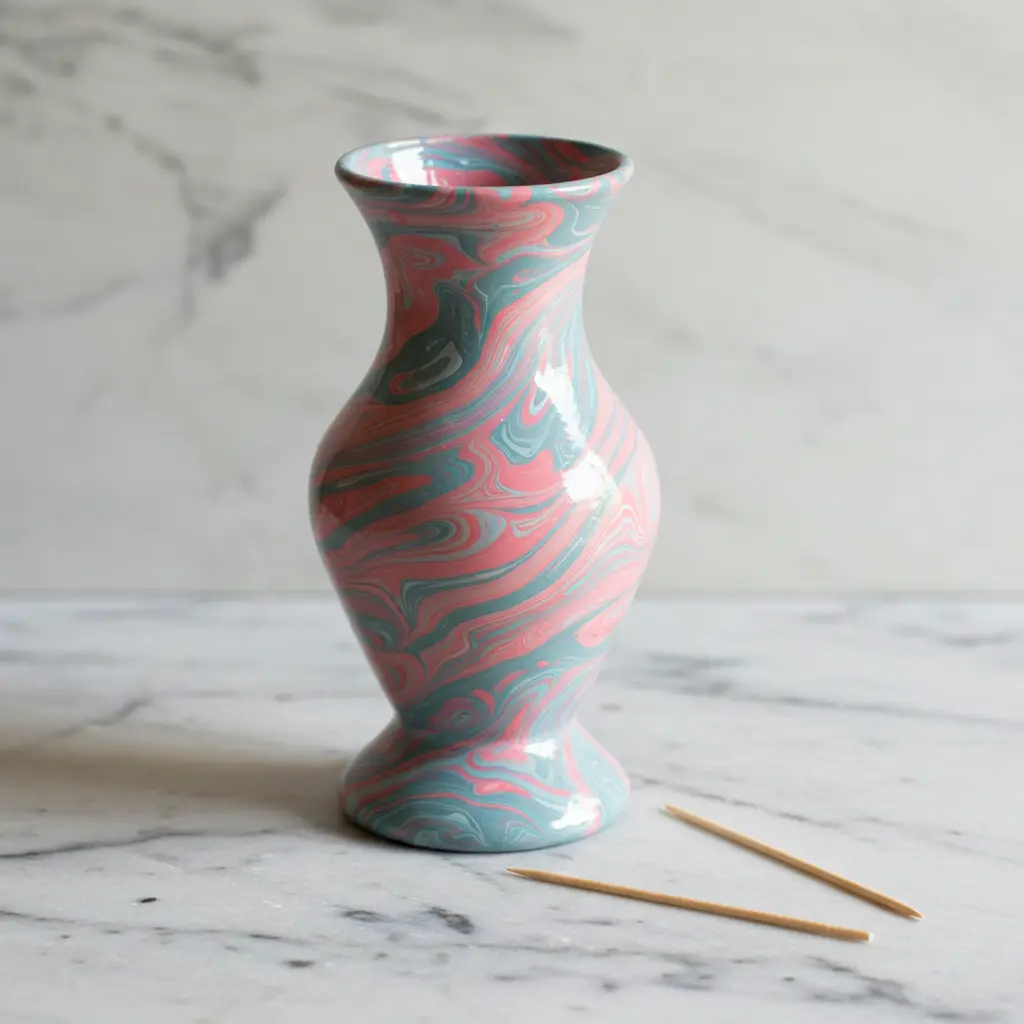
14. The “Marble Effect” Swirls of Sophistication
Achieve a chic marble look using nail polish or marbling paint. Fill a container with water. Drip a few drops of different nail polish colors onto the surface.
Gently swirl the colors with a toothpick. Quickly dip your vase into the water, rolling it to pick up the marbled pattern. Let dry.
It’s a trendy, high-end look that’s surprisingly easy to DIY. This creates unique, organic swirls of color. Each vase will be completely one-of-a-kind.
Your friends will be amazed by this cool technique. Use a disposable container, as it will get messy. Experiment with different color combinations for various effects.
15. The “Photo Transfer” Personalized Memories
Transfer your favorite photos directly onto your vase. Print your photos (laser prints work best) onto special transfer paper or use the Mod Podge photo transfer medium method.
Follow the product instructions to transfer the image to the vase surface. It’s a beautiful way to personalize a vase with cherished memories.
This makes a wonderfully thoughtful gift. The slightly vintage, imperfect look of photo transfers is charming. Your vase becomes a unique, sentimental keepsake.
Black and white photos can look particularly elegant. This is a truly special way to decorate a vase.
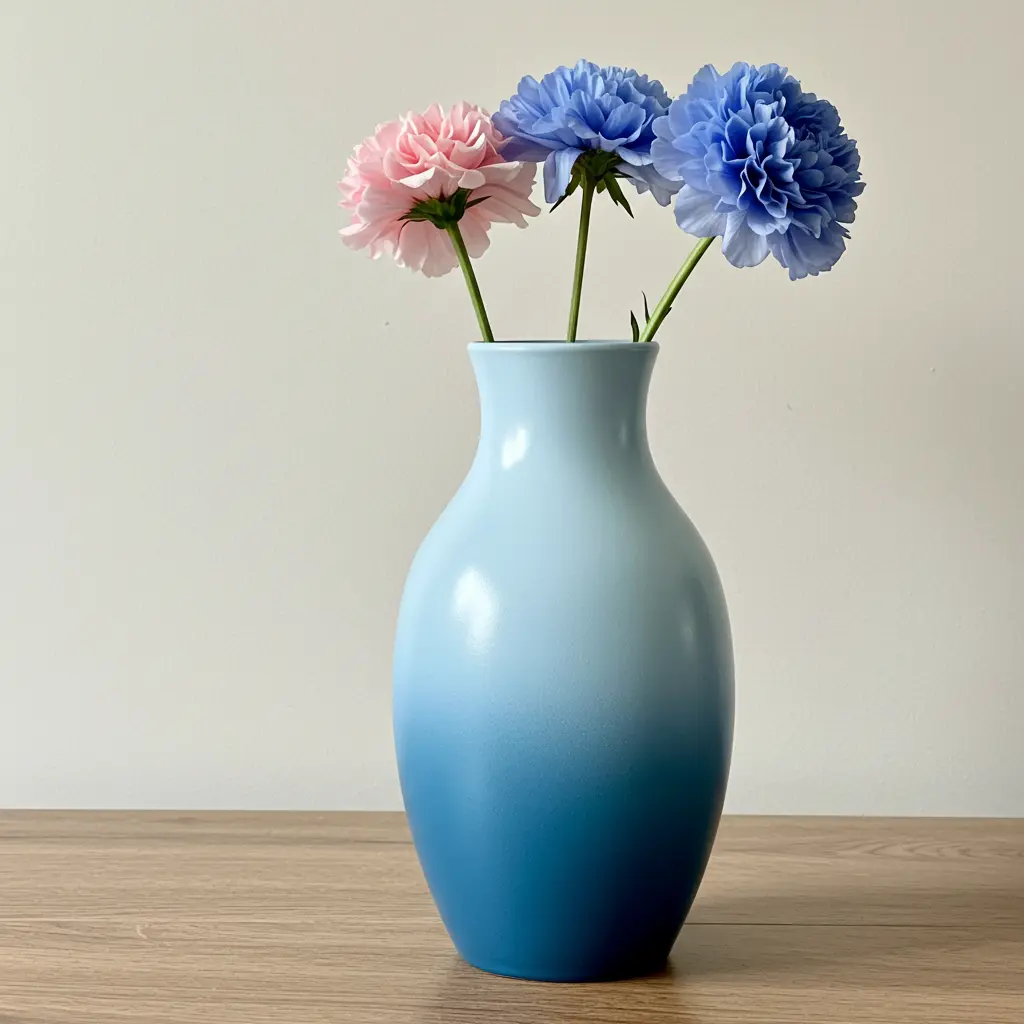
16. The “Ombre Fade” Gradual Color Glam
Create a beautiful gradient effect with spray paint. Choose two or three coordinating colors (e.g., light to dark shades of blue).
Spray the darkest color at the bottom of the vase. Spray the medium color in the middle, slightly overlapping the dark. Spray the lightest color at the top, overlapping the medium. Blend gently.
It’s a sophisticated, modern look that adds depth. This creates a beautiful, seamless transition of color. The subtle fade is incredibly chic and eye-catching.
Your vase will look like a piece of modern art. Practice on a piece of cardboard first to get the technique down.
This requires a bit of spray paint finesse, but the result is stunning.
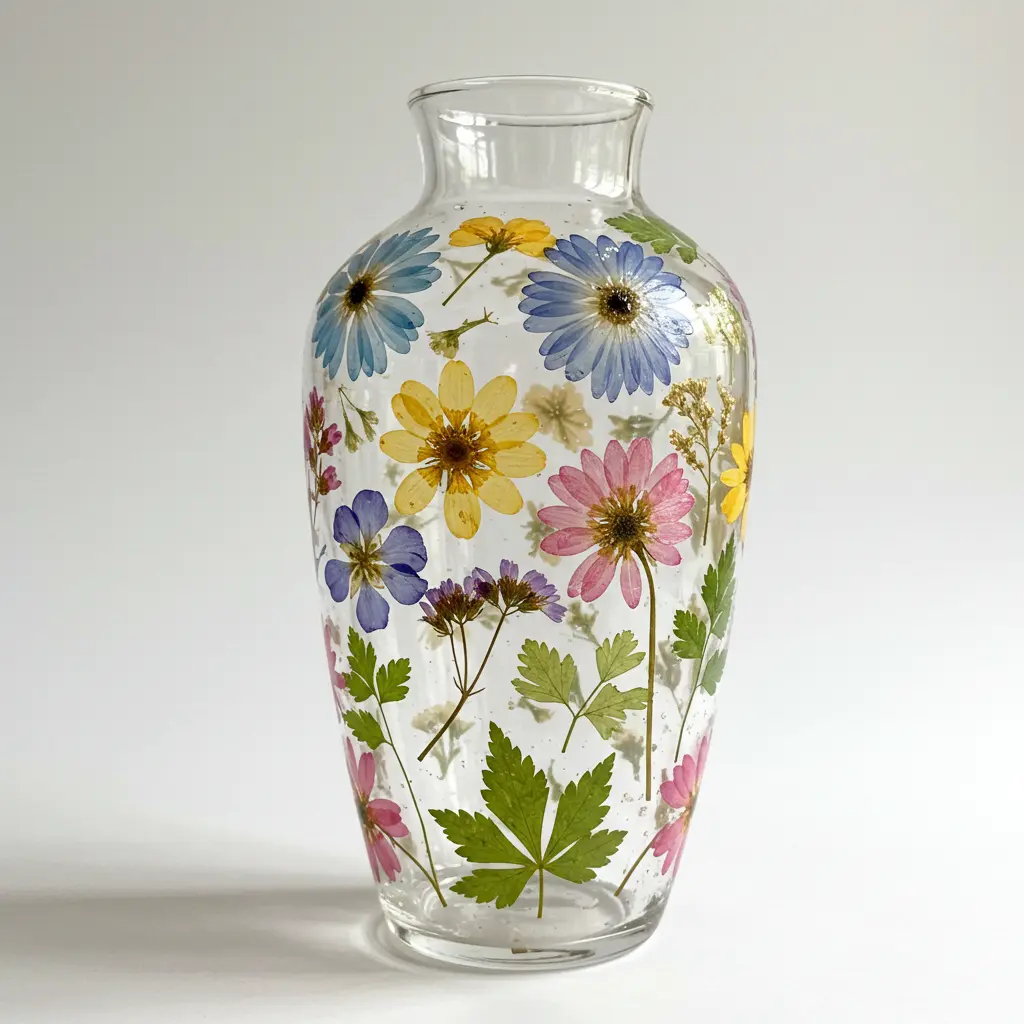
17. The “Nature’s Touch” Pressed Flowers & Leaves
Embed the beauty of nature directly onto your vase. Press fresh flowers and leaves until they are flat and dry.
Carefully arrange them on your vase and seal them with Mod Podge or a clear resin.
It’s delicate, organic, and brings a touch of botanical charm. This is a beautiful way to preserve the beauty of your garden.
The translucent quality of pressed flowers is magical. Your vase will look like a piece from an enchanted forest.
Use tweezers for precise placement of delicate botanicals. This is a truly unique and nature-inspired decoration.
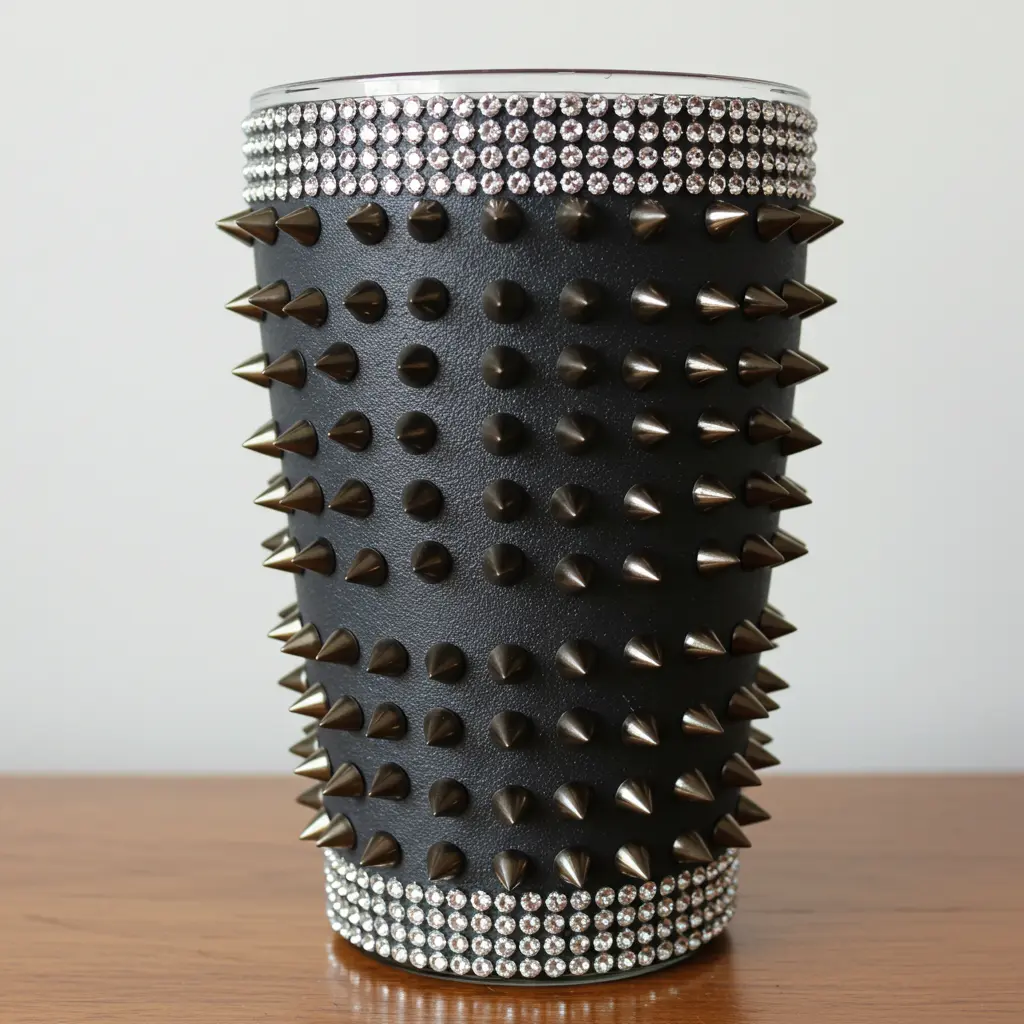
18. The “Studded Style” Edgy & Chic Accents
Add some rocker chic or glam edge with studs or rhinestones. Use craft glue to attach flat-backed metal studs, spikes, or sparkly rhinestones.
Create patterns, borders, or cover the entire vase for maximum impact. It’s a bold, fashionable way to add texture and personality.
This adds an unexpected, edgy touch to a plain vase. The metallic shine or sparkle is instantly eye-catching.
Your vase will have a cool, fashion-forward vibe.
Plan your design before you start gluing. This is perfect for adding a touch of glam rock to your decor.
19. The “Cement Look” Industrial Cool
Give a cheap glass or ceramic vase an industrial-chic makeover. Use textured spray paint designed to mimic concrete or stone.
Or, apply a thin layer of actual cement mix (like Rapid Set Cement All) for an authentic feel. It’s modern, minimalist, and adds a touch of raw texture.
This creates a cool, urban loft vibe. The contrast with delicate flowers can be really striking. Your vase will look like an expensive designer piece.
Ensure the vase is clean and dry before applying. This is a trendy look that’s surprisingly easy to achieve.

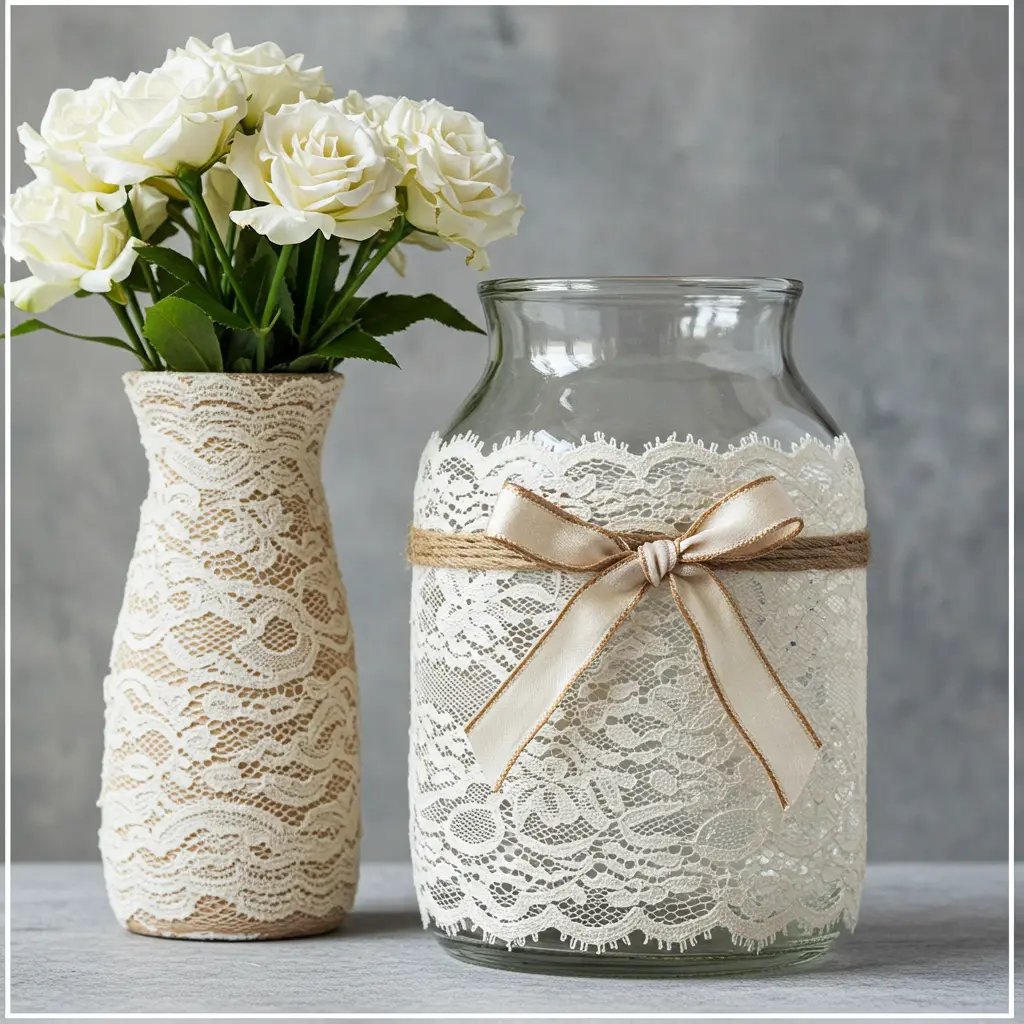
20. The “Vintage Lace” Delicate & Romantic
Add a touch of old-world romance with lace. Wrap a piece of vintage or new lace around your vase. Secure it with a thin layer of fabric glue or a pretty ribbon tied in a bow.
You can also use lace as a stencil with spray paint for a subtle pattern. It’s soft, feminine, and adds a touch of delicate charm.
This is perfect for a shabby chic, vintage, or romantic aesthetic. The intricate patterns of lace are so beautiful. Your vase will have an instant heirloom quality.
Use a contrasting color vase underneath to make the lace pop. This is a simple way to add a touch of timeless elegance.
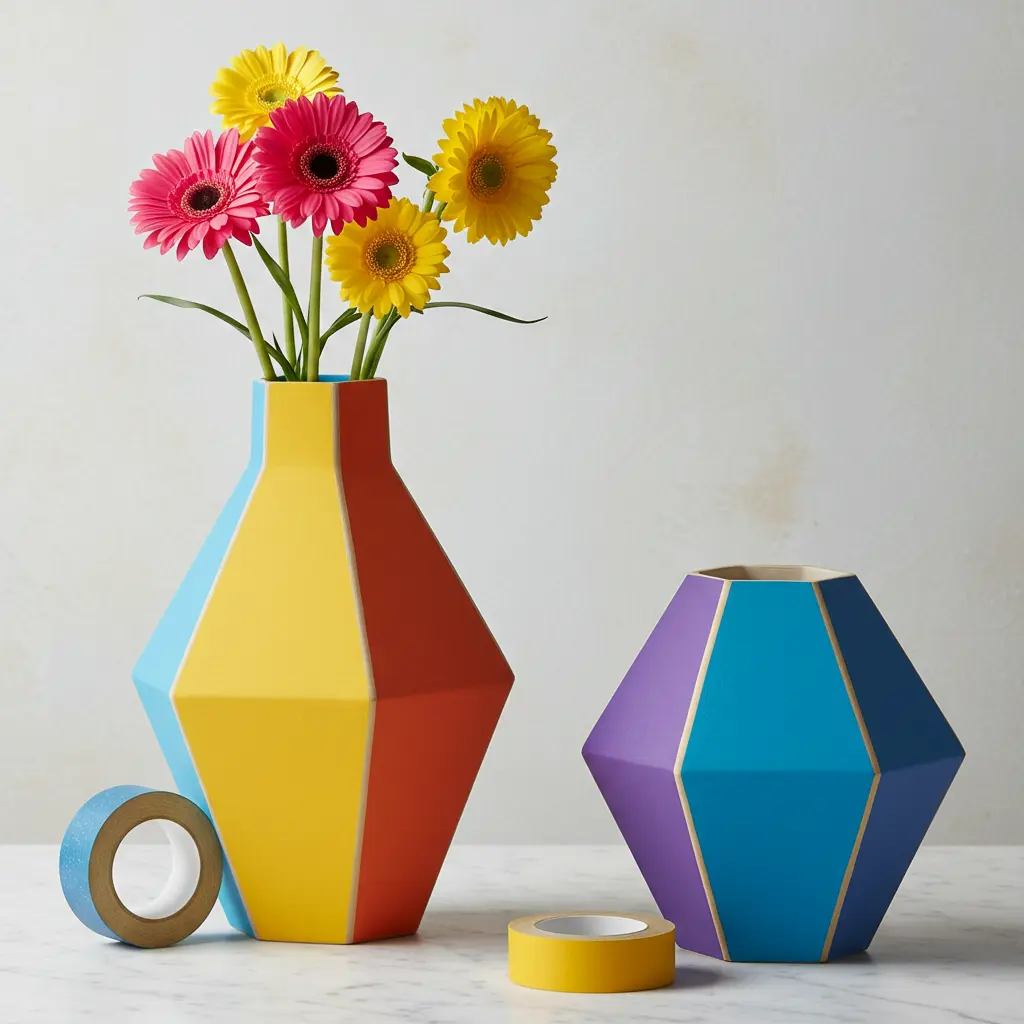
21. The “Color Block Pop” Bold & Graphic
Use painter’s tape to create sharp, geometric color-blocked sections. Paint each section a different, bold color. Peel off the tape while the paint is still slightly tacky for crisp lines.
It’s modern, playful, and makes a strong graphic statement. This is a great way to incorporate multiple accent colors.
The clean lines and bold shapes are very contemporary.
Your vase will be a vibrant, eye-catching piece. Experiment with different angles and shapes for your blocks. This is a fun way to play with color theory.
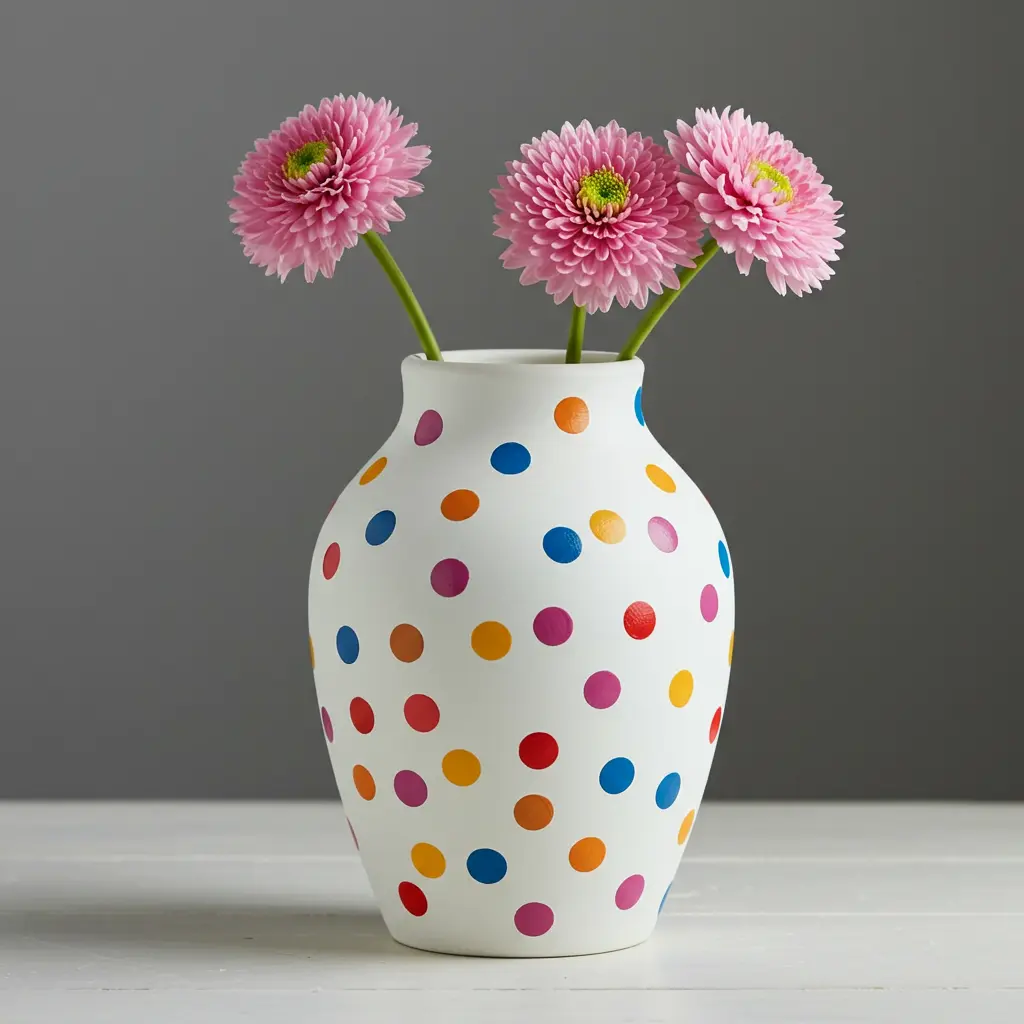
22. The “Confetti Dot” Playful Polka Dots
Create a fun, celebratory vibe with confetti-like dots. Use a round sponge pouncer or the end of a pencil eraser dipped in paint.
Apply dots randomly or in a pattern all over the vase. Use multiple colors for a true confetti feel, or stick to one or two. It’s cheerful, whimsical, and adds a touch of playful energy.
This is perfect for a kids’ room, a party, or just to brighten your day. The scattered dots look like a mini celebration.
Your vase will instantly feel more fun and lighthearted.
Vary the size of the dots for more visual interest. This is an easy and joyful way to decorate.
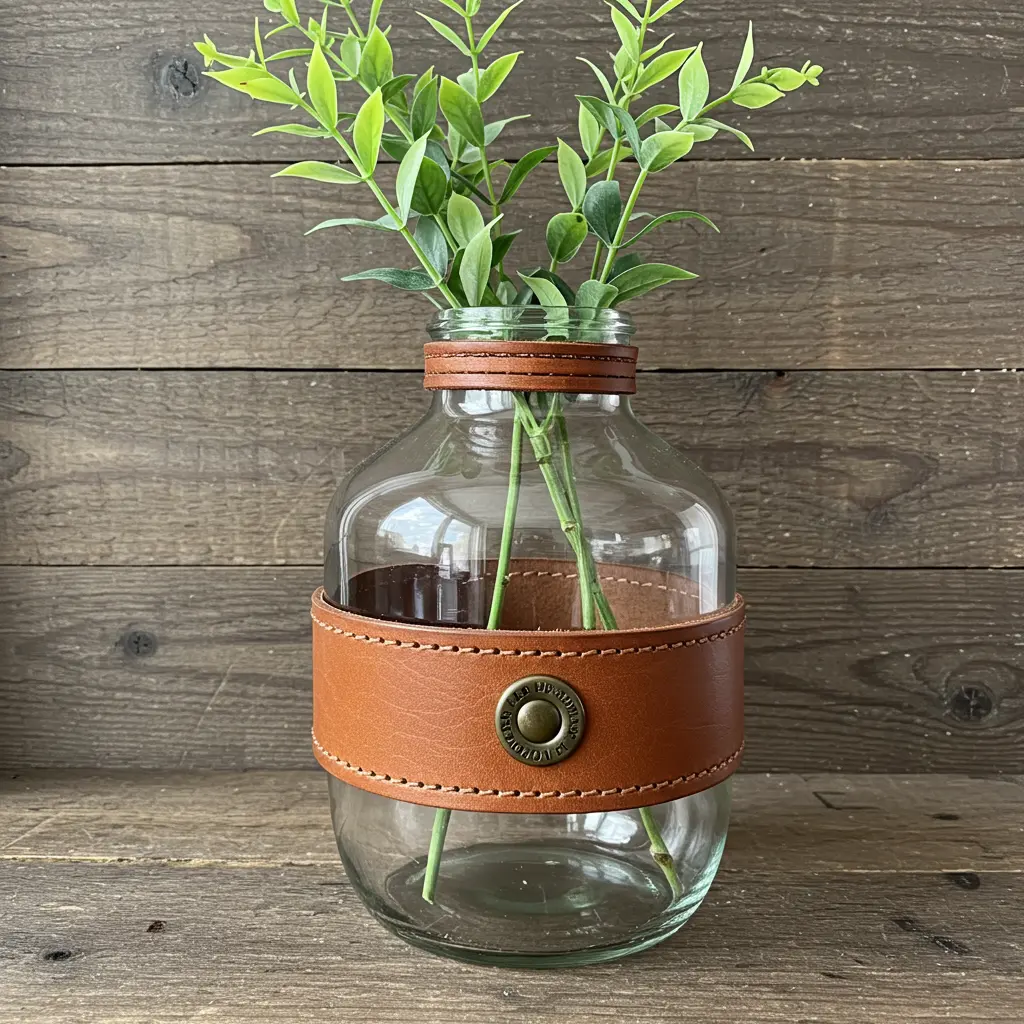
23. The “Leather Cuff” Rustic & Refined Accent
Add a touch of sophisticated, rustic charm with a leather accent. Cut a strip of real or faux leather to fit around the vase. Secure it with leather adhesive, rivets, or by lacing it with cord..
You can stamp or tool the leather for extra detail. It’s a unique way to add texture and a touch of masculine elegance.
This adds a refined, slightly rugged feel.
The warmth and texture of leather are very appealing. Your vase will have a cool, artisanal quality. This is perfect for a modern farmhouse or industrial chic style. A simple leather band can make a big impact.
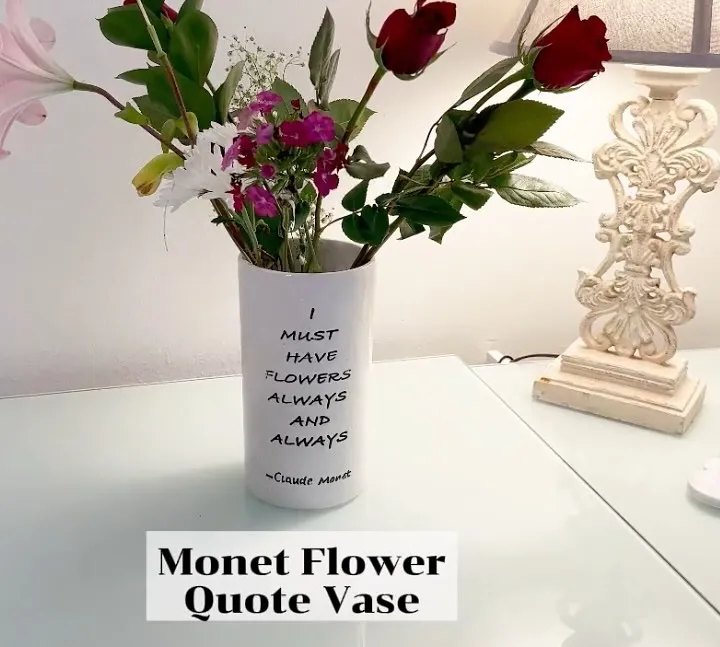
24. The “Message in a Bottle” (or Vase!) Meaningful Words
Use letter stencils, vinyl decals, or a paint pen to add words or quotes. Choose a meaningful phrase, a single powerful word, or even a fun saying.
This personalizes your vase and makes it a true reflection of you. It’s a way to add a literary or inspirational touch.
The words become part of the vase’s design.
Your vase can literally speak to you (and your guests!). Ensure your lettering is neat and well-spaced.
This is a beautiful way to make your vase uniquely yours. What message will your vase share with the world?
Your Vase Transformation Journey Starts NOW!
Okay, seriously, are you buzzing with ideas yet?Your plain vases are practically crying out for a makeover.
From simple paint dips to intricate mosaics, there’s a project here for every skill level and style.
Remember, decorating your vases isn’t just a craft; it’s an act of self-expression. It’s about making your home feel more like YOU.
So, which of these creative ideas will you try first?Don’t let your vases be an afterthought any longer. Unleash your creativity and turn them into the stars they were born to be.
Your room (and your Instagram feed) will thank you. Happy decorating, bestie! You’ve got this!
