Is that half wall in your home the architectural equivalent of a question mark? A relic of a bygone design era, dividing a space for no clear reason, collecting dust and clutter? You’re in the right place to change that.
A half wall shouldn’t just be a divider to nowhere; it should be a stylish and functional asset, a backdrop for daily life, a clever storage solution, and a beautiful feature in its own right.
This is your creative playbook for transforming that awkward wall into a purposeful element that’s not only stunning and useful but feels deeply personal to you.
We’ll explore dreamy designs, decode the secrets of spatial harmony, and walk through the practical steps to bring it all to life.
By the end, you’ll see that the half wall is not an obstacle, but a canvas waiting for its next chapter.
Before You Begin: Reimagining Your Divider
The most beautiful spaces start with a little bit of soul-searching, not a sledgehammer. Before you pick up a single tool, let’s lay the groundwork for a design that solves a problem and adds value to your home. Ask yourself: What does this space need? Storage? Seating? A serving area? A defined entryway? Let the answer guide your design.
The Secrets of Style: Simple Rules for a Stunning Look
Design theory sounds intimidating, but it’s really just about what makes a space feel right. Here are a few simple secrets for half walls:
- Create Cohesion: The half-wall makeover should feel connected to the rest of the room. Use materials, colors, or design elements that are already present in the space to create a seamless, integrated look.
- Define, Don’t Just Divide: A successful half wall creates distinct “zones” (like separating a living area from a dining nook) without creating a hard visual barrier. It should guide the eye and the flow of traffic, not stop it.
- Mind the Proportions: The scale of your makeover is crucial. A massive, bulky addition on top of a small half wall can feel top-heavy and out of place. Ensure the final design feels balanced within the room.
- Light is Your Ally: The primary benefit of a half wall over a full wall is that it allows light to pass through. Choose designs that enhance this, like open shelving or glass panels, rather than something that blocks the light and defeats the purpose.
What’s the Real Cost? A No-Fuss Budget Breakdown
| The Approach | Estimated Cost | What Your Money Buys | The Little Extras (Don’t Skip These!) |
| The Weekend Refresh | $50 – $300 | • A great can of paint or peel-and-stick wallpaper • A simple stained wood cap | • High-quality painter’s tape • Good brushes & rollers • Sandpaper & wood conditioner |
| The Polished Upgrade | $300 – $1,500 | • A quality butcher block or stone countertop • Materials like slat wood or shiplap • Custom-built shelving | • A quality saw & level • Construction adhesive • A stud finder & good screws |
| The Custom Transformation | $1,500 – $8,000+ | • Custom cabinetry or banquette seating • Columns or glass panel installation • An electric fireplace insert & finishing | • Potential design fees • Demolition & disposal • Electrical or drywall work |
The Design Menu: Finding Your Signature Style
Here are the ingredients for your perfect half wall. Each one comes with a breakdown to help you choose with confidence.
Functional Add-Ons: Topping It Off with Purpose
1. The Casual Breakfast Bar
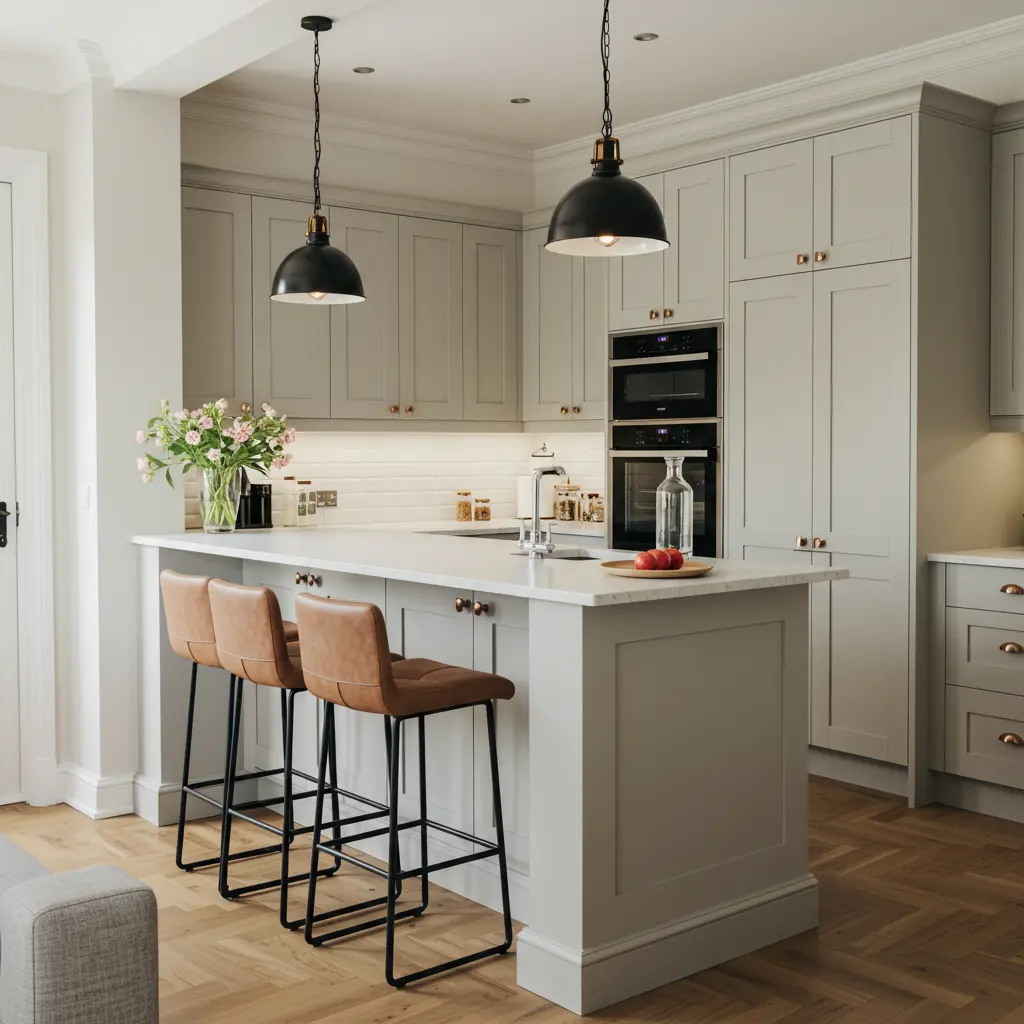
Best For: Creating informal seating and connecting a kitchen to a living or dining area.
- Key Consideration: The countertop must have a sufficient overhang (at least 10-12 inches) to allow for comfortable knee space.
- Pro-Tip: Choose barstools that can tuck completely underneath the overhang. This keeps the walkway clear when the bar isn’t in use.
- Styling Cue: Install two stylish pendant lights above the bar to define the zone and provide beautiful task lighting.
2. The Smart Coffee Bar
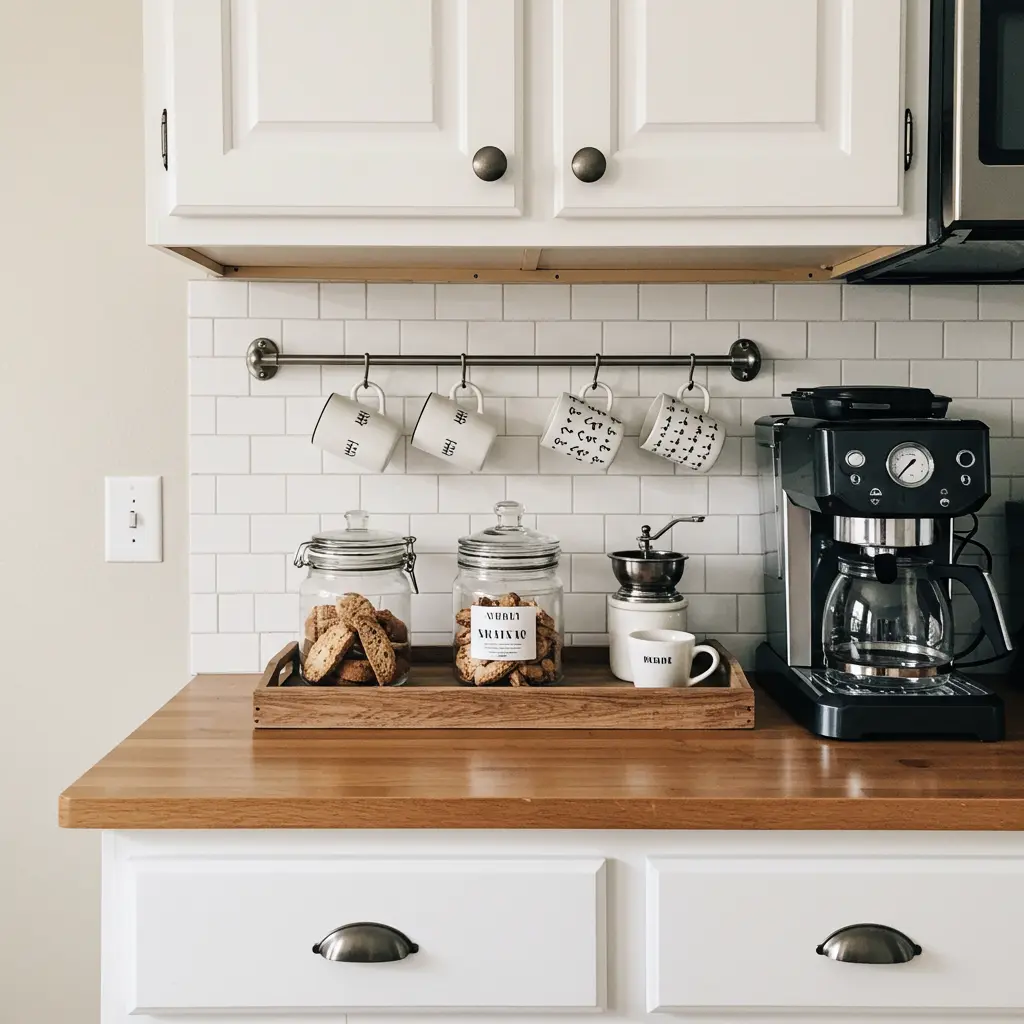
Best For: Freeing up kitchen counter space and creating a dedicated morning ritual station.
- Key Consideration: You’ll need a nearby electrical outlet to power a coffee maker and grinder.
- Pro-Tip: Install a short, wall-mounted rail with hooks underneath the countertop overhang to hang your favorite mugs.
- Styling Cue: Style it with a tray to corral your coffee essentials, a jar of biscotti, and a small plant.
3. The Open-Concept Bookcase
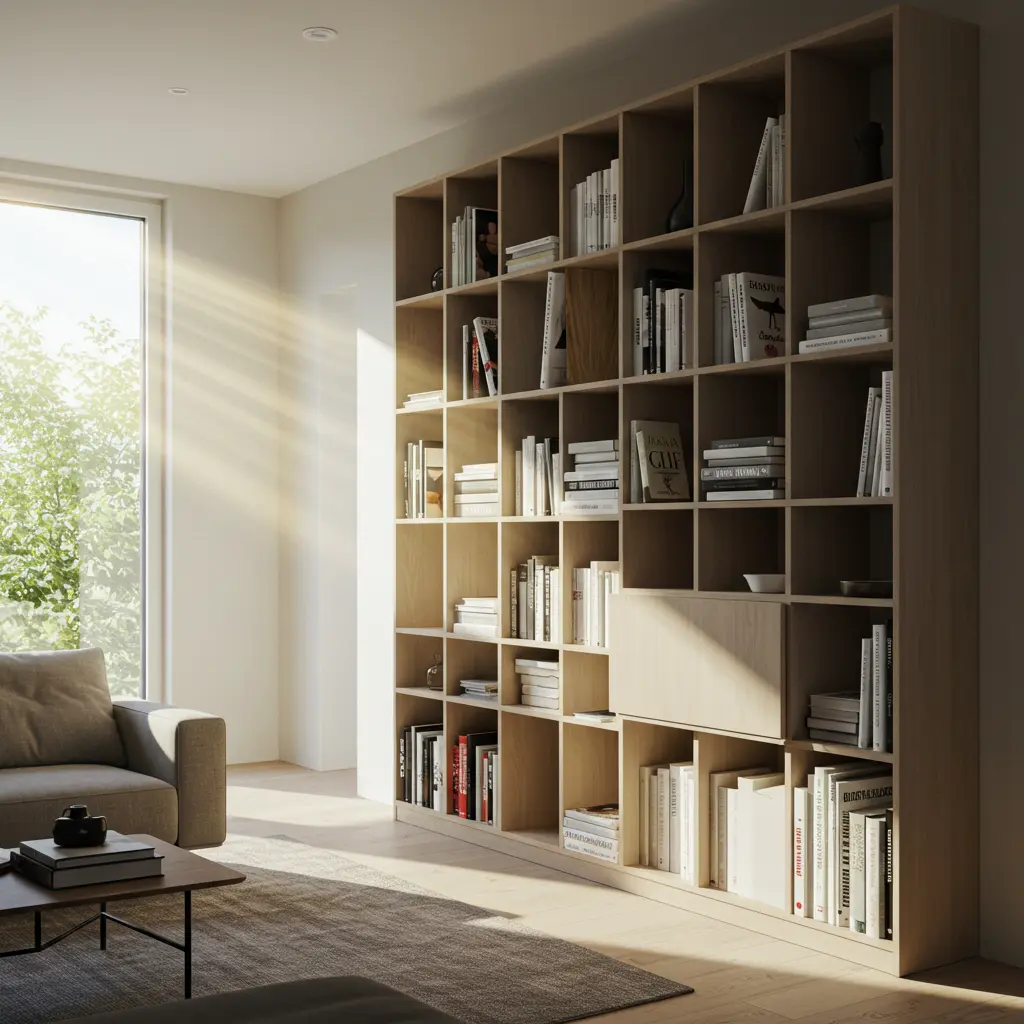
Best For: Adding valuable storage and display space while maintaining an open feel.
- Key Consideration: Decide if you want the bookcase to be accessible from one side or both. A backless, double-sided bookcase visually connects the two spaces.
- Pro-Tip: Build the bookcase on top of the half wall, extending the uprights down the sides of the wall. This makes it look like a single, seamless, custom-built-in piece.
- Styling Cue: Don’t just fill it with books. Mix in decorative objects, photos, and small plants, leaving some “breathing room” on the shelves.
4. The Lush Plant Ledge
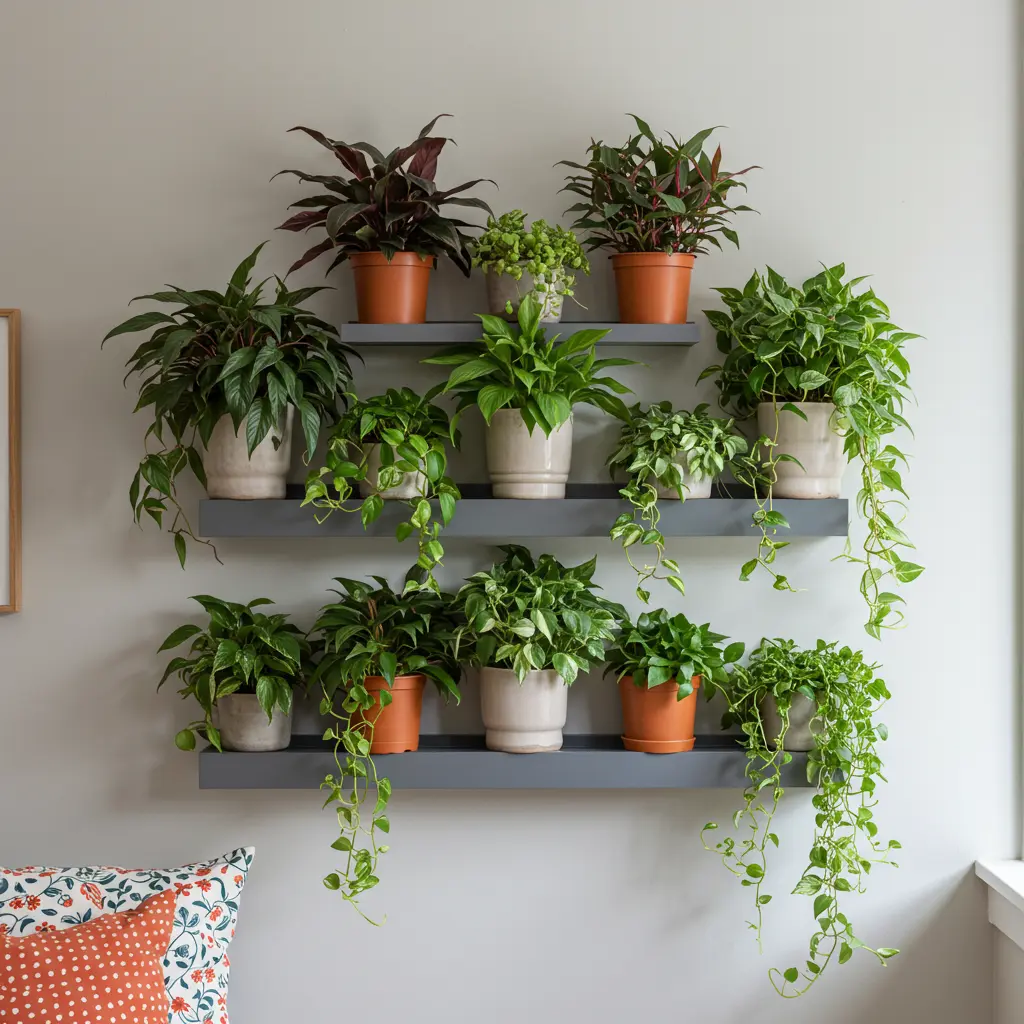
Best For: Bringing life, color, and an organic element into your home, especially for plant lovers.
- Key Consideration: Ensure the location gets enough natural light for the plants you choose.
- Pro-Tip: Top the half wall with a waterproof material or use decorative trays under your pots to protect the wall from water damage during watering.
- Styling Cue: Choose a variety of plants with different heights and trailing habits to create a dynamic, layered look.
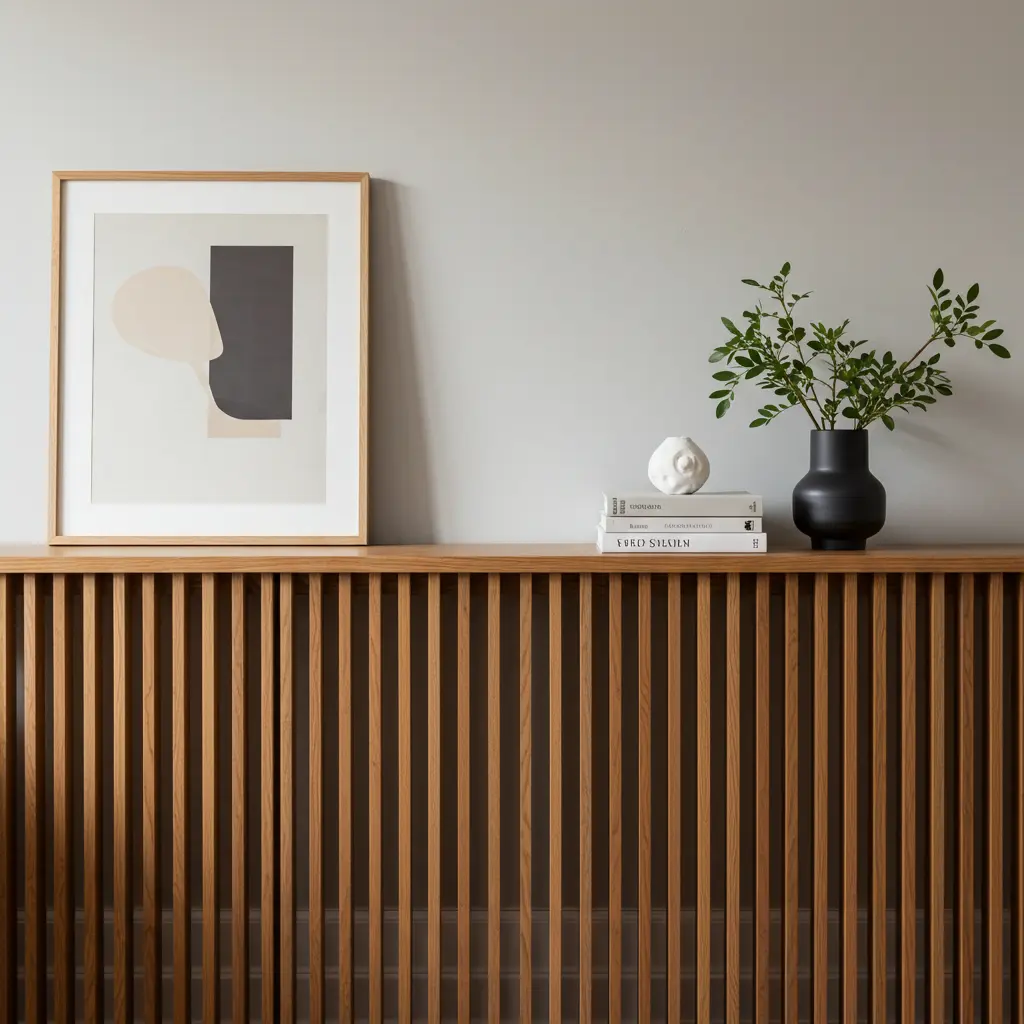
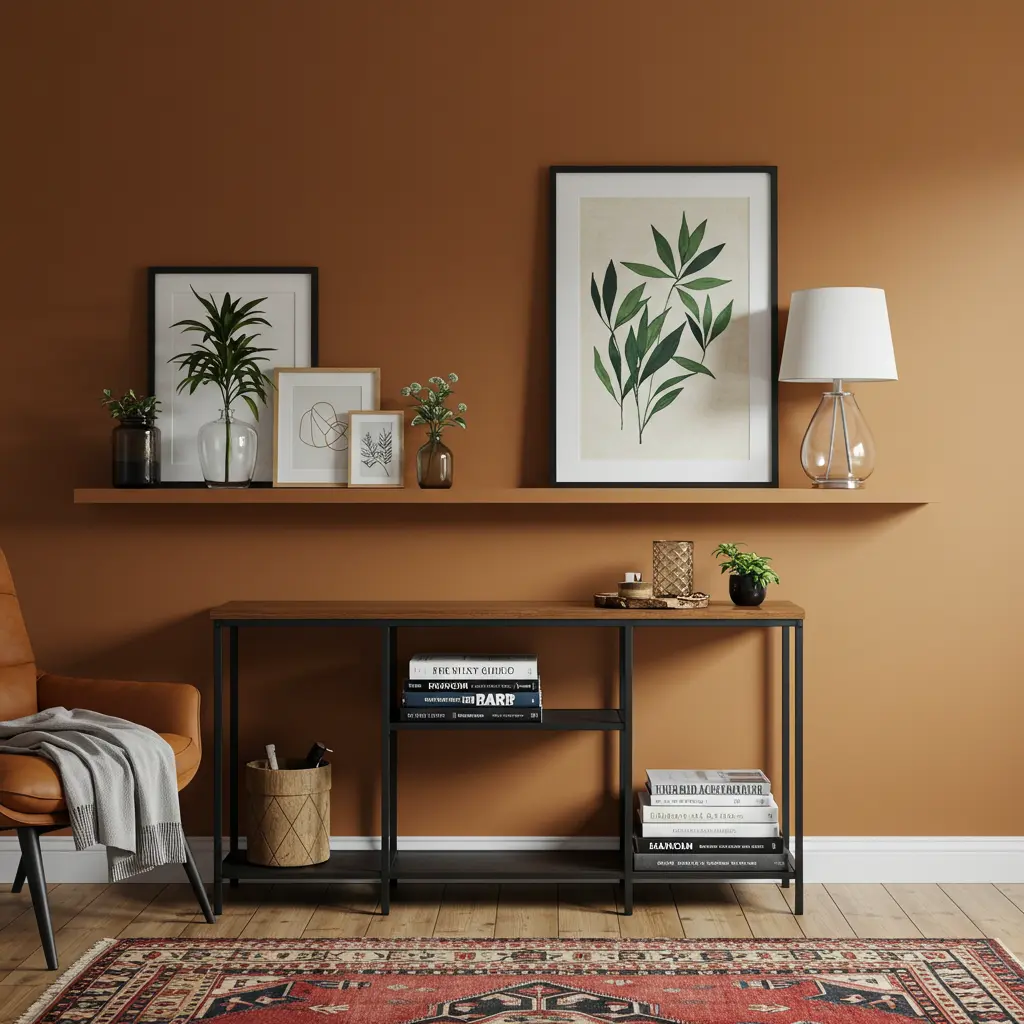
5. The Elegant Display Shelf
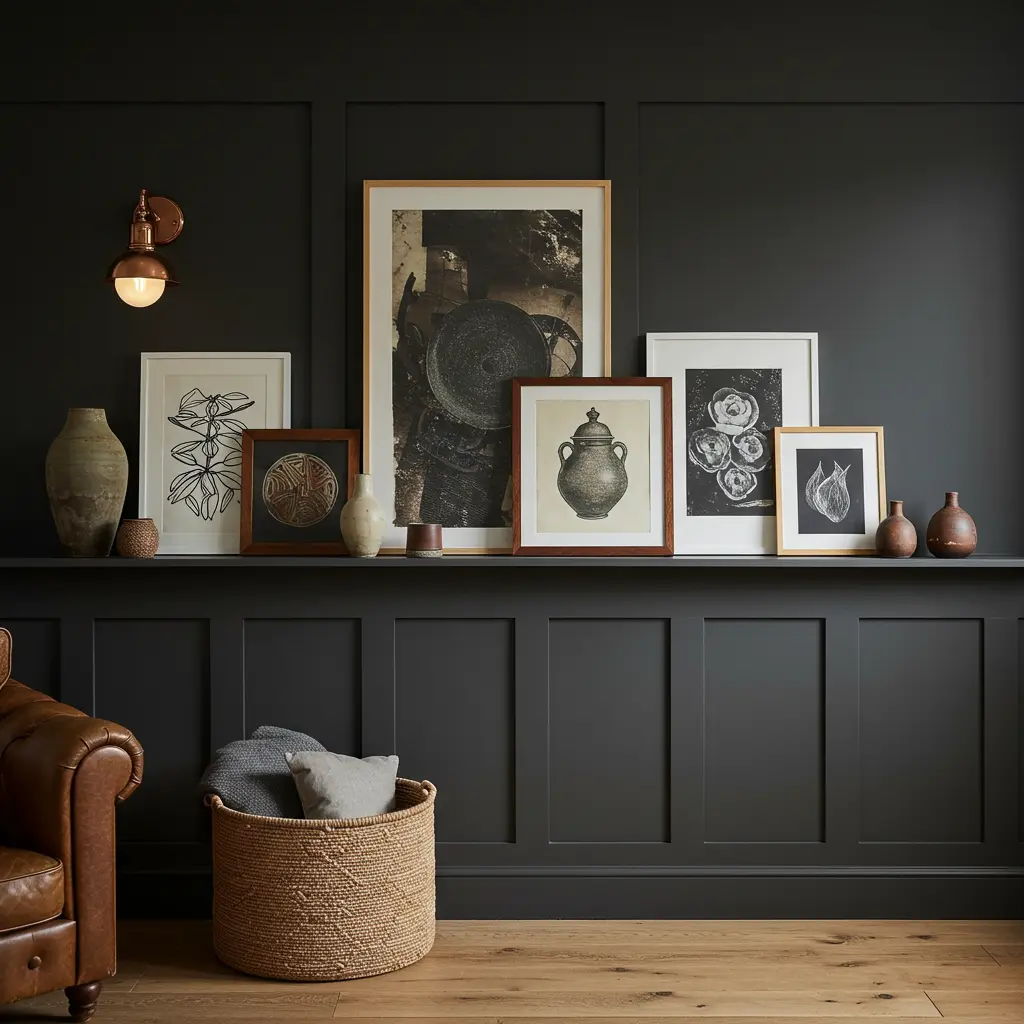
Best For: Showcasing a curated collection of art, pottery, or treasured objects without taking up floor space.
- Key Consideration: The width of the top “cap” will determine what you can display. A wider cap (10-12 inches) is much more versatile than a standard 4-6-inch one.
- Pro-Tip: Paint the half wall a dark, moody color. This will make the objects you place on top pop and feel like they’re in a high-end gallery.
- Styling Cue: Style using the “rule of threes” and vary the heights of your objects for a balanced, visually pleasing composition.
6. The Entryway Drop Zone
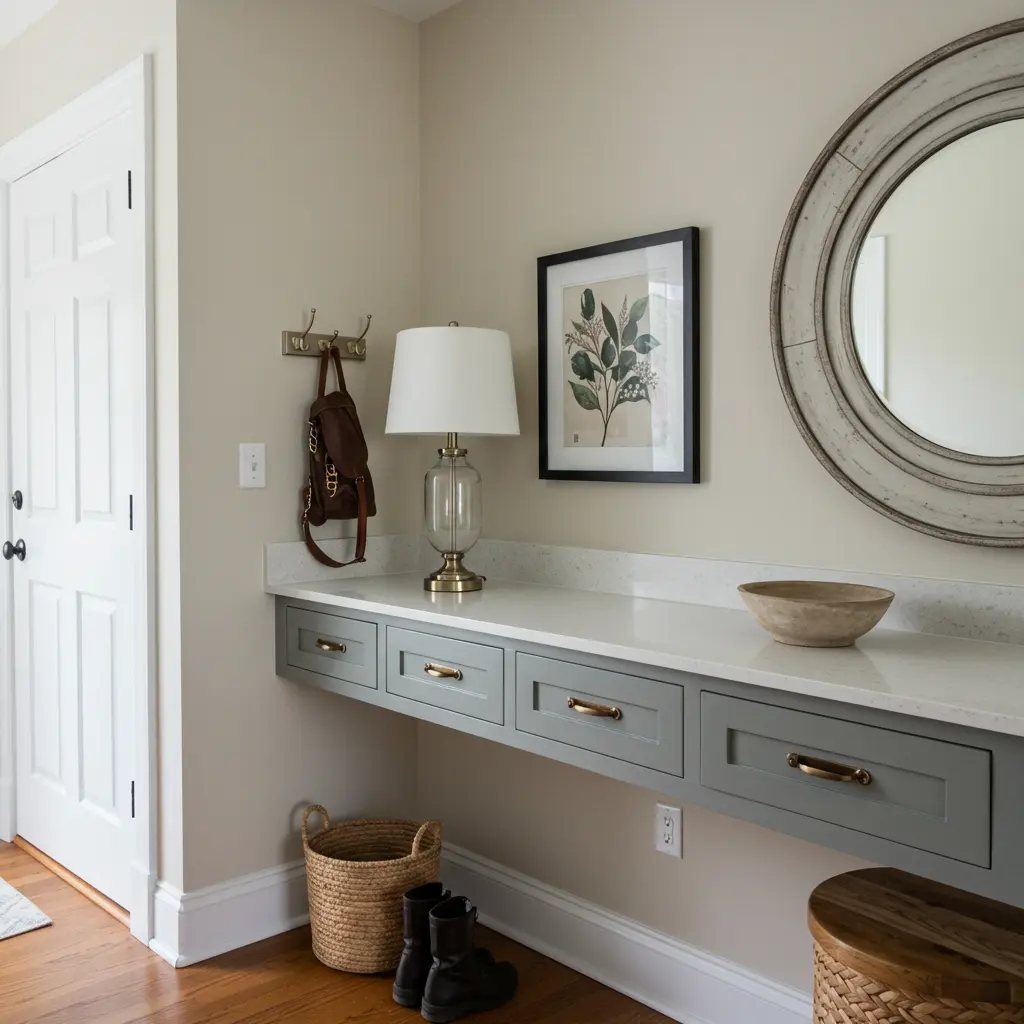
Best For: Half walls located near the front door to create a functional and organized entryway.
- Key Consideration: This area will see a lot of wear and tear. Choose a durable top surface like quartz or a sealed hardwood.
- Pro-Tip: Add functionality by installing a few stylish hooks on the side of the half wall for keys, dog leashes, or light bags.
- Styling Cue: Place a beautiful bowl for keys and mail, a small lamp for a welcoming glow, and a mirror on the adjacent wall.
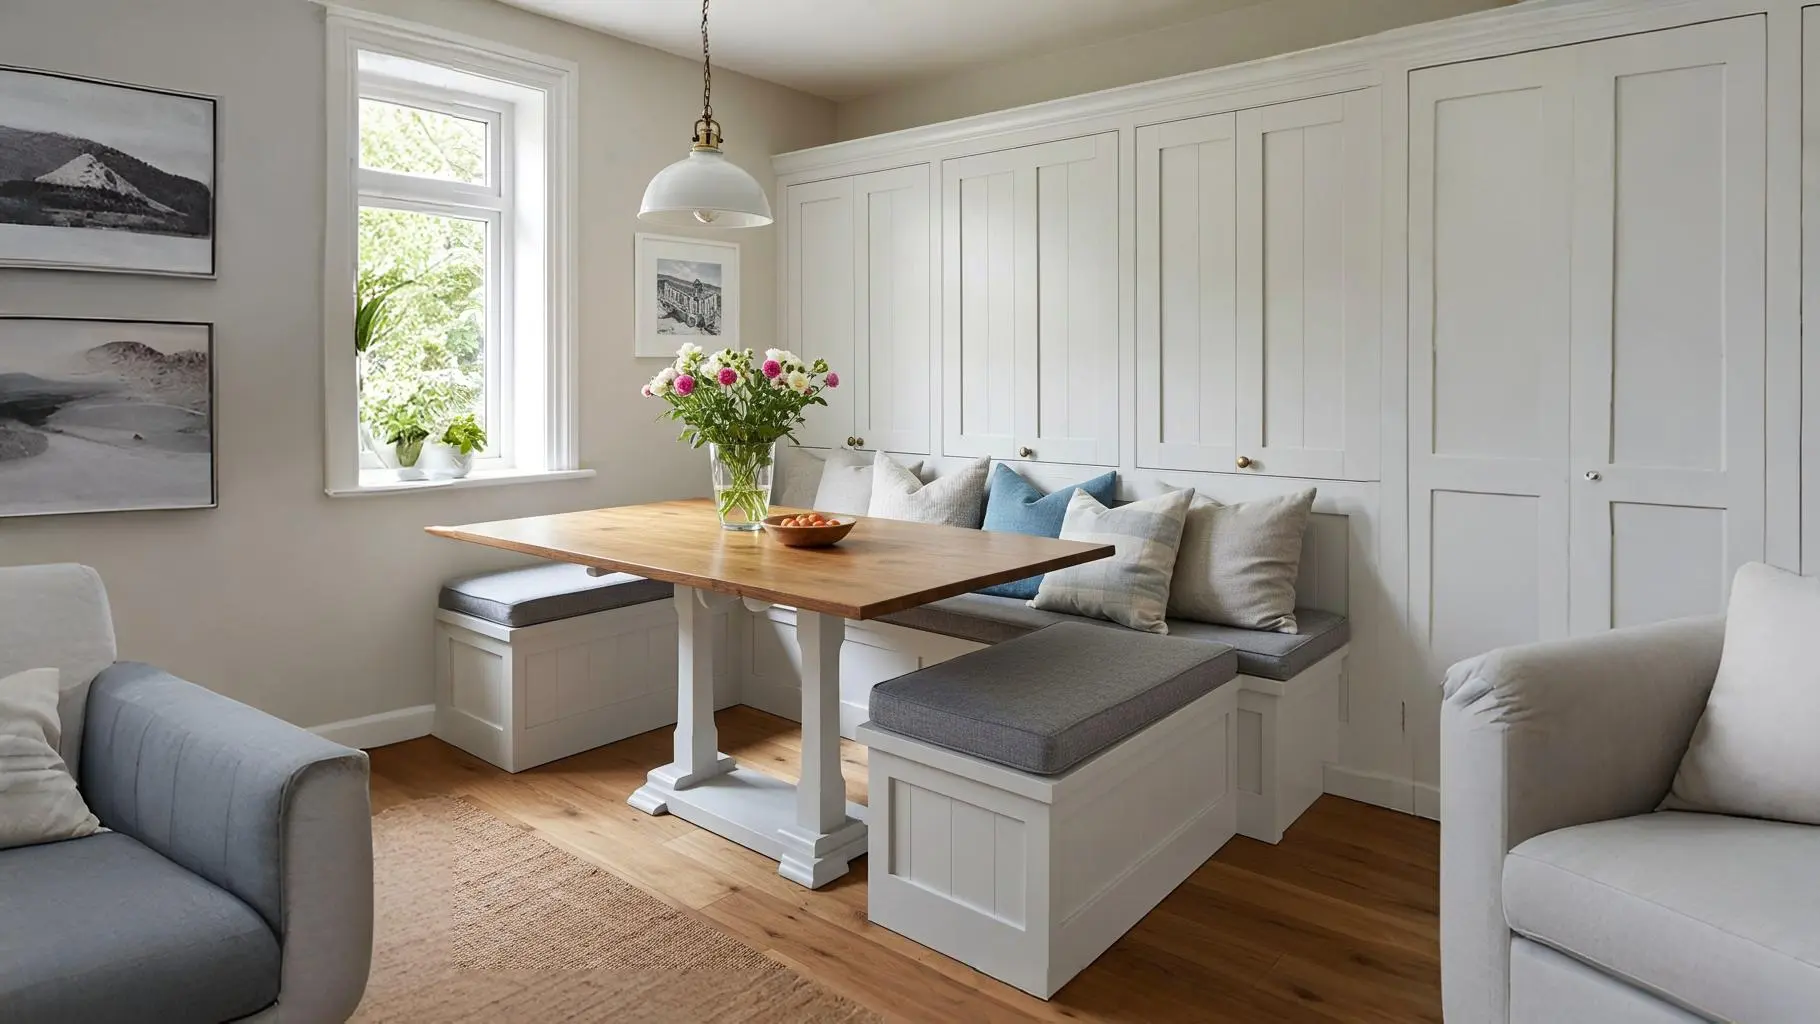
7. The Built-in Banquette
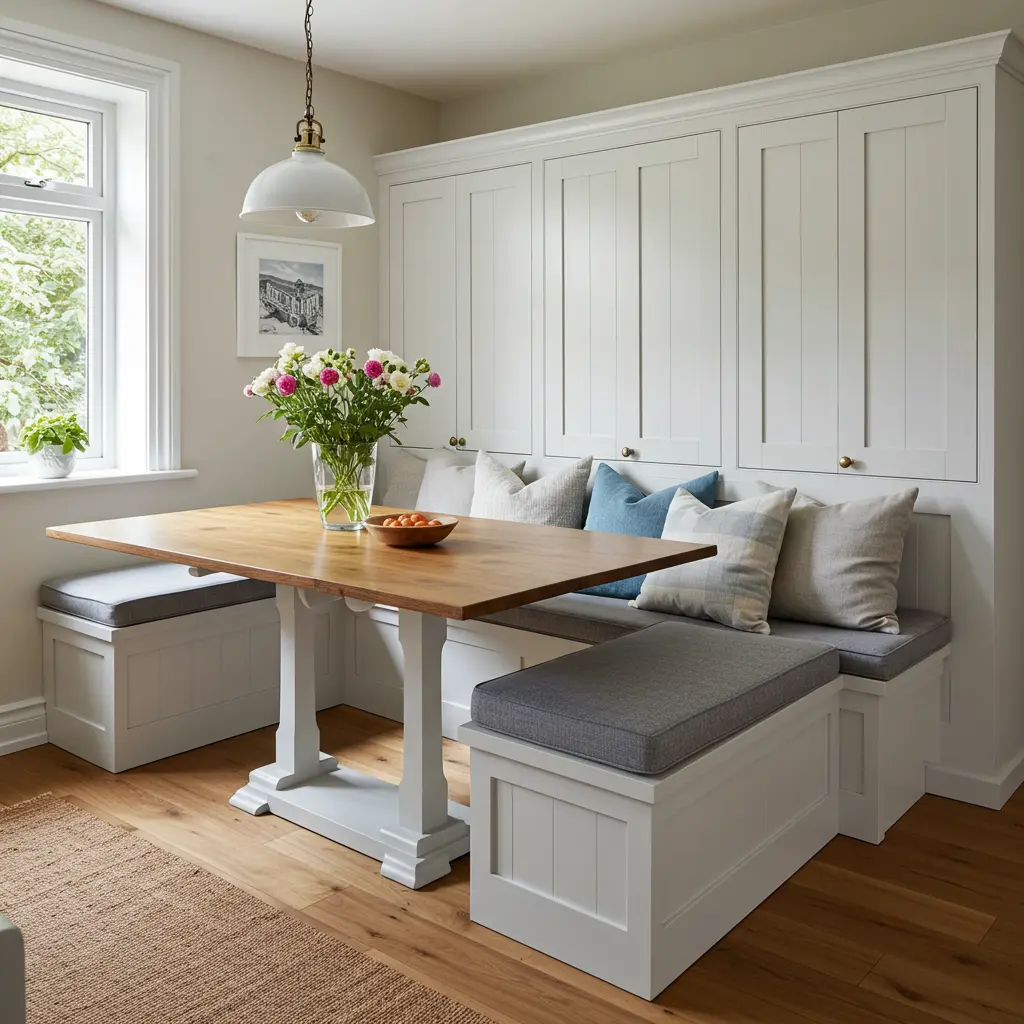
Best For: Creating a cozy, space-saving dining nook in an open-concept kitchen/dining area.
- Key Consideration: This is a more involved custom build. Standard seat height is 18 inches, and seat depth is 18-20 inches.
- Pro-Tip: Design the banquette with a hinged lid on top for hidden storage—the perfect place to stash seasonal linens or less-used kitchen gadgets.
- Styling Cue: Add a comfortable custom cushion and a collection of pillows that tie in with the colors of the adjoining room.
Surface Transformations: A Facelift for Your Wall
8. The Sleek Slat Wood Panel
Best For: Adding warm, organic texture and a modern, Japandi-inspired feel.
- Key Consideration: The wood tone sets the mood. Light oak is airy and Scandinavian; walnut is rich and Mid-Century.
- Pro-Tip: For a high-end look, run the slats vertically and wrap them continuously around the top and down both sides of the half wall.
- Styling Cue: Let the beautiful slats be the art. Top it with a simple, low-profile decorative object or leave it completely bare.
9. The Charming Shiplap Finish
Best For: A coastal, modern farmhouse, or transitional look that adds subtle texture.
- Key Consideration: For a more modern take, run the shiplap planks vertically instead of horizontally.
- Pro-Tip: Use a high-quality wood cap on top (like a 1×6 piece of stained oak or pine) to give the shiplap a clean, finished edge.
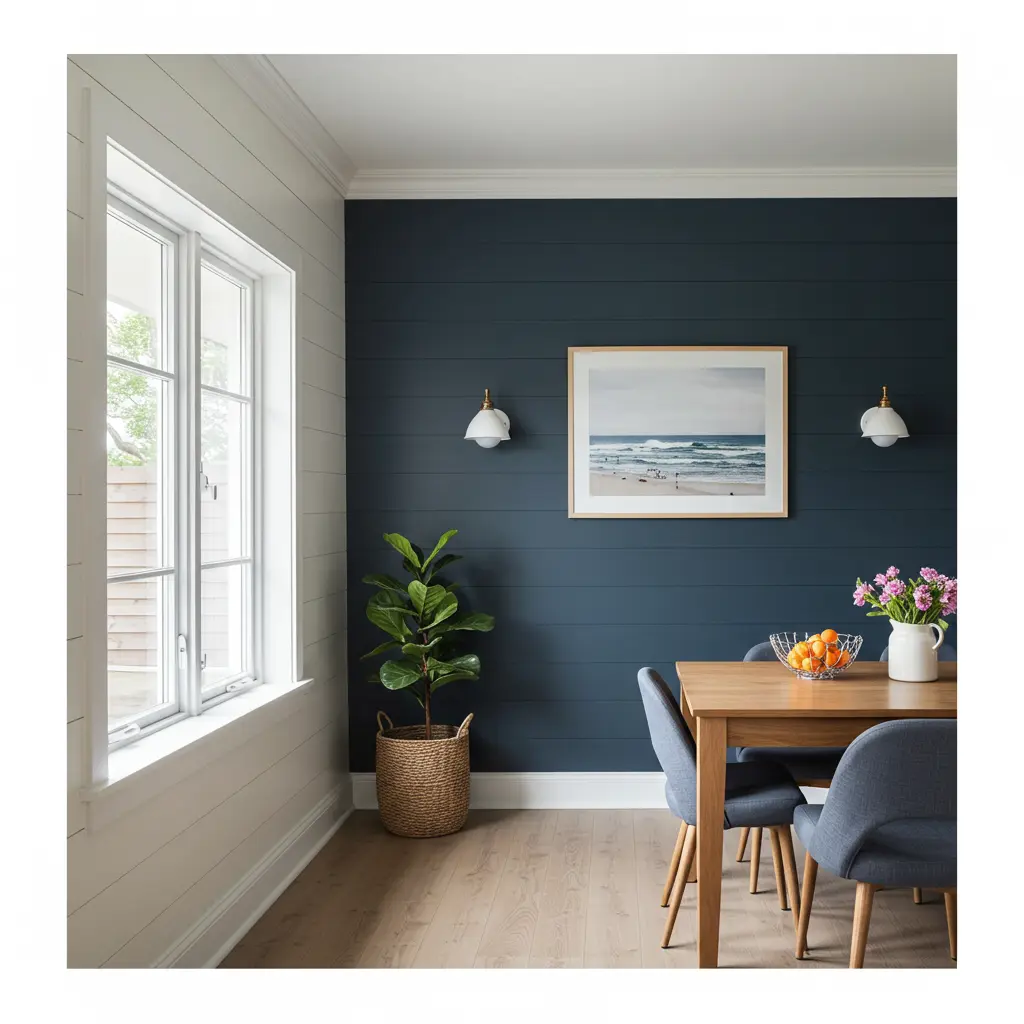
- Styling Cue: Paint the shiplap a moody charcoal or deep navy blue to create a dramatic, sophisticated focal point.
10. The Bold Accent Color
Best For: The most budget-friendly, high-impact makeover you can do in a single afternoon.
- Key Consideration: Choose a color that connects to other accents in the room (like throw pillows, art, or a rug) to make it feel intentional.
- Pro-Tip: Use a satin or semi-gloss finish on the top ledge. It’s more durable and easier to wipe clean than a flat finish.
- Styling Cue: Treat the half wall like a piece of furniture. A bold color will make it feel like a purposeful console rather than a random wall.
11. The Personality-Packed Wallpaper

Best For: Making a dramatic statement and infusing the space with pattern and personality.
- Key Consideration: In a high-traffic area, choose a durable, wipeable wallpaper.
- Pro-Tip: Use high-quality peel-and-stick wallpaper. It’s DIY-friendly and perfect for renters or those who like to change their minds.
- Styling Cue: Pick a wallpaper with a touch of metallic and pair it with a brass lamp or decorative object on top to make it feel extra luxe.
12. The Rugged Faux Brick/Stone
Best For: Adding industrial loft or rustic lodge character to a plain room.
- Key Consideration: Faux panels are lightweight and DIY-friendly, but the quality varies. Get samples to ensure a realistic look.
- Pro-Tip: After installing, use a German schmear technique (applying wet mortar or plaster over the faux brick and wiping some off) for a more authentic, aged look.
- Styling Cue: Top it with a thick, rustic reclaimed wood beam to complete the industrial or farmhouse vibe.
13. The Understated Tile
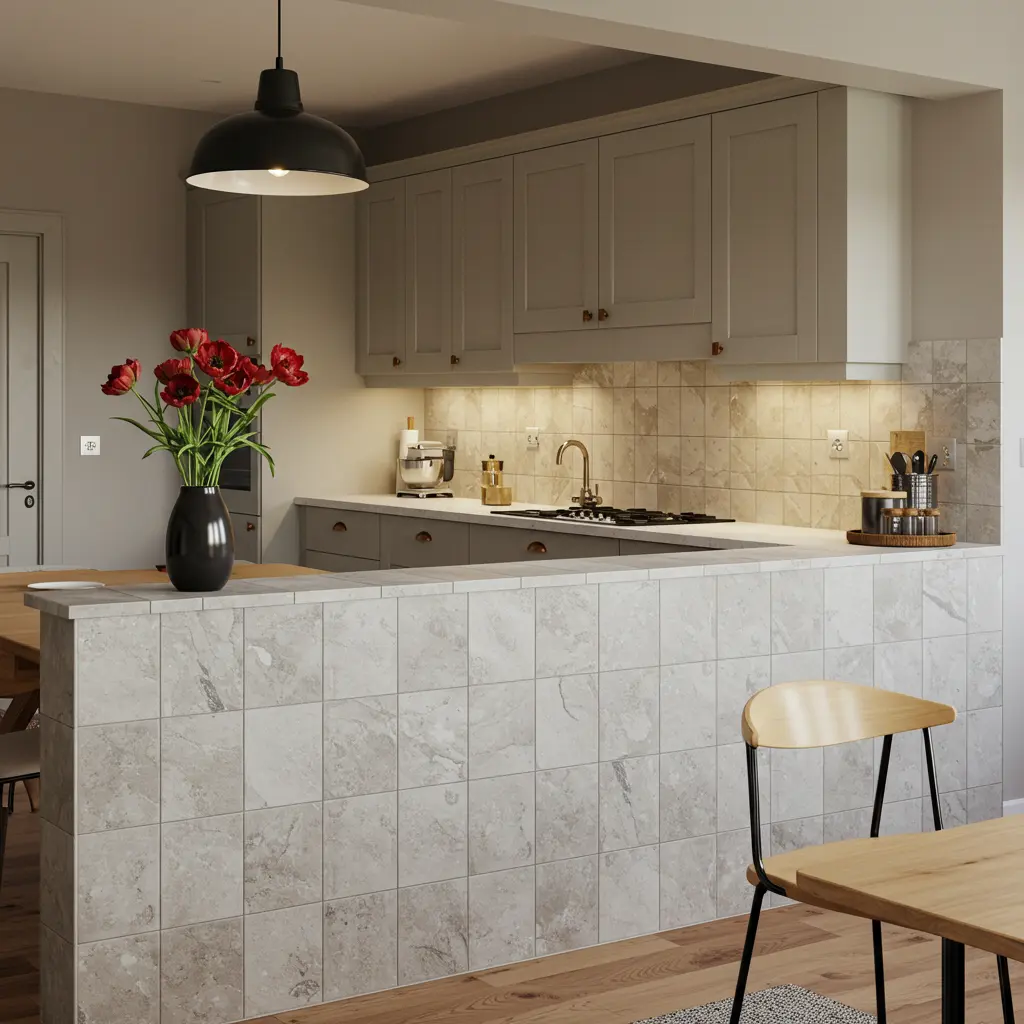
Best For: Creating a durable, unique, and easy-to-clean surface, especially when connecting to a kitchen.
- Key Consideration: Tile can be heavy. Ensure the half-wall structure is solid.
- Pro-Tip: Use the same tile that’s on your kitchen backsplash to create a powerful visual connection and make the spaces feel unified.
- Styling Cue: Choose a tile with a bold geometric pattern to turn the half wall into a true work of art.
Architectural Upgrades: A Structural Glow-Up
14. The Grand Colonnade
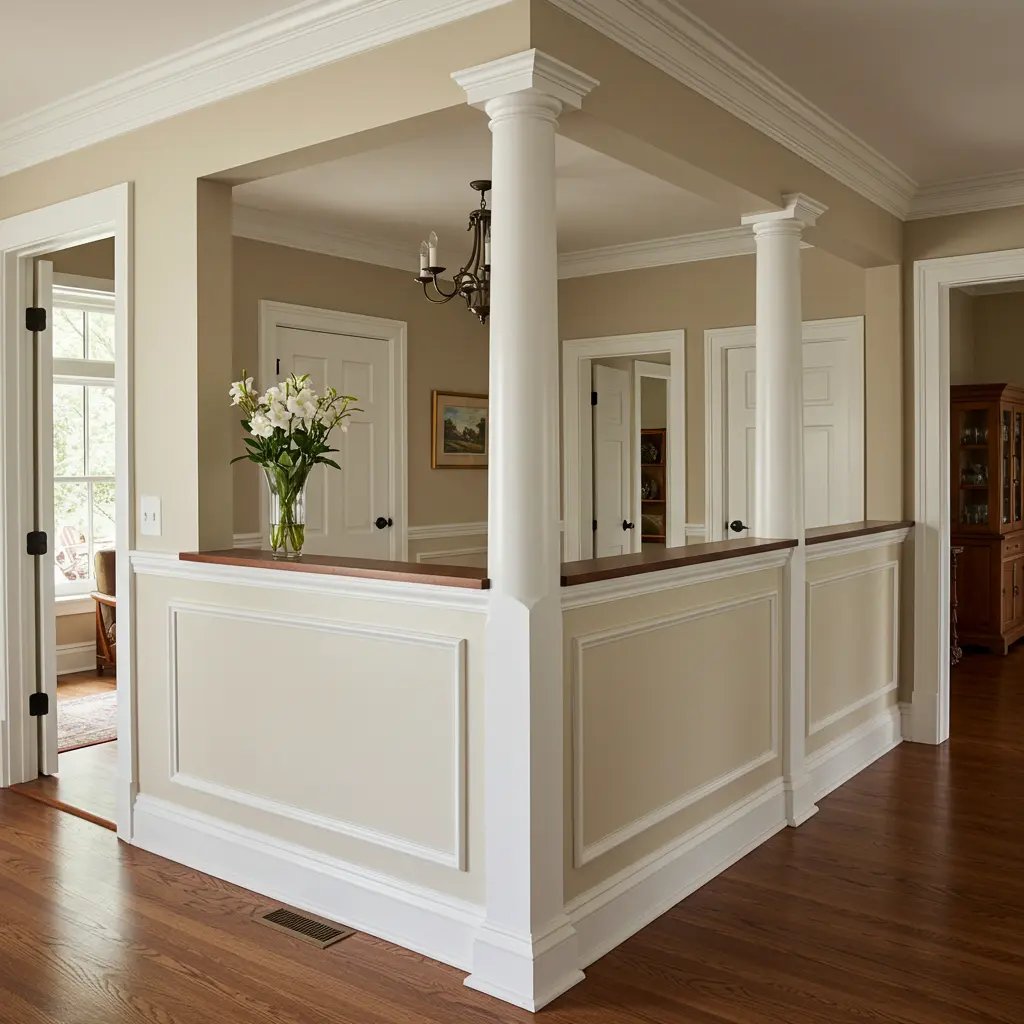
Best For: Adding a sense of traditional grandeur and architectural significance to a plain opening.
- Key Consideration: This look is best suited for homes with higher ceilings and a more traditional style.
- Pro-Tip: Use pre-made, paintable columns (either round or square) to make the installation much easier. Ensure they are securely anchored to the half wall and the ceiling.
- Styling Cue: Paint the half wall and the columns the same color as your trim to make them feel like they’ve been there all along.
15. The Modern Glass Panel
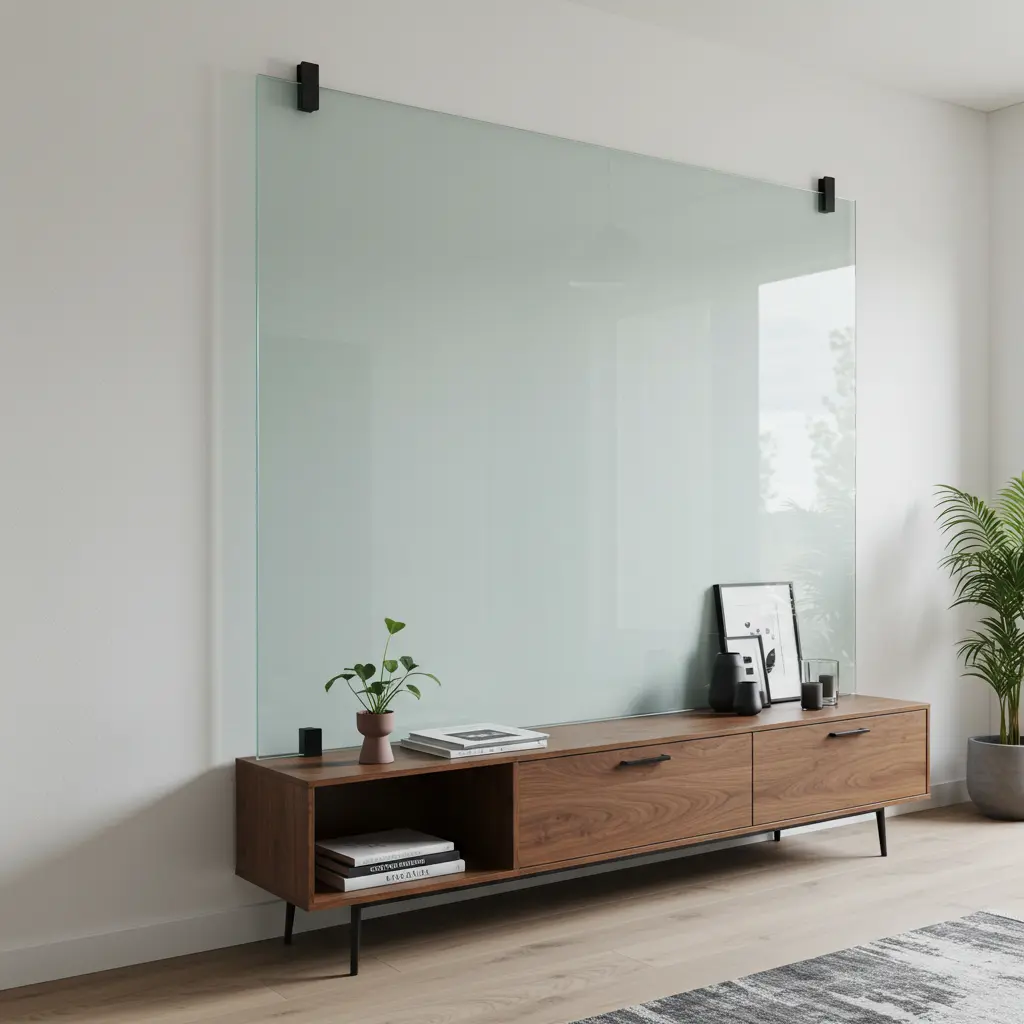
Best For: Defining a space while maximizing light flow and maintaining a completely open, airy feel.
- Key Consideration: This requires custom-cut tempered glass for safety and professional installation.
- Pro-Tip: For a sleek, minimalist look, use metal clips to mount the glass. For a more industrial vibe, opt for a black metal frame.
- Styling Cue: Keep the styling around it minimal. The clean, transparent glass is the statement.
16. The Floor-to-Ceiling Bookshelf
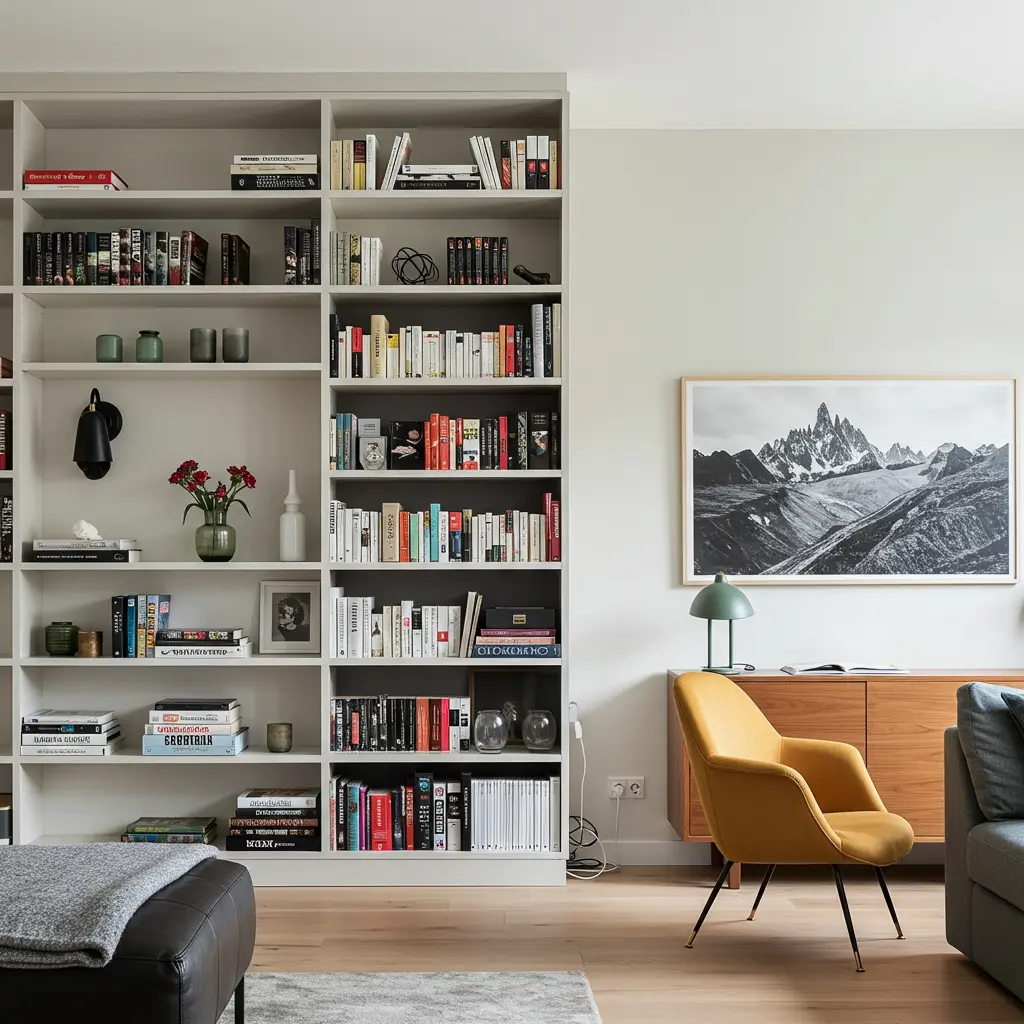
Best For: Creating a stunning room divider that provides massive storage and acts as an architectural feature.
- Key Consideration: The shelves must be backless to allow light to pass through.
- Pro-Tip: Secure the shelving unit to the half wall, the floor, and the ceiling for complete stability.
- Styling Cue: Arrange your books and decor thoughtfully on both sides, as it will be visible from two different rooms.
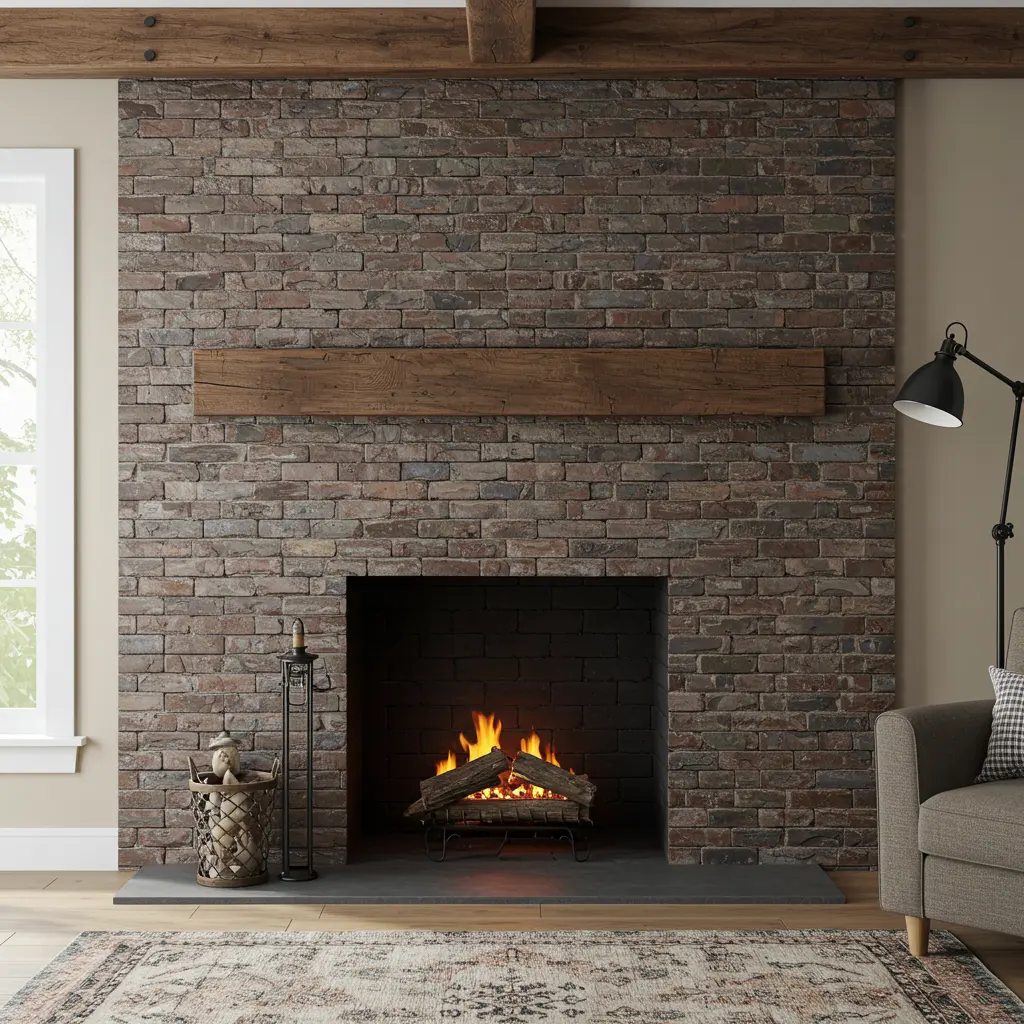
17. The Cozy Electric Fireplace
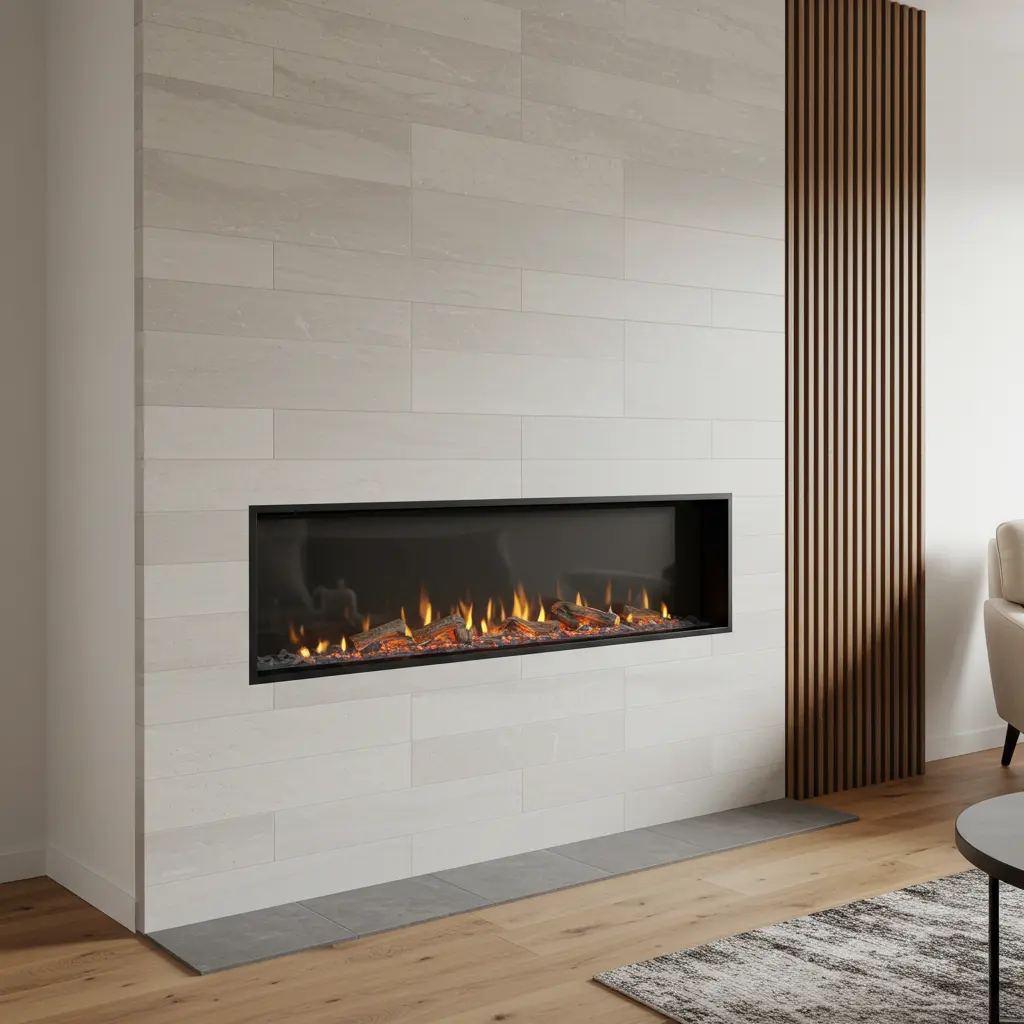
Best For: Adding an unexpected source of ambiance, warmth, and a modern focal point.
- Key Consideration: You will need to run electrical to the half wall. This is a job for a licensed electrician.
- Pro-Tip: Choose a slim, linear electric fireplace designed for in-wall installation. Build out the wall with framing to accommodate the fireplace depth.
- Styling Cue: Finish the new fireplace surround with sleek tile or slat wood for a contemporary masterpiece.
18. The Reclaimed Wood Wrap

Best For: Infusing a space with unparalleled warmth, history, and rustic character.
- Key Consideration: Ensure the wood is properly treated and sealed. You don’t want to bring any unwanted pests into your home.
- Pro-Tip: Use thin reclaimed wood planks (often sold as “wall paneling”) to avoid adding too much bulk to the wall.
- Styling Cue: Install the planks in a herringbone pattern for a more dynamic and custom look.
19. The Chic Home Office
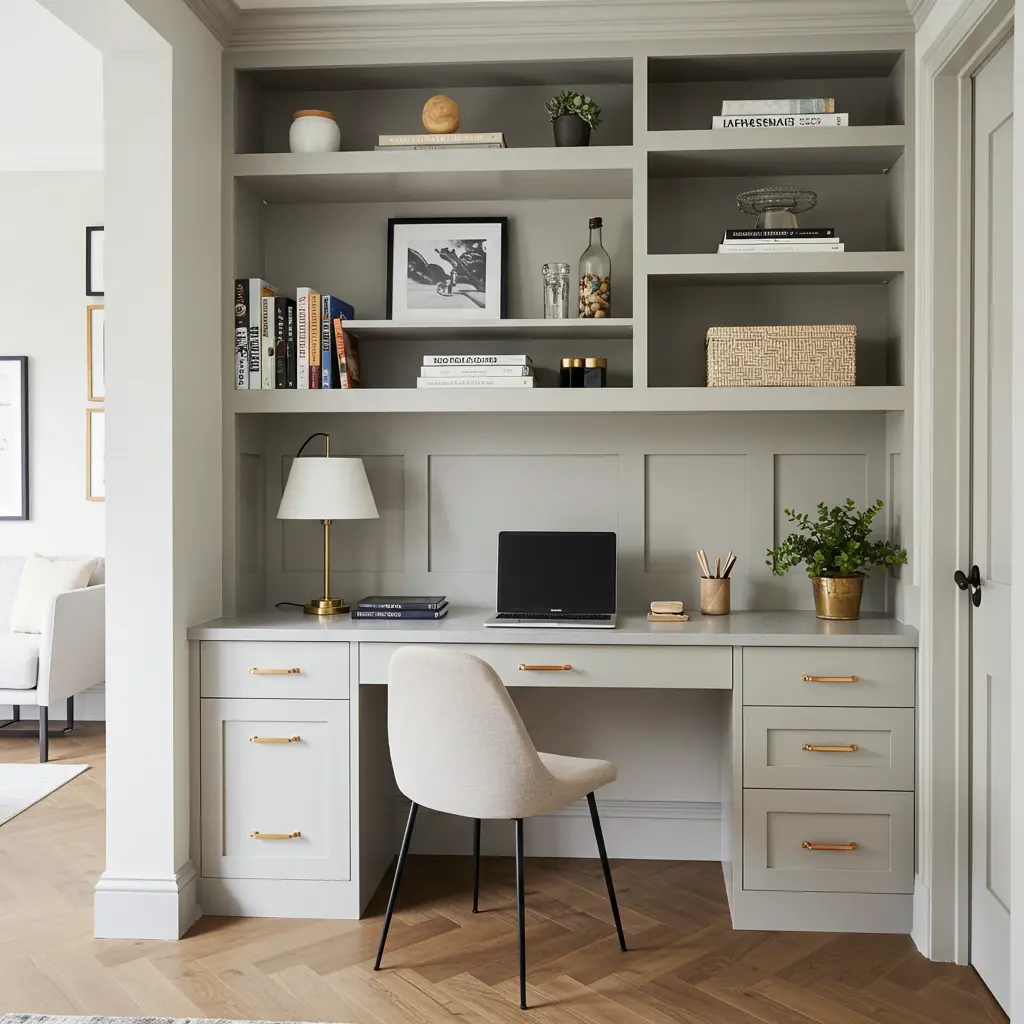
Best For: Carving out a dedicated workspace in a small home or open-concept floor plan.
- Key Consideration: Plan for cord management from day one. Drill a hole with a grommet in the countertop for a clean way to run laptop and lamp cords.
- Pro-Tip: Build shelves above the desk surface, connecting to an adjacent wall to create a functional, built-in “nook.”
- Styling Cue: Choose a comfortable but stylish chair that complements the decor of the adjoining room.
20. The Elegant Serving Buffet
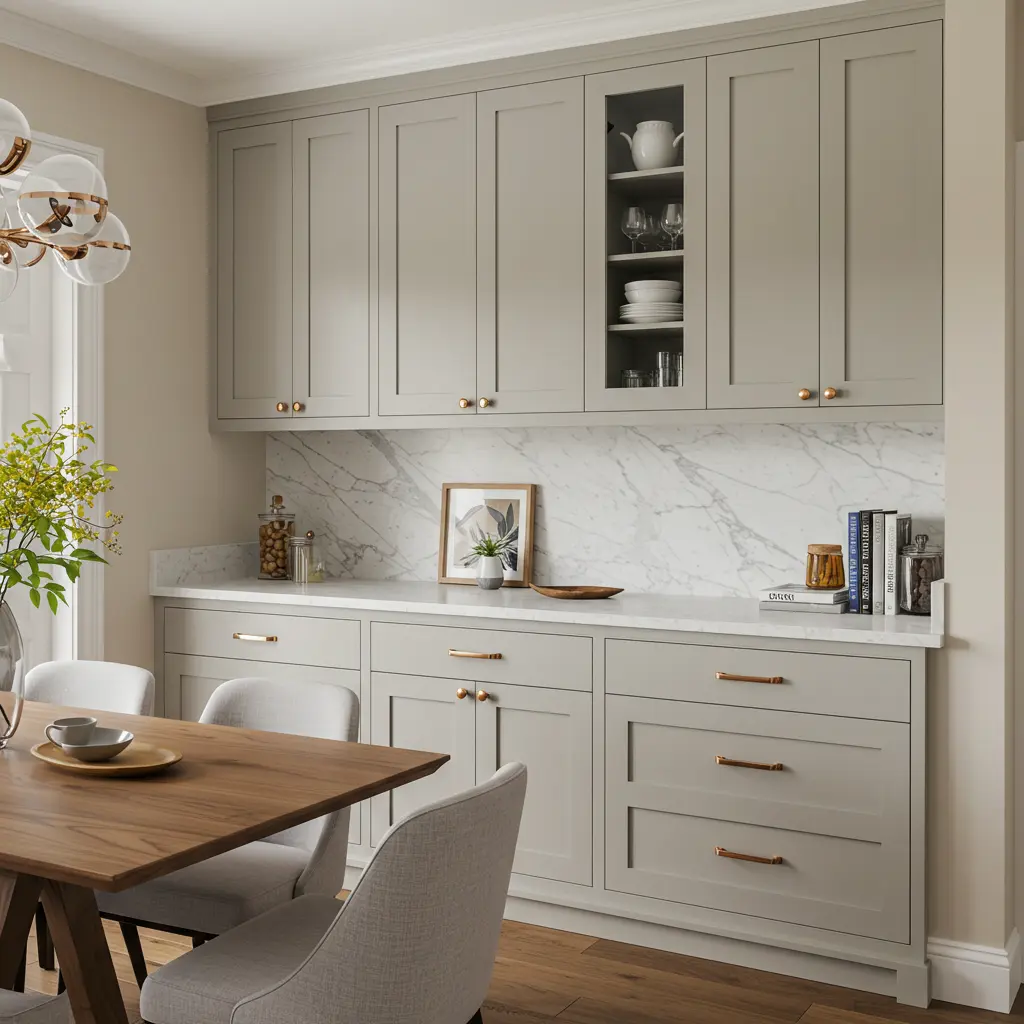
Best For: Adding storage and a serving surface in a dining area, perfect for entertaining.
- Key Consideration: Build custom cabinetry into the half wall, facing the dining area.
- Pro-Tip: Specify full-extension soft-close drawers and adjustable shelving to your cabinet maker. It’s a small upcharge for a massive upgrade in usability.
- Styling Cue: Top the half wall with a beautiful piece of marble or quartz that matches your kitchen countertops for a cohesive, high-end look.
Minimalist & Final Solutions
21. The Seamless Disguise

Best For: Minimalists who want the wall to visually disappear as much as possible without demolition.
- Key Consideration: This is the opposite of making it a feature. The goal is to make it blend in.
- Pro-Tip: Paint the half wall, including the top cap and any trim, the same color and finish as the surrounding walls.
- Styling Cue: Leave it empty. Don’t place any objects on top that would draw attention to it.
22. The Complete Removal
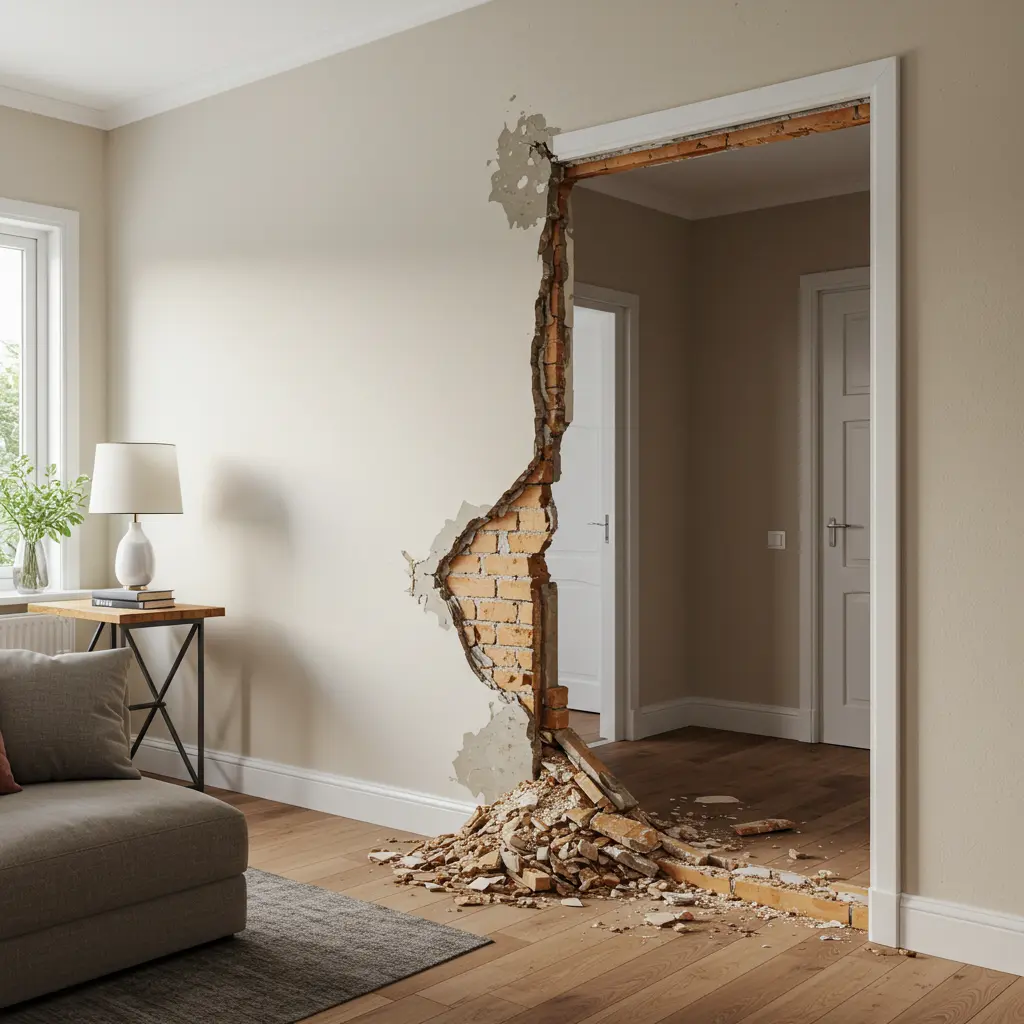
Best For: When the half wall truly serves no purpose and cramps the flow of your home.
- Key Consideration: This is a major step. You must first confirm that the wall is not load-bearing and does not contain any essential electrical, plumbing, or HVAC systems. Consult a professional if you are unsure.
- Pro-Tip: Be prepared for floor patching. There will be a gap in your flooring where the wall once stood that will need to be repaired.
- Styling Cue: Enjoy your new, truly open-concept space!
Conclusion: Your Half Wall’s Next Chapter
And just like that, you’re no longer just looking at an awkward divider—you’re looking at a world of purposeful possibilities. You have the ideas, the inspiration, and the know-how to transform this feature into an integral part of your home’s beauty and function. This isn’t just about a renovation; it’s about reclaiming space and making it work for you.
It all starts with a single choice. Pick an idea that made your heart skip a beat, and take the first small step.
You’ve got this.
