Tired of the same old paper bats and cheesecloth ghosts? Ready to graduate from common crafts to conjurings that will genuinely haunt your guests’ memories? You’re in the right place to change that.
Interior Halloween decor shouldn’t just be a collection of familiar tropes; it should be an immersive story, a gallery of delightful disturbances, a backdrop for true spooky season immersion.
This is your advanced creative playbook for transforming your home into a unique house of horrors that’s not only deeply atmospheric but feels like it was ripped from a forgotten nightmare.
We’ll explore unsettling illusions, decode the secrets of advanced ambiance, and walk through the practical steps to bring these fresh fears to life.
By the end, you’ll see your home not just as a decorated house, but as a masterpiece of the macabre.
Before You Begin: Plotting Your Unique Nightmare
The most terrifyingly effective decor starts with a twisted vision, not just a shopping list.
Before you summon a single prop, let’s refine your theme. Are you building a forgotten crypt, a derelict asylum, an alien crash site, or the aftermath of a paranormal infestation? A specific story will make your decor truly unforgettable.
The Secrets of Style: Simple Rules for a Stunning Haunt
Design theory sounds intimidating, but it’s really just about what makes a space feel genuinely unsettling. Here are a few secrets for next-level spookiness:
The Power of the Uncanny: The most effective scares come from seeing ordinary things in disturbing new ways. A doll is fine. A dozen doll heads on a wreath is terrifying. Focus on twisting the familiar.
Creating a Narrative: Don’t just place props; create scenes. That skeleton isn’t just in a chair; it’s waiting for a guest that never arrived, a teacup still in its hand. This tells a story and draws people in.
Texture is Terror: Move beyond paper and plastic. Think about things that are decaying, slimy, dusty, or unnaturally smooth.
- Decay: Use coffee grounds and watered-down paint to age everything.
- Slime: Clear school glue mixed with green food coloring creates perfect, non-sticky slime drips.
- Dust: A light dusting of cornstarch or fuller’s earth on props makes them look ancient.
Sound & Scent: Elevate your decor by engaging other senses. A hidden Bluetooth speaker playing faint whispers, or a diffuser with a damp, earthy scent can triple the effectiveness of your visual props.
What’s the Real Effort? A No-Fuss Project Breakdown
| The Approach | Estimated Cost | What Your Money Buys | The Little Extras (Don’t Skip These!) |
| The Unsettling Afternoon | $20 – $50 | • Pool noodles, craft foam • Plaster wrap or paper mache • Glow-in-the-dark paint | • A silicone craft mat • A heat gun (for shaping foam) • Blacklight bulbs |
| The Dedicated Haunting | $50 – $150 | • Mannequin parts (heads, hands) • Chicken wire, burlap • Basic electronic components | • A Dremel or rotary tool • Zip ties and floral wire • A low-temperature fog machine |
| The Masterpiece of Macabre | $150 – $300+ | • A posable skeleton • A video projector • Materials for large-scale props | • A sewing machine • A stable work table • A curated sound effects library |
The Design Menu: Finding Your Signature Fright
Here are 20 fresh ingredients for your haunted home. Each is a unique DIY project designed for maximum unsettling impact.
1. The Wall of Pushing Souls
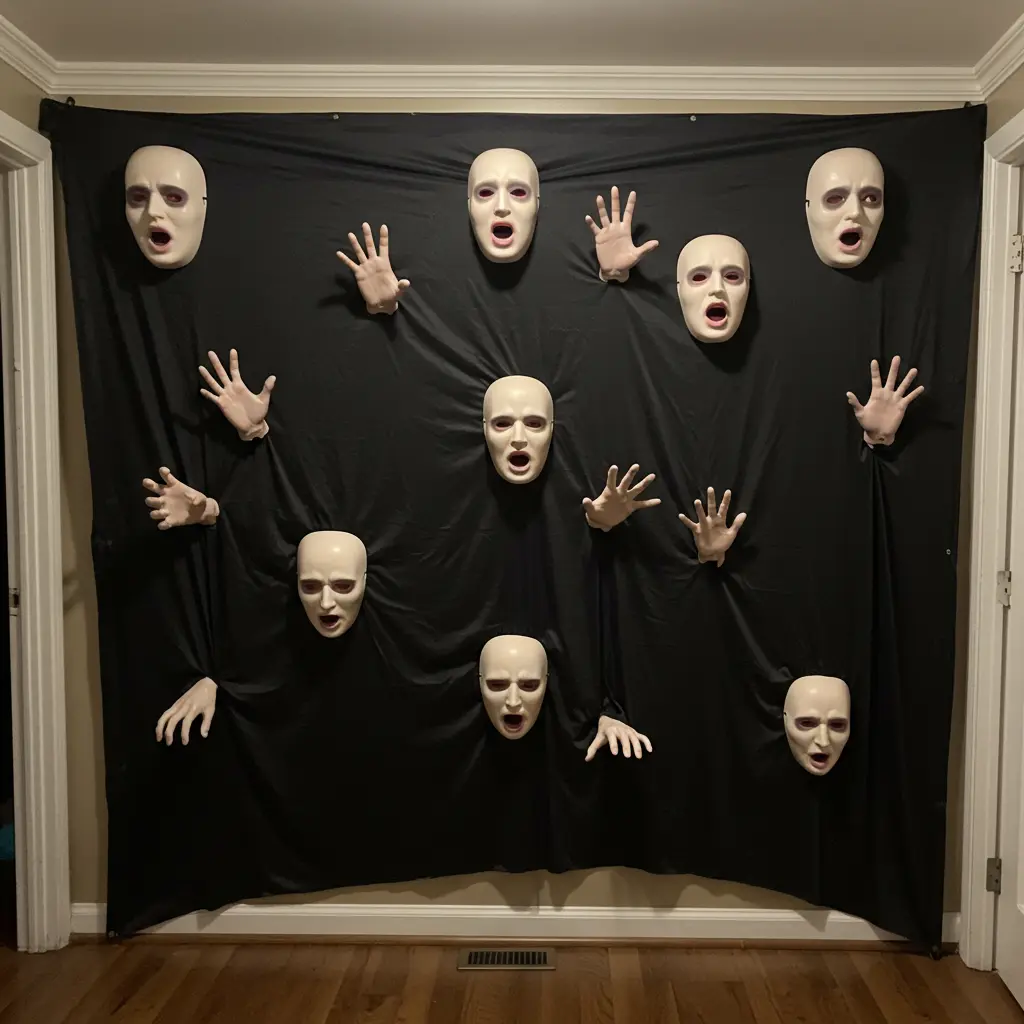
- Best For: Creating a high-impact, terrifying illusion in a hallway or on a main feature wall.
- Key Consideration: This looks like faces and hands are pushing through your wall from another dimension. It’s surprisingly simple but requires some space.
- Pro-Tip: Get a cheap plastic face mask and some fake hands. Stretch a large piece of spandex or jersey fabric across a wall, and from behind, press the mask and hands into it. It creates a truly convincing and creepy 3D effect.
- Styling Cue: Place a single, dramatic uplight below the wall. The shadows will make the faces and hands look like they are writhing in agony.
2. The Creeping Monster Tentacles
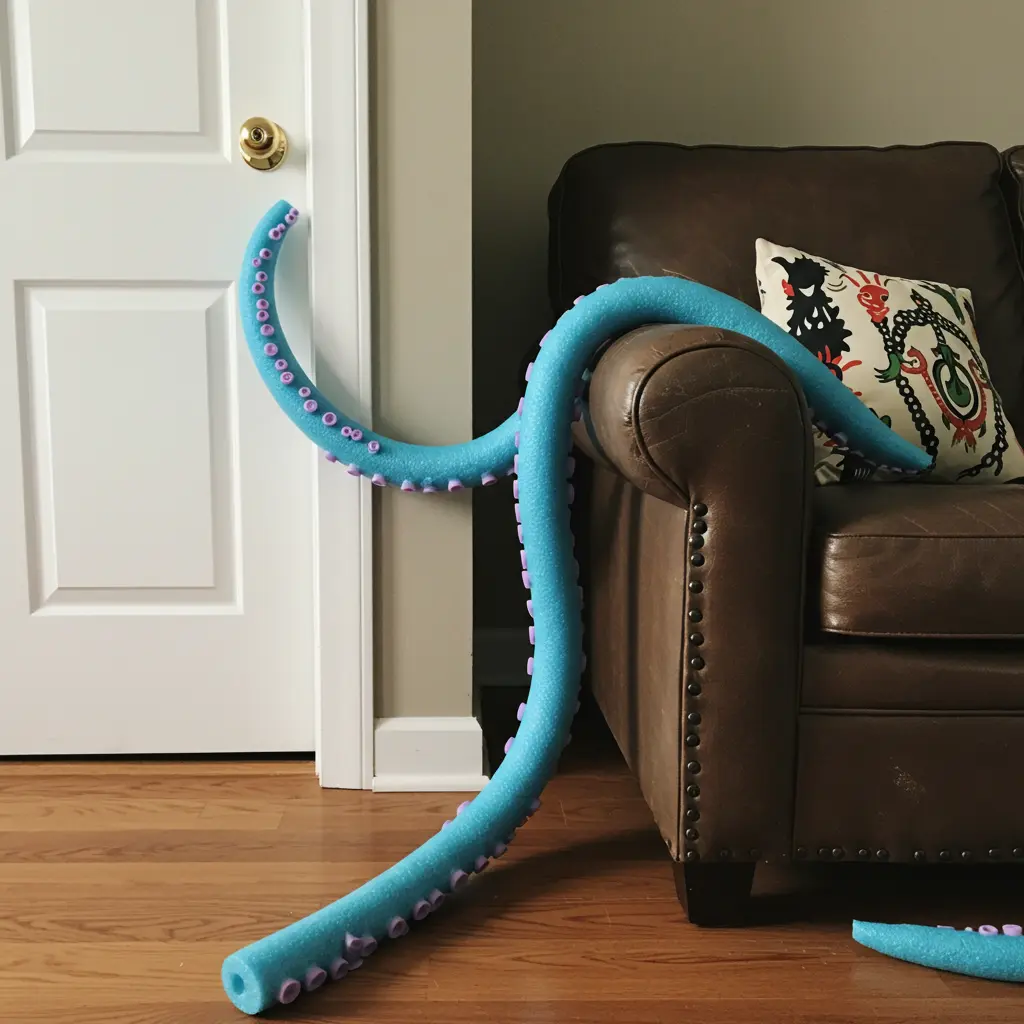
- Best For: A playful yet creepy effect that makes it look like a creature is invading your home.
- Key Consideration: This is a brilliant way to use foam pool noodles. The project is all about the painting and finishing.
- Pro-Tip: Cut a pool noodle to your desired length and use a heat gun to gently bend it into a curved shape. Use hot glue to add foam suction cups, then paint the whole thing in a creature-like color scheme.
- Styling Cue: Have the tentacles creeping out from under a closed door, from behind a sofa, or even coming out of the toilet bowl.
3. The Cocooned Spider Victims
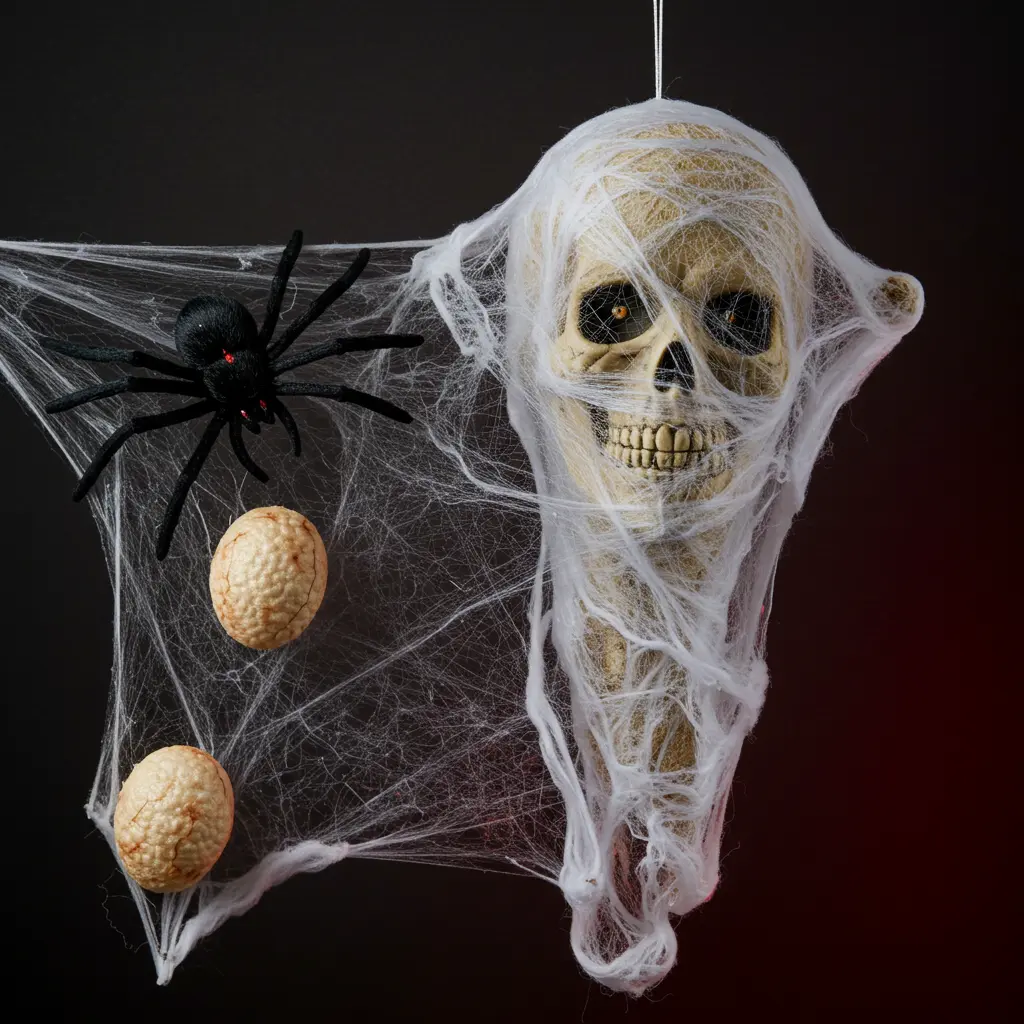
- Best For: A classic horror trope that’s genuinely creepy and perfect for hanging in a corner or from the ceiling.
- Key Consideration: The shape underneath the webbing is key to the illusion.
- Pro-Tip: Use a foam wig head or a small plastic skeleton as the base. Wrap it tightly in plastic wrap, then wrap it haphazardly with white gauze or cheesecloth. Finish by stretching and wrapping stretchy spider web material all over it.
- Styling Cue: Hang your victim near a large fake spider and create smaller “egg sacs” from foam balls and webbing to complete the terrifying scene.
4. The Witch’s Herb Drying Rack
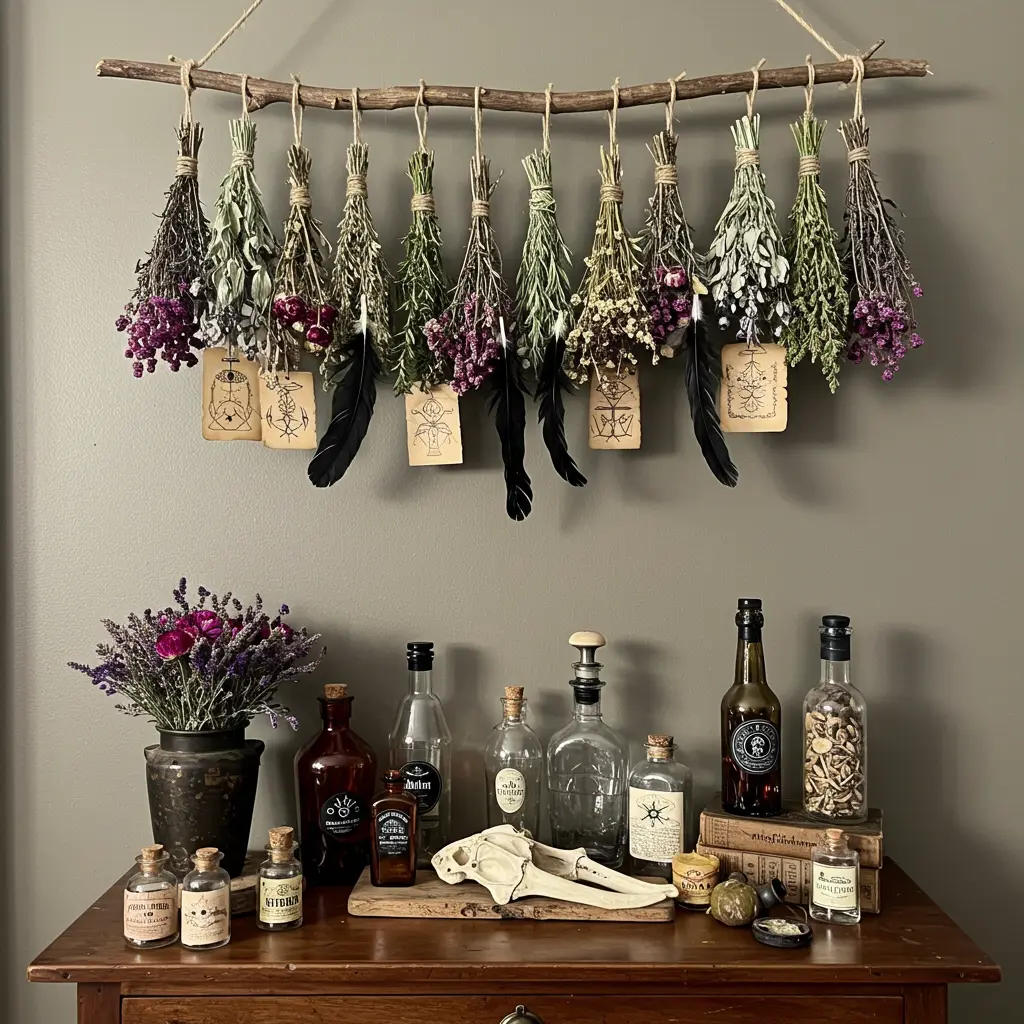
- Best For: An apothecary or kitchen-witch vibe that’s more sophisticated and atmospheric than just potion bottles.
- Key Consideration: This adds a natural, earthy, and slightly sinister element to your decor.
- Pro-Tip: Gather bundles of real herbs like sage and rosemary, along with twigs and dried flowers. Hang them upside down from a suspended branch or a rustic wooden rack. Intersperse them with bundles of black feathers, small animal bones (fake, of course), and strips of aged paper with symbols drawn on them.
- Styling Cue: Hang this above a bar cart or a side table that you’ve styled as your main “potions station.”
5. The Glow-in-the-Dark Ectoplasm
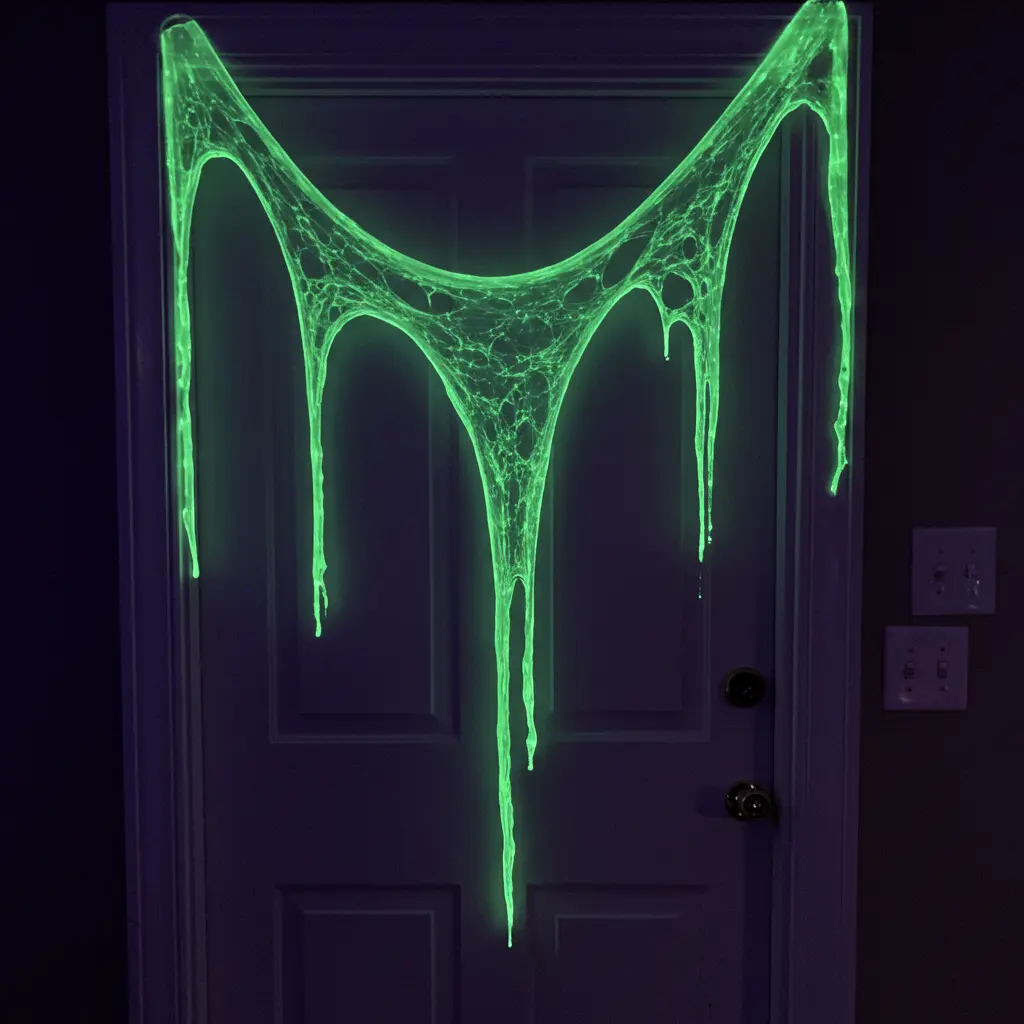
- Best For: Simulating a paranormal infestation on doorways, shelves, and furniture.
- Key Consideration: This is a hot glue gun project. You’ll need a non-stick surface to work on.
- Pro-Tip: On a silicone craft mat, create long, dripping patterns with your hot glue gun. Once cool, peel them off and paint them with 2-3 coats of glow-in-the-dark puff paint. They will look like slimy, glowing drips.
- Styling Cue: Drape these over the top of a door frame, down the front of a bookshelf, or on the mantelpiece for a convincing “haunting in progress.”
6. The Mummified Hands
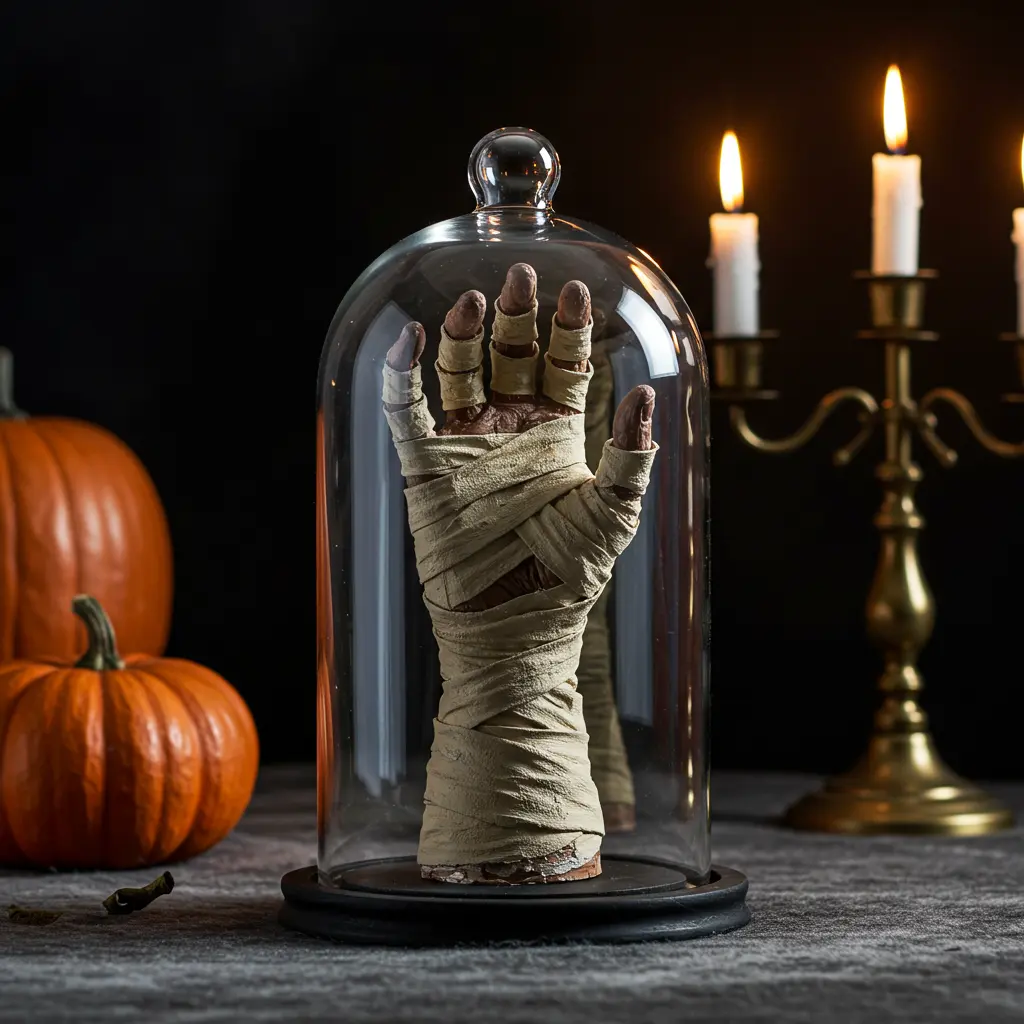
- Best For: Creating creepy “artifacts” to display in bell jars or as part of a larger scene.
- Key Consideration: This uses plaster wrap (the kind for medical casts) for a realistic, ancient look.
- Pro-Tip: Create a hand shape with floral wire and bulk it out with aluminum foil. Wrap the form in plaster strips according to the package directions. Once dry, “age” it by brushing it with watered-down brown and black craft paint.
- Styling Cue: Place a single mummified hand under a glass cloche on your mantelpiece as if it’s a prized, cursed artifact.
7. The Wreath of Doll Parts
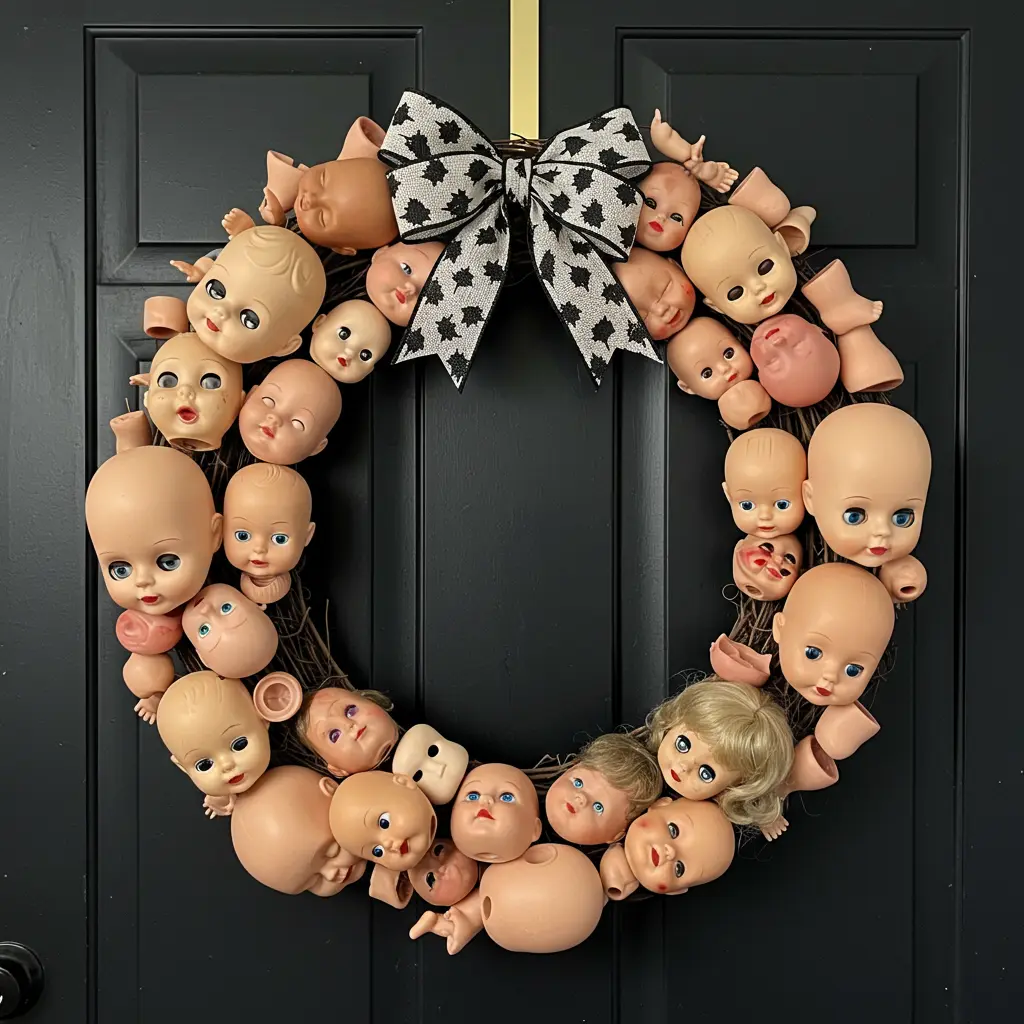
- Best For: A genuinely disturbing piece for your front door or an interior wall that will unsettle everyone who sees it.
- Key Consideration: This is pure psychological horror. The more distressed the doll parts, the better.
- Pro-Tip: Buy a bag of cheap plastic dolls from a thrift store. Take them apart. Spray paint a simple grapevine wreath matte black. Use a hot glue gun to strategically attach the doll heads, eyes, arms, and legs.
- Styling Cue: Add a single, pristine bow to the wreath. The contrast between the cute bow and the horrific parts makes it even more unsettling.
8. The Spooky Shadow Lanterns
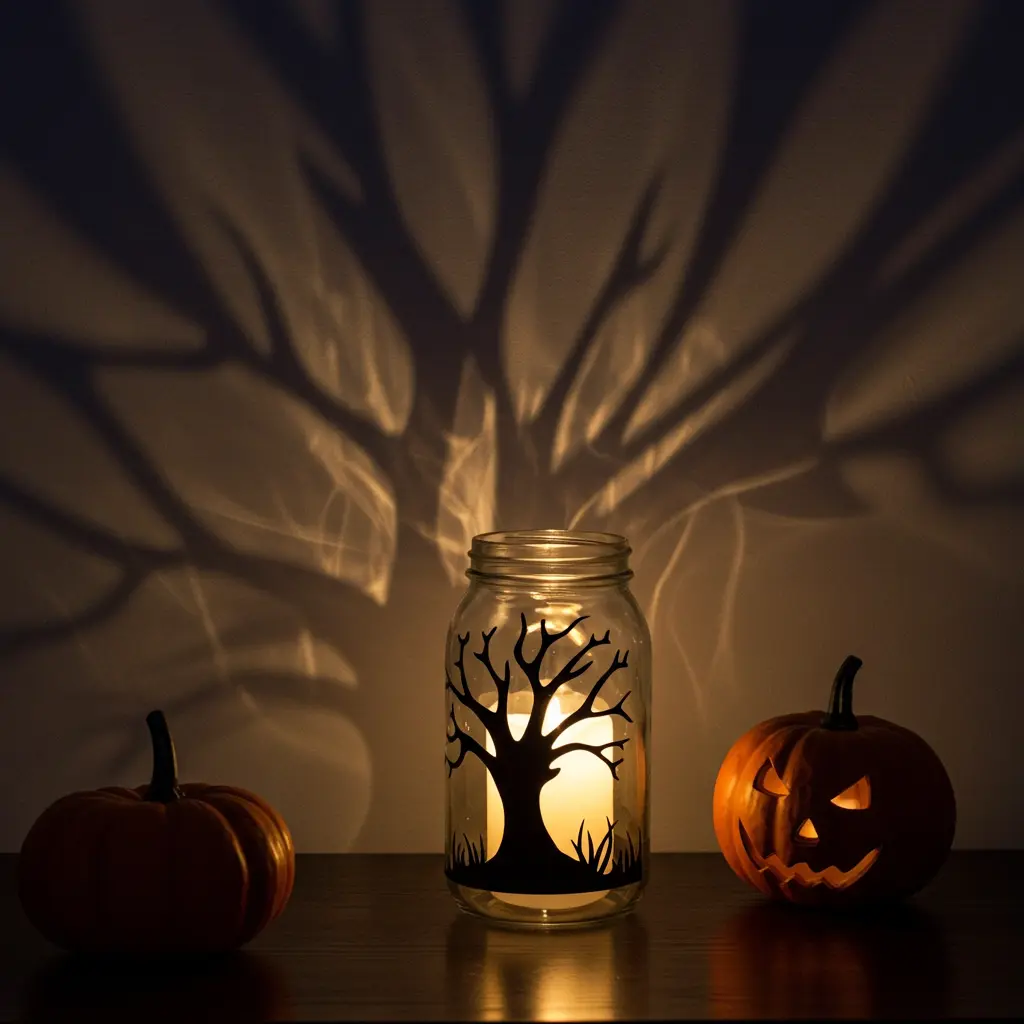
- Best For: Casting eerie, moving shadows across your walls and ceiling.
- Key Consideration: A new take on luminaries. The magic is in the cutout.
- Pro-Tip: Take a glass jar or a simple paper lantern. Cut a spooky silhouette (a gnarled tree, a creepy face, a spider) from black cardstock and affix it to the inside of the lantern. When you place an LED light inside, it will cast a large, distorted shadow on the wall behind it.
- Styling Cue: Place several of these in a darkened room. As guests walk by, their movement will cause the shadows to dance and shift.
9. The Weeping Angel Statue
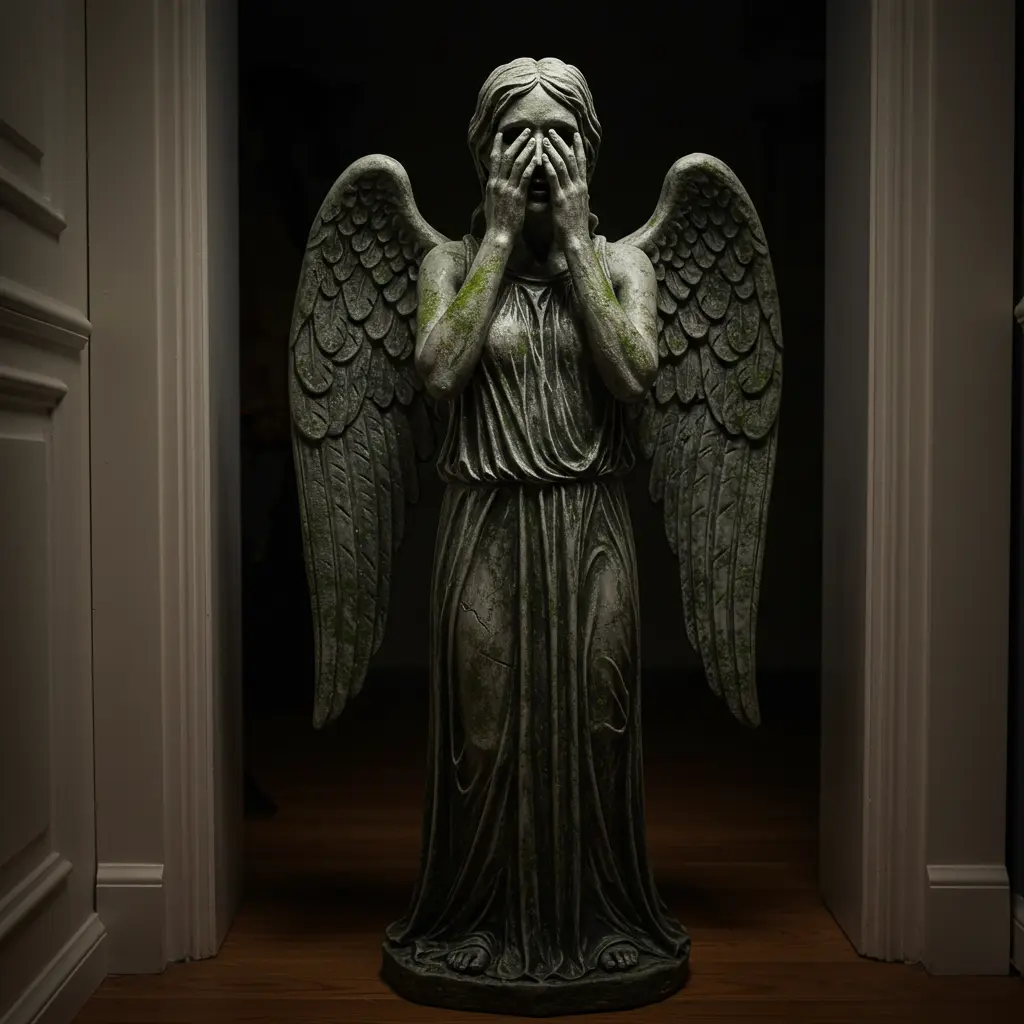
- Best For: A terrifying addition to a corner or hallway, especially for Doctor Who fans.
- Key Consideration: This project turns a cheap garden statue or mannequin head into something truly sinister.
- Pro-Tip: Buy a small concrete statue or a foam wig head. Use textured spray paint to give it a stone look. Use a sponge to add “moss” with green and black paint. The key is to pose it with its hands covering its face.
- Styling Cue: Place it in a hallway and use a single, flickering spotlight on it. It creates the unnerving feeling that it might move when you’re not looking.
10. The Ghost in the TV
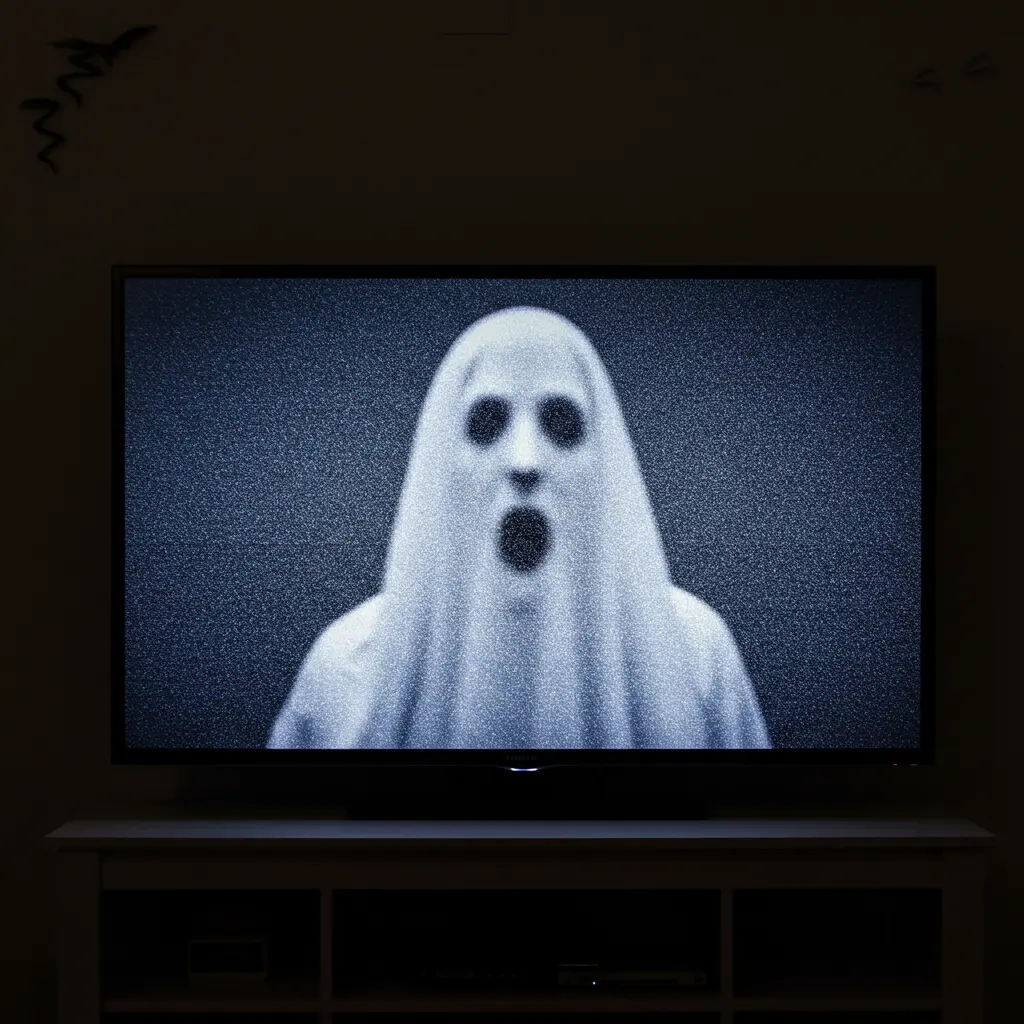
- Best For: A modern, technological twist on a classic haunting.
- Key Consideration: This is a static illusion that works on any TV screen.
- Pro-Tip: Find a high-resolution image of TV static online. In a photo editor, layer a faint, ghostly face or handprint over it. Save the image to a USB stick and display it on your TV.
- Styling Cue: Leave the TV on with this single, static image for the entire party. It’s an incredibly eerie and modern alternative to a haunted portrait.
11. The Rat Infestation Silhouettes
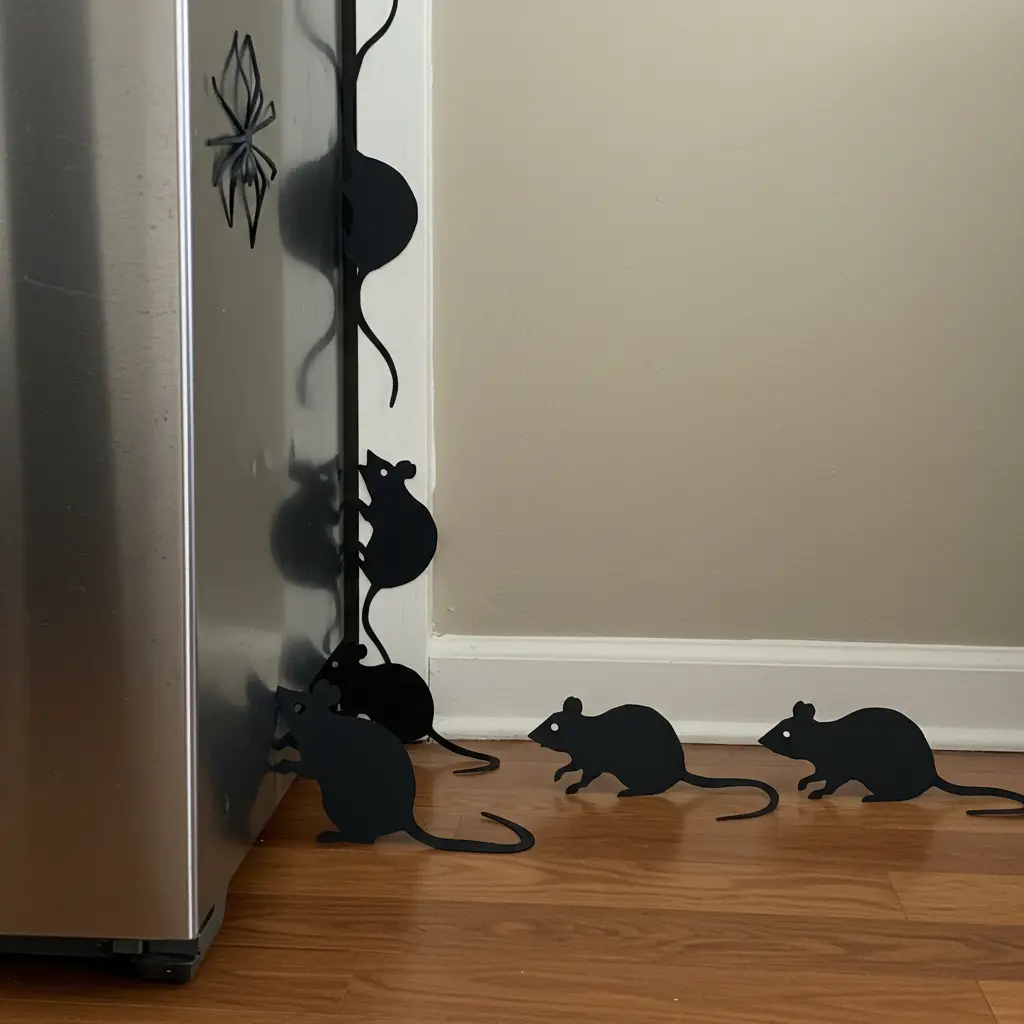
- Best For: A creepy alternative to bats or spiders that suggests a different kind of plague.
- Key Consideration: The placement is what makes this scary.
- Pro-Tip: Cut out realistic silhouettes of rats in various sizes from black paper. The real trick is to place them in a line coming from under an appliance (like the fridge or oven), along the baseboards, or peeking out from behind a curtain.
- Styling Cue: Place a few on your kitchen countertops to really sell the illusion of a home overrun by vermin.
12. The Spider Egg Sacs
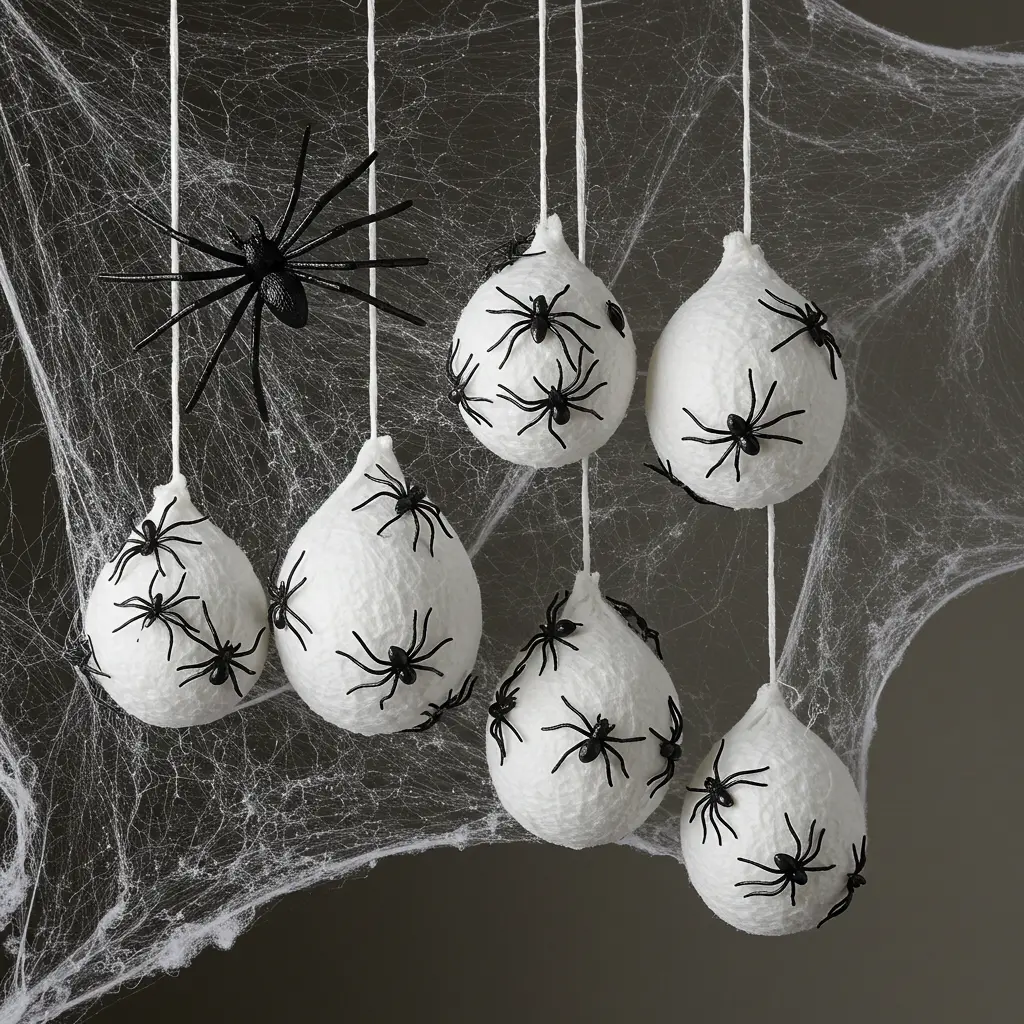
- Best For: A truly gross and skin-crawling addition to your spider-infested corners.
- Key Consideration: Much creepier than a simple spider web, these suggest an impending horror.
- Pro-Tip: Take a white water balloon or a small foam ball. Wrap it in a thin layer of quilt batting. Use a hot glue gun to attach dozens of tiny plastic spiders to it, then stretch and wrap the whole thing in stretchy spider web material.
- Styling Cue: Make 3-5 of these in varying sizes and hang them from the ceiling in a corner with a large “mother” spider watching over them.
13. The Haunted Sheet Music Stand
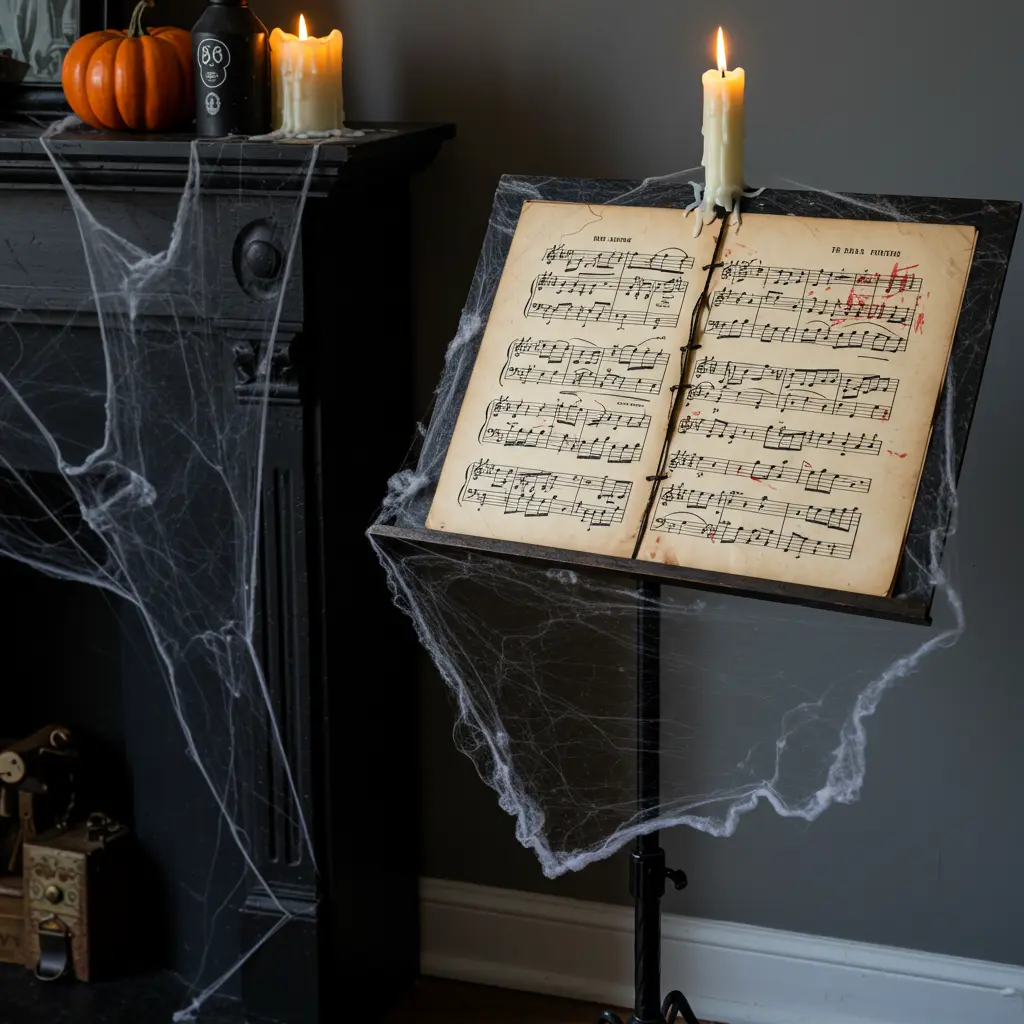
- Best For: A sophisticated, gothic, and subtly creepy vignette for a living room corner.
- Key Consideration: This tells a story of a long-departed, tormented musician.
- Pro-Tip: Print out some vintage-looking sheet music. Age it by soaking it in tea and carefully singeing the edges. Use red ink or paint to add dripping “blood” stains or scrawled, insane notes in the margins.
- Styling Cue: Set the haunted music on an old music stand. Drape it with spiderwebs and place a single, unlit, drippy candle on the stand’s ledge.
14. The “Monster Under the Rug”
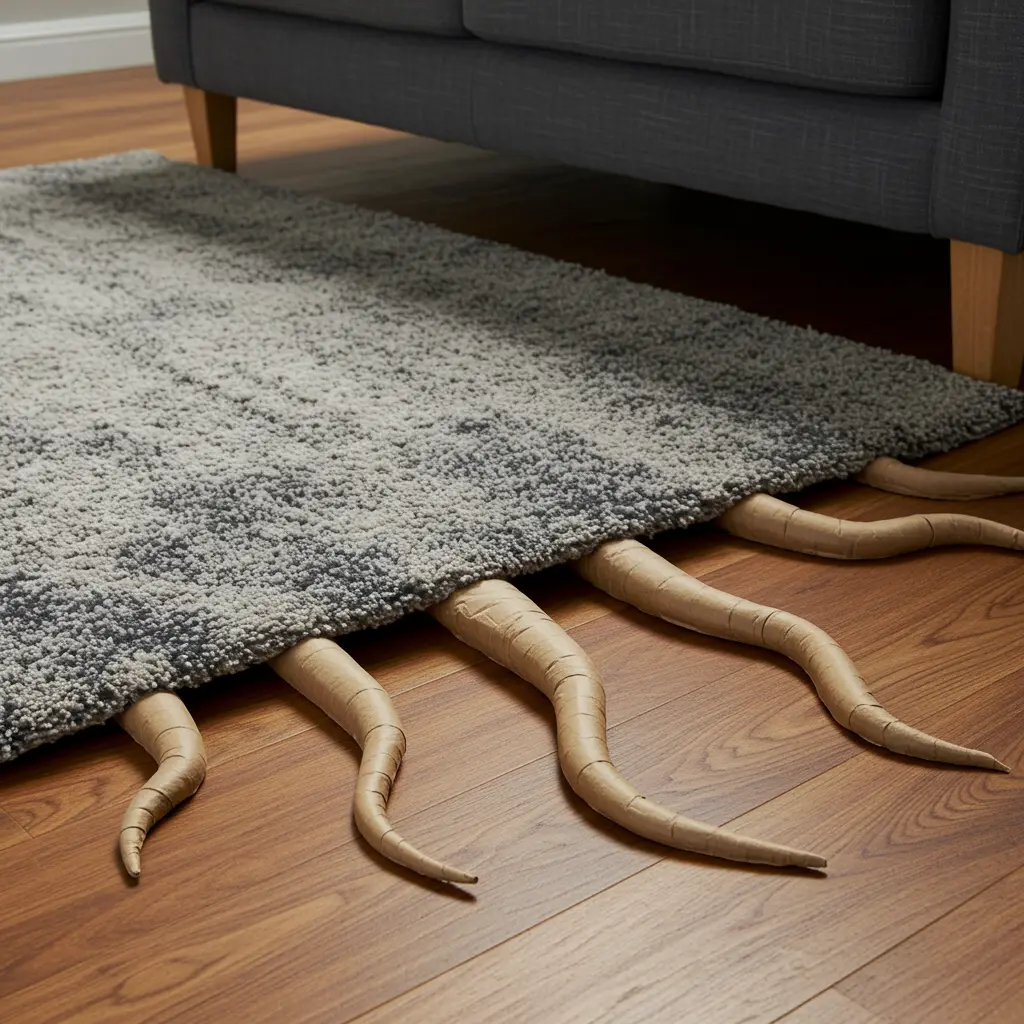
- Best For: A simple, surprising illusion that creates suspense with almost no materials.
- Key Consideration: This works best with a throw rug that has a bit of weight to it.
- Pro-Tip: Cut a few long, wavy “tentacle” or “lump” shapes from a piece of cardboard. Arrange them under the edge of a throw rug so it looks like a creature is hiding underneath, distorting the shape of the rug.
- Styling Cue: Place a “Do Not Disturb” sign or a fake pair of discarded shoes next to the lump to add to the story.
15. The Glowing Alien Specimen Jars

- Best For: A sci-fi horror twist on the classic specimen jar for a “lab” or kitchen display.
- Key Consideration: The secret ingredient here is tonic water.
- Pro-Tip: Tonic water contains quinine, which glows a brilliant blue under a blacklight. Fill jars with it and add weird-looking items: coiled cables to look like alien worms, bizarrely shaped pasta, or fake plants.
- Styling Cue: Set up a blacklight bar above your display. In a dark room, the jars will glow with an otherworldly, radioactive light.
16. The Cursed Candelabra
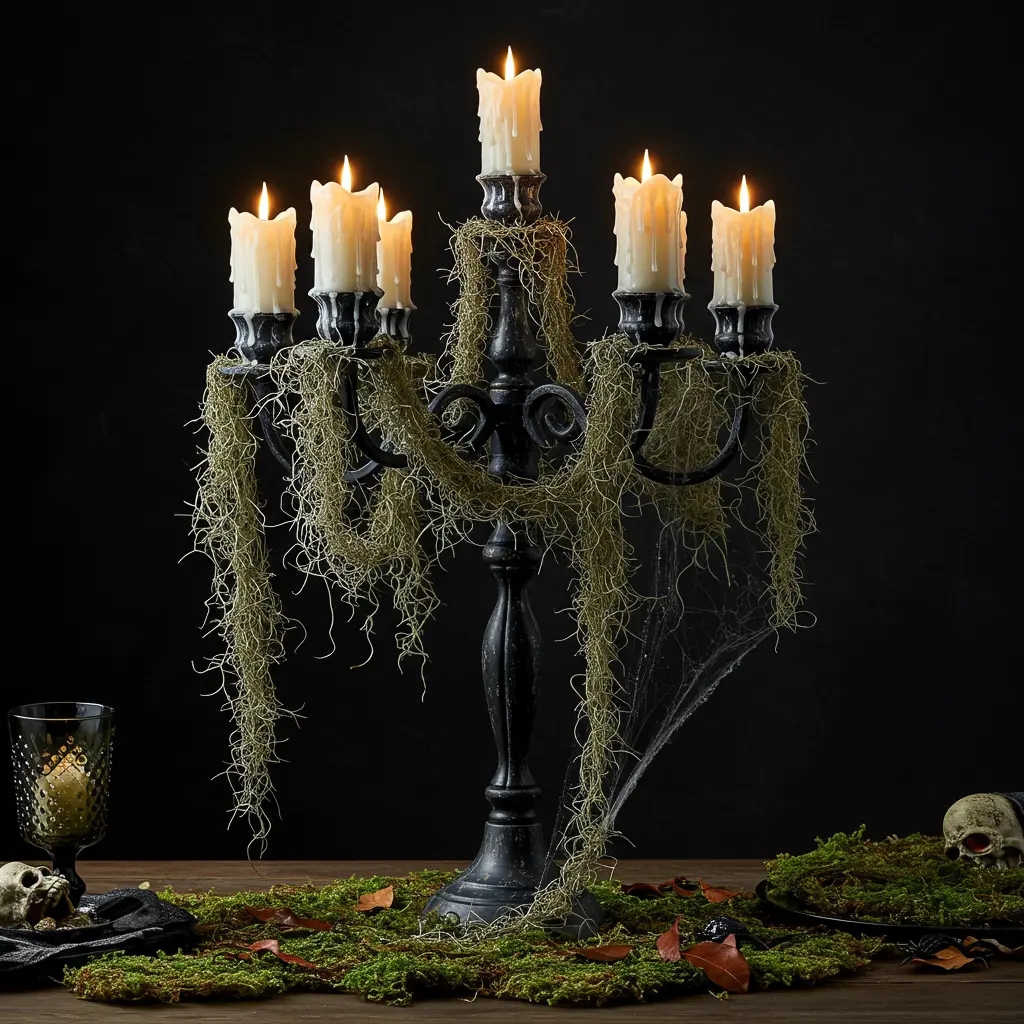
- Best For: Creating a dramatic, gothic centerpiece for a dining table or mantel.
- Key Consideration: This project is about aging and distressing a cheap prop to make it look ancient and cursed.
- Pro-Tip: Buy a cheap candelabra (from a thrift store or Halloween shop). Spray paint it black, then use a hot glue gun to create incredibly long, thick “wax drips.” Drape it with Spanish moss and stretchy spiderwebs.
- Styling Cue: Use flickering LED candles that have a “drip” effect built-in to complete the ancient, forgotten look.
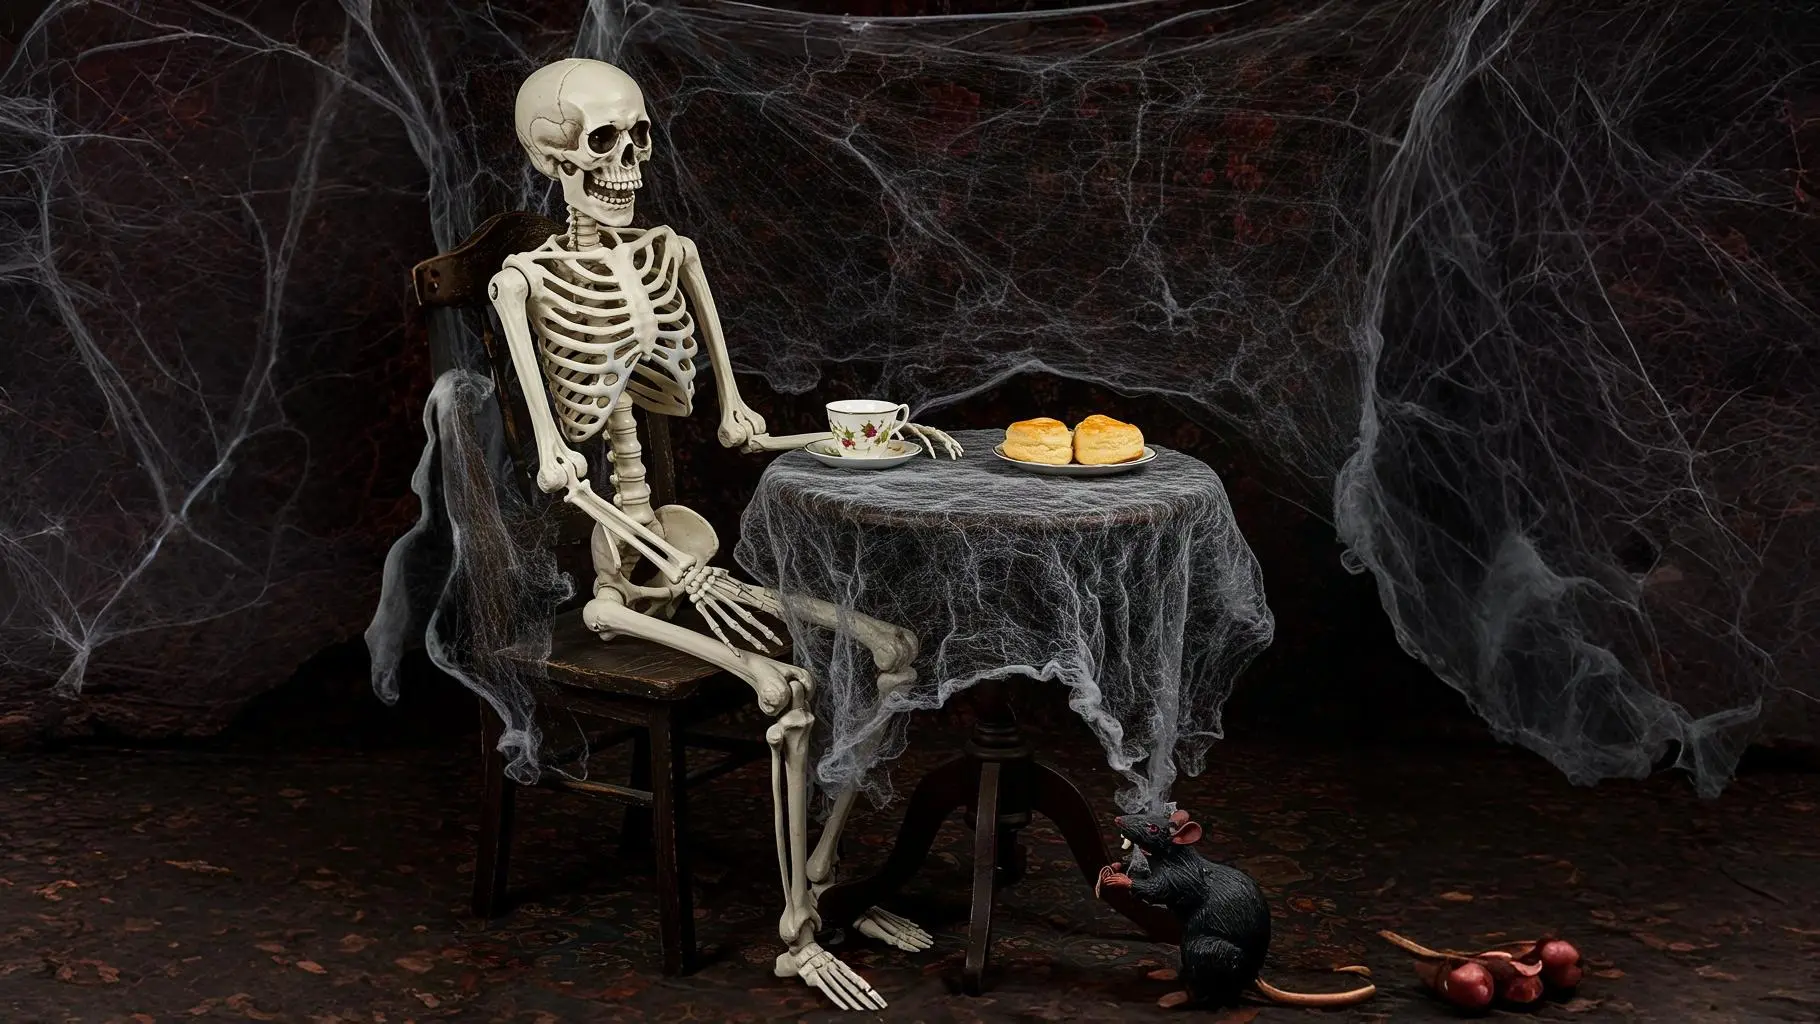
17. The Skeleton’s Final Tea Party
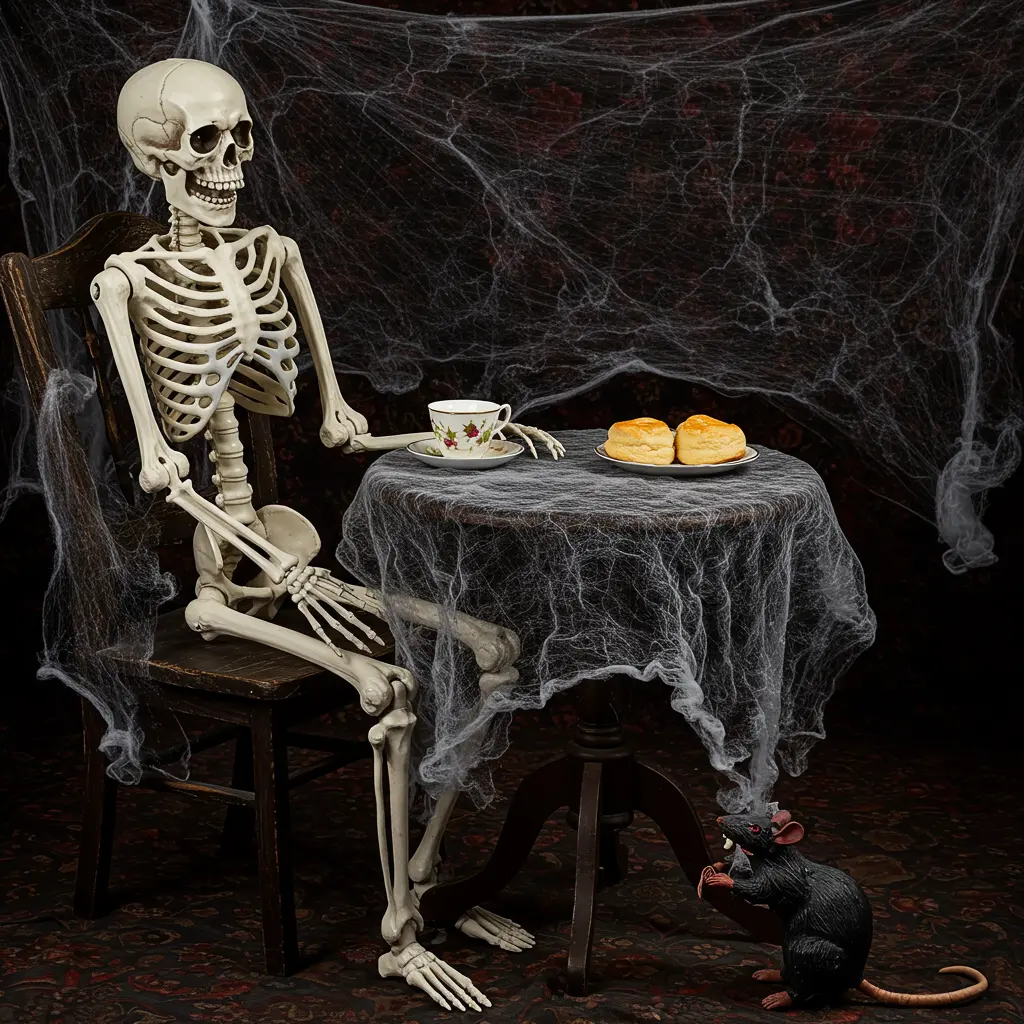
- Best For: Creating a full, narrative scene that is both spooky and strangely poignant.
- Key Consideration: You need a posable skeleton and a small table. The storytelling is in the details.
- Pro-Tip: Position a full-size skeleton at a small table, slouched over as if it has been waiting for centuries. Place an old, dusty teacup and saucer in front of it.
- Styling Cue: Cover the entire scene skeleton, chair, and table with a heavy layer of stretchy spiderwebs. Add a fake rat nibbling on a scone on the table to complete the picture of eternal decay.
18. The Man-Eating Plant Sculpture
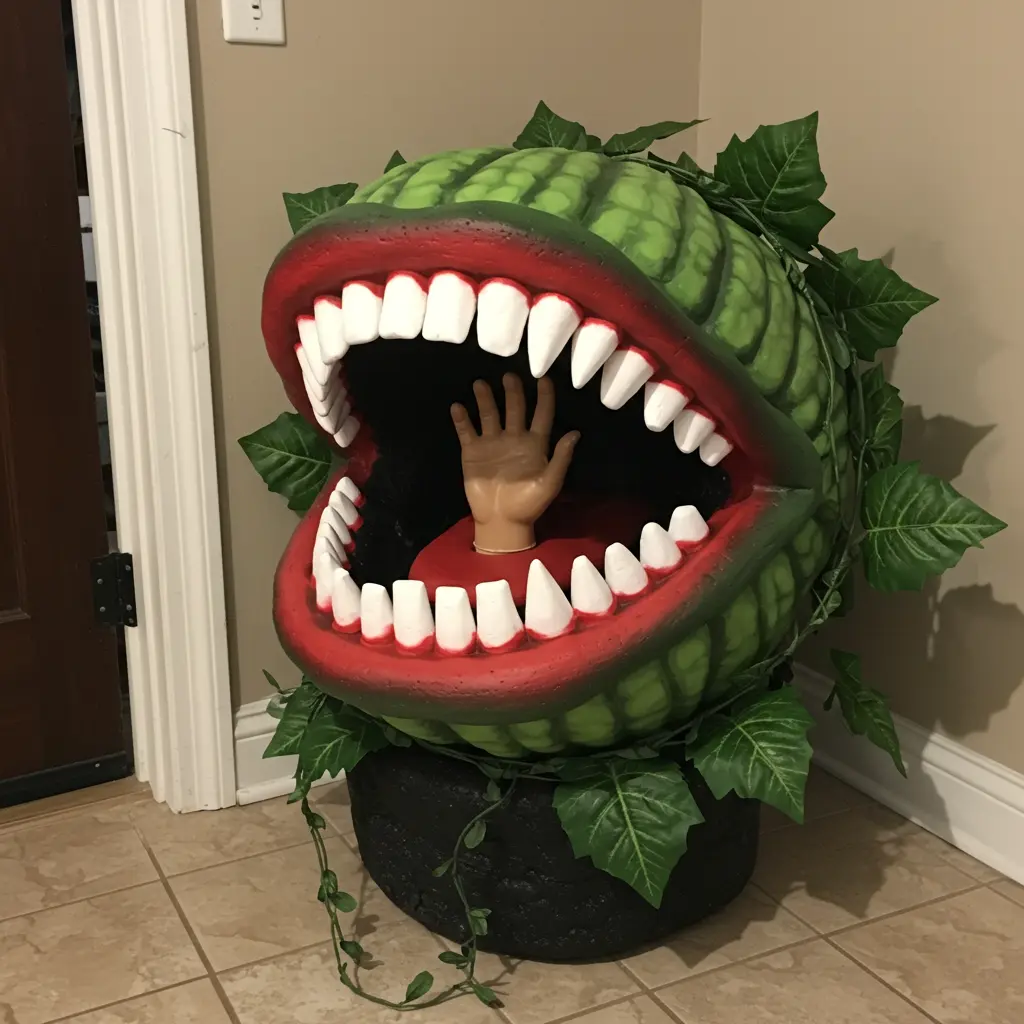
- Best For: A fun, campy, Little Shop of Horrors-style prop for a corner or entryway.
- Key Consideration: This is made from a craft pumpkin (the hollow foam kind).
- Pro-Tip: Cut a large mouth into the side of a foam pumpkin and paint the inside black and red. Use hot glue to attach rows of white cone-shaped beads or cut-up plastic forks for teeth. Add large, fake leaves and vines around the base.
- Styling Cue: Have a fake hand or a discarded shoe sticking out of the plant’s mouth.
19. The Possessed Ouija Board

- Best For: A classic paranormal object to stage as the source of a haunting.
- Key Consideration: The planchette is the key to the story.
- Pro-Tip: Buy a cheap Ouija board or print one out and glue it to a piece of wood. “Age” it heavily. The trick is to use a strong, hidden magnet under the table and another one glued to the planchette, allowing you to mysteriously move it when no one is looking.
- Styling Cue: Set the scene with just two chairs at the table and two candles, as if the players vanished mid-seance.
20. The Chicken Wire Sitting Ghost
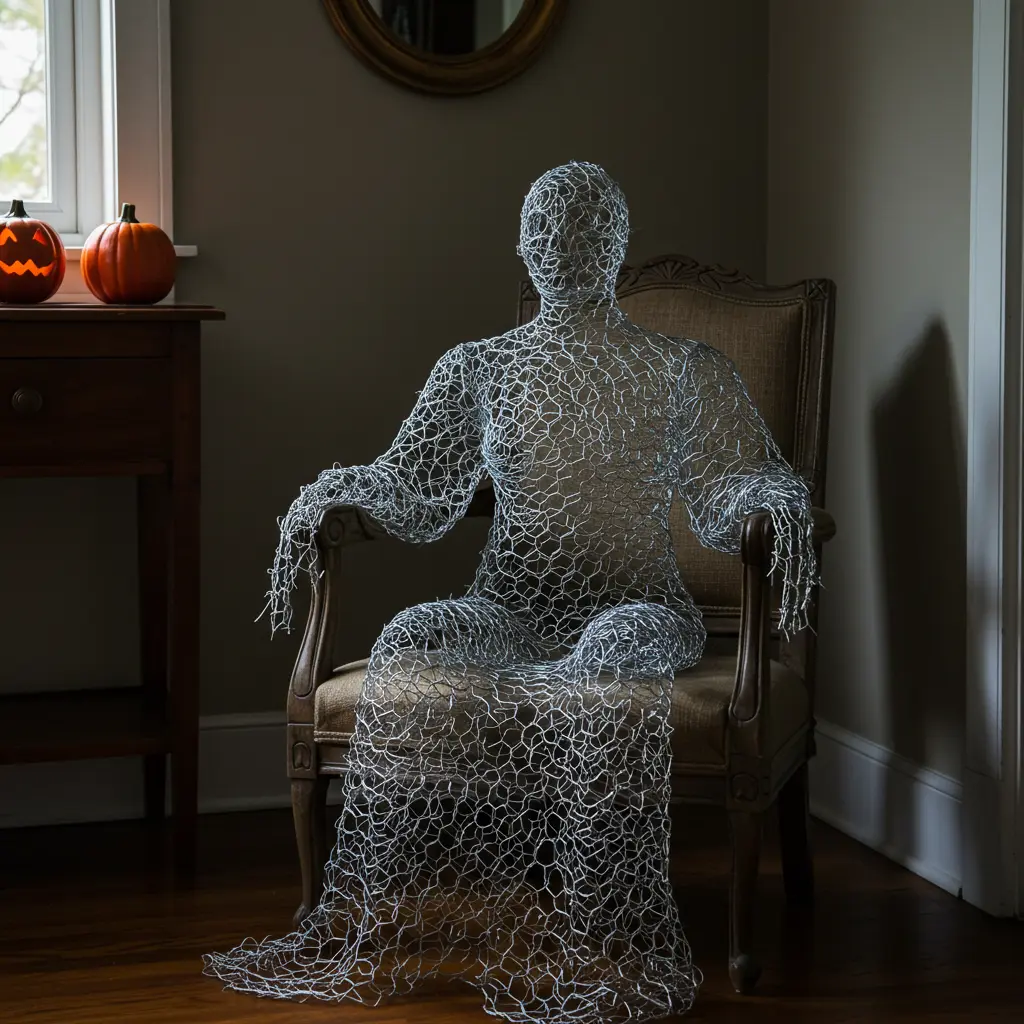
- Best For: A surprisingly beautiful and ethereal sculpture for a dark corner or entryway chair.
- Key Consideration: Working with chicken wire requires thick gloves and patience, but the result is a translucent, 3D work of art.
- Pro-Tip: Shape the chicken wire around a dress form, a large ball, or even your own body (with clothes on!) to create a ghostly, human-like shape. Once formed, it will hold its shape on its own.
- Styling Cue: Place the translucent ghost form in a chair and hit it with a single, cool-toned spotlight. It will look like a shimmering, see-through apparition has decided to join your party.
Conclusion: Your Home’s Next Nightmare
And just like that, you’re no longer just decorating you’re directing a horror film. You have the ideas, the inspiration, and the know-how to create a haunted experience that is clever, terrifying, and utterly unique.
This isn’t just about making your house look spooky; it’s about building a world, telling a story, and crafting an atmosphere that your guests will be talking about for years to come.
It all starts with a single, twisted idea. Pick a project that sparked a dark flicker of joy, and let the making of monsters begin. You’ve got this.
