Is your backyard feeling a little too… public? A beautiful space that feels more like a stage for the neighbors than a personal retreat? You’re in the right place to change that.
A privacy fence shouldn’t just be a barrier; it should be the walls to your outdoor room, a backdrop for family barbecues and quiet moments, and a beautiful architectural feature that extends the sanctuary of your home into the yard.
This is your creative playbook for transforming that open space into a secluded haven that’s not only beautiful and functional but feels deeply, personally you.
We’ll explore smart designs, decode the secrets of a sturdy build, and walk through the practical steps to bring your vision to life.
By the end, you’ll see your property line not as a boundary, but as a canvas for your private paradise.
Before You Begin: Dreaming Up Your Secluded Haven
The best fences start with a clear vision, not just a pile of lumber. Before you dig a single hole, let’s lay the groundwork for a design that complements your home, suits your lifestyle, and solves your privacy needs. Ask yourself: am I trying to block a specific view, dampen sound, contain a pet, or simply create a feeling of total enclosure?
The Secrets of Style: Simple Rules for a Stunning Fence
“DIY fence” can be interpreted in many ways. These simple secrets are what elevate a basic barrier into a stunning architectural feature.
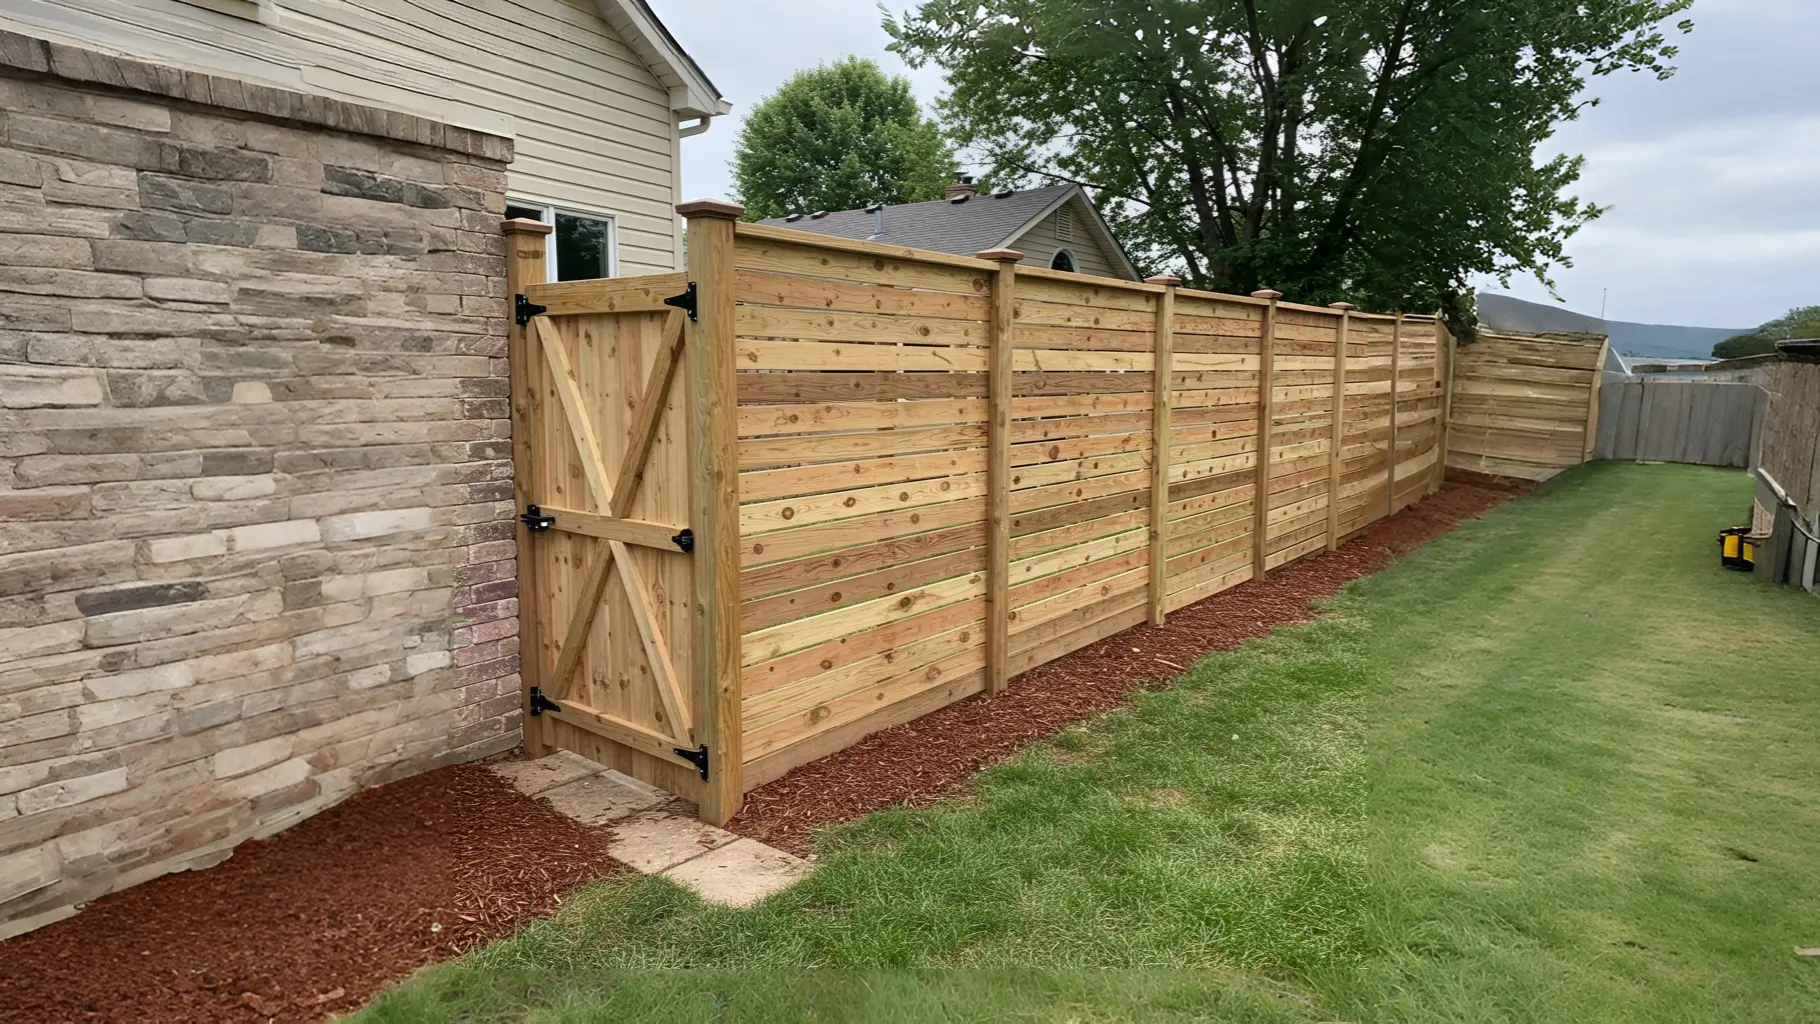
- Marry the Fence to the House: The most successful fences feel like a natural extension of the home’s architecture. A modern home with clean lines calls for a sleek horizontal plank fence. A traditional Colonial home looks best with a classic, stately wood fence. The goal is cohesion, not contrast.
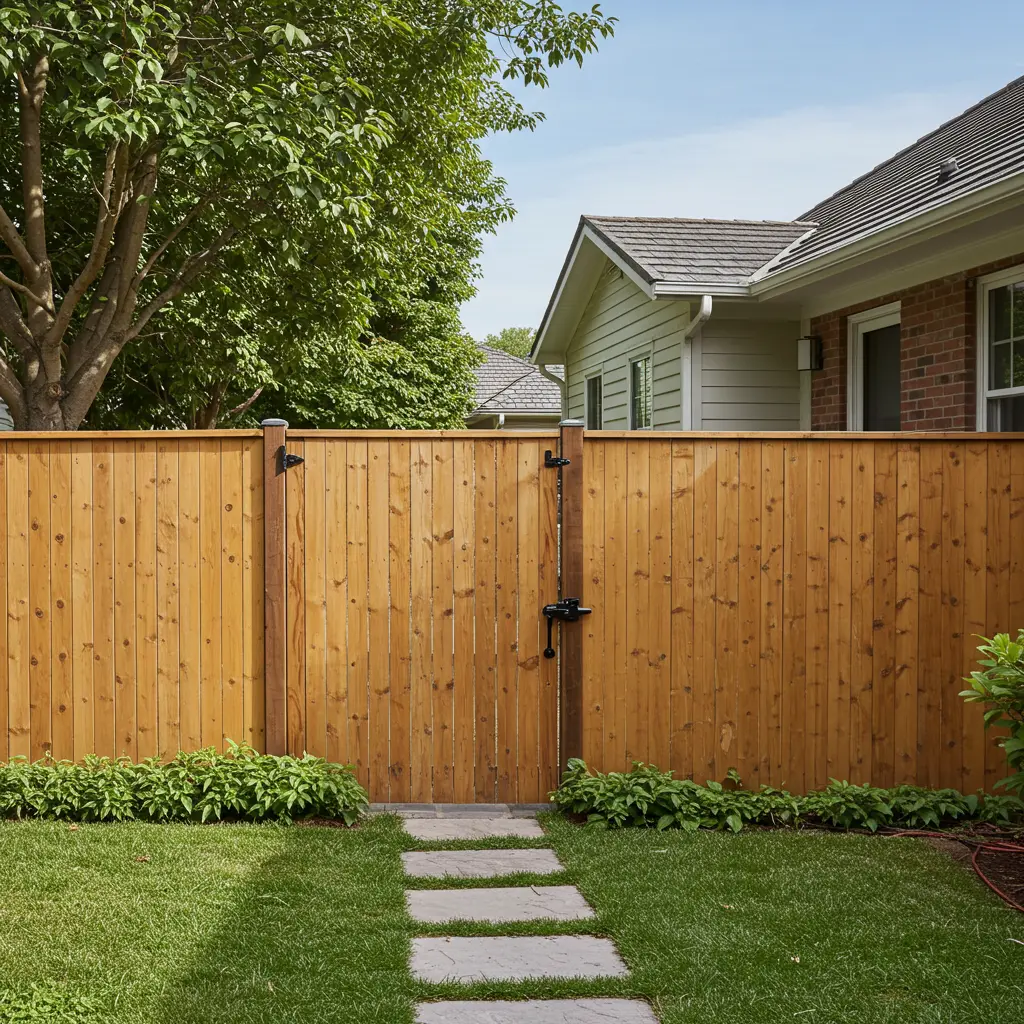
- The Gate is the Grand Entrance: Don’t treat the gate as an afterthought. It’s the “front door” to your backyard oasis. Invest in high-quality, non-sagging hardware (hinges and latch) and consider making the gate a design focal point.
- Break Up the Monotony: A long, unbroken wall of fencing can feel imposing and monotonous. Break up the line of sight by incorporating a decorative element, like a section of lattice, an arbor, or a built-in planter box.
- The Good Neighbor Rule: If possible, build a fence that is attractive on both sides. A “board-on-board” or “shadowbox” style looks great from your yard and your neighbor’s, which can make all the difference in maintaining good relationships.
What’s the Real Cost? A No-Fuss Budget Breakdown
| The Approach | Estimated Cost (per linear foot) | What Your Money Buys | The Little Extras (Don’t Skip These!) |
| The Budget Barrier | $15 – $30 | • A basic 6ft pressure-treated pine fence • Using prefab panels from a big-box store | • Post-hole digger rental • String line & stakes • A good level & speed square |
| The Polished Privacy Project | $30 – $75 | • A custom-built fence using premium lumber like cedar • A more complex design like board-on-board or horizontal planks | • A miter saw for clean, angled cuts • High-quality exterior stain & sealer • Decorative post caps & hardware |
| The Custom Enclosure | $75 – $200+ | • Incorporating elements like metal panels or masonry pillars • A very long or tall fence with complex terrain • Hiring help for post-setting or framing | • Permit fees (check local codes!) • A power auger rental for digging • Professional-grade tools |
The Design Menu: Your Step-by-Step Building Guide
Here are the essential steps to building your perfect private retreat. Each one comes with a breakdown to help you build with confidence.
1. Choose the Right Material for Your Privacy Fence
- Why It’s Crucial: This decision impacts your budget, the long-term maintenance schedule, and the entire aesthetic of your yard.
- Key Consideration: Wood (Cedar/Pine): Classic, natural, and customizable, but requires staining/sealing. Vinyl: Low-maintenance and durable, but offers fewer style options and can be more expensive upfront. Metal: Great for security and modern style, but often needs to be combined with other materials for full privacy. Composite: Looks like wood but is low-maintenance like vinyl, often the most expensive option.
- Pro-Tip: For a high-end, custom look on a budget, use pressure-treated pine for your posts and framing (the structure), and more beautiful cedar for your fence boards (the visible part).
2. Measure Twice, Cut Once – Precision Matters

- Why It’s Crucial: This adage is the #1 money-saving tip in construction. One wrong measurement can waste a whole piece of expensive lumber and throw off your entire project.
- Key Consideration: The most critical measurement is your property line. It’s highly recommended to get a professional survey if you are unsure, as building even six inches onto your neighbor’s property can lead to costly legal disputes.
- Pro-Tip: To ensure your corners are perfect 90-degree angles, use the 3-4-5 triangle method. Measure 3 feet down one line from the corner stake and 4 feet down the other. The diagonal distance between those two points should be exactly 5 feet.
3. Check Local Zoning Laws Before Building

- Why It’s Crucial: Failing to follow local regulations can result in fines or even a tear-down order from your city or HOA. This step is non-negotiable.
- Key Consideration: Look for common restrictions like: maximum fence height (often different for front vs. back yards), required “setbacks” from sidewalks or property lines, and sometimes even restrictions on certain materials or colors.
- Pro-Tip: Don’t just check the rules online. Call your local planning or zoning department. Tell them your address and your plan, and get a clear “yes” or “no.” If a permit is required, apply for it before buying any materials.
4. Dig Deep for Sturdy Fence Posts
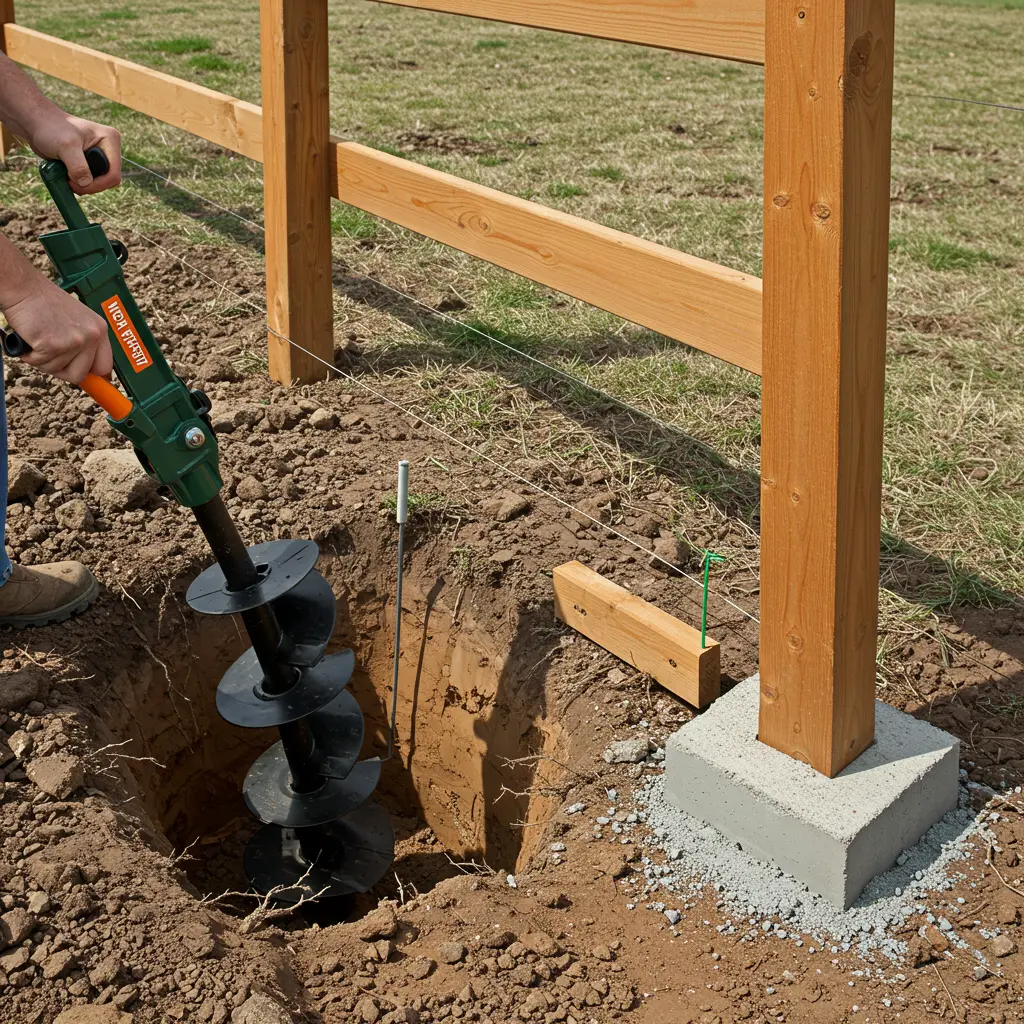
- Why It’s Crucial: The posts are the skeleton of your fence. If the posts fail, the entire fence fails. There are no shortcuts here.
- Key Consideration: A general rule is that 1/3 of your post length should be in the ground. For a 6-foot-tall fence, you should be using 8-foot posts and burying them at least 2 feet deep.
- Pro-Tip: After placing your post in the concrete-filled hole, use temporary 2×4 braces screwed to stakes in the ground to hold the post perfectly plumb (vertically level) in two directions while the concrete cures for 24-48 hours.
5. Opt for a Board-on-Board Design for Maximum Privacy
- Best For: Achieving 100% visual privacy and creating a strong, dimensional, and “good neighbor” fence.
- Key Consideration: This style uses more lumber than a simple side-by-side fence, so it will be slightly more expensive.
- Pro-Tip: A board-on-board fence is built with an overlapping pattern: a front board, a back board, a front board, etc., with about a 1-inch overlap on each side. This means that even if the boards shrink over time, no gaps will ever appear.
6. Staggered Panels for a Visually Appealing Fence

- Best For: Breaking up the monotony of a long fence line and adding a touch of custom design.
- Key Consideration: This requires more careful planning and cutting, but creates a beautiful rhythm.
- Pro-Tip: Create a pattern, such as two taller panels followed by one shorter panel, and repeat it down the fence line. This looks more intentional than a random staggering.
- Styling Cue: The shorter panels are a perfect place to feature a climbing plant or a decorative outdoor art piece.
7. Use Lattice or Trellis for Partial Privacy and Aesthetic Appeal
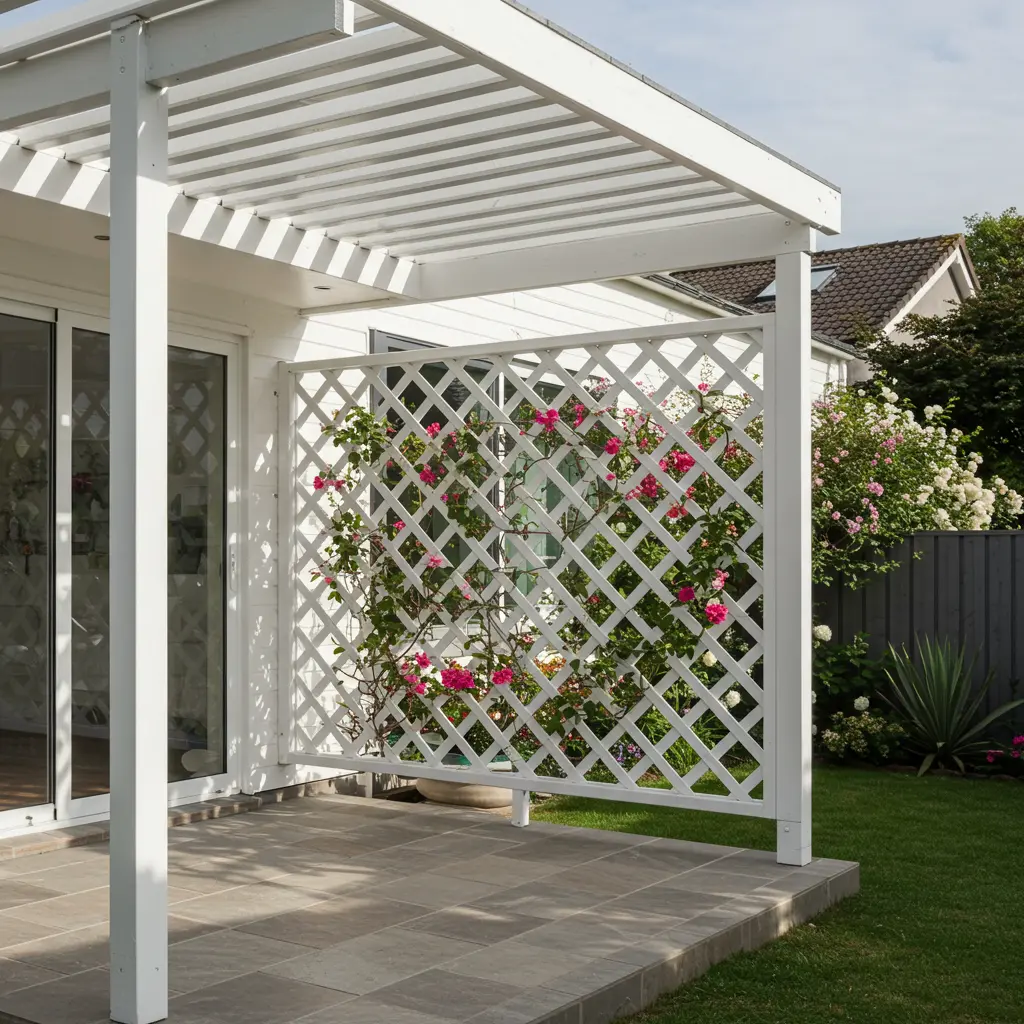
- Best For: Topping a solid fence to add height without creating a solid, imposing wall, or for use in areas where you want filtered light and airflow.
- Key Consideration: Standard privacy lattice has smaller openings than decorative lattice, so be sure to choose the right style for your privacy needs.
- Pro-Tip: Paint or stain the lattice the same color as the rest of the fence to make it look like an integrated, seamless part of the design.
- Styling Cue: This is the perfect framework for climbing plants like clematis or jasmine, which will eventually weave through the openings to create a beautiful living wall.
8. Incorporate Greenery for a Natural Barrier
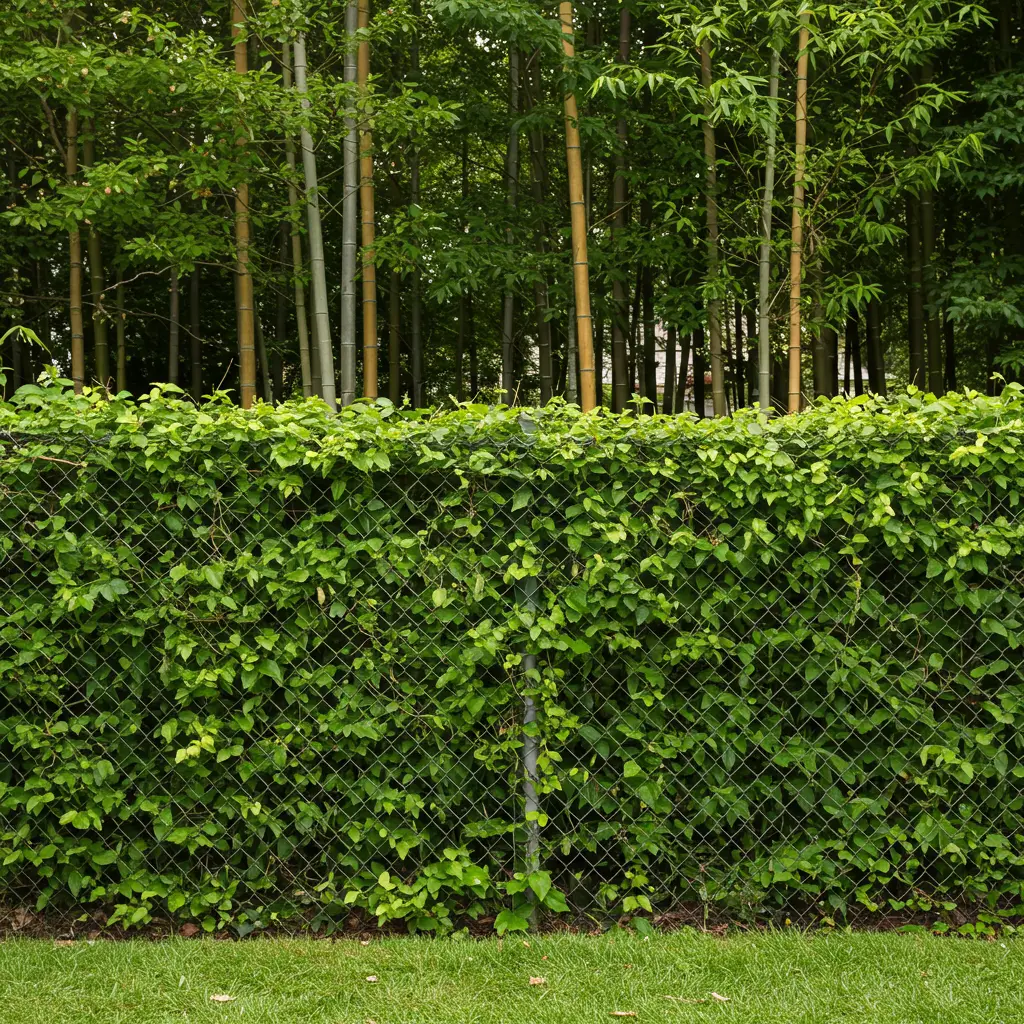
- Best For: Softening the hard lines of a fence and creating a lush, layered, and deep sense of privacy.
- Key Consideration: Choose plants appropriate for the amount of sun the area gets. For a dense screen, fast-growing evergreen shrubs like Arborvitae or Skip Laurel are excellent choices.
- Pro-Tip: Plant your shrubs or vines at the same time you build your fence. This allows them to start growing and filling in immediately.
- Styling Cue: A dark-stained or black fence creates a stunning, high-contrast backdrop that makes green foliage pop.
9. Add a Decorative Touch with Stained or Painted Wood

- Best For: Protecting the wood from the elements and integrating the fence into your overall landscape design.
- Key Consideration: A semi-transparent stain will showcase the natural beauty of the wood grain, while a solid stain or paint offers the most UV protection and allows for bold color choices.
- Pro-Tip: If possible, stain or paint your fence boards on sawhorses before you install them. It is infinitely faster and easier than trying to do it vertically once the fence is built.
- Styling Cue: Painting your fence a dark color, like black or charcoal gray, is a designer trick that makes the fence recede visually and makes the greenery in front of it look more vibrant.
10. Consider Soundproofing for an Ultra-Private Experience

- Best For: Homes on busy streets or with noisy neighbors, where dampening sound is as important as blocking sight.
- Key Consideration: This will not make your yard silent, but it can significantly reduce noise levels. The key principle is mass. A heavier, denser fence blocks more sound.
- Pro-Tip: The most effective DIY method is to build a solid board-on-board fence and then add a layer of exterior-grade mass-loaded vinyl (MLV) to the back, before covering it with another layer of fence boards.
11. Install a Lockable Gate for Extra Security
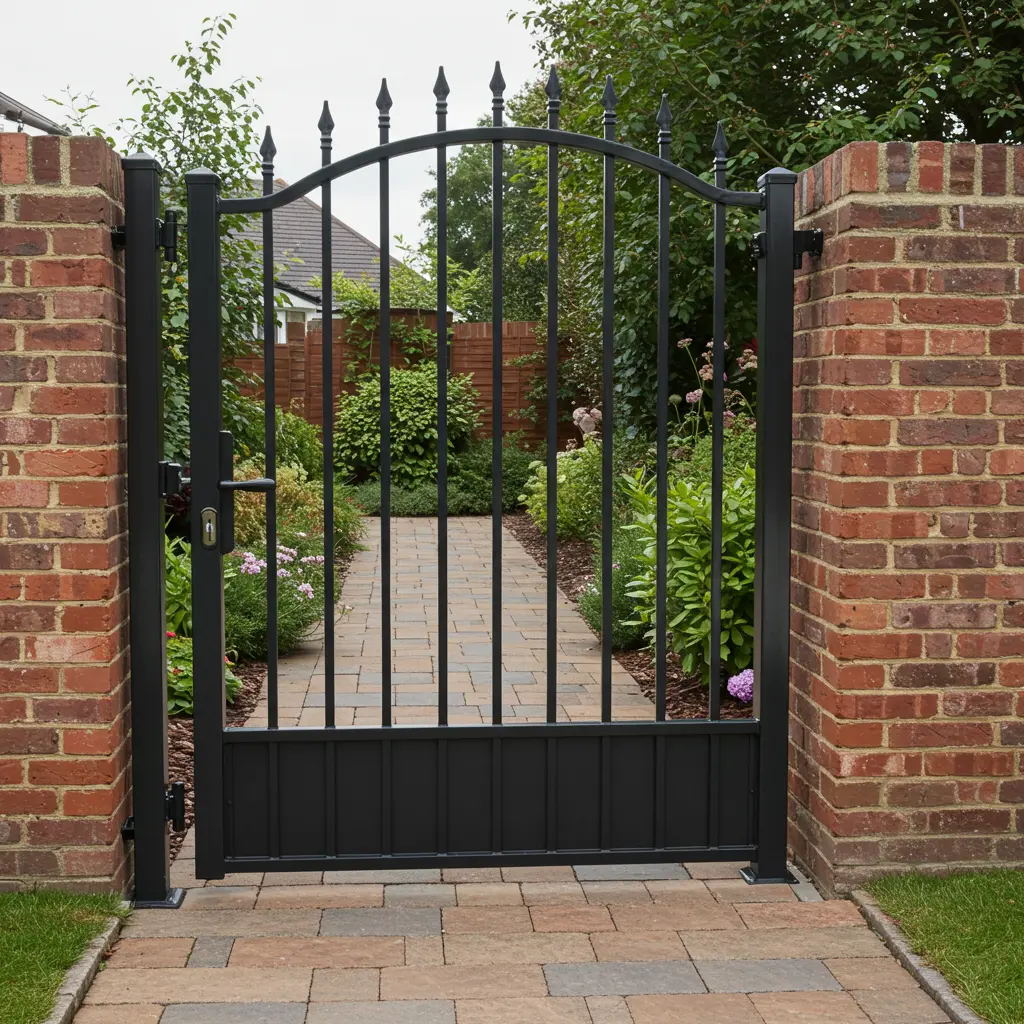
- Best For: Completing your privacy enclosure and providing peace of mind.
- Key Consideration: The gate will be the most-used, highest-stress part of your fence. Do not skimp on hardware. Use heavy-duty, adjustable hinges and a quality latch.
- Pro-Tip: Build a dedicated, robust frame for your gate out of 2x4s, with a diagonal cross-brace to prevent it from sagging over time. The gate should be built slightly smaller than the opening to allow for swing clearance.
12. Add Solar Lights for Nighttime Ambiance and Security

- Best For: An affordable, easy-to-install way to add safety, security, and a beautiful ambient glow to your fence line.
- Key Consideration: Solar lights require several hours of direct sunlight to charge fully. Place them on posts that receive the most sun during the day.
- Pro-Tip: Look for solar lights designed specifically as “post caps.” They fit perfectly on top of standard 4×4 or 6×6 posts and create a beautiful, integrated look.
- Styling Cue: The warm glow of solar lights creates a beautiful and welcoming atmosphere for evening entertaining.
13. Weatherproof Your Fence for Longevity
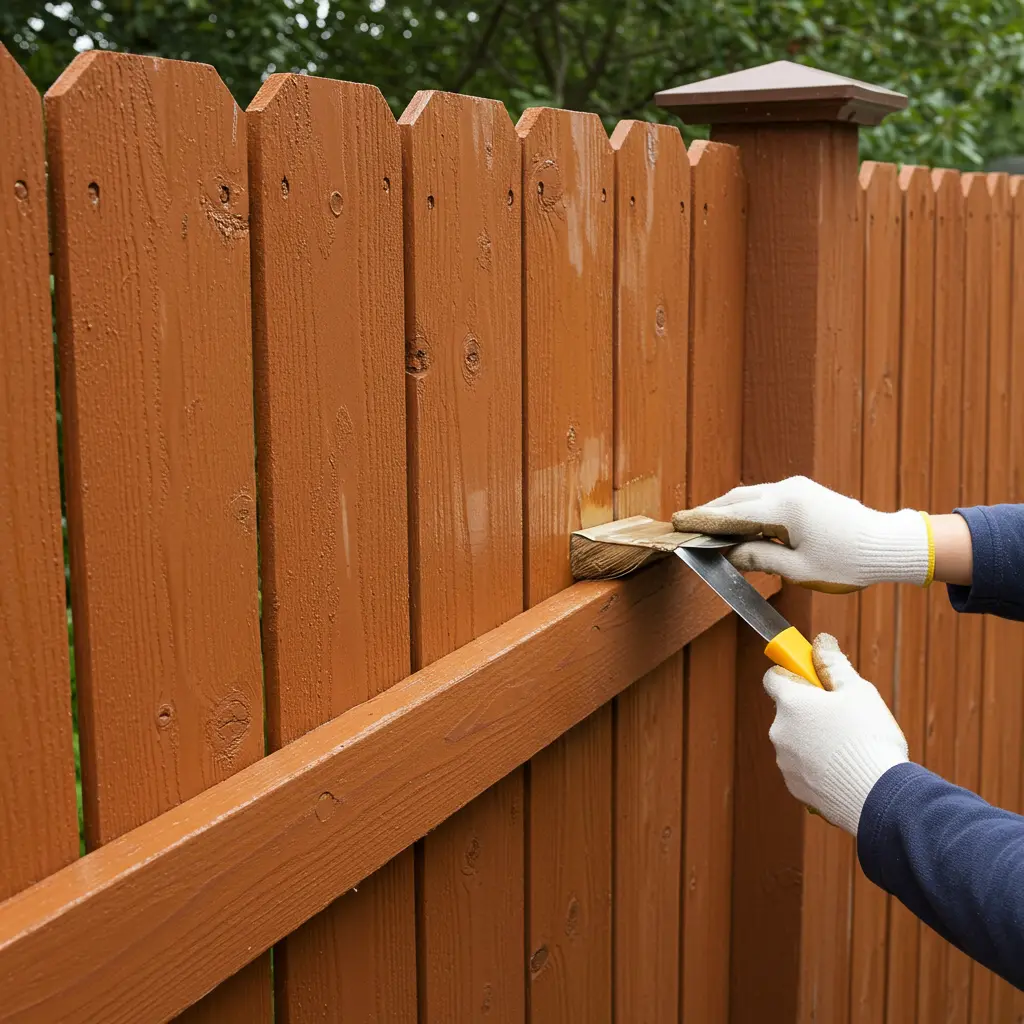
- Best For: Protecting your significant investment of time and money from rot, decay, and sun damage.
- Key Consideration: This is not a one-and-done step. A wooden fence will need to be re-sealed or re-stained every 3-5 years to keep it protected and looking its best.
- Pro-Tip: Even if you use pressure-treated lumber, you must apply a quality waterproof sealant. The pressure treatment protects against rot and insects, but the sealant is what protects against cracking, splitting, and warping from sun and water.
14. DIY or Prefab? Weigh Your Options
- Best For: Matching the project to your skill level, budget, and timeline.
- Key Consideration: Prefab Panels: Faster to install, requires less cutting and building skill. However, they are often lower quality and less customizable. DIY (Stick-Built): More time-consuming and requires more skill, but allows for complete customization, higher quality materials, and is often stronger and longer-lasting.
- Pro-Tip: A great hybrid approach: Set your posts (the hardest part), then attach prefab panels to them. This gives you a strong foundation with a faster installation.
15. Keep Up with Regular Maintenance for Lasting Results

- Best For: Ensuring your fence lasts for decades instead of just a few years.
- Key Consideration: Create a simple annual checklist. Walk the fence line every spring to check for loose boards, wobbly posts, or signs of rot.
- Pro-Tip: Keep vegetation from growing directly on or against the fence. Constant contact with damp leaves and soil is the fastest way to encourage rot, even in treated wood. Use a pressure washer on a low setting every couple of years to remove dirt and mildew before re-sealing.
Conclusion: Your Private Paradise Awaits!
And just like that, you’re no longer just looking at an open yard, you’re looking at the blueprint for your secluded oasis. You have the ideas, the inspiration, and the know-how to build a DIY privacy fence that adds immense value, beauty, and enjoyment to your home. This isn’t just a weekend project; it’s an investment in your peace and privacy.
It all starts with a single choice. Pick a spot for your first post, grab your shovel, and take the first small step.
You’ve got this.
