Table of Contents
- Assembly-Line Bulk-Production Guide and Cost Analysis
- Custom Photo Memory Jars with School Color Ribbons
- Diploma and Mortarboard Floral Centerpiece Containers
- Illuminated Mascot Lanterns with Achievement Inserts
- Personalized Hobby-Themed Stands with Childhood Photos
- Celebrating Every Milestone with Style
- Grad Party Design Dilemmas Solved
Celebrating a high school graduation is a momentous occasion that deserves a beautifully styled setting.
Creating a cohesive look for your party does not require a professional decorator; instead, it starts with a clear vision and a few well-placed details.
We will explore how to balance color palettes and textures to ensure your tables reflect the unique achievements of your graduate.
Practicality is the cornerstone of any successful DIY project, especially when you are hosting a large group of family and friends.
By focusing on budget-friendly materials like glass vessels, natural greenery, and thoughtful lighting, you can achieve a high-end aesthetic without a luxury price tag.
These centerpiece ideas prioritize simplicity and elegance, making them accessible for even the most novice crafter.
Every design choice should contribute to the overall warmth and comfort of the celebration.
Whether you prefer a modern minimalist approach or a more traditional vibe, these fifteen projects offer versatile solutions for any venue. Let us transform your space into a sophisticated environment that feels both welcoming and intentional for this special milestone.
Assembly-Line Bulk-Production Guide and Cost Analysis
Header Image: wide architectural shot of a styled room.
Context: Home Decor article about ‘DIY High School Graduation Party Centerpiece Ideas’.
Section: ‘Assembly-Line Bulk-Production Guide and Cost Analysis’.
Image: High-End Interior Design Photography, Architectural Digest Style, 4k, Natural Lighting, 9:16 ratio.
A wide shot of a bright, modern studio table covered in graduation party supplies, glass vases, and silk ribbons.
There is no text, no words, no letters, no signboards, and no logos.
Organizing a large-scale DIY project requires a clean surface. A raw wood table offers plenty of room. This layout provides the spatial flow needed to move from assembly to storage easily.
Efficiency is the bridge between a great design idea and a stunning celebration.

Optimizing Your Production Station
Group your materials by texture and weight. Place heavy glass jars at the start of your line. Place delicate velvet ribbons or linen scraps at the end to prevent snagging during the process.
Assign specific tasks if you have help. One person can handle the adhesive, while another focuses on placement. This creates a uniform look for all your DIY centerpieces.
When creating multiples of the same design, work in stages rather than finishing one at a time. This ensures a uniform look across all tables.
Martha Stewart, Event Planning Expert

Component Cost and Material Breakdown
Buying in bulk reduces the price per item. Focus on versatile materials like glass and wood. Using simple centerpieces as a base helps manage your budget effectively without sacrificing style.
| Style Choice | Core Material | Est. Cost Per Unit |
|---|---|---|
| Minimalist Glass | Cylinder Vase | $5 – $8 |
| Rustic Organic | Raw Wood Slices | $10 – $12 |
| Modern Photo | Acrylic Frames | $7 – $10 |
Keep your workspace well-lit with warm ambient lighting. This helps you catch small details like glue drips or uneven twine. A functional space leads to a professional, curated finished product.
The Designer’s Workflow
- Create a ‘Master Sample’ to keep at the head of your table, ensuring every centerpiece matches your original vision perfectly.
- Shop at wholesale floral supply warehouses for ribbons and vases; these ‘trade secrets’ often cost 40% less than standard craft retailers.
- Pre-cut all your twine and ribbon lengths before starting the assembly line to maintain a rhythmic, efficient production pace.
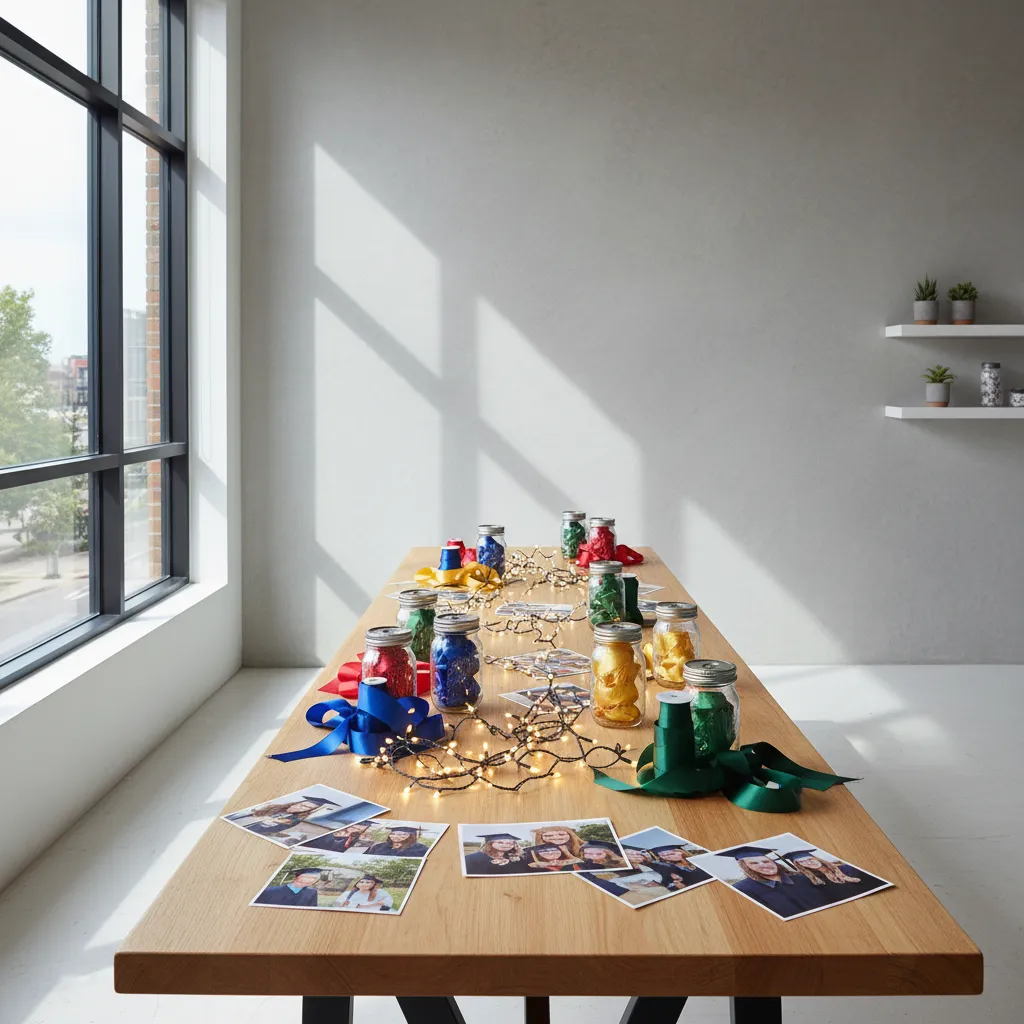
Custom Photo Memory Jars with School Color Ribbons

Photo memory jars create a nostalgic focal point for your celebration. They allow guests to walk through the graduate’s journey while they dine at their tables.
Use clear glass Mason jars or sleek cylinder vases for this project. The smooth surface contrasts beautifully with textured satin ribbons in specific school colors.
A memory jar isn’t just a centerpiece; it’s a glowing tribute to a graduate’s unique journey and bright future.
Selecting Textures and Lighting

Print your chosen photos in black and white for a timeless look. Curate a selection of sports, academic, and childhood snapshots to fill the visual space.
Secure the photos inside the jar using small pieces of double-sided tape. This ensures they stay visible through the glass without sliding down or overlapping.
Personal details are what guests remember long after the party is over. It is about sharing a story that resonates with every guest in the room.
Mindy Weiss, Celebrity Event Planner
Insert battery-operated fairy lights to create a warm ambient glow. This lighting effect highlights the photos and adds a magical feel to the room’s atmosphere.
| Material | Design Purpose |
|---|---|
| Glass Mason Jar | Provides a clear view of the photos while protecting the paper. |
| Fairy Lights | Creates a warm, ambient glow that highlights the imagery. |
| Satin Ribbon | Adds a soft texture and reinforces the school color theme. |
Wrap the jar neck with layers of school-colored ribbon. Add a small charm or a graduation year tag to provide a sophisticated and curated finish to the piece.
For more creative inspiration, you can explore 22 DIY Centerpieces to find the perfect style for your upcoming celebration.
These jars provide a dual purpose for your event. They act as decor and a thoughtful storytelling tool that sparks joy and conversation among your guests.
If you prefer a more minimalist look, 20 simple centerpieces can help you keep the table clutter-free while maintaining a stylish aesthetic.
Designer Secret
- To prevent photos from curling over time inside the glass, mount them onto heavyweight cardstock before placing them into the jar for a crisp, professional look.
- Mix ribbon textures in your school colors, such as pairing a ribbed grosgrain with a smooth satin, to add visual depth and a high-end boutique feel to the jar’s neck.
- Place the battery pack for your fairy lights at the very bottom and cover it with a layer of decorative pebbles or shredded paper to keep the mechanics hidden while the photos glow.
Diploma and Mortarboard Floral Centerpiece Containers

Transforming academic icons into floral vessels blends tradition with modern design. This method turns symbols into the functional focal point of your party tables.
Creating the Mortarboard Vase

The mortarboard cap offers a broad, flat surface that works beautifully for low-profile arrangements. Its soft velvet or matte fabric adds rich texture to the table.
Place a shallow, water-filled dish or soaked floral foam in the center of the cap. This provides a stable base for your greenery, ensuring it stays fresh for hours.
Let the tassel drape naturally over the edge of the table. This adds movement and a sense of curated elegance to the overall spatial flow of your dining area.
Design is where academic achievement meets artistic expression through texture and light.
Styling Diploma Scroll Tubes

For a diploma-style container, roll heavy white cardstock into cylinders. Secure them with silk ribbons to mimic a real scroll and create a clean, minimalist look.
Insert slim glass vials inside these paper tubes to hold water. This keeps the paper dry while allowing you to display tall, airy stems like lilies or snapdragons.
To enhance the mood, explore 20 beautiful flower decoration ideas for parties at home for more inspiration on seasonal blooms.
Arrange these scrolls in clusters of three at varying heights. This technique creates a dynamic visual rhythm that draws the eye across the entire celebration space.
A centerpiece is not just flowers in a vase; it is a conversation piece that sets the mood for the entire celebration.
Preston Bailey, Event Design Specialist
Material and Aesthetic Comparisons
Choosing between these two styles depends on your desired atmosphere. Each offers unique benefits for the spatial flow and usability of your graduation party tables.
| Feature | Mortarboard Style | Diploma Style |
|---|---|---|
| Visual Height | Low and Lush | Tall and Vertical |
| Texture | Velvet or Matte | Smooth Cardstock |
| Lighting Effect | Shadow and Depth | Bright and Reflective |
Consider how these containers interact with your current furniture. You can find more 21 dining room table centerpiece ideas to complement your existing home decor style.
Finish the look by placing small LED tea lights around the base. The warm ambient glow will highlight the fine details of the tassels and the crisp white paper.
Using these icons as containers improves usability by keeping the decor relevant to the theme. It creates an organic connection between the guest of honor and the room.
Artisan Grad Secrets
- Protect your cardstock scrolls and velvet caps from water damage by tucking slim glass vials or plastic liners inside before adding your stems.
- Create a sense of rhythm and depth by grouping diploma tubes in clusters of three at varying heights rather than lining them up in a row.
- Add a professional finishing touch by draping the mortarboard tassel over the table edge and placing LED tea lights at the base to highlight the textures of the fabric and paper.
Illuminated Mascot Lanterns with Achievement Inserts

Illuminated lanterns provide a warm, ambient glow that instantly softens the party atmosphere.
They serve as functional light sources while highlighting the graduate’s unique journey through school.
This design uses school colors to create a curated and cohesive look across the entire event space.
Crafting the Visual Layers

Start with a classic metal or glass lantern to establish a sturdy and elegant focal point.
Wrap the interior with translucent vellum paper printed with the school mascot and key achievements.
The texture of the vellum diffuses light, creating a dreamy effect similar to professional event styling.
Lighting is the single most important element in any event. It sets the mood and creates the energy.
David Tutera, Celebrity Event Designer
Practical Lighting and Placement

Use battery-operated LED pillars instead of real wax to ensure safety and a long-lasting flicker.
This choice improves usability by allowing guests to move freely without worrying about open flames.
Place these lanterns on a modern dining table runner made of linen or velvet for a tactile finish.
You can find more inspiration for sophisticated layouts in 17 New Year Eve Party Decorations Table Settings Ideas.
Celebrate the journey and light the path forward with personalized mascot lanterns.
| Lantern Type | Visual Effect | Best For |
|---|---|---|
| Black Metal | Modern & Bold | Evening outdoor parties |
| Clear Glass | Airy & Minimal | Indoor brunch settings |
| Frosted Jar | Soft & Romantic | Intimate family dinners |
By focusing on spatial flow, these centerpieces stay low enough to allow for easy conversation between guests.
These lanterns combine sentimental value with professional aesthetics, making them a standout choice for any celebration.
Designer Glow-Up Hacks
- Use high-resolution graphics for your vellum inserts to ensure mascot details and text remain sharp and professional when illuminated.
- Opt for remote-controlled LED candles so you can adjust brightness or switch to a flickering mode without opening the lanterns during the party.
- Secure the vellum edges with thin strips of clear double-sided tape inside the lantern frame to keep the inserts perfectly taut and centered.
Personalized Hobby-Themed Stands with Childhood Photos

Integrating childhood photos with hobby items creates a curated, nostalgic atmosphere. It honors the graduate’s past while celebrating their future path.
Start with a sturdy base, like a block of raw oak or a sleek brass tray. This provides a stable foundation for more delicate items, such as vintage snapshots.
Use small wooden clips to attach photos to thin wire or twine. This adds a tactile, organic feel that contrasts beautifully with glossy prints.
Design is about capturing a moment in time and turning it into a lasting memory.
Curating the Visual Story

For a musician, nestle sheet music and a miniature instrument among the photos. This spatial flow guides the eye through their personal story.
If you need more inspiration for youthful spaces, explore budget-friendly centerpieces that work for various ages and styles.
Mixing textures like smooth ceramic and rough twine adds depth. This combination creates a vignette that feels both sophisticated and cozy for guests.
The best rooms are those that tell a story about the people who live in them.
Bunny Williams, Interior Designer and Author
Selecting the Right Materials

Choose materials that reflect the graduate’s unique personality. A velvet runner can soften the look of more industrial hobby items like tech or tools.
For more formal layout ideas, look at these Spring dining table centerpieces to see how to balance scale and height.
The following table helps you pair specific hobbies with the best decorative textures to ensure a cohesive look across the party space.
| Hobby Type | Primary Material | Style Vibe |
|---|---|---|
| Sports | Leather & Raw Wood | Rustic & Energetic |
| Arts | Canvas & Velvet | Creative & Whimsical |
| Music | Brass & Aged Paper | Classic & Timeless |
| Science | Glass & Matte Metal | Modern & Minimalist |
These stands improve functionality by keeping loose items contained. They act as a focal point that keeps guests engaged and talking throughout the evening.
Place the tallest elements in the center to maintain balance. This ensures the centerpiece does not obstruct the view of guests sitting across from each other.
Memory Maker’s Guide
- Layer photos at varying heights using clips of different lengths to create a dynamic, three-dimensional display that captures attention from every angle.
- Incorporate micro-LED fairy lights around the base of the stand to softly illuminate vintage snapshots and add a polished, gallery-like feel.
- Coordinate your photo finish with your theme; use black-and-white prints for a classic brass and paper look, or high-gloss color for modern sports and tech themes.
Celebrating Every Milestone with Style
Creating your own centerpieces adds a personal touch to this major milestone. From photo jars to rustic wood slices, these designs capture the graduate’s unique journey.
Remember that bulk production is about efficiency and consistency. Organize your workspace to maintain a high-end look while staying within your party budget.
With school colors and thoughtful textures, your tables will look professionally curated. Go create a space that feels as warm and bright as their future.
Grad Party Design Dilemmas Solved
Use the primary school color for large ribbons and the secondary for small accents. This keeps the design sophisticated rather than overwhelming for your guests.
Absolutely. Most dry elements like wood slices and ribbon-wrapped jars can be assembled weeks early. Just add fresh flowers or photos the day before the event.
Look for cylinder vases at local thrift stores or dollar shops. Buying in bulk online also drastically reduces the cost per unit for larger graduation parties.
Warm fairy lights or flameless tea candles create a cozy glow. They highlight textures like glass and velvet without the safety risk of open flames.
