Is your home looking a little too… normal for the season? Just a living room on a Tuesday, not quite ready for a night of delightful frights? You’re in the right place to change that.
Halloween party decor shouldn’t just be a few store-bought skeletons; it should be the very atmosphere of your event, a backdrop for spooky stories, monster mashes, and cherished memories.
This is your creative playbook for transforming your home into a haunted spectacle that’s not only impressive and fun but feels deeply, personally spooky.
We’ll explore chillingly simple crafts, decode the secrets of creating a haunted ambiance, and walk through the practical steps to bring your nightmare to life.
By the end, you’ll see your home not as a house to be decorated, but as a stage waiting for a haunting.
Before You Begin: Dreaming Up Your Perfect Haunt
The most memorable parties start with a little bit of plotting, not just a trip to the craft store.
Before you cut a single piece of black paper, let’s lay the groundwork for a theme you’ll love. Are you conjuring a sophisticated gothic mansion, a creepy witch’s coven, a mad scientist’s lab, or a classic monster mash? Your theme will be your guide.
The Secrets of Style: Simple Rules for a Stunning Look
Design theory sounds intimidating, but it’s really just about what makes a space feel spooky. Here are a few simple secrets:
Getting the Scale Right: Vary the size of your decorations to create visual interest.
- Go Big for Impact: Use one or two large-scale decorations, like a giant spider web in your entryway, to create an immediate “wow” factor.
- Go Small for Discovery: Fill in the space with smaller details, like potion bottles on a shelf, for guests to discover throughout the night.
Creating Balance (or Imbalance): The goal is a controlled chaos that feels intentional.
- Symmetrical Spookiness: Think of a fireplace mantel perfectly balanced with two identical candelabras and a haunted portrait in the center. This feels classic, gothic, and elegant.
- Asymmetrical Terror: Imagine a swarm of bats erupting from one corner of the room and flying across the ceiling. This feels dynamic, chaotic, and unsettling.
The 3-Color Haunting Rule: This is a foolproof recipe for a cohesive and spooky color palette:
- 60% is your main color: Black. It creates shadows, drama, and the perfect moody base.
- 30% is your secondary color: White/Grey. Think ghosts, spiderwebs, and smoke. This provides crucial contrast.
- 10% is your accent: A pop of color. Use blood red for horror, deep purple for magic, or slime green for a monster lab.
Lighting is Everything: This is the most important secret. Dim your main lights and use accent lighting uplights in corners, candles (or LEDs), and colored bulbs to create long shadows and an eerie glow. A spooky decoration in bright light is just a craft; in dim light, it’s a terrifying silhouette.
What’s the Real Effort? A No-Fuss Project Breakdown
| The Approach | Estimated Cost | What Your Money Buys | The Little Extras (Don’t Skip These!) |
| The Last-Minute Frights | $10 – $40 | • Craft paper, cheesecloth • Black trash bags • Glue, tape, and string | • A good pair of scissors • A hot glue gun • Lots of tape |
| The Weekend Haunting | $40 – $100 | • Styrofoam or cardboard • A variety of empty bottles • Battery-powered LED lights | • A can of spray paint • Fishing line (for floating effects) • Removable adhesive hooks |
| The Immersive Experience | $100 – $250+ | • Larger props like skeletons • A fog machine • Simple electronics or sound effects | • A dedicated power strip • Blackout curtains • A spooky playlist |
The Design Menu: Finding Your Signature Spook
Here are the ingredients for your perfect Halloween party. Each one is a simple DIY project designed for maximum atmospheric impact.
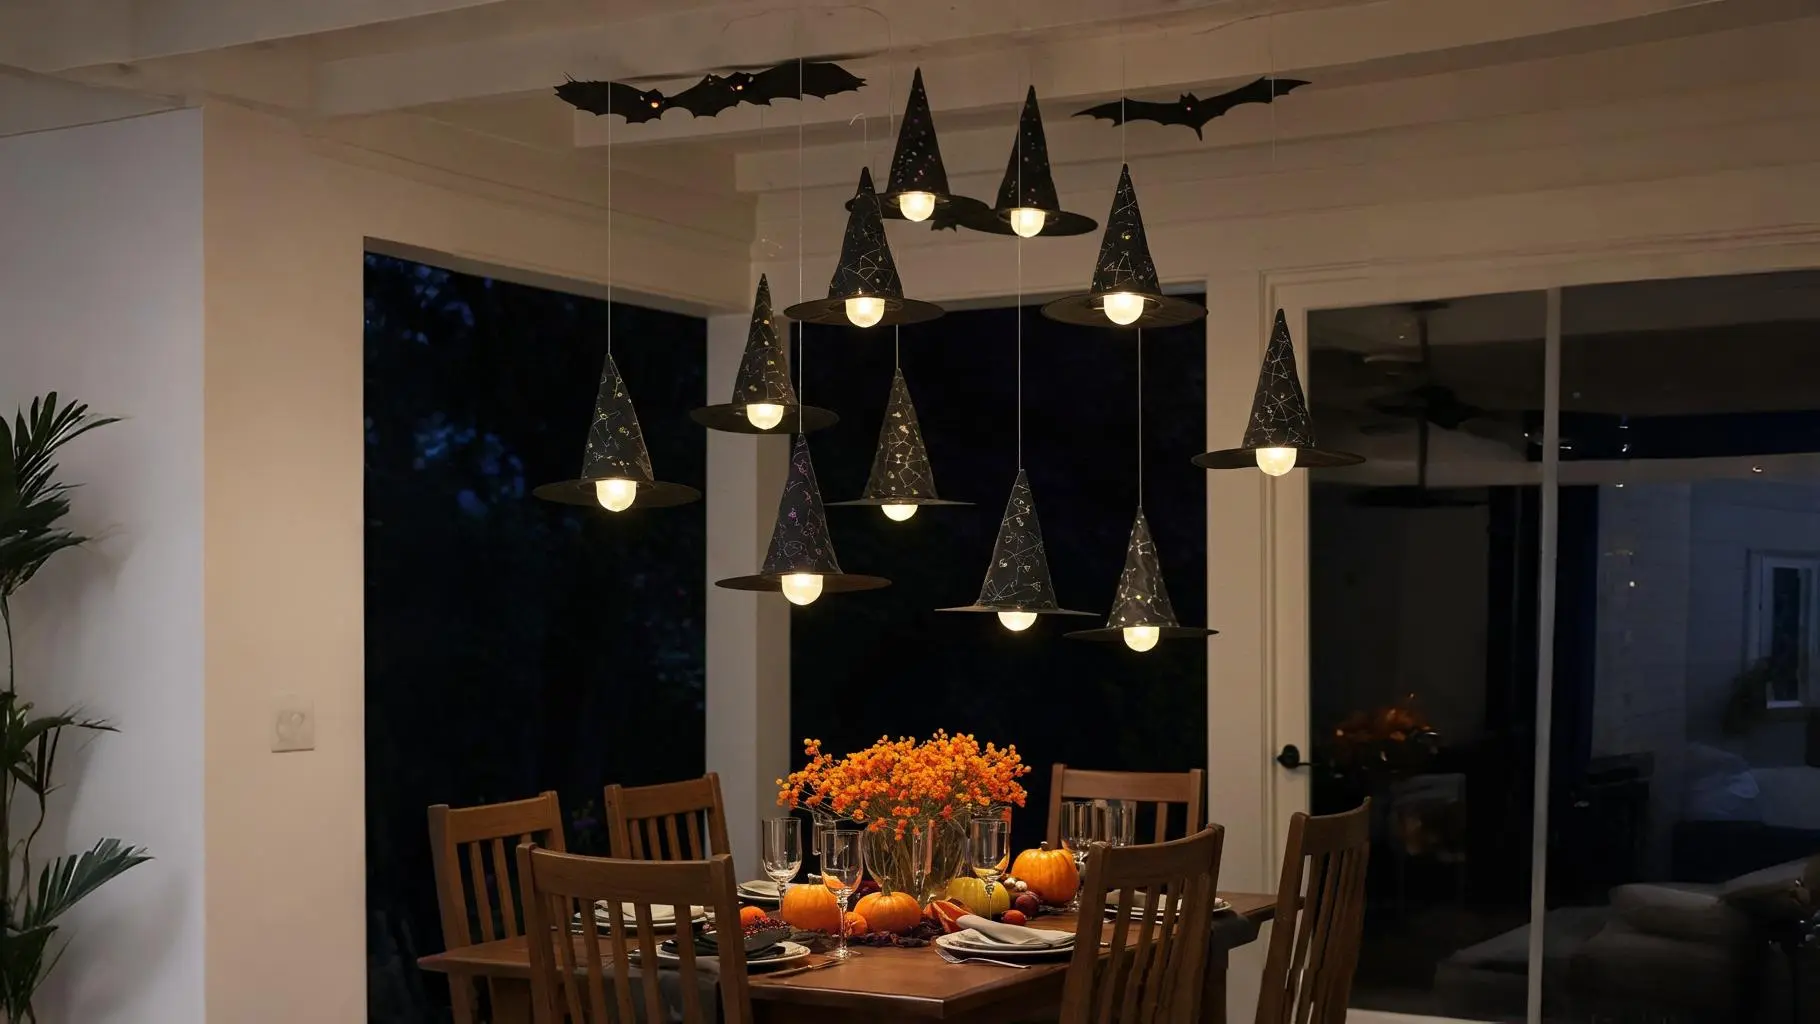
1. The Floating Witch Hats

- Best For: Creating a magical, high-impact focal point over a dining table, in an entryway, or on a covered porch.
- Key Consideration: You need a ceiling or overhead structure to hang them from. Ensure they are high enough that tall guests won’t bump into them.
- Pro-Tip: Use a needle to thread clear fishing line through the point of each hat and secure it with a knot and a dab of glue. Hang battery-powered LED tea lights inside for a truly enchanting glow.
- Styling Cue: Hang the hats at varying heights to create the illusion of a floating, swirling coven.
2. The Trash Bag Spider Webs

- Best For: A super cheap, high-impact way to cover large windows, doorways, or walls.
- Key Consideration: This works best with black, non-textured trash bags. The cutting process is similar to making paper snowflakes and can take a little practice.
- Pro-Tip: After cutting the folded bag into strips (leaving the center spine intact), gently stretch the plastic. The more you stretch, the more delicate and web-like it will look.
- Styling Cue: Tape these giant webs in a doorway and add a large, fake spider to the center to create a creepy entrance to a room.
3. The Ethereal Cheesecloth Spirits
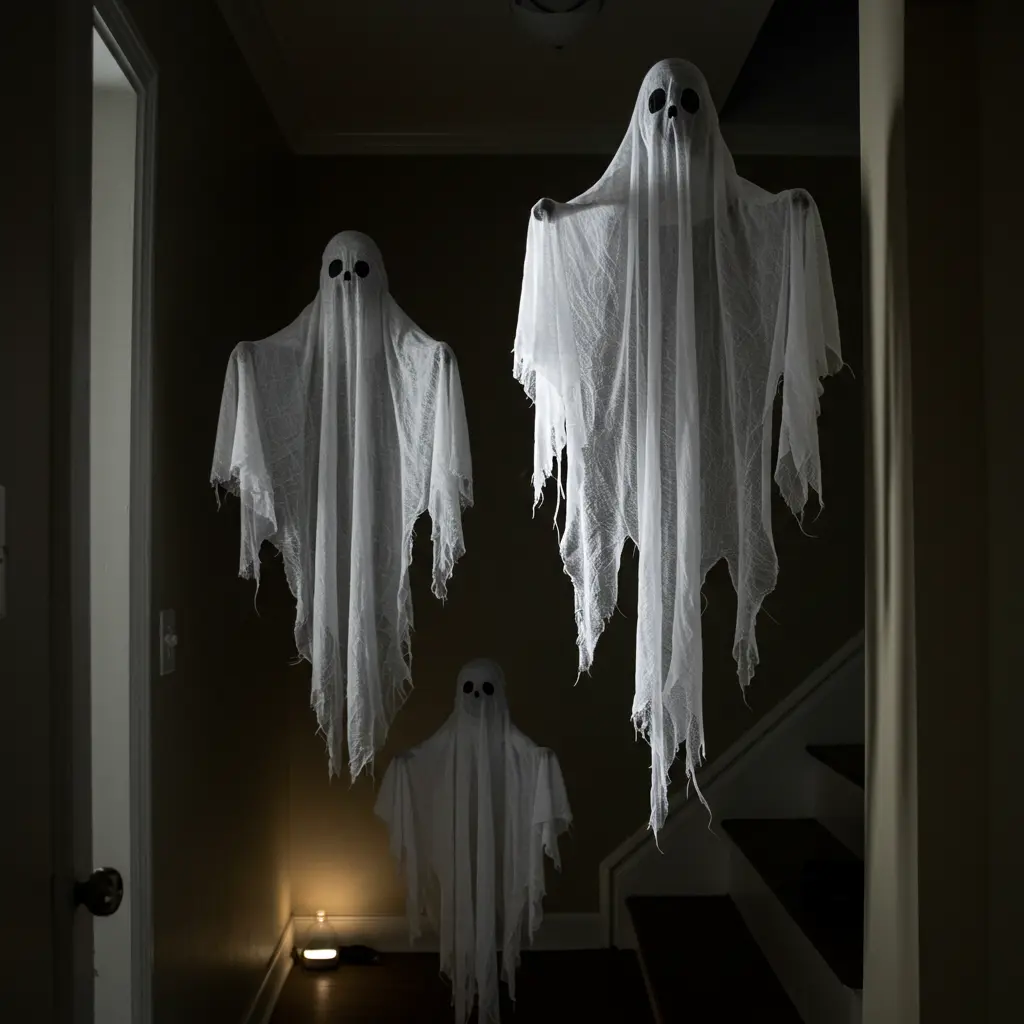
- Best For: Creating ghostly figures that seem to float in corners, hallways, or dangle from trees.
- Key Consideration: You’ll need a liquid starch mixture and a form (like a bottle with a balloon on top) to shape the cheesecloth. It needs about 24 hours to fully dry and harden.
- Pro-Tip: Shred the bottom edges of the cheesecloth before you drape and starch it. This will give your finished ghost a tattered, wispy, and more realistic look.
- Styling Cue: Hang them in a dimly lit hallway with a small, cool-toned uplight beneath them to make them glow menacingly.
4. The Mad Scientist Specimen Jars
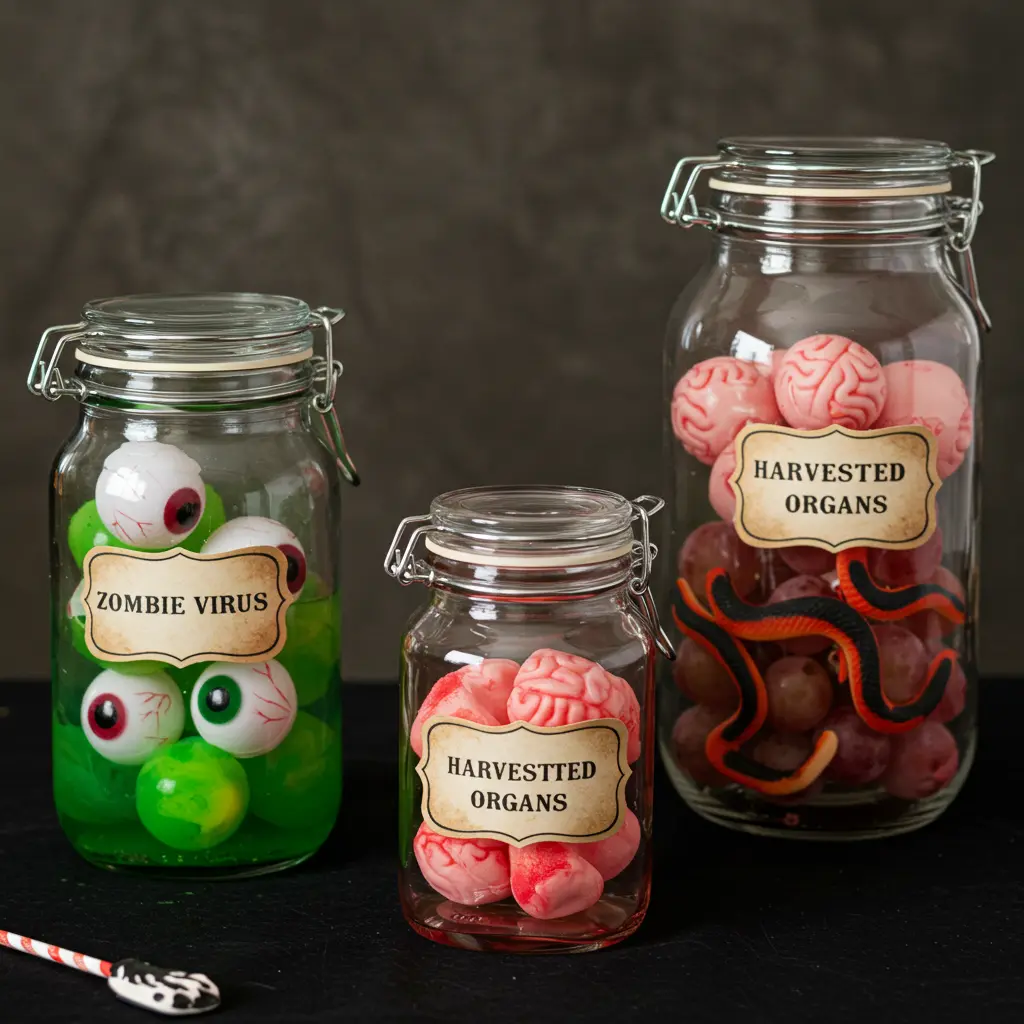
- Best For: Adding creepy details to a food and drink table or a “mad lab” themed area.
- Key Consideration: Use a variety of glass jars with lids. The contents are key to the effect.
- Pro-Tip: Fill jars with water and a few drops of food coloring (green or yellow works best). Add creepy items like plastic eyeballs, rubber snakes, cauliflower florets (to look like brains), or peeled grapes.
- Styling Cue: Create aged-looking labels with spooky names (“Zombie Virus,” “Harvested Organs”) by staining paper with a tea bag, tearing the edges, and gluing them on.
5. The Enchanted Floating Candles

- Best For: A magical, Harry Potter-inspired look, perfect for a dining room or main party space.
- Key Consideration: This requires paper towel or toilet paper tubes and battery-powered LED taper candles. It’s a bit of a project but the result is stunning.
- Pro-Tip: Use a hot glue gun to create “wax drips” around the top edge of the painted paper towel tubes before inserting the LED candle. It makes them look much more realistic.
- Styling Cue: Hang dozens of these from the ceiling with fishing line at different heights to create a breathtaking, magical canopy of light.
6. The Bloody Handprint Window Clings
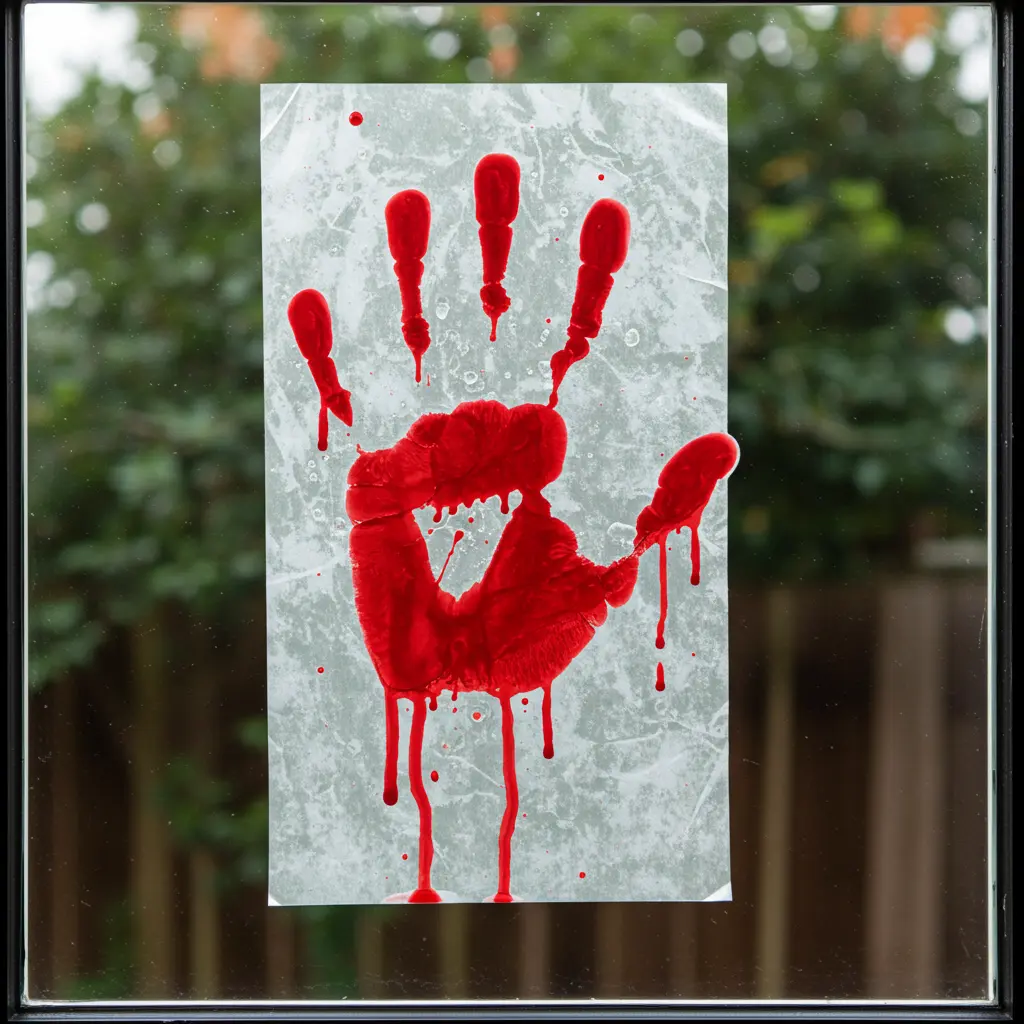
- Best For: A classic horror movie scare for windows, mirrors, and shower doors.
- Key Consideration: This DIY version is temporary and easy to clean up. Don’t use actual paint on your glass!
- Pro-Tip: Mix white school glue with red food coloring. Paint the mixture onto a sheet of wax paper in the shape of a handprint and some drips. Let it dry completely (1-2 days), then peel it off. It will cling to glass like a store-bought gel cling.
- Styling Cue: Place one on the inside of the front door’s window or on the bathroom mirror for a jump-scare moment when a guest is alone.
7. The Cardboard Tombstones

- Best For: Turning your front yard or the entryway of your home into a spooky graveyard.
- Key Consideration: If using outdoors, they need to be sealed with a waterproof coating and securely staked into the ground.
- Pro-Tip: After cutting the tombstone shape, spray paint it with a grey “stone texture” spray paint. Then, use a sponge to dab on black and green craft paint to simulate age and moss.
- Styling Cue: Write funny, pun-filled epitaphs on them (“Here lies Ben Better,” “Ima Goner”) and arrange them at crooked angles. Add a pile of loose dirt in front of one for a “freshly dug” look.
8. The Swarm of Paper Bats
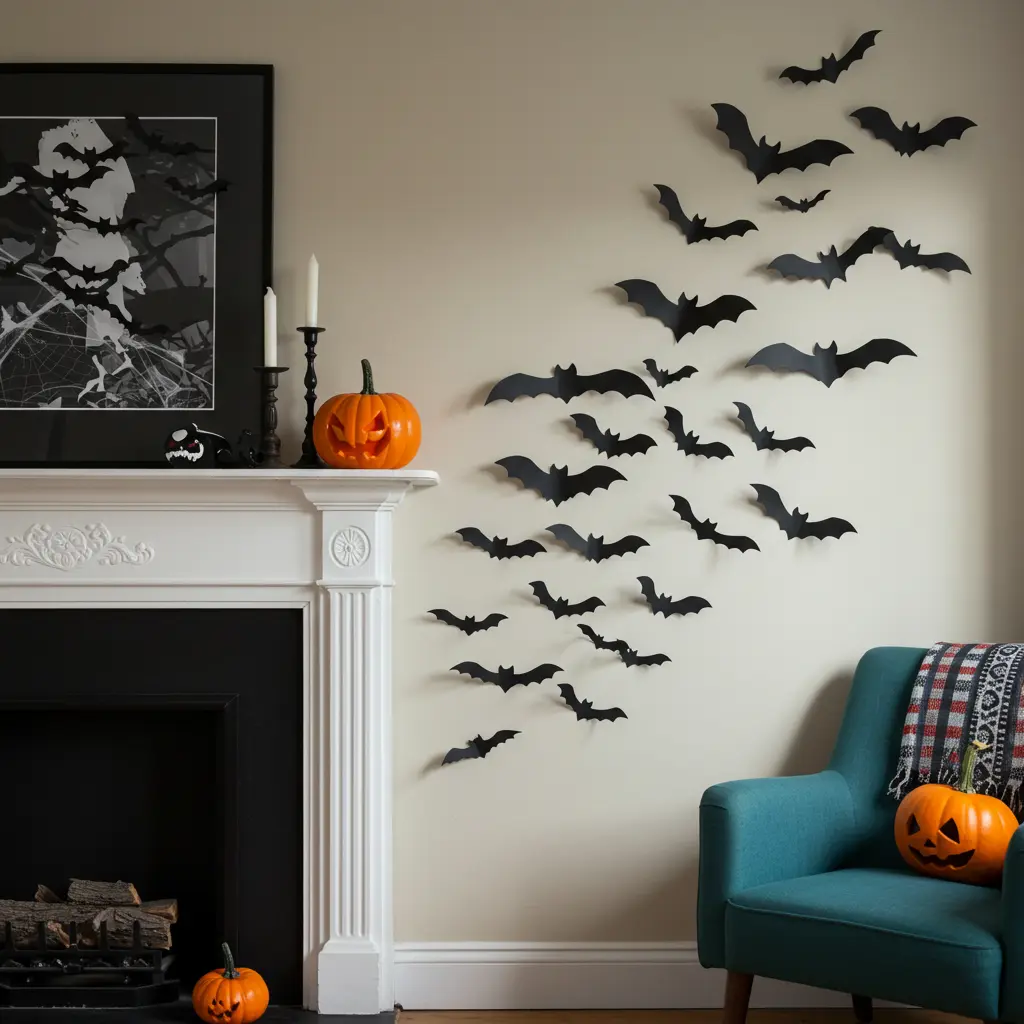
- Best For: A dramatic, 3D wall art installation that looks impressive but is incredibly simple.
- Key Consideration: Use black cardstock, as it’s sturdier than paper and holds its shape better.
- Pro-Tip: Use a bat stencil in 2-3 different sizes to make your swarm look more natural. After cutting them out, fold the wings up slightly to give them a 3D effect before sticking them to the wall with removable poster putty.
- Styling Cue: Arrange the bats so they look like they are flying out of a fireplace, a closet, or from behind a piece of furniture for a dynamic, startling effect.
9. The Creepy Spider Invasion
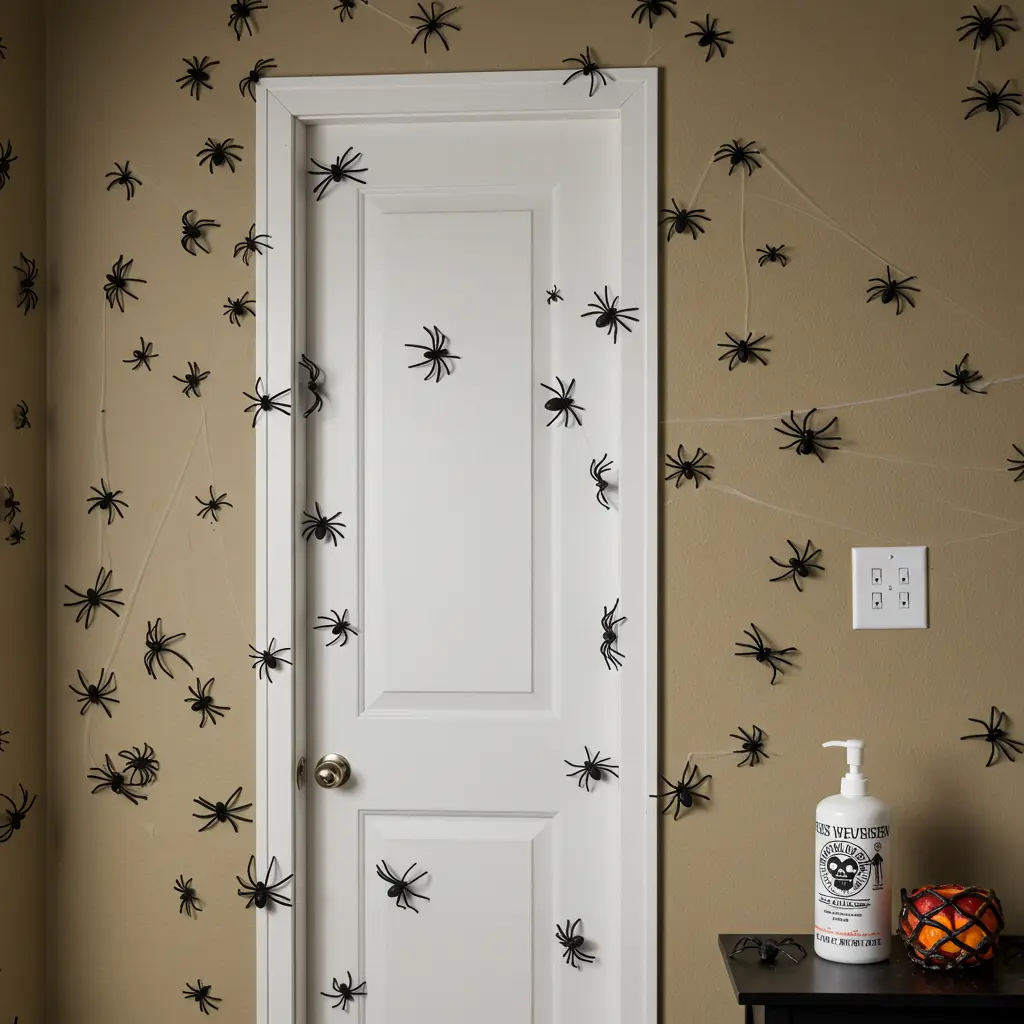
- Best For: Creating a skin-crawling feeling of infestation on a budget.
- Key Consideration: More is more! The effect comes from having a huge number of spiders.
- Pro-Tip: Buy a bulk bag of small, plastic spider rings and cut the ring part off. Use poster putty or hot glue to stick them everywhere crawling up walls, over picture frames, onto curtains, and even on the soap dispenser in the bathroom.
- Styling Cue: Create a “trail” of spiders leading from a crack under a door or a window, making it look like they have a point of entry.
10. The Witch’s Apothecary Potion Bottles
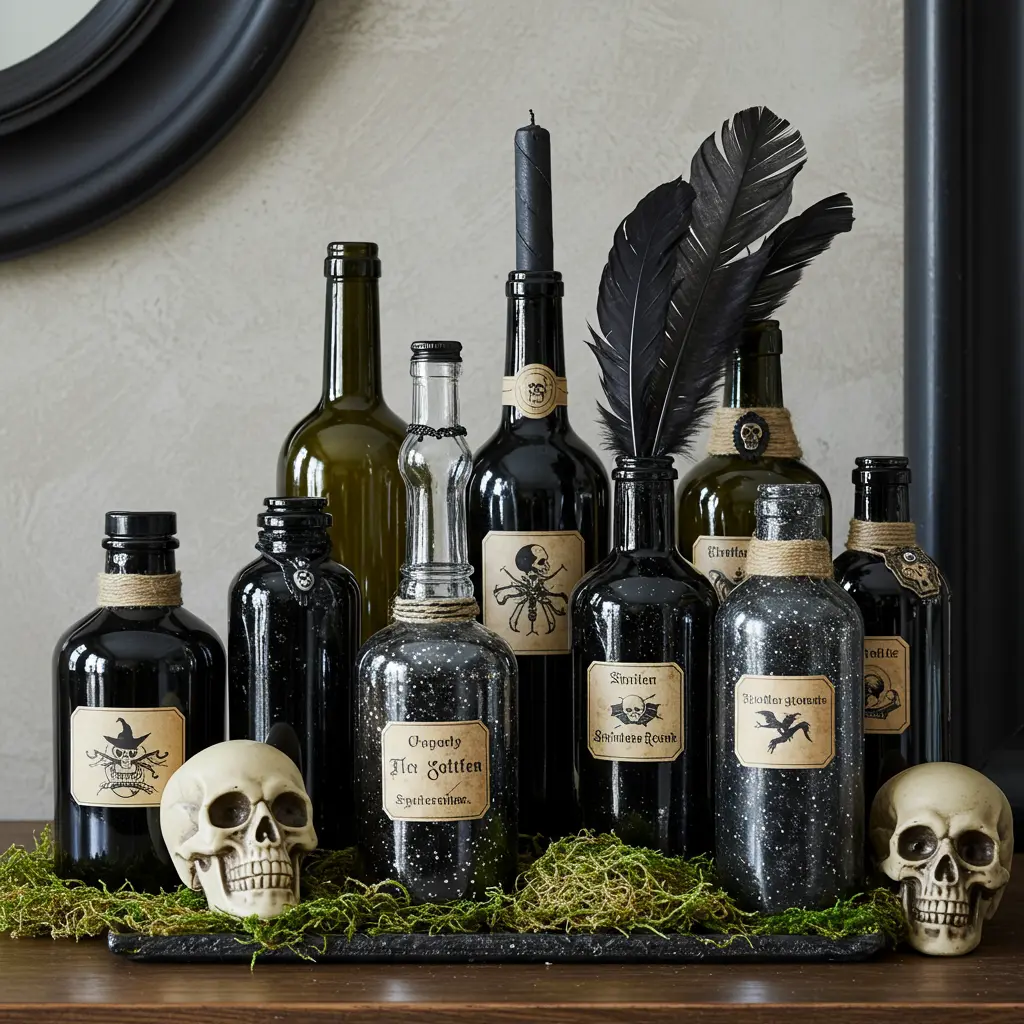
- Best For: Styling a mantelpiece, bookshelf, or bar cart with magical, gothic flair.
- Key Consideration: Collect empty wine bottles, spice jars, and other glass containers of interesting shapes and sizes.
- Pro-Tip: Use a matte black spray paint as a base coat on some bottles. For others, fill them with water and glitter, or add twine, melted wax, and vintage-style labels to make each one unique.
- Styling Cue: Group a collection of 5-7 bottles of varying heights together on a tray. Add a few black feathers, a plastic skull, and some moss to complete the chilling vignette.
11. The Gnarled Tree Silhouette
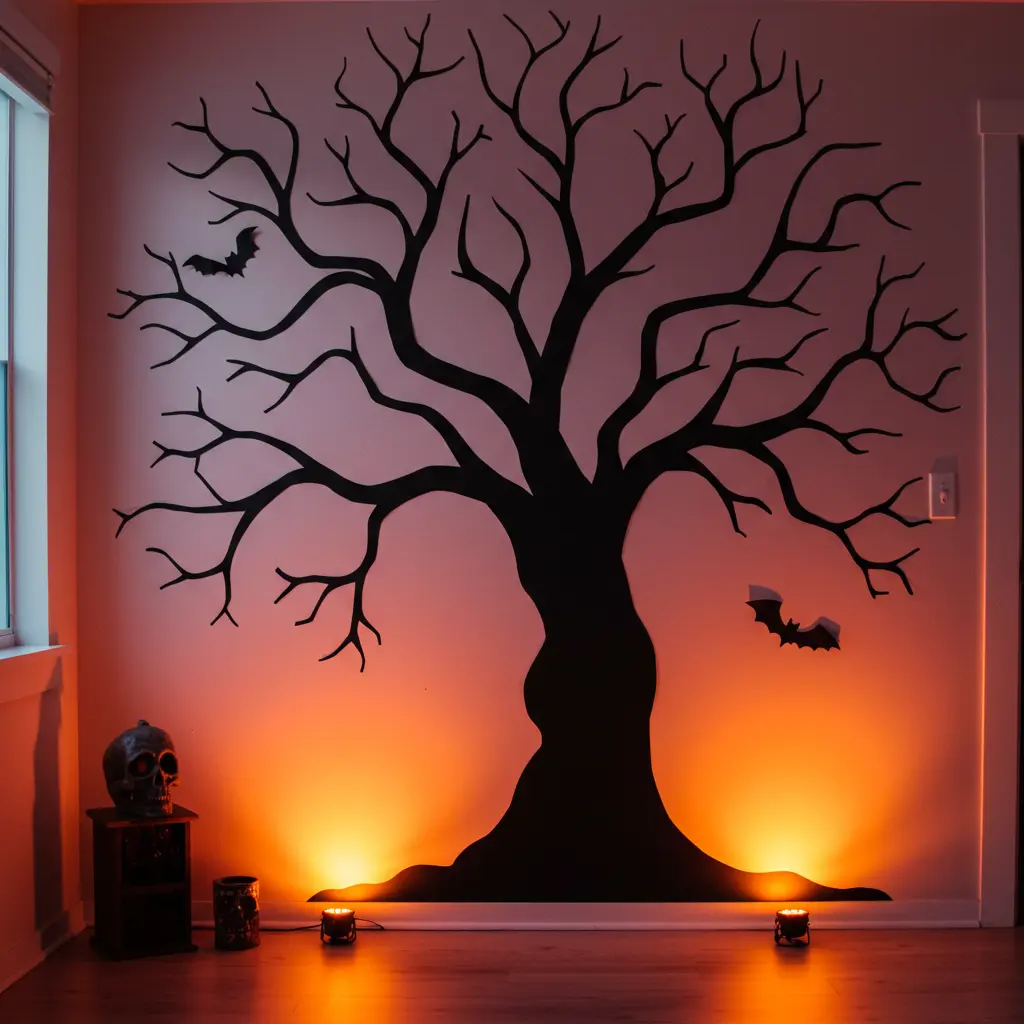
- Best For: Covering a large wall or window with a spooky, forest-like atmosphere.
- Key Consideration: This is best made from large rolls of black craft paper or by using a black, flat sheet.
- Pro-Tip: Don’t aim for a perfect tree. The spookiness comes from twisted, unnatural-looking branches. Lightly sketch your design first, then cut it out and tape it to the wall.
- Styling Cue: Place an orange or purple uplight on the floor shining up at your tree silhouette. The colored light and long shadows will create an incredibly dramatic and eerie effect.
12. The Haunted Mirror Message
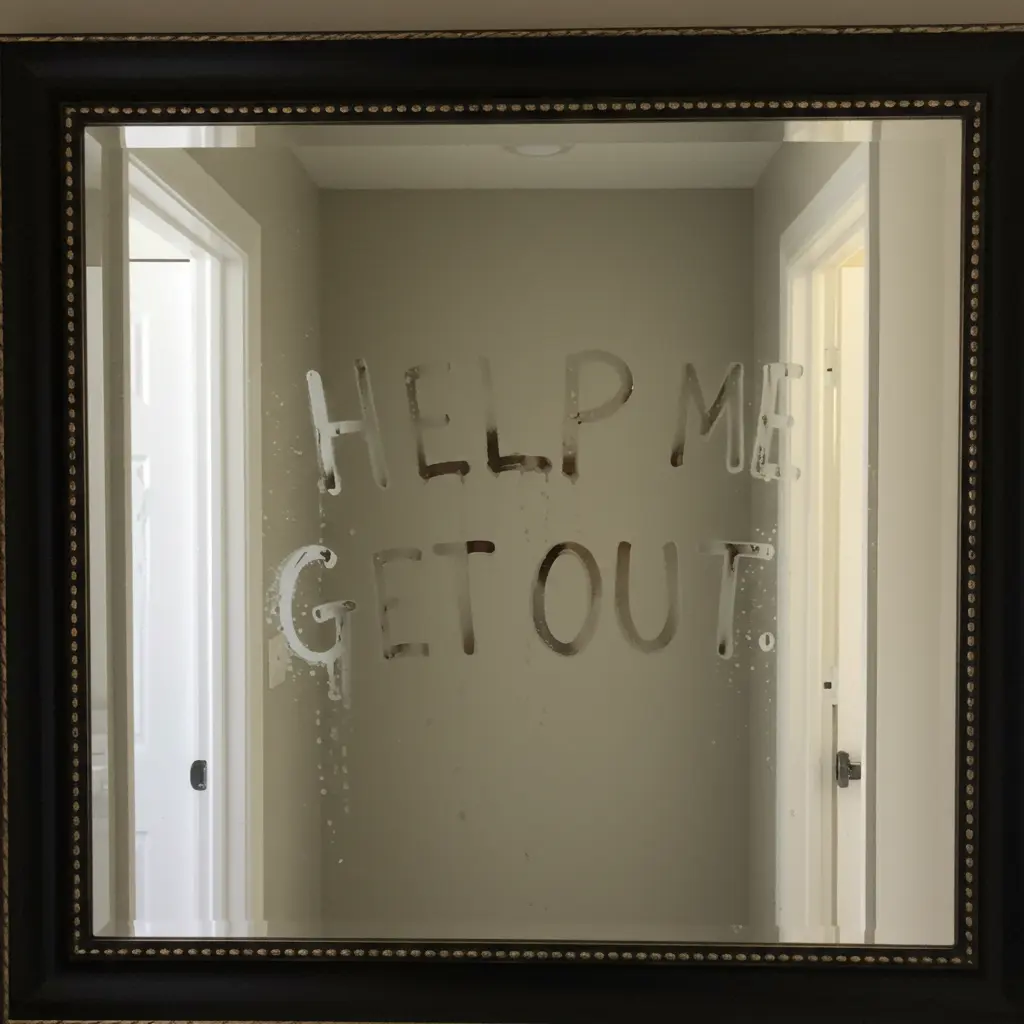
- Best For: A subtle, creepy detail that will spook guests when they least expect it.
- Key Consideration: This works on any mirror in your house, but is most effective in a bathroom or hallway.
- Pro-Tip: Use the natural condensation from a hot shower or a steamer to fog up the mirror. Write a creepy message (“HELP ME,” “GET OUT”) backwards with your finger. When the mirror defogs, the message will be invisible, but it will reappear every time the room gets steamy. For a non-steamy version, use a bar of soap to write the message it will be barely visible until it catches the light just right.
- Styling Cue: This effect is best left alone. Its power is in its subtlety and the slow-dawning horror when a guest finally notices it.
Conclusion: Your Party’s Next Act
And just like that, you’re no longer just throwing a party you’re crafting an experience. You have the ideas, the inspiration, and the know-how to create decorations that are spooky, personal, and a true reflection of your love for the season.
This isn’t just about making your house look haunted; it’s about creating a world for your guests to step into, a place where spooky fun and lasting memories are made.
It all starts with a single choice. Pick a project that gave you a delightful shiver, and let the crafting begin. You’ve got this.
