A chicken feeder shouldn’t just hold food; it should be the heart of your coop’s efficiency, a fortress against waste and rodents, and your secret weapon for saving time and money.
This is your creative playbook for transforming simple pipes, buckets, and recycled materials into a system that’s not only functional and brilliant but perfectly suited to your flock and your lifestyle.
We’ll explore clever designs, decode the secrets of a low-waste setup, and walk through the practical steps to bring it all to life.
By the end, you’ll see that old tote bin not as clutter, but as the key to a cleaner coop and happier chickens.
Before You Begin: Smart Feeder Fundamentals
The most effective feeders start with a little bit of chicken psychology, not just a pile of spare parts. Before you drill a single hole, let’s lay the groundwork for a design that works with your flock, not against them.
The Secrets of a Great Feeder: Simple Rules for a Flawless Setup
Feeder design sounds basic, but these simple rules are what separate a food-wasting mess from a money-saving machine.
- Height is Everything: This is the #1 rule. The lip of the feeder opening should be level with the back of your average chicken. If it’s too low, they will gleefully scratch and rake all the feed onto the floor. Raising your feeder is the single best way to prevent waste.
- Placement is Key: Keep your feeder protected from the elements. Placing it inside the coop or in a covered area of the run is non-negotiable. Wet feed molds quickly and can make your flock sick, and feed left in the open is a free buffet for wild birds and rodents.
- Capacity Matters: Match the size of your feeder to the size of your flock and your lifestyle. If you have many birds or want to refill less often, a high-capacity feeder is your best friend. For a small bantam flock, a smaller feeder is perfectly fine.
- Outsmart the Pests: A feeder with a lid and protected feeding ports is your first line of defense against rodents. An open trough or dish is an open invitation for pests to move in.
What’s the Real Cost? A No-Fuss Budget Breakdown
| The Approach | Estimated Cost | What Your Money Buys | The Little Extras (Don’t Skip These!) |
| The Upcycled Fix | $0 – $15 | • Using old bottles, tires, or shoeboxes • A single length of PVC or guttering | • A sharp utility knife • Good, weatherproof screws • A drill with a basic bit set |
| The Weekend Project | $20 – $60 | • A large tote bin or 5-gallon bucket • Multiple PVC pipes & fittings • A full length of gutter & end caps | • A quality hole saw bit • PVC cement • Sturdy mounting brackets |
| The Farm-Scale Solution | $50 – $150+ | • A large food-grade barrel • Hardware for a treadle system • Multiple high-capacity feeders | • Metal strapping for mounting • Nuts, bolts, and hinges • A level for perfect placement |
The Design Menu: Finding Your Signature Feeder Style
Here are the ingredients for your perfect DIY feeder. Each one comes with a breakdown to help you build with confidence.
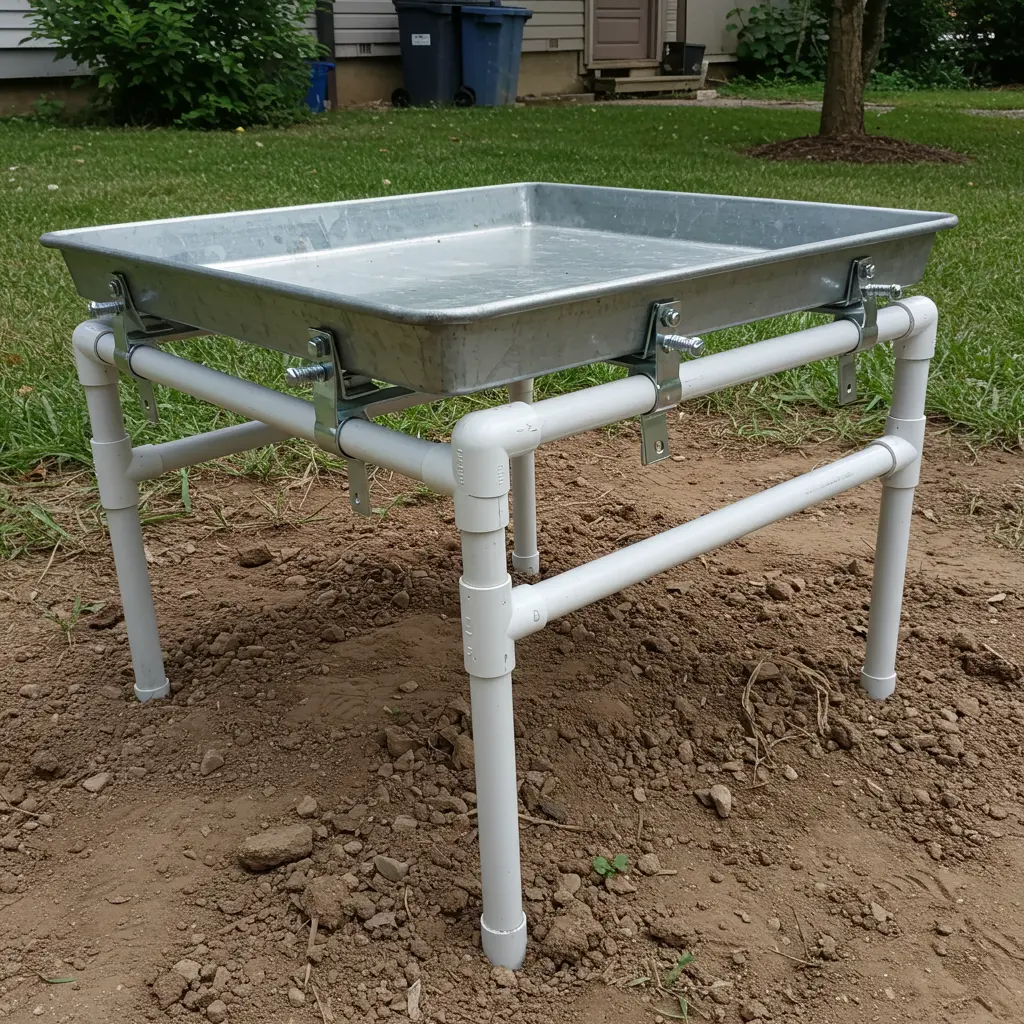
1. PVC Pipe Gravity Feeder – The Effortless Classic
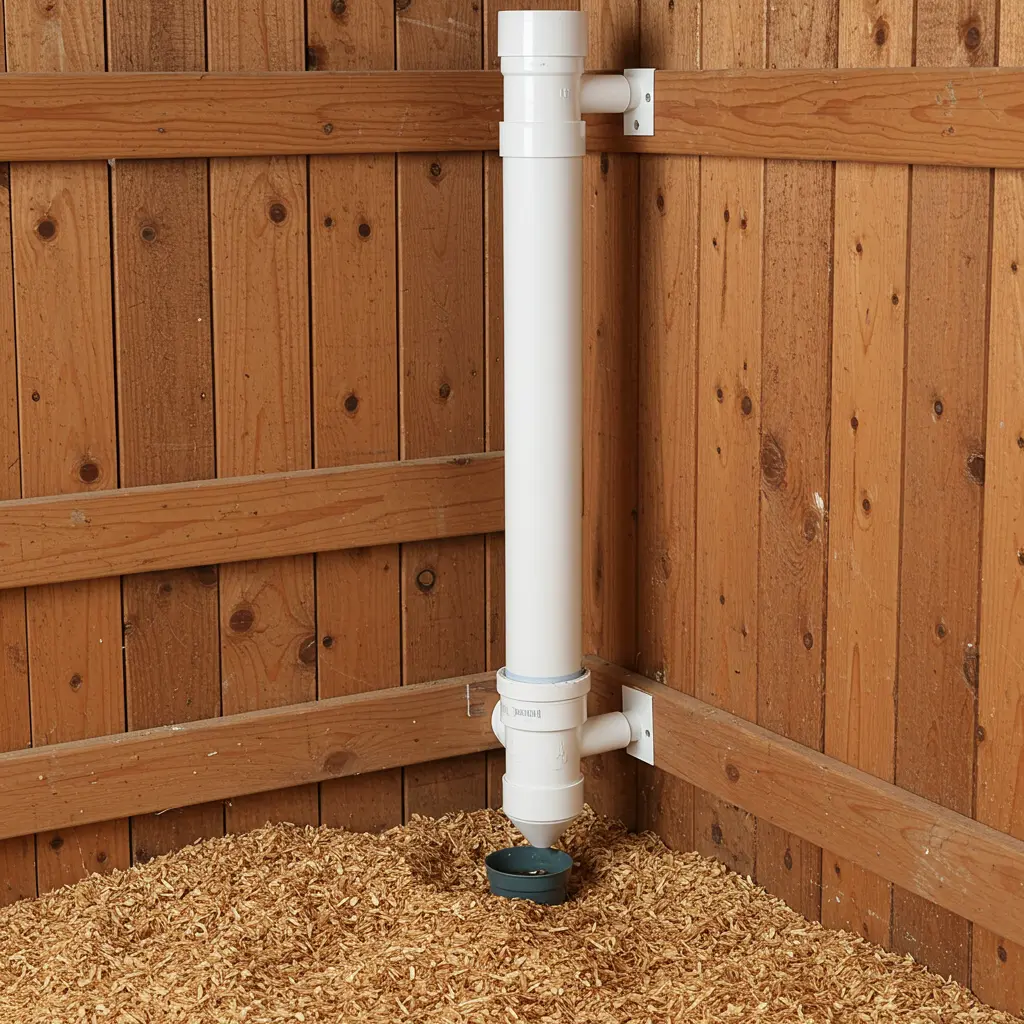
Best For: Anyone wanting a low-waste, set-it-and-forget-it system that can be customized to any size.
- Key Consideration: The diameter of the pipe matters. A 3-inch pipe works, but a 4-inch or 6-inch pipe is far less likely to get clogged with certain types of feed (like pellets).
- Pro-Tip: Use a 45-degree elbow fitting at the bottom instead of a sharp 90-degree one. It creates a more natural feeding angle for the chickens and improves the flow of the feed.
- Placement Cue: Strap it securely to a corner post inside the coop. This keeps it stable, out of the main traffic area, and protected from rain.
2. Bucket Treadle Feeder – A Mess-Free Solution
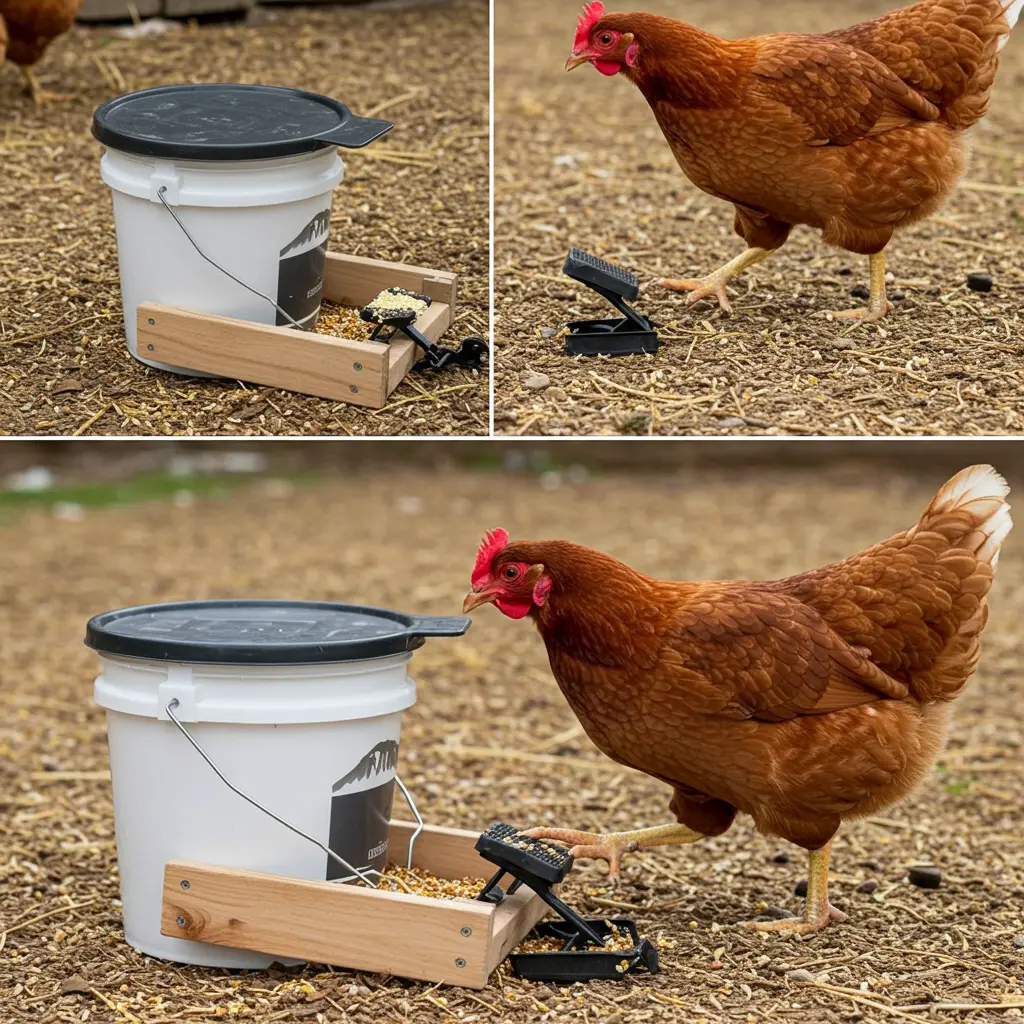
Best For: Flock owners with a serious rodent problem or those who want to keep feed in pristine condition, completely protected from weather.
- Key Consideration: This is the most mechanically complex DIY feeder. The hinge mechanism and the weight of the treadle need to be calibrated so your chickens can open it.
- Pro-Tip: If your chickens are a lighter breed, you may need to make the treadle (the pedal) longer to give them more leverage. Alternatively, add a small weight to the bucket lid to help it close properly.
- Placement Cue: This feeder must be placed on flat, level ground to function correctly. Place it in a central, sheltered area of the run.
3. Upcycled Wooden Box Feeder – Eco-Friendly and Functional
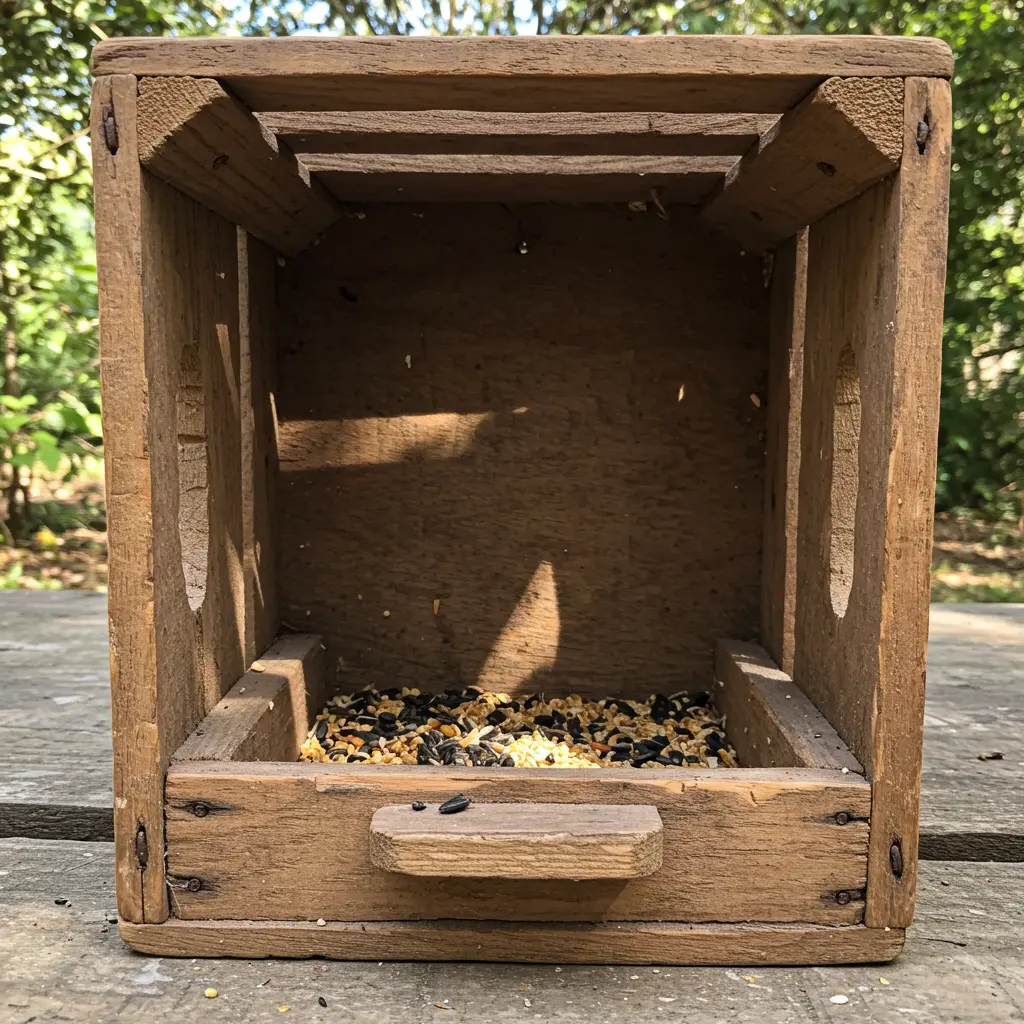
Best For: Creating a rustic, farmhouse aesthetic using materials you may already have.
- Key Consideration: The wood must be untreated. Pressure-treated wood contains chemicals that can be harmful to chickens.
- Pro-Tip: Attach a narrow lip along the bottom edge of the feeding hole, angled slightly upwards. This acts as a barrier that makes it much harder for the chickens to rake feed out onto the ground.
- Placement Cue: Mount it to an interior coop wall a few inches off the ground to prevent moisture from wicking up from the floor and spoiling the feed.
4. Rain-Proof Gutter Feeder – The Outdoor Champion
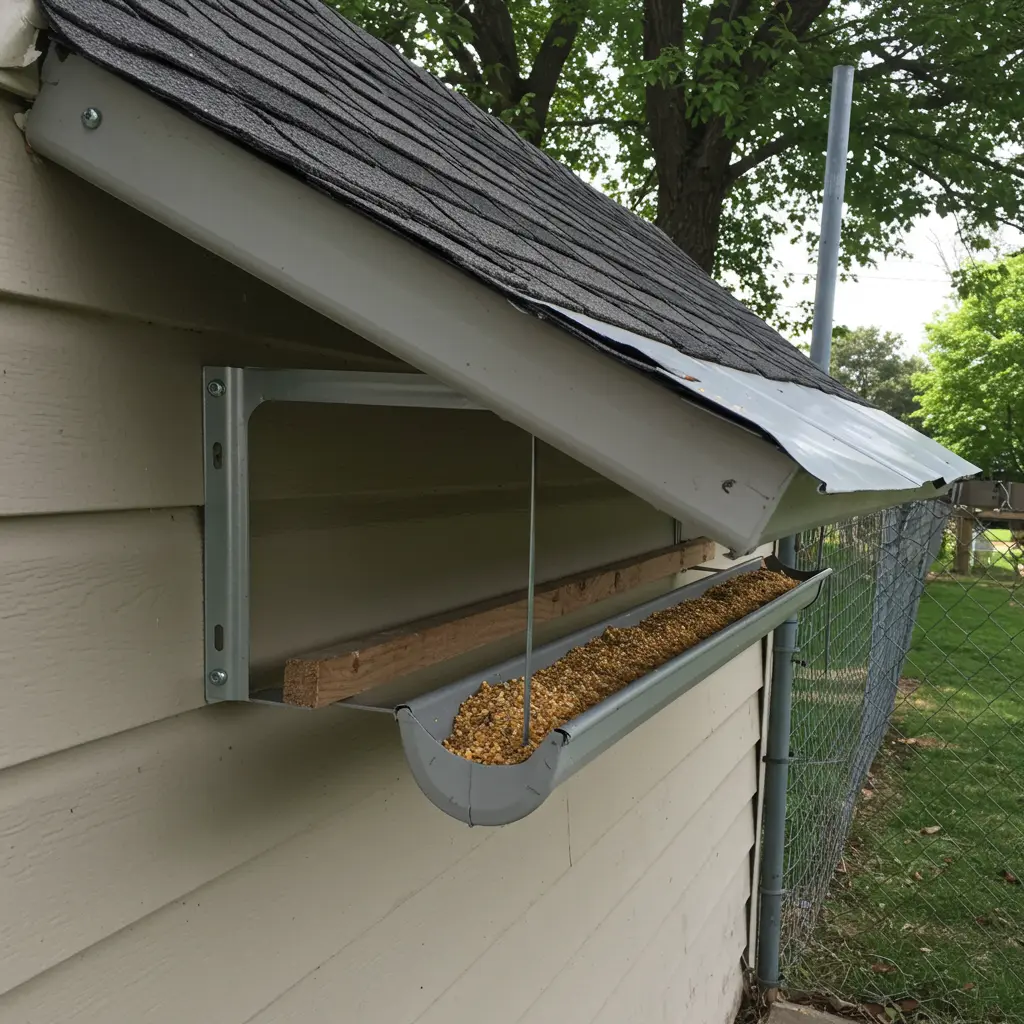
Best For: Larger, free-ranging flocks where you need to provide feeding space for many birds at once.
- Key Consideration: Without a cover, this feeder is completely exposed to rain. It must be installed under a deep roof overhang or have a custom-built sloped “roof” to be effective.
- Pro-Tip: Don’t lay the gutter perfectly flat. Install it with a very slight, almost imperceptible slope. This will ensure any moisture that does get in will run to one end instead of pooling in the middle.
- Placement Cue: The perfect solution for mounting along the outside wall of the coop, underneath the eave, to provide extra feeding space for your flock during the day.
5. Hanging Bottle Feeder – A No-Cost Marvel
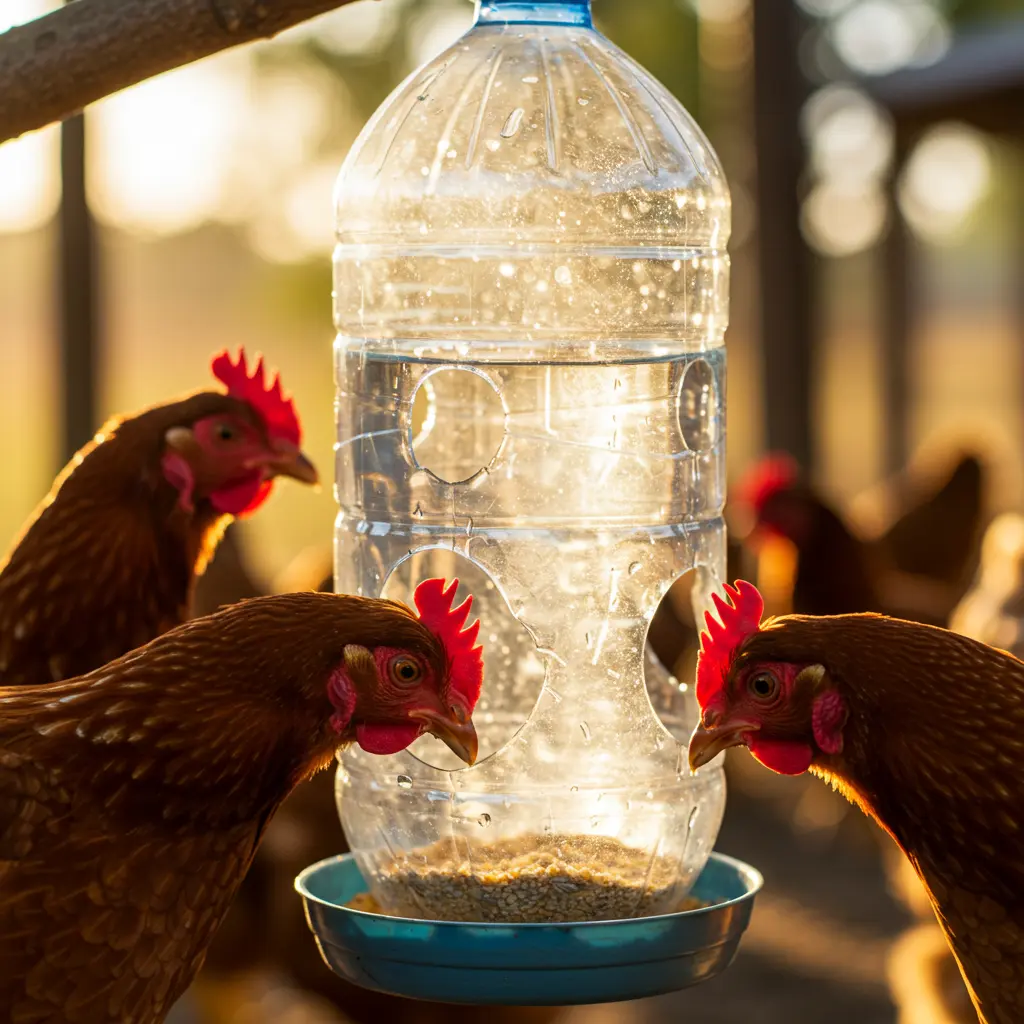
Best For: Small flocks of 2-4 birds, bantam breeds, or for use in a chick brooder.
- Key Consideration: The small capacity means you will be refilling this daily. It’s best suited for very small-scale setups.
- Pro-Tip: After cutting the feeding holes in the plastic bottle, briefly run a lighter flame over the cut edges. This will melt the plastic just enough to make it smooth, removing any sharp points that could harm a chicken’s beak or comb.
- Placement Cue: Hang it so the feeding ports are at chicken-back height. This is your best defense against the chickens scratching all the contents out.
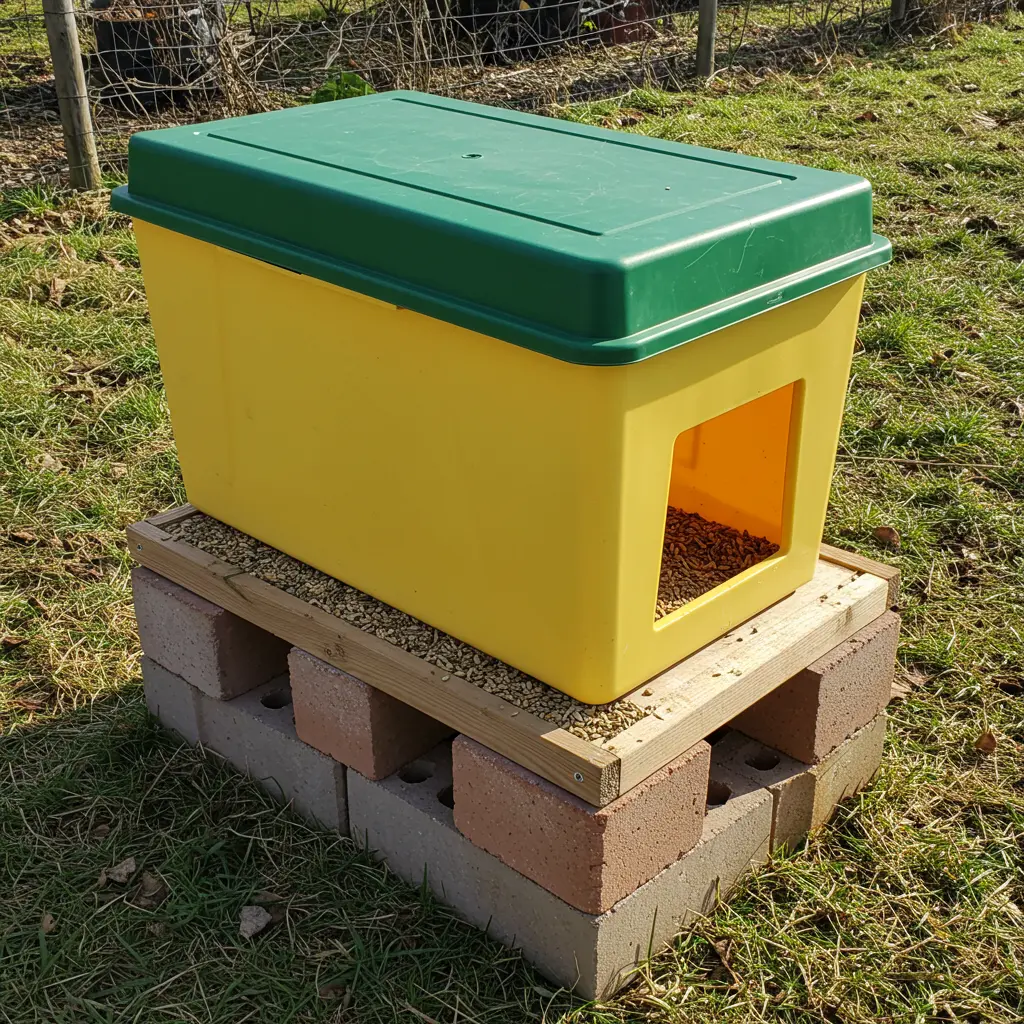
6. Tote Bin Feeder – Large Capacity, Low Maintenance
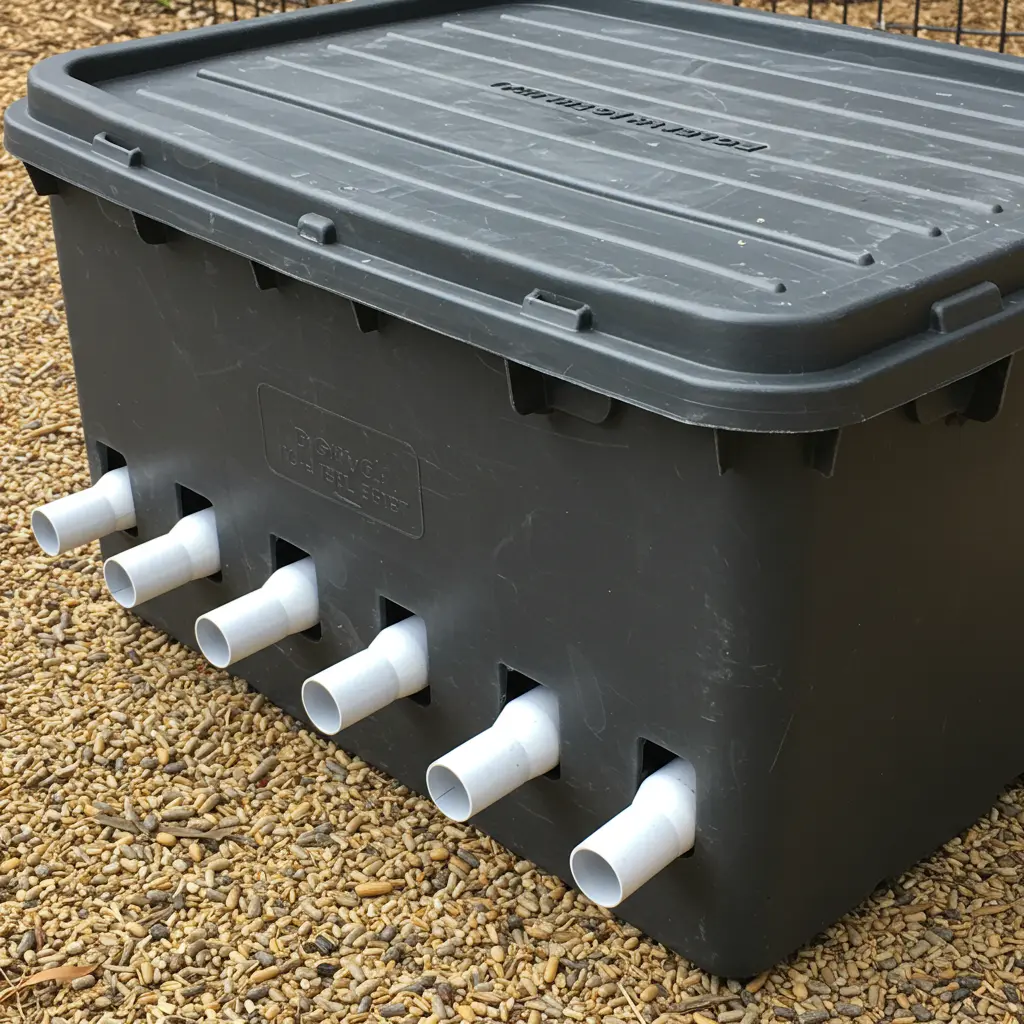
Best For: Medium-to-large flocks and for owners who want to refill their feeder weekly instead of daily.
- Key Consideration: Use a food-grade, BPA-free plastic tote for safety. A hole saw bit for your drill is the best tool for cutting clean, perfectly round holes for the PVC elbows.
- Pro-Tip: Place a couple of bricks at the bottom of the tote bin before you add the feed. This adds weight and stability, making it almost impossible for the flock to knock over.
- Placement Cue: Place it on level ground inside the coop. Its large, flat lid is great for keeping feed fresh and preventing chickens from roosting on top of it.
7. Cinder Block Feeder – The Indestructible Choice
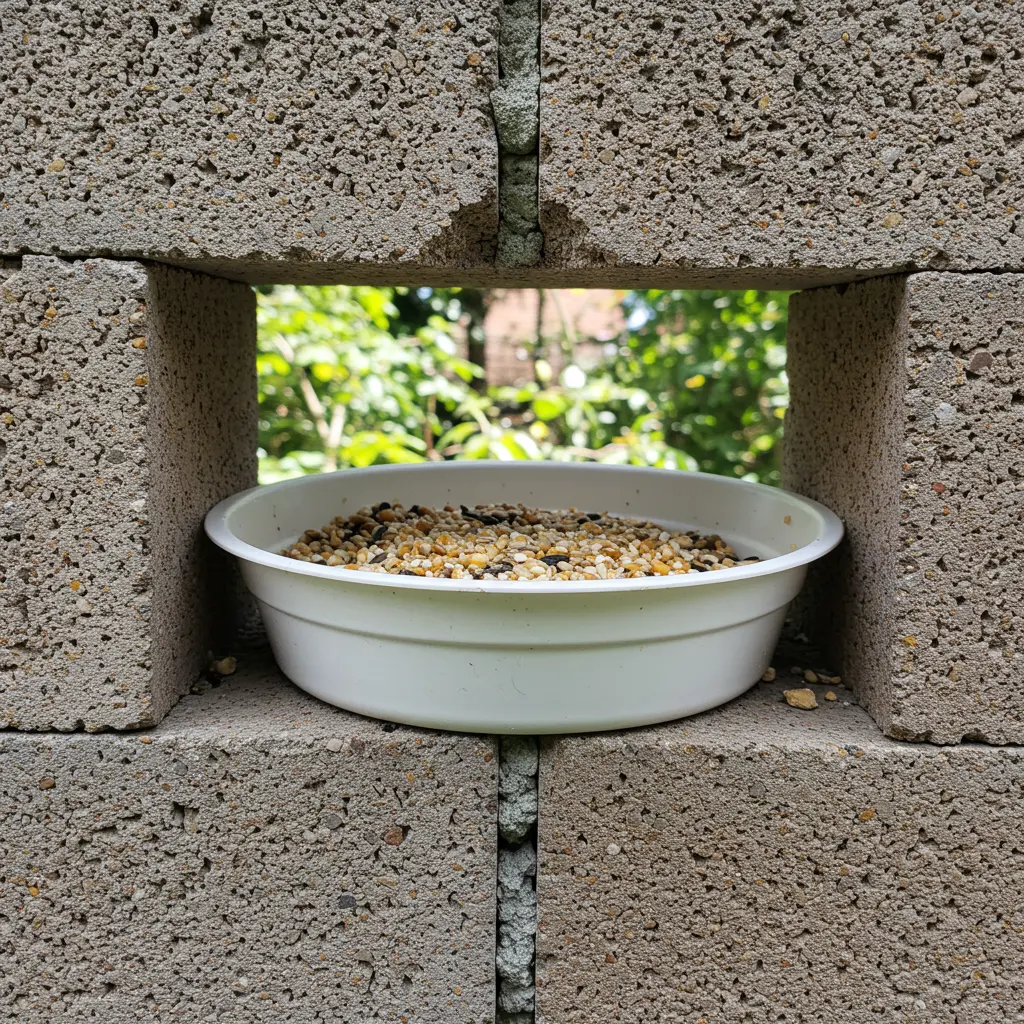
Best For: A quick, temporary, or secondary feeding station that is extremely durable and won’t tip over.
- Key Consideration: This offers zero protection from rain or pests, and the feed can be easily scratched out. It’s a simple solution, but not the most efficient one.
- Pro-Tip: Find a small dish or terracotta saucer that fits snugly inside the cinder block hole. This makes it much easier to clean out old feed and debris.
- Placement Cue: Best used in a completely covered and dry area of the run for providing grit, oyster shells, or special treats, rather than as a primary feeder.
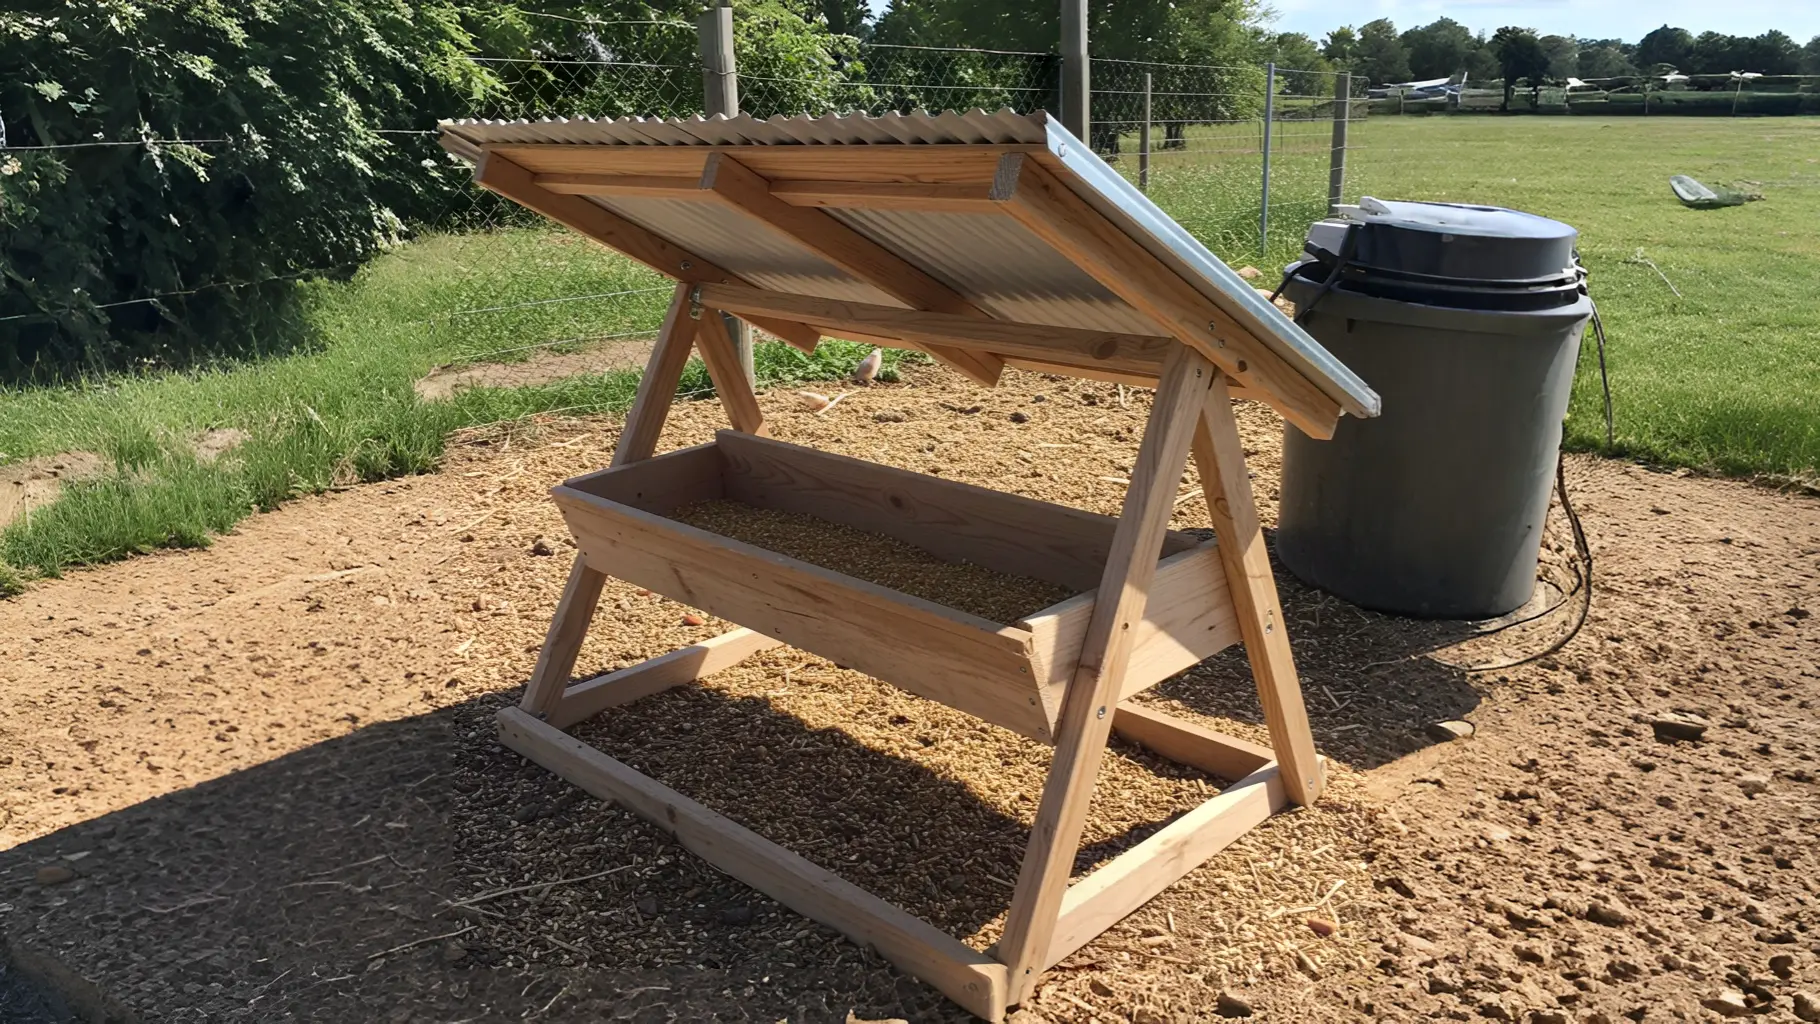
8. Trough Feeder – Ideal for Large Flocks
Best For: Feeding many birds at once without competition. Excellent for meat bird flocks or spacious runs.
- Key Consideration: This design is prone to waste if not managed properly. Only put out enough feed for a single day and ensure the trough is raised to the proper height.
- Pro-Tip: Install a “grill” or a spinning dowel rod over the top of the trough. This prevents the chickens from climbing into the trough and scratching out all the feed with their feet.
- Placement Cue: Place it in the center of a large run where birds can access it from both sides, doubling the available feeding space.
9. Automatic Hopper Feeder – Set and Forget
Best For: A simple, DIY version of a commercial feeder that automates a daily chore.
- Key Consideration: The angle of the “slope” inside the hopper is crucial. It needs to be steep enough (at least 45 degrees) to allow the feed to slide down freely into the feeding tray.
- Pro-Tip: Build it out of plywood and add a hinged lid. This makes refilling incredibly easy and ensures the feed inside stays protected and fresh.
- Placement Cue: Mount it to a wall inside the coop, ensuring the feeding tray is at the correct height to minimize waste.
10. Recycled Tire Feeder – Unbeatable Durability
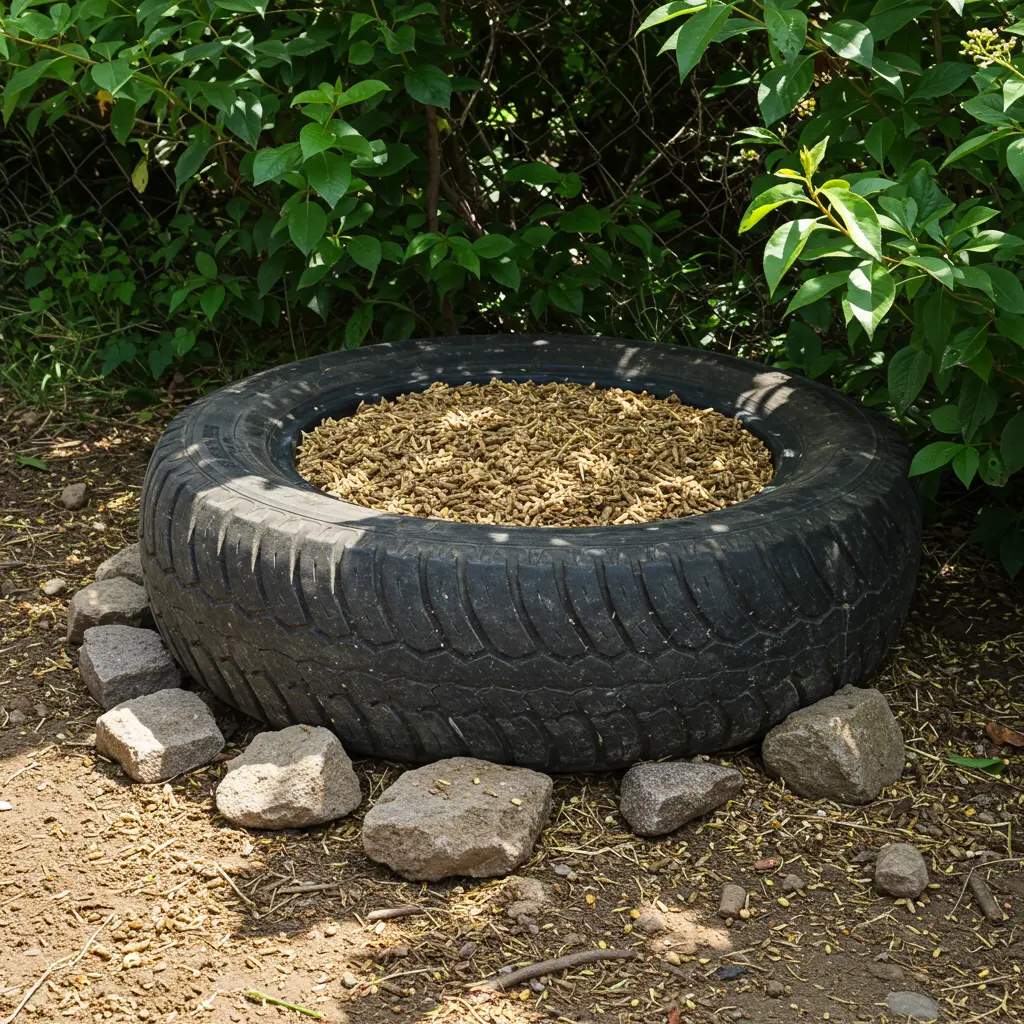
Best For: A rugged, weatherproof feeder for free-range flocks that costs virtually nothing.
- Key Consideration: You must clean the tire thoroughly with soap and water before use. Also, be aware that black rubber can get very hot in direct sunlight, so it must be kept in a shady spot.
- Pro-Tip: Drill a few small drainage holes in the bottom of the tire wall. This will allow any rainwater that gets in to drain out, preventing the feed from turning into a moldy swamp.
- Placement Cue: A great, durable option for a shady spot in the run. Its weight and low profile make it very difficult for chickens to flip over.
11. Shoebox Feeder – The Ultimate Budget Fix
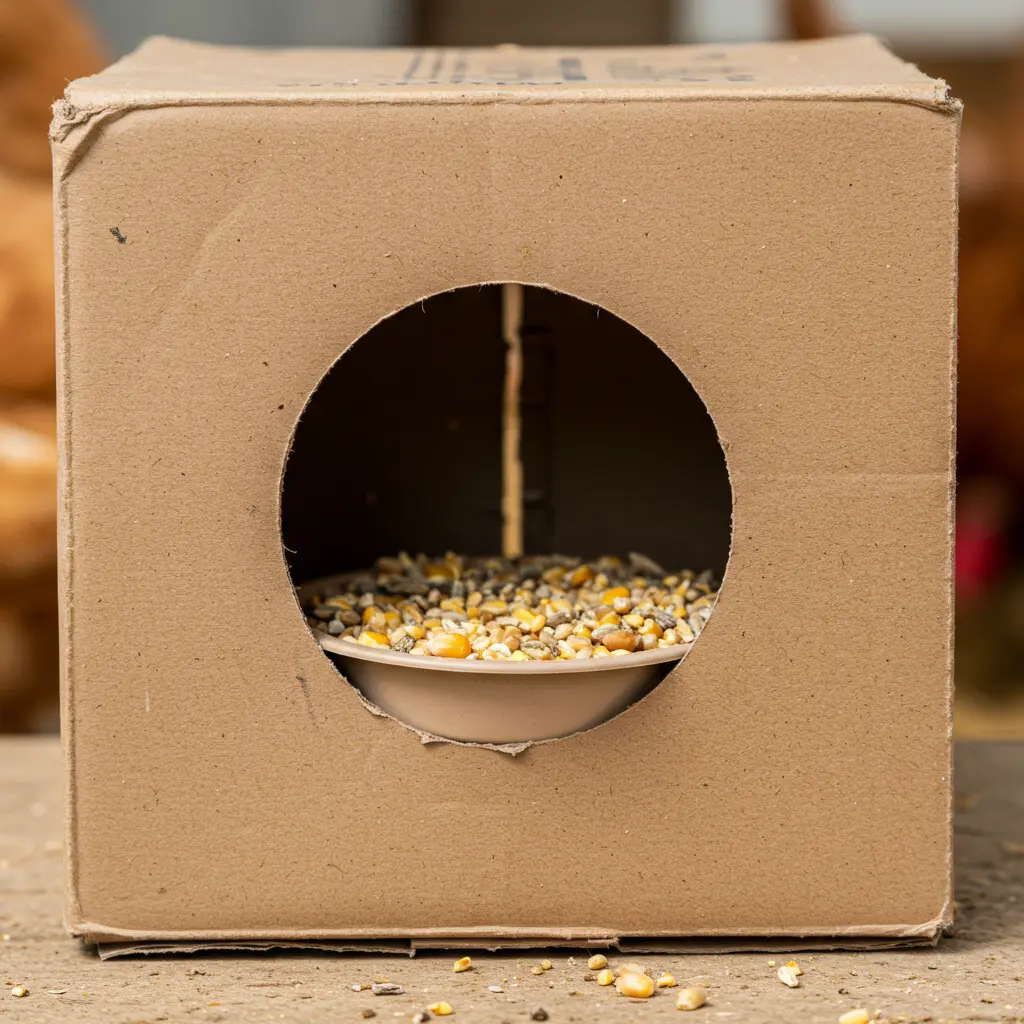
Best For: An absolute emergency or a temporary solution for isolating a single bird for a day or two.
- Key Consideration: This is not a durable or weatherproof solution. Cardboard will get soggy and fall apart quickly. It should only be used in a completely dry, temporary setup.
- Pro-Tip: Reinforce the cut edges of the cardboard with packing tape to give it a little more longevity and prevent a chicken from easily tearing it apart.
- Placement Cue: Only for use inside a clean, dry brooder or isolation cage. This is not suitable for a main coop or run.
12. Barrel Feeder – The Long-Term Solution
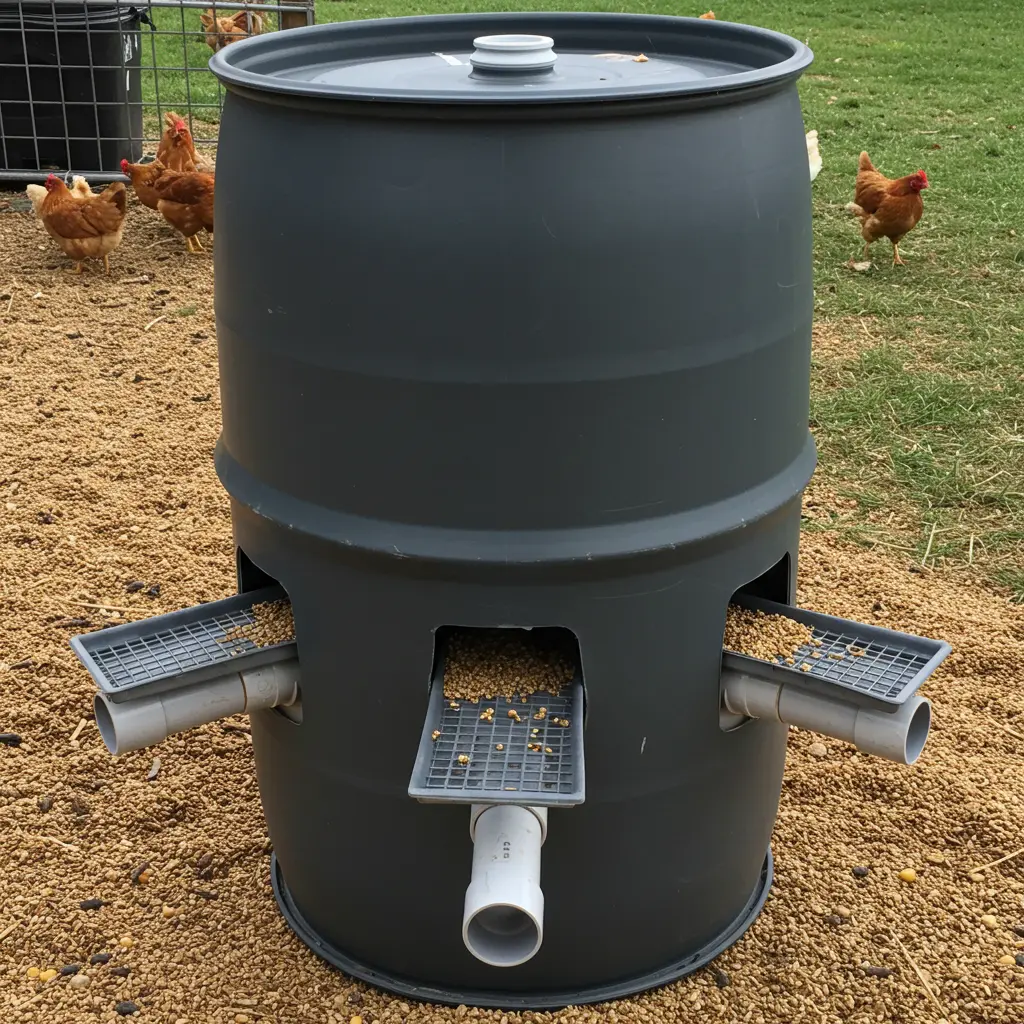
Best For: Large-scale operations, homesteaders with big flocks, or anyone who wants to buy feed in bulk and refill their feeder only a few times a year.
- Key Consideration: Use a food-grade plastic barrel. Ensure it is placed on a sturdy, level base of cinder blocks to raise the feeding ports to the correct height.
- Pro-Tip: Before filling, make sure you can easily move the barrel into its final position. A 55-gallon barrel filled with feed can weigh over 300 pounds and will be impossible to move.
- Placement Cue: This is a permanent installation. Place it in a central, well-protected part of your coop or barn where it will stay dry and be easy to access for refills.
Conclusion: Your Farm Setup Just Got Smarter!
And just like that, you’re no longer just looking at a pile of spare p;rts, you’re looking at a world of efficient, money-saving possibilities. You have the ideas, the inspiration, and the know-how to build a feeder that solves your biggest frustrations. This isn’t just about a better way to feed chickens; it’s about creating a smarter, cleaner, and more enjoyable system for your entire farm.
It all starts with a single choice. Pick the feeder that solves your biggest problem, and take the first small step.
You’ve got this.
